Table of Contents
Advertisement
User Product Manual
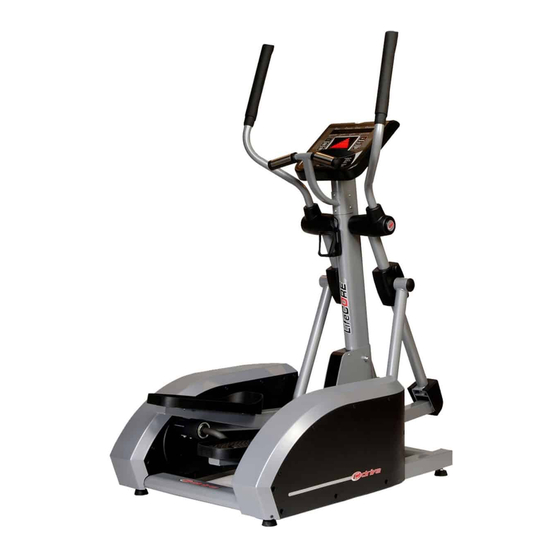
LifeCore CD400 Center Drive Elliptical
Customer Service
Toll Free (888) 815-5559
Service@lifecorefitness.com
www.lifecorefitness.com
LifeCore Fitness Inc.
2575 Pioneer Ave. Suite 101
Vista, CA 92081
Serial Number is located on the
frame.
Please send in the attached
warranty card (Page 29) and a
copy of the original receipt or
register online
at
www.lifecorefitness.com
(10) days of purchase to register
your product with LifeCore Fitness.
Visit our website for assembly videos: www.lifecorefitness.com
within
LC-CD400
Advertisement
Table of Contents

Related Manuals for LifeCore Fitness LC-CD400


Summary of Contents for LifeCore Fitness LC-CD400
- Page 1 Please send in the attached warranty card (Page 29) and a copy of the original receipt or register online www.lifecorefitness.com within (10) days of purchase to register your product with LifeCore Fitness. Visit our website for assembly videos: www.lifecorefitness.com...
- Page 2 2 | P a g e ...
-
Page 3: Table Of Contents
Table of Contents Important Safety Information Page 4 Assembly Tips Page 5 Elliptical Assembly Assistance Page 6 Assembly Figure 1 Page 7 Assembly Figure 2 & 3 Page 8 Assembly Figure 4 & 5 Page 9 Assembly Figure 6 & 7 Page 10 Assembly Figure 8 Page 11... -
Page 4: Important Safety Information
Important Safety Information We at LifeCore fitness would like to thank you for your recent purchase of a LifeCore CD400 elliptical, and we hope that our product inspires and motivates you to accomplish your fitness goals. Please read the owner’s manual and orient yourself with the unit before you use the product to get a better understanding of your exercise machine. -
Page 5: Assembly Tips
Assembly Tips The LifeCore LC-CD400 is made from the best materials and has been tested and received a quality control review prior to its packaging to ensure the correct parts and proper fitting of each component. This machine was designed to limit the amount of assembly needed by a consumer. - Page 6 6 | P a g e ...
-
Page 7: Assembly Figure 1
Assembly Figure 1 Getting Started The LifeCore Fitness LC-CD400 Elliptical will require some assembly. Unpack the box in a clear location, remove all packaged parts from the box and lay each part out on the floor. Double check all packaging material for missing pieces, do not dispose of any packing material until assembly is complete and unit is working properly. -
Page 8: Assembly Figure 2 & 3
Assembly Figure 2 & 3 FIGURE 2 Tools Needed: Philips Screw driver: 2JAY Locate bag labeled Figure 2. Locate black metal cover. Note: First fasten screws at the bottom of the cover, next top and finally the middle. (See Figure 2) Secure cover to main frame by using Qty. -
Page 9: Assembly Figure 4 & 5
Assembly Figure 4 & 5 FIGURE 4 Tools Needed: 6mm Allen wrench: 2JC7 Locate bag labeled Figure 4. Note: Additional help may be needed to help align holes on top and bottom. (See Figure 4) Lift and place left linkage handrail assembly onto shaft sleeve. -
Page 10: Assembly Figure 6 & 7
Assembly Figure 6 & 7 F IGURE 6 Tools Needed: Philips screw driver: 2JAY Note: Do not over tighten M5*0.8-12 screw, this will damage bracket cover. Locate bag labeled Figure 6. Locate bracket covers. (See Figure 6) Attach bracket cover to the handrail assembly by lining up the hole and using a Philips screw driver to tighten Qty. -
Page 11: Assembly Figure 8
Assembly Figure 8 FIGURE 8 Tools Needed: Philips screw driver: 2JAY Note: Ensure that all wires are properly connected inside the console. Be careful not to pinch the wires. Wires only connect one way. Locate bag labeled Figure 8. Locate computer console. -
Page 12: Assembly Figure 9 & 10
Assembly Figure 9 & 10 FIGURE 9 Tools Needed: 4mm Allen wrench: 0J3P Note: Ensure that all wires are properly connected inside console tube. Be careful to not pinch wires. Addition help maybe needed to help line up holes to frame. -
Page 13: Assembly Figure 11
Assembly Figure 11 FIGURE 11 Tools Needed: Philips screw driver: 2JAY Locate bag labeled Figure 11. Locate black pivot covers. (See Figure 11) Connect the left side two pivot covers on to the handlebar assembly. Using a Philips screw driver, tighten Qty. - Page 14 Tighten the leveler nut on top of the lever to prevent them from moving. Congratulations! You have completed assembly of your LC-CD400 Elliptical 14 | P a g e ...
-
Page 15: Computer Console Instructions
Computer Console Instructions Please read the computer instructions below and take a few minutes to review the computer console layout. Practice using the computer console before you start in order to get a better understanding of the functions. Below is an overview of the console’s layout with button location. - Page 16 Computer Console Instructions Start Button: Press the button to begin a workout. Once a program has been selected, pressing the start button will activate the time and the readouts on the display will begin once workout starts. ...
-
Page 17: Program Profiles
Computer Console Instructions ENTERING PROGRAMS: There are six preset programs and 5 Heart Rate Programs. To enter Program Mode: The message window will display “PRESS PROGRAM KEY TO BEGIN.” Press button until desired program name shows in the message window and the programs profile shows in the Profile Window. - Page 18 Computer Console Instructions GLUTE BLASTER – Will gradually take a user to the highest resistance peak, then gradually bring the tension level back to the beginning resistance level. This program best simulates a mountain climb. This is a good program for people who want to reach higher tension levels over long periods of time, or who want to elevate his/her heart rate.
- Page 19 Computer Console Instructions press to select. Repeat same steps for age. Once age is entered and the button has been pressed, the profile is set. Now the button can be pressed to scroll through the preset programs, keeping the “Custom Course” settings that were set – Time, Weight, and Age.
- Page 20 Computer Console Instructions HEART RATE PROGRAMS % TARGET HEART RATE: Allows the user to select their own percentage of Maximum Heart Rate that you would like to maintain during your exercise session. The range of percentages is 50% to 85%. (See section titled MONITORING YOUR HEART RATE for more information) ...
- Page 21 Computer Console Instructions LAP PROGRESS DISPLAY – The lap progress displays for 30 seconds, after this time the selected program (example: Hill Program) will display for 10 seconds and they will continue to alternate. Lap progress displays show a user’s progress around a virtual track. One dot on the virtual track counter is equal to 15 revolutions.
-
Page 22: Monitoring Your Heart Rate
Monitoring Your Heart Rate In order to obtain the greatest cardiovascular benefits from your exercise workout, it is important to work within your target heart rate zone. The American Heart Association defines this target as 60%-75% percent of your maximum heart rate. Your maximum heart rate may be roughly calculated by subtracting your age from 220. -
Page 23: Troubleshooting Guide
TROUBLESHOOTING GUIDE Symptom Diagnosis No Power: Check to see if the unit’s AC adaptor is plugged into a surge protector and/or There is no machine. If the light on the surge protector is lit. Check to see if any other power to power sources work from the surge protector. - Page 24 Computer Check to see if customer has read computer instructions, and has a good programs understanding of computer functions. do not work Contact technical support toll free 1-888-815-5559 Computer Insure the computer is reading Speed/RPM’s/Distance/Calories or Watts is turns off reading.
-
Page 25: Cleaning And Maintenance
The LC-CD400 is only for indoor use and should not be stored in damp, extremely cold or hot areas as this will damage the unit this voiding the warranty. - Page 26 26 | P a g e ...
-
Page 27: Parts List
Parts List Part Part Description Part Part Description 0K7M Pedal Screw 2HDZ M6*10 Hex Socket Bolt 018D Flat Washer (Foot Assembly) 2HG6 M8*16 Hex Bolt 01HL D.C Motor Assembly 2HMB Crown Nut, M10*1.5 01HR AC Adaptor DC 9V 1000MA 2HMC M10*120 Hex Screw 01HU Outlet ‐ AC Inlet Cable 2D3C Shaft Cover Right 01J8 Reed Switch (Speed Sensor) 2D3E Shaft Cover Left 0J3P 4mm Allan Wrench 2D3F Bracket Cover 0J4Z Flat Washer12x20‐3 ... -
Page 28: Service Notes And History
Service Notes and History 28 | P a g e ... - Page 29 arranty C Card – Lif feCore Fitn n ess Inc. LC-C CD400 Cen nter Drive Elliptical This L imited Warran nty applies in the United Sta ates to produ ucts manufact tured or distrib buted by LifeC Core Fitness, I nc.
Need help?
Do you have a question about the LC-CD400 and is the answer not in the manual?
Questions and answers