Ness M1 Navigator User Manual
Touchscreen keypad
Hide thumbs
Also See for M1 Navigator:
- Setup manual (21 pages) ,
- Technical note (4 pages) ,
- User manual (28 pages)
Table of Contents
Advertisement
Quick Links
Advertisement
Table of Contents

Related Manuals for Ness M1 Navigator


Summary of Contents for Ness M1 Navigator
-
Page 1: Users Manual
Ness M1 Navigator Touchscreen Keypad USERS MANUAL Ness Document No. 890-421... - Page 2 Ness. Ness reserves the right to make changes to features and specifications at any time without prior notification in the interest of ongoing product development and improvement.
-
Page 3: Main Screen
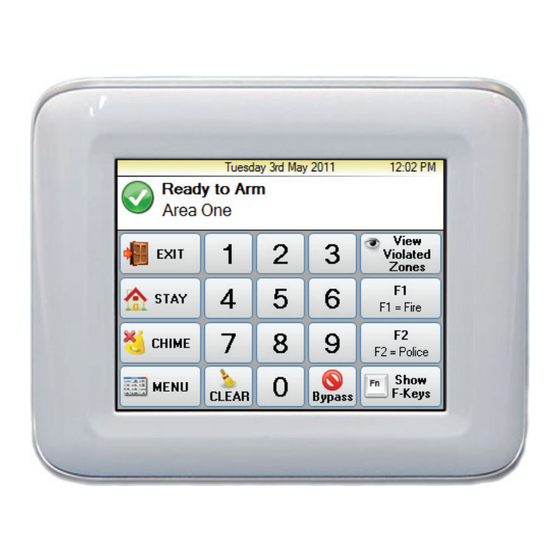
Congratulations on purchasing a Navigator Keypad as part of your featured packed M1 Security and automation controller. The Ness M1 Navigator is a revolutionary Touch Screen interface for use with the Ness M1 Gold and M1 EZ8 / EZ16 series Cross Platform Controllers. -
Page 4: Status Window
M1 Navigator Keypad Users Manual The display of the date and time may vary slightly to that shown above, based on system settings with the M1. Status Window The status window located below the top display strip shows the current status of the panel. - Page 5 Main Screen Button On the main screen is a numeric keypad along with several other buttons. Along with the “Exit”, “Stay”, “Chime” buttons that function as detailed in the M1 User Guide, is the following buttons unique to the Navigator Keypad.
-
Page 6: Keypad Locked
M1 Navigator Keypad Users Manual Keypad Locked If a wrong code is entered and the “Wrong Code Lock Out number” of Keystrokes is reached, as set by (Global 12 option), then the Keypad Locked screen will be displayed and the beeper will beep for 60 seconds before returning to the main screen. -
Page 7: Main Menu
Main Menu The Main Menu screen will be displayed when the menu button is pressed on the main screen and the M1 panel allows access to the menu. The Main Menu is split across 2 pages. The two pages can be accessed by pressing “Next Page” or “Previous Page”... -
Page 8: Select Area
“Change Keypad Area” can allow full control of your system from the one Navigator Keypad. A Ness M1 key Pad is programmed to control one Area only. However with this option it allows the Navigator Keypad to control any of the 8 Areas the M1 controls. - Page 9 M1 Navigator Keypad Users Manual 2. The second option this feature allows is the control of ALL areas from this one screen. To allow for the control of ALL areas (based on the Access level of the user code used to access this option) Press the “Control All Areas” button at the bottom of the screen.
-
Page 10: Installer Information
M1 Navigator Keypad Users Manual Installer Information The Installer Information screen is displayed when the Installer Information button is pressed on the Main Menu. Once pressed information on the keypad and the Manufacturer can also be viewed by pressing the “Keypad Information”, or “Manufacturer Information” button. -
Page 11: Automation Control
M1 Navigator Keypad Users Manual Automation Control The Automation Control screen is displayed when the “Automation button” is selected in the Main Menu. This screen provides access to the 6 Automation options: Tasks Lighting Outputs Temperature Sensor Keypad Temperature ... - Page 12 M1 Navigator Keypad Users Manual Automation Custom Settings (Requires Master Level User Code) The Automation Custom Settings page is accessed from the Automation page. It allows programming of the 20 Automation Custom Settings. Task Activation The Task Activation screen will be displayed when Tasks is selected from the...
- Page 13 M1 Navigator Keypad Users Manual Tasks 8 task buttons are displayed on the screen at once. Each task button displays the task number and task name. To activate the task, press the required task button. Some tasks maybe programmed by the installer to do internal task activations that may not be intended to be activated by the keypad.
-
Page 14: Lighting Control
4 Lighting control options are displayed at one time. These items may take a little longer to be displayed than Tasks or Outputs as the M1 panel has to be polled for each item to ensure their status are 100 live. - Page 15 M1 Navigator Keypad Users Manual Lighting Control Single View The Lighting Control Single View screen will be display when the Single View button is pressed on the Lighting Control screen. In “Single View” mode, the lighting number can be selected with the numeric buttons.
- Page 16 M1 Navigator Keypad Users Manual Lighting Dim The Lighting Dim screen is displayed when Dim is pressed on one of the Lighting control screen. The lighting number, lighting name and current dim level is displayed at the top of the screen. The lighting dim level is changed by pressing one of the lighting dim value buttons. The button corresponding to the current dim value will be highlighted.
-
Page 17: Output Control
M1 Navigator Keypad Users Manual Output Control The Output Control screen will be displayed when Output Control is selected from the Automation window. 8 output buttons are displayed on the screen at once with each output button displaying the output number and output name. -
Page 18: Temperature Sensors
Temperature Sensors Your M1 system will support up to 16 temperature sensors. If your M1 system includes a temperature sensor your M1 Navigator can easily view the temperature. To view the temperature sensors temperature press the “Temperature Sensor” option from... - Page 19 M1 Navigator Keypad Users Manual Keypad Temperature If your M1 system includes KP1 Model keypads, which includes a Temperature Sensor, the temperature of these keypads can be displayed on the Navigator keypad. To view the keypad temperatures press the “Keypad Temperature” option from the main menu screen.
-
Page 20: Reset Smoke Detectors
M1 Navigator Keypad Users Manual Reset Smoke Detectors If your M1 System has smoke detector connected then depending on what type and model detector the installed has fitted, it may need resetting if it detects smoke and goes into alarm. The main purpose of these could be multiple detectors can be connected together to cause a common smoke detector alarm. -
Page 21: Walk Test Area
The M1 Navigator has a full zone testing feature that makes it simple to test your system without annoying family of neighbours as you test. -
Page 22: History Log
M1 Navigator Keypad Users Manual History Log Your Ness M1 system will store the last 512 events. At anytime you wish to view history events as logged in your systems memory select “View History Log” which will then display the last event that was logged into your systems memory. -
Page 23: Zone Status
M1 Navigator Keypad Users Manual Zone Status From the Main Screen the M1 Navigator keypad will display zones that are violated (Unsealed). In addition to this from the “View Zone Status” menu it allows viewing of the current status of all zones. Press “Next Zone” or “Previous Zone” to move up and down the zone... -
Page 24: Change User Codes
M1 Navigator Keypad Users Manual Your M1 system supports up to 199 Change User Codes User Codes. The installer at time of (Requires Master Level User Code) installation and setting your system up will have enabled the users. From this “Change User Codes” option you can change user codes and users names. - Page 25 M1 Navigator Keypad Users Manual To change the users name allocated with the user code select “Edit Name” and enter the users name and then press “Save Name”.
-
Page 26: System Settings
M1 Navigator Keypad Users Manual System Settings The Systems settings are normally set by the Installer and not covered in this manual. System Tests The Systems Tests and Diagnostics are tools for the installation and trained service company technicians and not covered in this manual. - Page 27 M1 Navigator Keypad Users Manual Notes...
Need help?
Do you have a question about the M1 Navigator and is the answer not in the manual?
Questions and answers