Interquartz Gemini IQ333 User Manual
Gemini series telephone
Hide thumbs
Also See for Gemini IQ333:
- Operating instructions manual (25 pages) ,
- Operating instructions manual (26 pages)
Table of Contents
Advertisement
Advertisement
Table of Contents

Related Manuals for Interquartz Gemini IQ333


Summary of Contents for Interquartz Gemini IQ333
-
Page 1: User Guide
USER GUIDE GEMINI SERIES TELEPHONE MODEL IQ333... -
Page 2: Table Of Contents
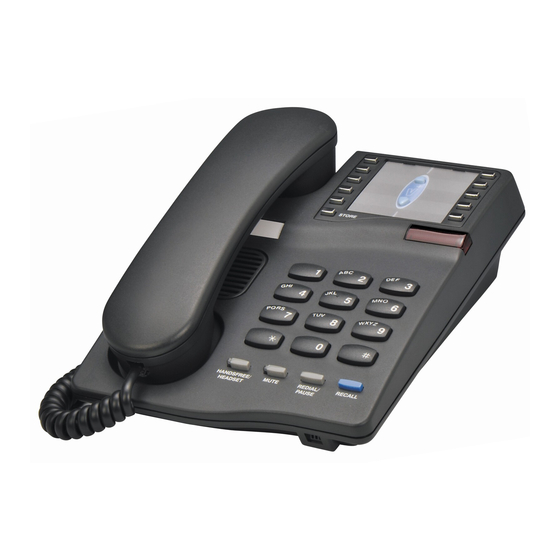
GENERAL CONTROLS AND INDICATORS BASIC OPERATION MULTIFUNCTIONAL INDICATOR LIGHT RINGER VOLUME SWITCH ALPHA-NUMERIC KEYPAD CRADLE SWITCH (and the Interquartz anti-ring back feature) ELECTRONIC VOLUME CONTROL RECALL KEY HANDSFREE / HEADSET KEY AND INDICATOR (with auto-detection) MUTE KEY AND INDICATOR REDIAL / PAUSE KEY... - Page 3 ADVANCED NETWORK OPERATIONS PAUSE FUNCTION WHEN DIALLING HOLDING AND TRANSFERRING CALLS USING THE MEMORIES MEMORY FEATURE OPERATION STORING A NUMBER DIALLING A NUMBER CASCADE DIALLING MEMORY STORAGE TIME INSTALLATION UNPACKING GENERAL SETTING-UP LOCATION WALL MOUNTING HEADSET LINE CONNECTION TECHNICAL ADJUSTMENTS –FOR CORRECT OPERATION MESSAGE WAITING LIGHT COMPATIBILITY HEADSET MIC ADJUST CONTROL HEADSET POLARITY SWITCH...
-
Page 4: Features
1. FEATURES ● Tone dialling ● Handsfree speakerphone ● Built-in headset socket to suit a wide range of headset types ● 10 one-touch memory keys (non-volatile memories) ● Push-button electronic volume control for Handsfree / Headset / Handset speakers ● Mute key and indicator - for privacy on Handset, Handsfree and Headset microphones ●... -
Page 5: General Controls And Indicators
● REN (Ringer Equivalence Number) = 0.68 allows multiple parallel devices on the same line ● Alphanumeric keypad allows full access to services that require the entering of numerals and letters ● Fully modular connection provides maximum ease of installation on desk or wall ●... - Page 6 HANDSFREE MICROPHONE FIGURE 1: BOTTOM VIEW...
-
Page 7: Basic Operation
BASIC OPERATION This telephone can be used as a normal telephone; lift the HANDSET to answer an incoming call, or lift the HANDSET and dial on the KEYPAD to commence an outgoing call. Please refer to the appropriate sections to learn more about advanced operating instructions. -
Page 8: Cradle Switch (And The Interquartz Anti-Ring Back Feature)
This happens because of an unintentional PBX (or exchange) recall; PBX recall is also referred to as hook-flash (that is, one quick tap of the cradle switch lever). Having the Interquartz Anti-Ring Back feature means that you cannot tap the cradle switch lever (i.e. -
Page 9: Mute Key And Indicator
1. Lift HANDSET, or press HANDSFREE / HEADSET KEY 2. Press REDIAL. Pause Function The Pause function may be needed in a dialling sequence if your telephone is connected to any network where a pause is required (e.g. between internal and external dial tones). For manual dialling: 1. -
Page 10: Hearing-Aid Compatibility
The Handsfree microphone is located at the front of the telephone (see Figure 1 Bottom View). While your telephone is in HANDSFREE mode it will pick up and transmit your voice as you speak to the other party. Positioning of the telephone, and therefore the microphone, is important to ensure the best pick-up and transmission of your voice. -
Page 11: Changing From Handsfree To Handset During A Call
During the handsfree conversation, your telephone will give priority to the person who speaks louder when both people are talking simultaneously. Speak only after the other person pauses or stops. If the other person complains about poor transmission, talk directly at your telephone and from a closer distance as necessary, or lower the speaker volume. -
Page 12: Headset Operation
4. HEADSET OPERATION This telephone can be configured to suit many different headsets - please consult the INSTALLATION section for details to get the best performance from your headset. (Warning: Only use NZ Telecom Telepermit Approved headsets with this telephone) -
Page 13: Trainee / Supervisor Mode
Designed for Call Centers or any application where call-related noise is to be kept to a minimum, this feature allows incoming calls to ring quietly in the headset receiver (speaker); the headset user can hear the incoming call, but the telephone does not ring and... -
Page 14: Volume Control
PAUSE FUNCTION WHEN DIALLING Depending on your telephone system, this may or may not be required. If in doubt, check with your system supplier or Interquartz dealer, as failure to observe your system's requirements may lead to difficulty in making outgoing external calls. If you have determined that a pause is required by your host system, please refer to the PAUSE Function section to ensure correct usage of the PAUSE button. -
Page 15: Holding And Transferring Calls
You can store many different numbers and/or codes in the memories. For example it might be useful to store some of your favourite network facility commands in the telephone for fast and convenient access to those facilities (e.g. call diversion, call forward, call back etc). -
Page 16: Dialling A Number
1. Fit the COILED HANDSET CORD to the appropriate sockets in the HANDSET and to the side of the telephone base. Then place the handset in the handset cradle 2. Fit the LINE CORD to the socket of the telephone base marked LINE and the other end to your telephone network outlet... -
Page 17: Location
LOCATION The telephone should be placed on a desk, table or shelf where it is not likely to be pushed off. If the unit is to be wall mounted, it should be attached securely on the WALL MOUNTING BRACKET. Avoid excessive heat, damp, dust, direct sunlight, vibration, and other appliances or devices that may transmit or emit electrical or electromagnetic radio frequency noise or signals (e.g. - Page 18 FIGURE 2: WALL MOUNTING (Repositioning the cradle handset retainer) FIGURE 2: WALL MOUNTING (Attaching the telephone to the wall mount bracket)
- Page 19 Figure 3...
-
Page 20: Technical Adjustments -For Correct Operation
Light switch is located on the telephone's underside for enabling or disabling the l i g h t , a n d i s f a c t o r y s e t i n t h e “... -
Page 21: Headset Polarity Switch
HEADSET POLARITY SWITCH Located on the underside of the telephone, this switch provides compatibility with the two commonly used headset-wiring modes. P o s i t i o n “ V ” s u i t s P l a n t r o n i c s V i s t a C o r d s a n d o t h e r H e a d s e t s w i r e d i n t h e s a me c o n f i g u r a t i o n ( a l s o k n o w n a s " r e v e r s e d " w i r i n g mode). - Page 22 TABLE 1...
-
Page 23: General Care And Maintenance
If telephone service problems occur at any time, it is recommended that you first re-check the installation procedure described in this user guide. If the telephone still fails to operate correctly, try to determine if the fault is with the telephone, or with the network or system to which the telephone is connected: Disconnect the "suspect"... -
Page 24: Thunderstorms
10. WARRANTY - 3 YEARS Interquartz (NZ) Limited warrants the original purchaser against failure (under normal usage and in the environment and network for which it was designed) resulting from defective material and workmanship at time of manufacture for a period of THREE YEARS from the date of purchase.
Need help?
Do you have a question about the Gemini IQ333 and is the answer not in the manual?
Questions and answers