Interquartz IQ750 Operating Instructions Manual
Caller id handsfree headset business telephone
Hide thumbs
Also See for IQ750:
- Quick reference manual (2 pages) ,
- Operating instructions manual (48 pages)

Related Manuals for Interquartz IQ750


Summary of Contents for Interquartz IQ750
- Page 1 CALLER ID HANDSFREE HEADSET BUSINESS TELEPHONE MODEL IQ750 & IQ750EHS OPERATING INSTRUCTIONS...
-
Page 2: Table Of Contents
Contents Introduction ........................ 6 1. FEATURES ......................7 “HEADSET SAVVY” FEATURES ......................7 CALLER ID (CLI) FEATURES........................ 7 GENERAL FUNCTIONS ........................8 OPERATING REQUIREMENTS ......................8 LIQUID CRYSTAL DISPLAY ........................9 MESSAGE WAITING ..........................9 2. SETTING UP ......................10 UNPACKING ............................10 GENERAL SETTING-UP ........................ - Page 3 DISPLAY ICONS AND FIELDS ......................17 4. HANDSFREE OPERATION .................. 19 HANDSFREE MICROPHONE ......................19 USING THE HANDSFREE/HEADSET KEY ..................19 INCOMING CALLS USING HANDSFREE: ..................19 CHANGING FROM HANDSFREE TO HANDSET DURING A CALL ................19 CHANGING FROM HANDSET TO HANDSFREE DURING A CALL ................19 OUTGOING CALLS USING HANDSFREE (MANUAL OR MEMORY DIALING) ............
- Page 4 PAUSE FUNCTION WHEN DIALING OUT ..................32 AUTOMATIC TRUNK ACCESS DIGIT INSERTION ................32 TO SETUP, MODEL IQ750 AND IQ750EHS ACCEPTS A ONE OR TWO DIGIT TRUNK ACCESS CODE AS FOLLOWS ... 32 AUTOMATIC PAUSE INSERTION ....................... 33 PAUSE TIME ............................33 THEN PROGRAM THE CALL HOLD FUNCTION CODE WITH 200MSEC OF PAUSE TIME (TWO 100MSEC PAUSES) AS FOLLOWS ..
- Page 5 FIGURE 2B: BOTTOM VIEW ....................... 13 FIGURE 3A: DISPLAY IN IDLE STATE....................17 FIGURE 3B: TYPICAL DISPLAY APPEARANCE WHEN ..............17 FIGURE 4: IQ750 CONNECTION DIAGRAM ..................20 FIGURE 5: IQ750EHS CONNECTION DIAGRAM ................22 FIGURE 6: MEMORY PROTECTION SWITCH ................... 26 FIGURE 7: TYPE 2 CID SWITCH ......................
-
Page 6: Introduction
Introduction Model IQ750 offers many features including headset support, handsfree speakerphone, caller ID display, headset support, phone book and memories. Model IQ750EHS is specially designed to suit most of the popular *Plantronics wireless headset models via EHS port connection and provision of an OLI port to support *Plantronics OLI visual indication module. The EHS functionality allows the telephone on/off hook state to be controlled by the headset. -
Page 7: Features
1. FEATURES “Headset Savvy” Features • Auto Detect circuitry disables Handsfree when Headset is in use • Mute Key for Headset microphone • Earpiece Volume Control • Built-in headset socket to suit a wide range of headset types • Headset Microphone level adjustment to suit all Headset types so both high gain and low gain headset mics can be used • Headset Cable Polarity Switch to suit both common (“normal” and “reversed”) Headset plug wiring modes • Mid-call mode support (change between Headset, Handsfree and Handset during a call in any order) • “Silent Ringing” feature for Headset users allows the ringing to be heard in the Headset only (keeps call centre noise levels down by eliminating the sound of ringing during incoming calls) • Trainee/Supervisor Mode allows both a Handset user and a wired-Headset user to be online simultaneously without the need for a Headset training cord or adaptor • IQ750EHS supports Plantronics wireless headset models CS510, CS520, CS530, CS540, Savi W710, W720, W730, W740, CS60, CS70N, Voyager 510S, CS351N/A, CS361N/A, CS5 series, Savi Office series, WO100 and WO200 etc through EHS control cable connection via a dedicated EHS port... -
Page 8: General Functions
• EEPROM Memory allows mass pre-programming of the upper row of 5 Direct Access memory keys (i.e. 10 memories) to create network feature access keys • Desk or Wall mountable • On-screen warning icons to indicate “Low Battery” and “Adaptor Failure” power conditions Operating Requirements • Any 2-wire analog line; if the IQ750 and IQ750EHS’s Caller ID feature is required, please ensure that your line delivers the necessary Caller ID data • 240V mains outlet for 9V mains power adaptor (supplied) for full support of all functions • If 4 x AA Alkaline batteries (not supplied) are fitted in the absence of mains adaptor or during mains power failure, they can provide up to one month’s support of all functions • If no adaptor or battery power available - basic telephone operation (will automatically power up approximately... -
Page 9: Liquid Crystal Display
Liquid Crystal Display • Liquid Crystal Display with a row of useful icon indicators, a number field and a name field (16 characters each) Message Waiting The following types are supported: • PABX compatible to 80VDC signal with red LED indicator - Some systems require the fitting of optional circuitry • Polarity reversal (eg. Ericsson BP250) Message Waiting light built-in with red LED indicator • Centrex (eg. Telstra Spectrum and Nortel DMS) with both on-screen and LED indicators • Type 2 Caller ID Call Waiting (CIDCW) during a call • Telstra’s Flashing Message Indicator for MessageBank and Home Messages 101... -
Page 10: Setting Up
2. SETTING UP UNPACKING The carton contains the following: • Telephone body and handpiece • Coiled handset cord, line cord and Interquartz EHS Cable (for IQ750EHS only) • 9V DC Adaptor • Headset Stand (optional) • Headset Riser (optional) • Quick Start-up Guide GENERAL SETTING-UP 1. Fit the coiled cord to the appropriate sockets in the Handset and in the telephone base - please do not connect the coiled cord into the Headset jack 2. -
Page 11: Date And Time Set Up Display
DATE AND TIME SET UP DISPLAY The best time to set up the Date and Time is during installation, as follows: Upon installation the display will automatically show step by step prompts to guide you through the Date and Time setup procedure. This procedure can also be used at any time to change the time and date settings. The following procedure assumes that all steps in the “General Setting Up”... -
Page 12: Basic Operation
BASIC OPERATION IQ750 and IQ750EHS can be used in the same way as a normal telephone; simply lift the Handset to answer an incoming call, or lift the Handset and dial on the keypad to commence an outgoing call. Please refer to other sections for more about Handsfree, Headset, Caller ID display and Memory operations. The telephone will also operate in a basic mode when mains power has failed and if batteries have not been fitted (the telephone will automatically power up approximately 1 second after lifting handset). If 4 x AA alkaline batteries (not... -
Page 13: General Controls And Indicators
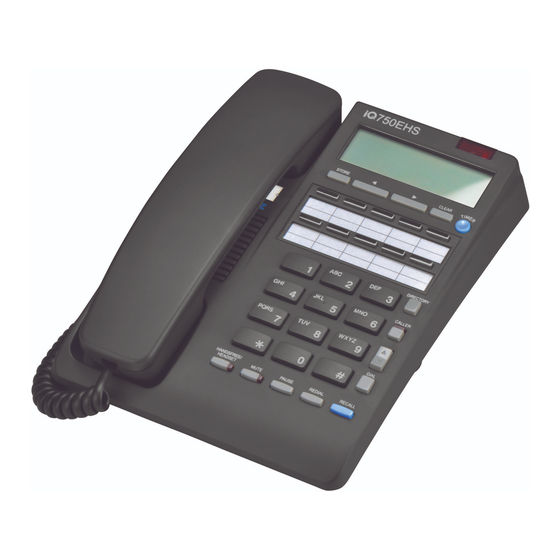
3. GENERAL CONTROLS AND INDICATORS DISPLAY STORE KEY RINGER/MESSAGE WAITING INDICATOR DIRECT ACCESS MEMORY KEYS CURSOR KEYS ( CLEAR KEY TIMER KEY TYPE 2 CALLER ID CALL WAITING SWITCH RESET KEY MEMORY PROTECTION SWITCH DIRECTORY KEY CALLER KEY WITH NEW CALL INDICATOR AND CENTREX MESSAGE WAITING INDICATOR SCROLL KEYS ( DIAL KEY... -
Page 14: Ringer/Message Waiting Indicator
Check the telephone’s underside for a label indicating that specific circuitry has been installed in your unit. If in doubt, contact Interquartz for further details. To retrieve your message, consult your voice mail system user guide. IQ750 and IQ750EHS are also fitted with a message waiting indicator lamp which is compatible with the voicemail features of Centrex networks (e.g. Telstra Customnet) and residential line voicemail systems (e.g. Telstra Home Messages 101 and MessageBank). There are indicators located in the Caller Key and display for these services are described elsewhere in this manual. -
Page 15: Volume Slider
VOLUME SLIDER Used to adjust the hearing level of the Handset Earpiece/Handsfree Speaker/Headset. Set to midway for normal listening level. Adjustment during a conversation will not be detected by the other party. RECALL KEY For use with PABX systems to invoke special PABX facilities such as call-hold or call transfer which may be available in your PABX. It is sometimes referred to as the “Flash” Key or “Facility” Key. To learn how to use it, please consult your telephone host system manual. -
Page 16: Handsfree/Headset Key And Indicator
HANDSFREE/HEADSET KEY AND INDICATOR The HANDSFREE/HEADSET has an auto-detection function; which disables the Handsfree mode when a Headset is in use. When the HANDSFREE/HEADSET Key is pressed, a red indicator will glow to show that the Handsfree or Headset mode is activated. Press the key again to turn it off. To use Handsfree mode Ensure that a headset is NOT connected to the Headset Jack. Press the HANDSFREE/ HEADSET; the telephone will automatically operate in Handsfree Mode. -
Page 17: Display Icons And Fields
DISPLAY ICONS AND FIELDS Clock Centrex Message Answered/ am/pm Waiting Date Time Unanswered call Number of Power Adaptor New Calls or TIMER Failure REPEAT CALL# Repeat Call # Battery Low New Call(s) Total Call(s) Counter Counter FIGURE 3A: DISPLAY IN IDLE STATE TIMER REPEAT CALL#... - Page 18 (see “Message Waiting Light Compatibility” section) Indicates, when reviewing the Caller List, that the call was answered on the IQ750 or IQ750EHS Indicates, when reviewing the Caller List, that the call was NOT answered on the IQ750 or IQ750EHS If this symbol is visible, the 4xAA Alkaline batteries in the battery compartment should be replaced...
-
Page 19: Handsfree Operation
4. HANDSFREE OPERATION HANDSFREE MICROPHONE Located at the front of the phone (Figure 2A), its function is to reproduce your voice as you speak to the other party while your telephone is in Handsfree mode. Positioning of the telephone, and therefore the Microphone, is important to ensure the best reproduction of your voice. -
Page 20: Headset Operation
FIGURE 4: IQ750 CONNECTION DIAGRAM Note: This section applies to model IQ750 only (for IQ750EHS operation, please see the next section). Model IQ750 can be used with corded headsets and wireless headsets with/without a handset lifter. USING A CORDED HEADSET To make or receive an outgoing call using the headset, the headset should be connected to the headset jack at the rear of the IQ750: ● Press the HANDSFREE/HEADSET. Dial tone will be heard in the headset... -
Page 21: Trainee/Supervisor Mode
TRAINEE/SUPERVISOR MODE Allows for the Handset and a Headset to be used in tandem. This will enable a supervisor to monitor a trainee’s progress during a call, or “take over” a call. The following procedures assume that the trainee is wearing the Headset and a call is in progress. -
Page 22: Model Iq750Ehs Headset Operation
Note 2: When the EHS cable is connected please note that the HANDSFREE key is disabled. Note 3: If you are using a Handset Lifter instead of the EHS connection (which is possible with IQ750EHS), please see “USING A WIRELESS HEADSET WITH HANDSET LIFTER” in the “Model IQ750 Headset Operation” section. -
Page 23: Switching Modes During A Call
To answer or start a call: press the Headset’s Call Control button (this is typically the button on the headset’s earpiece: see Headset User Guide). If you have connected an OLI, it will illuminate. During the call: • The MUTE key will not respond when pressed (use the headset’s mute function instead) • The HANDSFREE key will not respond when pressed • The red indicator on the HANDSFREE/HEADSET Key, when ON, will signify that the telephone is in use via the headset • The Handset, if lifted off the cradle, will not interrupt the headset and cannot disconnect the call if replaced... -
Page 24: Memory Operation
6. MEMORY OPERATION MEMORY STORAGE The telephone has 20 Direct Access Memories, 100 Directory Memories, 80 incoming call Caller List and 5 Last Number Redial Memories. All memories have a maximum 32 digits capacity and 16 characters name capacity. Memory Backup No batteries are required. The Caller List, Direct Access and Directory Memories are non-volatile (no batteries needed to retain contents in the event of power failure). Memory Storage Storage operations can be carried out either with the adaptor connected or with batteries installed. To enter letters for name entries, use the letters marked on the keys. For example, press key 7 (P, Q, R, S) once to enter P, twice to enter Q and so on. -
Page 25: To Store A Number And Name In A Direct Access Memory
If your upper-row memory keys are locked and prevent storage of new numbers this may be due to the presence of pre-programmed codes chosen by your system administrator. Before moving the switch to the “Non-Protected” position we recommend that you contact your system administrator, Interquartz or your dealer to discuss if they can be unlocked. Changing the switch setting may allow any pre-programming to be lost. -
Page 26: To Program Or Alter The Contents Of A Protected Direct Access Memory
If your network does not send caller name information in conjunction with the caller’s number, the ability of the IQ750 and IQ750EHS to display the caller’s name during an incoming call will be dependent on the caller’s number matching a number already stored in the Directory Memory. Therefore, at the time of installation it may be useful to store names and numbers of friends, business associates and other regular callers into the... -
Page 27: Directory Memory Capacity
Directory Memory to take immediate advantage of the name display feature. In addition, the Caller List can be used as a convenient source of programming data – the details of any previous incoming calls found in the Caller List can be stored in the Direct Access memory keys and/or the Directory memory by a simple transfer process, thereby reducing keystrokes and eliminating potential error that may otherwise result during manual storage of the same details. -
Page 28: Last Number Redial Memory
LAST NUMBER REDIAL MEMORY The Last Number Redial memory contains your 5 most recently dialed outgoing numbers, with a maximum of 32 digits each. The Scroll key allows you to navigate through the list to select the number that you wish to redial. Using the 5-Stack Last Number Redial Memory 1. To dial the most recently dialed number, press REDIAL. If you require an earlier number go to step 2, otherwise proceed to step 3 2. Press Scroll ▲ or ▼ to select a number from the 5 redial memories. The most recently dialed number will be identified as “REDIAL 1” on the display... -
Page 29: Using The Caller Id Display
“To store a caller’s details in the Directory Memory from the Caller List”. CALL WAITING DISPLAY The IQ750 and IQ750EHS can display the details of a current caller while you are already on a call. To enable the Call Waiting feature, you may need to request or subscribe the Call Waiting Service from your network provider. For details, please call your service provider. -
Page 30: To View The Caller List And Dial A Number In The Caller List
To view the Caller List and dial a Number in the Caller List 1. Press CALLER to display the most recent incoming call; if there is no entry in the Caller List, the display will show “NO ENTRIES” 2. Press Scroll ▲ to move on to the previous call; subsequent presses will display successively earlier calls 3. To dial a number displayed; press DIAL 4. If the end of the Caller List is reached, the display will show “END OF LIST”; you may continue to scroll ▲ or ▼ to review the list again 5. If you choose not to dial any number from the Caller List, the display will revert to clock mode in 10 seconds. A typical call displayed from the Caller List is depicted in Figure 8. -
Page 31: To Store A Call Into A Direct Access Memory
Indicates, when reviewing the Caller List, that the call was answered on the IQ750 or IQ750EHS, Indicates, when reviewing the Caller List, that the call was NOT answered on the IQ750 or IQ750EHS To store a Call into a Direct Access Memory 1. Press CALLER; the most recent incoming caller’s name and number will be displayed... -
Page 32: Advanced Network Operation
Where this telephone is used on an intelligent network such as Easycall, Customnet, Centel, Spectrum, a PABX or any Centrex Networks, the following information may be useful. Message Waiting function in conjunction with Telstra’s Customnet, MessageBank and Home Messages 101 services The IQ750 and IQ750EHS has built-in compatibility with the above services. When the Message Waiting signal is received: 1. the CALLER key will flash 2. the display will show the words “Message Waiting” in the name field 3. -
Page 33: Automatic Pause Insertion
After programming digit 0 in the above example the unit will insert a 0 in front of any outgoing number that is dialed from the Caller List (the list of incoming calls). This setting remains set until the user changes it - removal of power sources or line connection will not change the setting. AUTOMATIC PAUSE INSERTION The above procedure will also insert a pause after the access code before dialing the actual number that has been selected for call-back from the Caller List. -
Page 34: Holding And Transferring Calls
HOLDING AND TRANSFERRING CALLS The method used for these functions is dependent on your system type, so you will need to check your system’s Extension User Guide. The RECALL Key is typically used to transfer calls and the Recall Timing setting affects the Recall Key’s ability to function correctly with your system (see below). USING THE MEMORIES Any combination of numbers, and , Pause, Recall and Handsfree commands can be stored. You may find it useful to store some of your favourite network facility commands in the telephone for fast, convenient access... -
Page 35: Installation
9. INSTALLATION GENERAL SETTING-UP 1. Fit the Coiled Cord to the appropriate sockets in the Handset and the telephone base - please do not connect it to the Headset socket at the rear 2. Fit the Line Cord to the rear socket and to your telephone network outlet 3. - Page 36 FIGURE 9B: IQ235 WALL MOUNT BRACKET. 7626 MODULAR WALL JACK AND LINE CORD Notes: 1. See below for details of IQ235 Wall Mount Bracket 2. The IQ235 WALL MOUNT BRACKET, 7626 MODULAR WALL JACK and LINE CORD illustrated in Figure 9B are available from your authorized Interquartz dealer and can be ordered as Wall Mount Kit No.3.
-
Page 37: Figure 10: Iq235 Wall Mount Bracket – Break-Off Lugs
2. Lugs to break off before wall mounting the phone. TELEPHONE MODELS BREAK OFF LUGS IQ260 IQ750EHS IQ360 IQ281 “B” and “D” IQ560E IQ283 IQ750 IQ330 IQ333EHS IQ331 IQ333D “B” only IQ333 IQ335 FIGURE 10: IQ235 WALL MOUNT BRACKET – BREAK-OFF LUGS... -
Page 38: Technical Adjustments - For Correct Operation
If the light does not function correctly, your IQ750 and IQ750EHS may need an optional circuit to be added to make it compatible with your system. If you have a Centrex system (e.g. Spectrum) the Caller key indicator and the “Mail” (envelope) icon will flash and... -
Page 39: Headset Polarity Switch
HEADSET POLARITY SWITCH Located on the underside of the telephone (see Figure 11), this switch provides compatibility with the two commonly-used headset wiring standards. Position “V” suits Plantronics Vista Cords and other Headsets wired in the same configuration (also known as “reversed” wiring mode). Position “P” suits Plantronics P cords and other Headsets wired in the same configuration (also known as “normal”... -
Page 40: Table:
Headset Mic Headset Headset Model Adjustment Polarity Control Switch ACS Orator ACS stratos Addcom Elite 100% Addcom Contour 100% BTC GHA-M201 100% BTC GHA M201N 100% Claria 100% Claria Alert 100% Crest II 100% GN Netcom Profile III Flex GN Netcom Optima 100% GN Netcom Advantage 100%... -
Page 41: Wireless Headset*, Handset Lifter* And Oli* Installation (* See Note)
WIRELESS HEADSET*, HANDSET LIFTER* and OLI* INSTALLATION (* see note) 1. Plug the telephone interface cable supplied with the Wireless headset (also called “telephone cable” in some Plantronics headset manuals) to the telephone socket on the headset base unit and to the IQ750 handset socket 2. -
Page 42: General Care And Maintenance
Disconnect the “suspect” telephone, and test the line with a substitute telephone. If the telephone service then operates satisfactorily, the fault is in the “suspect” telephone. Test the “suspect” telephone on a known good line. If the fault still occurs, the fault is in the “suspect” telephone. Consult your Interquartz dealer for further advice if necessary. -
Page 43: Thunderstorms
11. THUNDERSTORMS The telephone, in common with household electrical appliances, can be a source of electric and acoustic shock during thunderstorms. The possibility of a telephone user experiencing a shock is minimal. Nevertheless, customers should be aware of some simple precautions to follow during thunderstorms: Use your telephone only for calls of the utmost urgency. -
Page 44: Warranty - 10 Years
Act or other Commonwealth or State laws and all other obligations and liabilities on the part of Interquartz (A’Asia) Pty Ltd. Warranty Coverage The warranty period is ten (10) years. Please contact Interquartz for confirmation of the coverage of your product, or consult the documentation supplied with the unit. Freight costs in sending goods to Interquartz and returning the goods to the owner, are not included in the warranty coverage. Warranty Claim and Non-Warranty Repair Procedure 1. Contact Interquartz to discuss the symptoms of the problem. Our staff can assist to determine whether the... -
Page 45: Additional Support Services
Additional Support Services Upon request, site visits can be arranged to resolve difficult service or fault issues at the discretion of Interquartz. Units suffering from Radio Interference due to close proximity to radio or TV transmitters cannot be modified and the warranty does not cover such work. Workshop Service Fees For all repairs excluded from the warranty provisions a service fee, plus the cost of parts or materials, will apply. Bulk repair prices are negotiable. Quotations Repair quotations can be arranged upon request and do not attract any extra charge for the quotation service. Note: No undertaking is given or implied to automatically provide replacement units as a result of warranty claims (as we may prefer to repair the returned unit) and Interquartz reserves the right at all times to determine all matters related to warranty claims within the scope of the stated Terms of Warranty.
Need help?
Do you have a question about the IQ750 and is the answer not in the manual?
Questions and answers