Table of Contents
Advertisement
Quick Links
Advertisement
Table of Contents

Subscribe to Our Youtube Channel
Related Manuals for OpenEye EasyDVR OE1-D12004


Summary of Contents for OpenEye EasyDVR OE1-D12004
-
Page 1: User Manual
User Manual OE1-D12004 OE1-D24008 www.openeye.net OE1-D48016... - Page 2 NOTES:...
- Page 3 The information in this publication is provided “as is” without warranty of any kind. The entire risk arising out of the use of this information remains with recipient. In no event shall OPENEYE be liable for any direct, consequential, incidental, special, punitive, or other damages whatsoever (including without limitation, damages for loss of business profits, business interruption or loss of business information), even if OPENEYE has been advised of the possibility of such damages or whether in an action, contract or tort, including negligence.
-
Page 4: Important Safeguards
10. Object and Liquid Entry Points – Never insert foreign objects into the HVR, other than the media types approved by OpenEye, as they may touch dangerous voltage points or short-out parts that could result in a fire or electrical shock. Never spill liquid of any kind on the product. -
Page 5: Battery Explosion Caution Statement
BATTERY EXPLOSION CAUTION STATEMENT CAUTION: Risk of Explosion if Battery is replaced by an Incorrect Type. Dispose of Used Batteries According to the Instructions. NOTES ON HANDLING Please retain the original shipping carton and/or packing materials supplied with this product. To ensure the integrity of this product when shipping or moving, repackage the unit as it was originally received from the manufacturer. -
Page 6: Rack Mount Instructions
WARNING TO REDUCE THE RISK OF ELECTRICAL SHOCK, DO NOT EXPOSE THIS APPLIANCE TO RAIN OR MOISTURE. DANGEROUS HIGH VOLTAGES ARE PRESENT INSIDE THE ENCLOSURE. DO NOT OPEN THE CABINET. REFER SERVICING TO QUALIFIED PERSONNEL ONLY. CAUTION C A U T I O N RISK OF ELECTRIC SHOCK DO NOT OPEN CAUTION: TO REDUCE THE RISK OF ELECTRIC SHOCK,... -
Page 7: Fcc Statement
USERS OF THE PRODUCT ARE RESPONSIBLE FOR CHECKING AND COMPLYING WITH ALL FEDERAL, STATE, AND LOCAL LAWS AND STATUTES CONCERNING THE MONITORING AND RECORDING OF VIDEO AND AUDIO SIGNALS. OPENEYE SHALL NOT BE HELD RESPONSIBLE FOR THE USE OF THIS PRODUCT IN VIOLATION OF CURRENT LAWS AND STATUTES. -
Page 8: Notes
NOTES:... -
Page 9: Table Of Contents
TABLE OF CONTENTS NOTES: ..................................8 TABLE OF CONTENTS ............................9 PREFACE ................................16 About this Guide ..........................16 Technician Notes ..........................16 INTRODUCTION ..............................18 Product Description ......................... 18 Features ............................19 PTZ Compatibility List ........................19 Quick Start Instructions ........................20 Logging In for the First Time ...................... - Page 10 Power Button ........................25 ID Button ........................... 25 Search Button ........................25 Backup Button ........................25 Live Button ........................26 Menu Button ........................26 Number Buttons ........................ 26 Log Off (key) Button ......................26 Enter Button ........................26 Exit Button ......................... 26 Arrow Buttons ........................
- Page 11 Normal Power On ........................36 Turning off the DVR ......................... 36 SETUP ..................................37 Menu ............................... 37 Cameras ............................38 Analog Camera Select......................38 Motion Detection Setup ......................38 Motion Detect ........................38 Detected Area Setup ......................38 Sensitivity .......................... 39 Block Threshold ........................
- Page 12 Purge Data ..........................44 Purge All Data ........................44 Purge All Event Data ......................45 Purge Event Before ......................45 Start To Purge ........................45 Alarms ............................. 46 Internal Buzzer ......................... 46 Per Channel Configuration ....................... 46 Channel Select ........................46 Alarm In ..........................
- Page 13 Set Daily Update ....................... 53 Send Alarm Events Instantly ..................... 53 MAC Address ........................54 Send to Custom URL ......................54 Custom URL ........................54 Network Time Protocol Setup ....................55 NTP Server ........................55 Automatically Time Sync ....................55 Manually Time Sync ......................
- Page 14 Mouse Sensitivity ........................62 Upgrade............................ 62 Language ..........................62 Hard Drive Setup ........................62 Data Lifetime ........................62 Circular Recording......................62 Internal Disks ........................63 Repair On Power Loss ...................... 64 Total Size .......................... 64 Free Size ........................... 64 Configuration ..........................64 Export Configuration......................
- Page 15 Search By Event ........................74 Backup from Search: Quick Backup ....................75 Backup a Selection of Video with Quick Backup ..............75 Backup Event Video with Quick Backup ................... 75 Backup (Export) ..........................76 Backup Viewer ..........................77 Upgrade the Recorder Firmware ..................... 78 Save or Load Settings ........................
-
Page 16: Preface
Series EasyDVR and for troubleshooting when a problem occurs. Only authorized personnel should attempt to repair this unit. OpenEye reserves the right to make changes to the products represented by this manual without notice. The following text and symbols mark special messages throughout this guide:... - Page 17 NOTES: 30757AC...
-
Page 18: Introduction
The EasyDVR runs on an embedded Linux operating system which provides stability and protection from viruses. The OpenEye EasyDVR comes ready for fast and seamless integration within your existing IT infrastructure. Designed around Linux Embedded, the EasyDVR offers unparalleled stability, security, and ease of use. -
Page 19: Features
Digital Signature Support • Schedule Recording for Day, Night, or Weekend • Record Continuously, with increased on Motion Events, or on Sensor Events PTZ COMPATIBILITY LIST OpenEye’s EasyDVR supports the following RS-485 PTZ communication protocols: • AD422 • DSCP •... -
Page 20: Quick Start Instructions
QUICK START INSTRUCTIONS Establish necessary cable connections and power on the recorder. Press MENU. Select admin and press ENTER. Enter the default password 1234 and press ENTER. Select SYSTEM and press ENTER. Select Date/Time and press ENTER. Verify or modify the date and time, press ESCAPE twice when finished. Select USERS and press ENTER. -
Page 21: Leds, Controls, And Connections
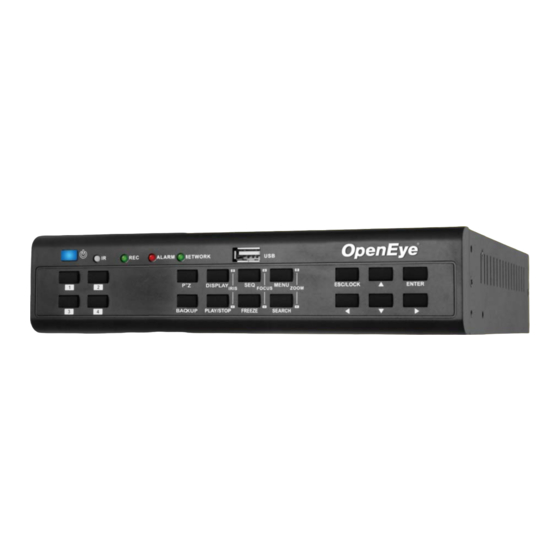
LEDS, CONTROLS, AND CONNECTIONS FRONT PANEL LEDS D120 Front Panel DISPLAY MENU ESC/LOCK ENTER IRIS FOCUS ZOOM BACKUP PLAY/STOP FREEZE SEARCH D240 & D480 Front Panel Power Button / Power LED Indicator Alarm LED Indicator Network Connection LED Indicator Record LED Indicator IR Receiver Channel Selection Enter / Zoom... -
Page 22: Remote Control
The Mighty Squirrel Contr oller Setting the Remote Controller ID When more than one OpenEye EasyDVR is installed in the same location, you can use one remote controller to control up to 16 recorders. To control multiple recorders, you must change the remote controller ID to match the Unit ID of the recorder. -
Page 23: Assign A Unique Unit Id On The Recorder
Assign a unique Unit ID on the recorder Press MENU. • If prompted, login with an administrator level username. Select SYSTEM and press ENTER. Select RS485 Setup and press ENTER. Select Unit ID and press ENTER. Use the UP/DOWN arrows to set the desired Unit ID. Press ENTER when the desired number is displayed. -
Page 24: Interface Control Options
INTERFACE CONTROL OPTIONS The recorder can be controlled using the front panel buttons, the handheld remote control, or with a USB mouse; and a USB keyboard can be used to input alpha or numeric characters. Front Panel Control Buttons Power Button When the recorder is powered off, pressing the power button will power on the recorder. -
Page 25: Call Button
Call Button Press the CALL button to enter the call monitor control mode, and define the camera channels to be displayed on the call monitor output (only available on the 8 and 16 channel models). For more details, see the Call Monitor Display section in the Operations chapter later in this manual. Backup Button Press the BACKUP button to open the Backup menu and select export options;... -
Page 26: Live Button
Live Button Press the LIVE button while in the Search or Backup menus, or in Sequence mode to return to the Live Display. Menu Button Press the MENU button to access the recorder configuration menu; please refer to the Setup section later in this manual for further details. -
Page 27: Display Button
Display Button Press the DISPLAY button repeatedly to cycle through the available display configurations. Depending on the recorder model, the available options include: single channel, four cameras (2x2), nine cameras (3x3), and sixteen cameras (4x4). Searching Navigation Buttons These six buttons are used for navigation while in Search mode. Play Play video forward at normal speed. -
Page 28: Onscreen Menu Bar
Onscreen Menu Bar The Onscreen Menu Bar will display two menu buttons when you move the mouse pointer over the Menu Bar: Channel and Function. The Channel menu allows you to click a channel number to display that channel full screen. The Function menu provides all the same options as the Right-Click Menu in icon format. -
Page 29: Usb Keyboard
USB Keyboard A USB keyboard can be connect to the USB port on either the front panel or the rear panel of the recorder. Having a USB keyboard connected will allow you to use the keyboard to enter alpha or nemeric characters (instead of using the arrow buttons and ENTER to navigate the onscreen keyboard). -
Page 30: Rear Panel Connectors
REAR PANEL CONNECTORS The rear panel of the recorder contains the connectors used to attach cameras, sensors, relay, audio, network, and monitor to the recorder. D120 Rear Panel 4 Channel PTZ Control & Audio Input & Alarm Input & Output BNC Main Monitor Output Power Camera Inputs (BNC) -
Page 31: D480 Rear Panel
D480 Rear Panel 16 Channel Audio Input VGA Main Monitor Output Power BNC Call Monitor Output Camera Inputs (BNC) BNC Main Monitor Output HDMI Main Monitor Output Alarm Input & Output 30757AC... -
Page 32: Pin Definition Of Alarm I/O & Rs-485, And Audio In
Pin Definition of Alarm I/O & RS-485, and Audio In You can use this chart to create your own peripheral connection dongle; or you can D120 D240 purchase a manufactured dongle as an accessory. Advantages of purchasing the Wire Definition Definition manufactured dongle: •... -
Page 33: D480
You can use this chart to create your own peripheral connection dongles; or you can D480 purchase manufactured dongles as accessories. Alarm I/O & RS-485 Audio Advantages of purchasing the manufactured dongles: • Wire Definition Definition The connections are colored according to the Wire list in this chart. -
Page 34: Installation
INSTALLATION CONNECTION GUIDE Power Setup WARNING: To reduce the risk of electrical shock or damage to the equipment: Do not disable the power grounding plug. The grounding plug is an important safety feature. If the electrical plug you are using does not have a ground plug receptacle contact a licensed electrician to have it replaced with a grounded electrical outlet. -
Page 35: Connecting A Video Source
Connecting a Video Source Various types of video sources can be connected to the recorder including DVD players, VHS players, and CCTV Cameras. The back of the recorder contains 4, 8, or 16 video inputs depending on the recorder model. The connectors use the BNC standard. The video inputs are 75 Ώ... -
Page 36: Turning On The Dvr
TURNING ON THE DVR First Time Power On Connect camera cables. Connect monitor cable. Connect network cable (if remote access will be needed). Connect alarm inputs, relay output, or PTZ wires (if needed). Connect the power cable to the recorder and wait until the main screen is displayed on the connected monitor;... -
Page 37: Setup
SETUP MENU Use the MENU button on the front panel to access the system menu. All system configurations for the recorder are done through this menu. Use the , , , and buttons on the front panel to navigate the menus. 30757AC... -
Page 38: Cameras
CAMERAS Use the CAMERAS menu to configure camera channel settings; including channel name, motion detection, and PTZ configuration. Analog Camera Select Analog Camera Select allows you to select the camera channel to make changes to. Motion Detection Setup Detect Config allows you to configure the motion detection settings for the selected channel. Motion Detect Motion Detect allows you to enable or disable the motion detection for the recorder. -
Page 39: Sensitivity
Sensitivity Sensitivity allows you to change the sensitivity of motion detection function. A greater value represents more sensitive detection (motion events will be easier to trigger). Block Threshold Block Threshold allows you to change the amount of motion needed to register a motion event. This number represents the number of blocks on the 16x12 grid that are required to be detecting motion before a motion event is registered. -
Page 40: Ptz Setup
PTZ Setup PTZ Setup allows you to configure the PTZ settings for the selected channel. PTZ Protocol PTZ Protocol allows you to select the PTZ protocol for the camera on the selected channel. Supported Protocols: • • AD422 • • DSCP Panasonic C •... -
Page 41: Schedule
SCHEDULE Use the SCHEDULE menu to configure recording quality, resolution, schedule, and other recording parameters. Audio Recording Audio Recording allows you to enable or disable audio recording. If an audio source is connect to the recorder, change Audio Recording to On to record the audio. Schedule Setup Schedule Setup allows you to define the start and end time for the day, night, and weekend schedule. -
Page 42: Weekend Schedule
Weekend Schedule Weekend Schedule allows you to enable or disable the Weekend Schedule option. Change setting to On if you need to define a weekend schedule. Weekend Start Weekend schedule start time and day of the week; use LEFT/RIGHT to move between fields, and UP/DOWN to change values. -
Page 43: 512Kbps Dsl
Quick Record Global Configuration must be set to Quick Record to enable the Quick Record Setup menu option. 512Kbps DSL Record settings will be universally adjusted to work in a low bandwidth environment. 256Kbps DSL Record settings will be universally adjusted to work in a lower bandwidth environment. 128Kbps DSL Record settings will be universally adjusted to work in the lowest bandwidth environment. -
Page 44: Quick Record
Quick Record Setup Quick Record Setup allows you to easily make record setting changes to all channels. Two approaches can be used within the Quick Record Setup menu: • The desired number of days can be entered, and the PPS and Quality settings will automatically adjust. -
Page 45: Purge All Event Data
Purge All Event Data Purge All Event Data allows you to delete all event based recorded video from the recorder. Caution This will permanently delete all motion based and alarm based recorded video; there are no recovery options once this process is started. Select Purge All Event Data and press ENTER. -
Page 46: Alarms
ALARMS Use the ALARMS menu to configure the recorders response to alarm events Internal Buzzer Internal Buzzer allows you to enable or disable the audible beep from the recorder when alarm events occur. Set to On to enable the beep; set to Off to disable the beep. Per Channel Configuration Per Channel Configuration allows you to configure alarm events for video loss and alarm inputs and outputs. -
Page 47: Copy Event Settings
Video Loss Detect allows you to enable or disable video loss as an alarm event. Copy Event Settings Copy Event Settings allows you to copy the current channel confirmation to other channels. Select Copy Event Settings and press ENTER. Select the desired target channel and press ENTER. •... -
Page 48: Users
USERS Use the USERS menu to manage usernames, passwords, and privileges. The OpenEye recorder provides eight built in user accounts. Seven of these accounts can have the username, password, and privilege customized; the preconfigured admin account has a statically set username and privilege, but you can customize the password. -
Page 49: Account Setup
Account Setup Account Setup allows you to setup or modify user accounts, including customizing the username, password, and privilege level, or even disable an account. Creating a New User Account From the USER menu, select Account Setup. Select user from the Account option. Click Edit to the right of the Account field. -
Page 50: Permissions Setup
Permissions Setup Permissions Setup allows you to modify the privilege level required to access menu options and features of the recorder. To enable privilege requirements for any option, set it to a selected level: 1 through 8. Users will be able to access functions that are equal to or less than (numerically) their set privilege level. -
Page 51: Network
NETWORK Use the NETWORK menu to configure your network communication options. LAN Setup LAN Setup allows you to configure the basic network settings for Ethernet communication. Consult a network administrator if you are not familiar with basic network configuration, or not familiar with the network you will be connecting to the recorder. -
Page 52: Dns
DNS allows you to specify the DNS of the network you are connecting to the recorder. Web Port Web Port allows you to specify the web port used to connect to the recorder from a remote location. By default the port is set to 80. Although ports 1 through 65535 are valid, to avoid possible conflicts we recommend using port 80, or ports 1025 through 65535. -
Page 53: Email Attachment
Email Attachment Email Attachment allows you to enable or disable the AVI attachment inclusion with alarm event notifications. Note When Email Attachment is enabled, any alarm event will cause the recorder to send a short AVI video clip from each channel with a connected camera. ReportStar Setup ReportStar Setup allows you to configure the ReportStar settings for the recorder. -
Page 54: Mac Address
Send to Custom URL Send to Custom URL is used for additional troubleshooting, and should only be enabled when directly instructed to do so by an OpenEye representative. Custom URL Custom URL is used for additional troubleshooting, and should only be modified when directly... -
Page 55: Network Time Protocol Setup
Network Time Protocol Setup Network Time Protocol Setup allows you to have the recorder synchronize time with a network time server. Note A time zone must be selected to enable this option (via the SYSTEM menu). Note A network connection is required to connect to a NTP server; and an internet connection is required if you plan to connect to a public NTP server. -
Page 56: Ezddns
The DDNS address will also be displayed (you should make a note of this address for future use). Note Port forwarding also needs to be configured on the router to allow remote access to the recorder from an offsite location. For further instruction on this process, visit http://openeye.net and search for “Port Forwarding.”... -
Page 57: Display
DISPLAY Use the DISPLAY menu to change the video output display settings. Date/Time Display Date/Time Display allows you to enable or disable the display of the date and time on the main display. Show Camera Name Show Camera Name allows you to enable or disable the camera name display in live view. Show System Name in Live Show System Name in Live allows you to enable or disable the display of the Unit Name (specified in the SYSTEM menu) on the main display. -
Page 58: Main Monitor Dwell
Main Monitor Dwell Main Monitor Dwell allows you to select the dwell time of a camera or screen division when the main display has been set to sequence (1 second – 120 seconds). Main Monitor Sequence Main Monitor Sequence allows you to configure a custom sequence order to be displayed when the main display has been set to sequence single channels. -
Page 59: Create A Custom Sequence Order
Create a Custom Sequence Order To create the example above: Select Main Monitor Sequence and press ENTER. Press LEFT arrow until the fifth sequence position (CH5) is selected. Press UP arrow until CH1 is displayed. Press RIGHT arrow to select the sixth sequence position (CH6). Press UP arrow until CH5 is displayed;... -
Page 60: System
SYSTEM Use the SYSTEM menu to configure the date and time and the unit name; to export, import, or reset system configurations; and to upgrade software and restart or shutdown the recorder. Date/Time This is the option used to set the date and time on the recorder. Date Select Date and press Enter. -
Page 61: Date Display Mode
Date Display Mode This option allows you to select the format for the date displayed (Y/M/D, M/D/Y, or D/M/Y). Time Display Mode This options allows you to select the format for the time displayed (12 HR or 24 HR). Daylight Saving Time Setup This option allows you to turn Daylight Saving Time On or Off. -
Page 62: Parity
Parity Parity allows you to select the parity that the RS485 network communicates at. Mouse Sensitivity Mouse Sensitivity allows you to configure the sensitivity of a connected USB mouse. Setting options range from 10% to 100% in increments of 10. The 10% settings is the least sensitive, resulting in a slower moving mouse pointer;... -
Page 63: Internal Disks
Internal Disks Internal Disks allows you to examine the state and details of internal hard drives; as well as add new drives to data rotation, remove drives from data rotation, format drives, and repair data on drives. Check Drive Status and Details Select Internal Disks and press ENTER. -
Page 64: Repair On Power Loss
Repair On Power Loss Repair On Power Loss allows you to enable or disable the automatic hard drive scan and repair process that occurs upon startup after a power loss or improper shutdown. Total Size Total Size displays the total storage capacity of all hard drives that are active. Free Size Free Size displays the current free space on the hard drives that are active. -
Page 65: Load Factory Default
Load Factory Default Load Factory Default allows you to reset all settings and configuration to the default state. Note This does not affect the recorded data on the internal hard drive (which can be done via the Internal Disks menu). Select Configuration and press ENTER. -
Page 66: Power Key Privilege
Power Key Privilege This option defines what prompts will be displayed when the power button is held down for five seconds. There are four options to choose from: Auth Users will be prompted to login with an authorized account to shutdown the recorder (the Password Protection option under USERS must also be enabled). -
Page 67: Info
INFO Use the INFO menu to view system information such as hardware and software version, and network address information. Note The items displayed in this menu are read only and cannot be changed on this screen (Software version can change via upgrade on the SYSTEM menu, and Network Address can be customized via the NETWORK menu). -
Page 68: Operation
Select admin and press ENTER. Enter the default password 1234 and press ENTER. Change the Admin Password To prevent unauthorized changes to the recorder settings, OpenEye recommends changing the default admin password. Press MENU. Login with a user that has admin privileges. -
Page 69: Live Display
LIVE DISPLAY Live Display is the default mode of the recorder. After startup the recorder will load to the Live Display. After being left idle on any menu, the recorder will return to the Live Display. Channel Selection To display an individual camera channel press the channel number buttons on the front panel, on the remote control, or via the onscreen menu bar using the mouse. -
Page 70: Call Monitor Display
CALL MONITOR DISPLAY Using the CALL button, you can define what is being displayed on the BNC Call Monitor output. To display a single channel: Press CALL on the front panel or the remote control, or use the mouse to click SPOT on the right- click menu or the onscreen menu bar. -
Page 71: Ptz
To open the PTZ control menu, press PTZ on the front panel or the remote control, or use the mouse to click PTZ on the right-click menu or the onscreen menu bar. The PTZ control menu can be controlled using the recorder front panel, the remote control, or the USB mouse;... -
Page 72: Presets
Presets When the PTZ control menu is open, click the Preset icon with the mouse pointer (or press 1 on the front panel or remote). From the Preset screen preset camera positions can be set or called, and tours can be started. Note Preset position and tours are stored in the camera, not in the recorder. -
Page 73: Search
SEARCH To open the Search Menu, press SEARCH on the front panel or the remote control, or use the mouse to click Search on the right-click menu or the onscreen menu bar. There are four different search methods that can be used to find the desired video to playback: Play First or Last Video, Select a Date and Time to Play, Review Calendar to Select Date and Time to Play, Search By Event. -
Page 74: Review Calendar To Select Date And Time To Play
Review Calendar to Select Date and Time to Play Press SEARCH. Highlight Calendar Search and press ENTER. The calendar will display highlighted dates if there is recorded data. Below the calendar a horizontal bar represents 24 hours, and will display yellow highlights to indicate recorded data. -
Page 75: Backup From Search: Quick Backup
BACKUP FROM SEARCH: QUICK BACKUP The Quick Backup function allows you to quickly select and export video footage while searching, using as few as three button presses. Backup a Selection of Video with Quick Backup Connect a USB thumb drive or external hard drive to the front panel of the recorder. Start a Search: •... -
Page 76: Backup (Export)
BACKUP (EXPORT) Connect a USB thumb drive or external hard drive to the front panel of the recorder. Press BACKUP. Select Select Device and press ENTER. Select the desired USB device and press ENTER. Press UP arrow to change the selection to YES and then press ENTER. Select the camera channels to export. -
Page 77: Backup Viewer
BACKUP VIEWER Connect the USB thumb drive or external hard drive containing backup video to your PC. Browse to the USB drive and open the Player folder. Double-click DVR_Player. Click the Playback button near the bottom of the window. • Available video backups located on the USB drive will be displayed. -
Page 78: Upgrade The Recorder Firmware
UPGRADE THE RECORDER FIRMWARE Note The currently installed version can be checked on the INFO menu. Visit openeye.net to download the latest firmware version. Unzip the downloaded firmware update to the root of a USB storage device. • It will unzip a folder labeled “upd_88ts” that contains four files; DO NOT change this folder label or relocate any of the files it contains. -
Page 79: Save Or Load Settings
SAVE OR LOAD SETTINGS The recorders configuration settings can be exported to and imported from a USB storage device. Save Configuration Connect a USB storage device to the recorder. Press MENU. Select SYSTEM and press ENTER. Select Configuration and press ENTER. Select Export and press ENTER. -
Page 80: Remote Connection
REMOTE CONNECTION The recorder has built-in web-based remote software that can be accessed if the recorder has a network connection. This web-based remote software requires Microsoft® Internet Explorer®. Note Mozilla ® Firefox ®, Google™ Chrome™, or Apple® Safari® can be used to connect to the recorder. -
Page 81: Configure Port Forwarding
Configure Port Forwarding To connect to the recorder with the remote software from an offsite location, the router or firewall device will need to be configured for port forwarding to the recorder. Press MENU. Select NETWORK and press ENTER. Select IP Advanced and press ENTER. Make a note of the Web Port;... -
Page 82: Using The Remote Software
USING THE REMOTE SOFTWARE Channel Select The channel select buttons allow you to view an individual camera channel in the viewing area. 2-Way Audio 2-Way Audio allows you to communicate via audio with someone at the recorder location (this requires speakers and microphone at both the recorder and the computer running remote software). -
Page 83: Camera Display Divisions
Camera Display Divisions The camera display division buttons allow you to choose the desired display view. Normal Stream or Dual Stream Dual Stream provides the highest quality video streaming from the recorder to the remote software. Normal Stream provides a lower quality video stream from the recorder for connections with less bandwidth. -
Page 84: Download Dvrplayer
Download DVRPlayer Download DVRPlayer allows you to download the proprietary player software. When you click this button you will be prompted to save or open a ZIP file; extract the contents of the ZIP file to a location on your computer’s hard drive. To launch the player, double-click the DVR_Player executable. Live Live allows you to return to the live mode from Playback mode. -
Page 85: Playback (Search)
Playback (Search) Playback allows you access to basic search function playback recorded video, download a segment of recorded video to your local workstation, or use the proprietary player to playback DRV video files already located on your computer. Playback Recorded Video Click Playback. -
Page 86: Download A Segment Of Recorded Video
Download a Segment of Recorded Video Click Playback. Select Download (.DRV). A ‘Save As’ prompt will open; select a location and file name, then click Save. Change the date and time of the Start field to the desired time (or move the left-hand ‘Start’... -
Page 87: Configuration (Setup Menu)
Configuration (Setup Menu) Configuration allows you to access the recorder setup menu. Please reference the Setup chapter earlier in this manual for a complete description of menu options. Note Some menu options can only be configured when accessing the recorder physically. When connected remotely these option may appear as read only in the configuration menu, or may be hidden completely. -
Page 88: Event (Search)
Event (Search) Event allows you to search based on event recorded video. Each event can be downloaded or reviewed in playback. View an Event in Playback Click Event. Double-click the desired event. • Playback of all channels at the selected time will begin. -
Page 89: Ptz
Use the channel select buttons to view a single PTZ camera to enable the onscreen pan-tilt-zoom controller. Focus Far Focus Near Iris Close Iris Open Zoom Out Zoom In Auto Focus Presets Pan & Tilt ID & Protocol Move Speed Please reference the PTZ section in the Operation chapter earlier in this manual for details on each of these functions. - Page 90 All rights reserved. No part of this publication may be reproduced by any means without written permission from OpenEye. The information in this publication is believed to be accurate in all respects. However, OpenEye cannot assume responsibility for any consequences resulting from the use thereof. The information contained herein is subject to change without notice.
Need help?
Do you have a question about the EasyDVR OE1-D12004 and is the answer not in the manual?
Questions and answers