Advertisement
Table of Contents
- 1 Table of Contents
- 2 General Description
- 3 General Description
- 4 Precautions
- 5 Tools and Parts Needed for Assembly
- 6 Tools & Parts Required
- 7 Assembly Instructions
- 8 Gas Requirements & Leak Tests
- 9 Heater Location
- 10 Operation & Storage
- 11 Troubleshooting
- 12 Storage & Maintenance
- 13 Warranty & Service
- Download this manual
PATIO HEATER
OWNER'S MANUAL
MODEL # L10-SS-P / L10-SS-BK / L10-PC-BK
**IMPORTANT NOTICE**
Establishing a burner ignition for the FIRST time
Do NOT return to place of purchase!
or after changing the cylinder tank may take up to
Please contact our toll free hotline:
2-3 minutes in order for the gas to purge through
1 (800) 561.5550 or e-mail parts@jrhome.com for
customer service and warranty issues
the feeder lines.
Hotline hours:
Monday to Friday 8:00am - 5:00pm (PST)
R
WARNING: For OUTDOOR USE ONLY
US
Advertisement
Table of Contents

Related Manuals for Paramount Fitness L10-SS-P


Summary of Contents for Paramount Fitness L10-SS-P
- Page 1 PATIO HEATER OWNER’S MANUAL MODEL # L10-SS-P / L10-SS-BK / L10-PC-BK **IMPORTANT NOTICE** Establishing a burner ignition for the FIRST time Do NOT return to place of purchase! or after changing the cylinder tank may take up to Please contact our toll free hotline: 2-3 minutes in order for the gas to purge through 1 (800) 561.5550 or e-mail parts@jrhome.com for...
-
Page 2: Table Of Contents
TABLE OF CONTENTS GENERAL DESCRIPTION.........3-4 ** WARNING ** PRECAUTIONS............5 Improper operation, installation, adjustment, TOOLS & PARTS REQUIRED........6 alteration, servicing or maintenance can cause ASSEMBLY INSTRUCTIONS......7-9 severe property damage and/or serious damage GAS REQUIREMENTS & LEAK TESTS..9-10 and/or serious injury or death. Please read the installation, operating and maintenance instruc- HEATER LOCATION........10-11 tions thoroughly before installing, operating or... -
Page 3: General Description
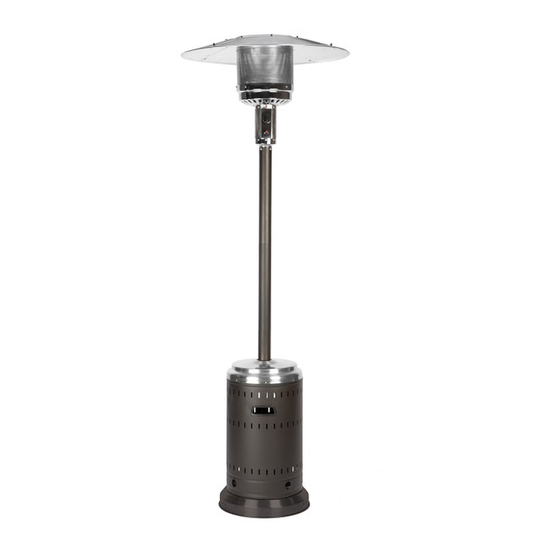
GENERAL DESCRIPTION - 3 A patio/deck & garden heater of operation with LPG (Liquid Propane Gas). For connection/working pressure information & lighting instructions, see the appliance data plate labels and this manual. MAIN COMPONENTS 1. Cylinder base, 18’’ dia. 2. Tank housing 3. -
Page 4: General Description
GENERAL DESCRIPTION - 4 CONSTRUCTION CHARACTERISTICS Color: Brushed matte finish on stainless steel models. (Powder coat finish on steel models) Casings: Base material on Deluxe Models feature stainless steel. (Galvanized sheet metal on steel models) The burner is controlled using a positive lock, on/off gas control valve. The gas supply is controlled from gas cylinder valve. -
Page 5: Precautions
GENERAL DESCRIPTION - 5 PRECAUTIONS – SAFETY FIRST! PLEASE READ THE FOLLOWING SAFETY RULES • Do not use this space heater in an explosive atmosphere. Keep heater away from areas where gasoline or other flammable liquids or vapors are strored. •... -
Page 6: Tools & Parts Required
GENERAL DESCRIPTION - 6 TOOLS AND PARTS NEEDED FOR ASSEMBLY NOTE : 20 Pound, 5 Gallon Capacity – Standard LPG Tank/Cylinder is NOT supplied. Tools Needed : Adjustable Wrench Phillips Head Screwdriver (#2 or #3 blade) Spray Bottle of Soapy Water or Paint Brush and Soapy Water (to check for leaks) Parts Supplied: •... -
Page 7: Assembly Instructions
ASSEMBLY INSTRUCTIONS - 7 STEP 1 1-1 Place the 3 post mounting brackets on the Cylinder Base as shown. 1-2 Use 3-M8 x 15mm bolts to secure brackets to the base. STEP 2 2-1 Place the tall upright support onto the top of the post brackets, aligning pre-drilled holes as shown. - Page 8 ASSEMBLY INSTRUCTIONS - 8 STEP 4 4-1 Carefully insert gas inlet hose completely through the post resting heater head unit on the support post. 4-2 Make sure both components are level and aligned with one another and are at a 90 degree angle to the floor. Align the holes of the support post with the holes at the bottom of the head unit.
-
Page 9: Gas Requirements & Leak Tests
INSTRUCTIONS - 9 STEP 7 7-1 Raise the tank housing cover and place on the post plate as il- lustrated. 7-2 Fit the gas regulator flexible hose to the threaded end of the gas inlet hose. 7-3 Tighten the fitting nut of the hose to the inlet gas hose. Be careful not to overtighten. -
Page 10: Heater Location
INSTRUCTIONS - 10 PROPANE CYLINDER TANK • The heater comes equipped with a hose assembly for hook-up to a standard propane gas tank. The propane tank is NOT included. • A dented, rusted or damaged propane tank may be hazardous and should be checked by your tank supplier. Never use a propane tank with a damaged valve connection. -
Page 11: Operation & Storage
OPERATION & STORAGE - 11 STEP 8 : OPERATION & STORAGE 8 -1 OPERATION Ignition 1. Open the LP gas cylinder valve at the propane tank. 1a. Align symbols on control knob with calibration mark (see illustration). 2. Turn control knob to a position half way between small flame (8b) and the large flame symbol (8c) aligning with calibration mark. - Page 12 INSTRUCTIONS - 12 BURNER OPERATION • The burner head unit emitter screen will burn bright red when operating normally. The heat generated is VERY INTENSE. Note : It is normal for some discoloration of the emitter screen after use. • The burner flame wil normally show blue with yellow tip flames (see fig.).
-
Page 13: Troubleshooting
TROUBLESHOOTING - 13 PROBLEM PROBABLE CAUSE SOLUTION Main Burner Will Not Light Gas valve may be OFF Turn the gas valve ON Fuel tank empty Refill LPG tank Orifice blocked Clean or replace crifice Air in supply system Purge air from lines. Open gas lines & Loose connection press control knob in for 2-3 min. -
Page 14: Storage & Maintenance
INSTRUCTIONS - 14 CUSTOMER SERVICE ATTENTION : Consumer ... Please use the customer information listed below for any questions concerning assembly, care information, warranty issues and/or replacement parts. To ensure your satisfaction and maintain high standards for quality and workmanship, we want to hear from you should you have any questions or comments. -
Page 15: Warranty & Service
WARRANTY - 15 1 YEAR LIMITED WARRANTY – CUSTOMERS IN CANADA IMPORTANT Do NOT return to the place of purchase. Please call our toll free hotline: 1-800-561-5550. For customer service and warranty issues e-mail: parts@jrhome.com. Hotline hours are Monday to Friday 7:00 am to 5:00 pm (P.S.T.) WARRANTY This product is inspected, tested and carefully packaged to minimize the chance of damage during ship- ment.
Need help?
Do you have a question about the L10-SS-P and is the answer not in the manual?
Questions and answers
Replacement thermocouple for paramount model L10-SS-PP outdoor propane heater . Price and supplier of thermocouple. I live in Stoney Creek, Ontario.