Table of Contents
Advertisement
Quick Links
INSTALLATION INSTRUCTIONS FOR PART 99-2021
99-2021
KIT FEATURES
• DIN Radio Provision with Pocket
• ISO Mount Radio Provision with Pocket
• Double DIN Radio Provision
• Stacked ISO Mount Units Provision
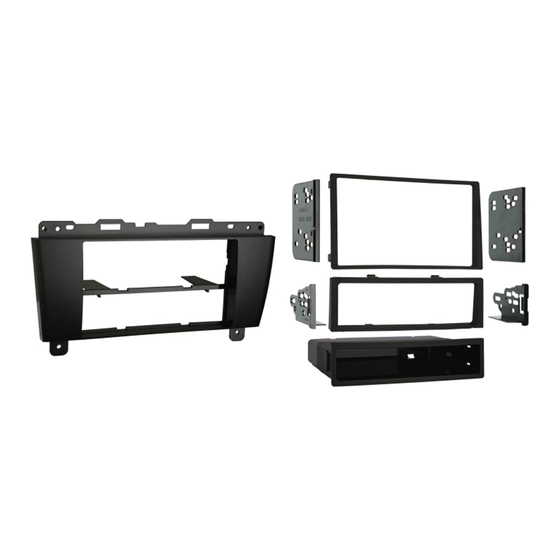
KIT COMPONENTS
• A) Radio Housing • B) ISO Brackets • C) ISO Trim Plate • D) Double DIN Brackets
• E) Double DIN Trim Plate • F) Pocket
A
E
F
APPLICATIONS
BUICK Lacrosse
2005-2009
B
WIRING AND ANTENNA CONNECTIONS (Sold Separately)
Wire harness:
• GMOS-01 GM interface 2002-up
• GMOS-04 GM amplified interface 2002-up
Antenna adapter:
• 40-GM10 -GM antenna adapter 1988-up
TOOLS REQUIRED:
Small Flat Blade Screwdriver/ Panel Removal Tool
• Phillips Screwdriver • Socket Set
D
C
Advertisement
Table of Contents

Summary of Contents for Metra Electronics BUICK Lacrosse 2005-2009
- Page 1 INSTALLATION INSTRUCTIONS FOR PART 99-2021 APPLICATIONS BUICK Lacrosse 2005-2009 99-2021 KIT FEATURES • DIN Radio Provision with Pocket • ISO Mount Radio Provision with Pocket • Double DIN Radio Provision • Stacked ISO Mount Units Provision KIT COMPONENTS • A) Radio Housing • B) ISO Brackets • C) ISO Trim Plate • D) Double DIN Brackets •...
- Page 2 99-2021 DASH DISASSEMBL Y BUICK LACROSSE 2005-2009 Note: Refer also to the instructions included with the aftermarket radio. Disconnect the negative battery termi- nal to prevent an accidental short circuit. Unclip and remove trim panel below a/c control. (Figure A) Remove (2) 9/32”...
- Page 3 99-2021 KIT ASSEMBL Y DIN MOUNT RADIO PROVISION WITH POCKET Note: Refer also to the instructions included with the aftermarket radio. Slide the DIN cage into the radio housing and secure by bending the metal locking tabs outward. (Figure A) Slide the aftermarket radio into the DIN cage and until it snaps into place.
- Page 4 99-2021 KIT ASSEMBL Y ISO MOUNT RADIO PROVISION WITH POCKET Note: Refer also to the instructions included with the aftermarket radio. Mount the ISO Brackets to the radio using the screws supplied with the radio. (Figure A) Slide the radio into the radio housing until it snaps into place.
- Page 5 99-2021 KIT ASSEMBL Y DOUBLE DIN RADIO PROVISION Note: Refer also to the instructions included with the aftermarket radio. Cut and remove the center bar from the radio housing. (Figure A) Snap the Double DIN brackets to the inside edge of the radio housing. (Figure B) Slide the Double DIN radio into the DDIN bracket/radio housing assembly...
- Page 6 99-2021 KIT ASSEMBL Y STACKED ISO MOUNT UNITS PROVISION Note: Refer also to the instructions included with the aftermarket radio. Cut and remove the center bar from the radio housing. (Figure A) Snap the Double DIN brackets to the inside edge of the radio housing. (Figure B) Slide the stacked ISO mount units into the bracket/trim plate assembly and...
- Page 7 99-2021 FINAL ASSEMBL Y FINAL ASSEMBL Y (A) Strip wire ends back 1/2" B) Twist ends together C) Solder D) Tape Locate the factory wiring harness in the dash. Metra recommends using the proper mating adapter and making connections as shown. (Isolate and individ- ually tape off the ends of any unused wires to prevent electrical short circuit.) Re-connect the negative battery terminal and test the unit for proper operation.


Need help?
Do you have a question about the BUICK Lacrosse 2005-2009 and is the answer not in the manual?
Questions and answers