Table of Contents
Advertisement
Quick Links
B
B
!
!
Instructions prepared by Ben Lankford
Model prototype by Bob Schott
Sold by Model Expo, a division of Model Shipways, Inc. • www.modelexpo-online.com
INSTRUCTION MANUAL
M
M
ODELING
ODELING
N
N
EWSBOY
EWSBOY
RIGANTINE
RIGANTINE
Manufactured by Model Shipways, Inc. • Hollywood, Florida
Model Shipways Kit No. MS2108
T
T
HE
HE
, 1854
, 1854
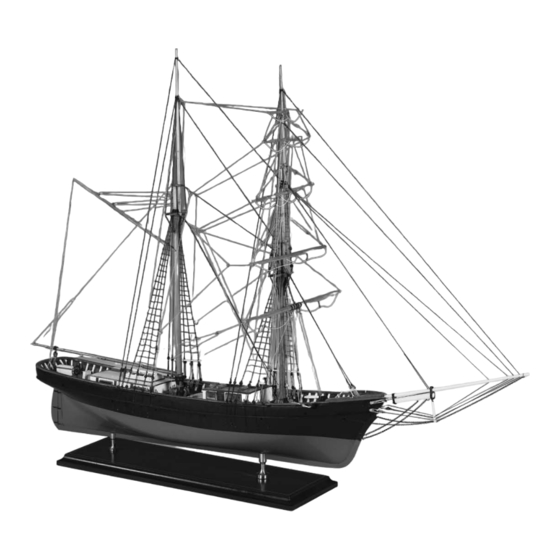
Technical Characteristics
Scale: 1/8" = 1 ft.
Overall Length: 21-3/8"; Hull Length: 15-1/4"
Width: 8" (width of lower yard); Hull Beam: 3-3/8""
Height: 15-3/8" (top of main mast to bottom of keel)
©2006, Model Shipways, Inc.
!
!
Advertisement
Table of Contents

Subscribe to Our Youtube Channel
Related Manuals for Model Shipways Newsboy


Summary of Contents for Model Shipways Newsboy
- Page 1 Height: 15-3/8" (top of main mast to bottom of keel) Instructions prepared by Ben Lankford Model prototype by Bob Schott ©2006, Model Shipways, Inc. Manufactured by Model Shipways, Inc. • Hollywood, Florida Sold by Model Expo, a division of Model Shipways, Inc. • www.modelexpo-online.com Model Shipways Kit No. MS2108...
-
Page 2: Table Of Contents
..she does her designer no discredit..her log will speak for itself”. The first plans and kit of the Newsboy were developed in 1948 by John Shedd, the original owner of Model Shipways in Bogota, New Jersey. -
Page 3: Before You Begin
Solder (lead-free solder Plan Sheet 1. However, the following modi- The Newsboy kit is manufactured to a scale of recommended) fications are recommended, based on Model 1/8" = 1'0" and matches the plans. Conse- b. -
Page 4: Stage A: Shaping The Pre-Carved Hull
Use a grey primer (one is provided with the what wrinkled and paint may run under Brushes & Procedures: Newsboy paint kit). The grey color will high- them. A good trick; seal the edge of masking Use good quality soft sable or synthetic hair... -
Page 5: Carving The Inside Of The Stern
FIG. A-1 MARKING THE HULL MARK RABBET LINES 1/8" RABBET MARK CENTER LINE WOOD TO BE CUT AWAY 1/8" RAIL WIDTH AT RAIL 1/8" MARK ALL STATION LINES MEASURE FROM LINES PLAN MARK HULL WIDTHS AT EACH STATION MARK STATIONS & TEMPLATES HULL WIDTHS ON TOP OF RAIL... -
Page 6: Stage B: Completing The Basic Hull Structures
STAGE B: COMPLETING THE BASIC HULL STRUCTURES 1. Installing the Keel, Stem & Sternpost FIG. B-1 KEEL, STEM & STERNPOST The keel, stem & sternpost are laser-cut parts. Taper the stem and install the parts (Figure B-1). Note that the hull plan shows TAPER several scarf joints at the stem. -
Page 7: Stage C: Mounting The Hull
Before permanent installation, paint the hawse pipes thru the waterway. The lips for parts according to the Newsboy color scheme or Catheads - The catheads are laser-cut parts. the mooring and hawse pipes are Britannia your choice of color. If wooden parts are not Cut a hole in the bulwarks for the parts. -
Page 8: Forward Cabin Construction
wark stanchions. Drill and install the belaying FIG. D-1 KNIGHTHEADS & HAWSE TIMBERS pins before installing the rails (Figure D-4). Channels - Fit the channels on the outboard side of the bulwarks (Figure D-5). 3. Forward Cabin Construction Laser-cut sides and ends of the cabin are pro- vided. -
Page 9: Hatches
FIG. D-5 CHANNELS CHANNEL CAP RAIL RAIL FIT PIN RAIL UNDER CAP RAIL CUT SLOTS FOR STANCHIONS TYPICAL CAVIL NOTCH FOR TYPICAL CHAINPLATE - PIN OR PIN RAIL INSTALL DRILL HOLES JUST GLUE CHAINPLATES, FOR BELAYING PINS THEN ADD FIG. D-4 CAVILS & PIN RAILS COVER STRIP FIG. -
Page 10: Stage E: General Masting & Rigging Information
STAGE E: GENERAL MASTING & RIGGING INFORMATION 1. Rigging Identification WEAVE SAME AS FIG. E-1 MAKING SAILS SAIL CLOTH All of the rigging is identified by name on the SEAM DIRECTION rigging plan. If you are not familiar with the names and functions of rigging lines, the book How to Build First-Rate Ship Models From Kits by Ben Lankford contains a description of... - Page 11 Wonder-Under FURLED PARTIALLY FURLED comes in sheets with a thin paper backing on one side. While not needed for Newsboy, it is useful for bonding letters and numbers to a SQUARE SAILS scale sailboat’s sail (maybe one of your future models).
-
Page 12: Applying Beeswax To The Lines
They could be cut to a shorter length or just Before you start the rigging, get a notebook Note: For the Newsboy, like the other metal left as is. and do a small sketch of each rigging line on... - Page 13 when you view your sketches, seek help or FIG. E-9 BLOCK STROPS find the answer in a rigging text (consult the HOOK bibliography). Use the final sketches as you EYEBOLT rig the model. You won’t need to crawl your LASHING way thru the rigging plan again.
-
Page 14: Stage F: Mast & Spar Construction
This is a casting provided in the as we have with Newsboy. It’s just a matter of kit. Slide and glue the casting onto the mast. be filed down somewhat. Add the ball on top... -
Page 15: Shaping & Detailing The Spars
yard trusses. And finally, add the ship’s bell on the foremast. Figure F-4 illustrates some SHOULDERS ON TOPMAST OR FORE TOPGALLANT assembled mast details. TOPGALLANT MAST Spanker and Gaff Topsail Mast Hoops - BAND These need to be put on the mainmast before installing the masts if you elect to include HOLE FOR YARD them. -
Page 16: Stage G: Standing Rigging
FIG. F-6 BOOM FIG. F-7 BOWSPRIT ASSEMBLY & GAFF JAWS HOLES FOR STAYS HINGED JIBBOOM - ROUND PARREL SADDLE GAMMON IRON BAND CAP - LASER-CUT TENON BOWSPRIT KNOT TENON MARTINGALE CHAIN BANDS DOLPHIN STRIKER - ROUND BOBSTAY LASER-CUT FLATTEN BANDS JAW HALF ROUND SQUARE... - Page 17 FIG. G-2 DEADEYE FIG. G-3 SHROUD SETUP STROPS & STROP CHAIN PLATES SEIZE MAKE A LITTLE LONGER THAN REQUIRED. LET LANYARDS PULL TIE LANYARD SHROUDS TIGHT & GLUE TWIST BOLT VIEW IS TEMPORARY INBOARD WIRE LOOKING MODEL OUTBOARD OPTIONS KNOT CHAINPLATE LANYARD SEQUENCE...
-
Page 18: Yard Lifts, Footropes, Stirrups, Slings & Trusses
5. Yard Lifts, Footropes, Stirrups, FIG. G-7 Slings, & Trusses FORE TOPMAST These lines and fittings are actually a part of SIMILAR TO FORESTAY STAY the standing rigging but we will defer the instruction to running rigging, Stage H. These rigs are best installed along with some DOUBLE LINE running rigging while working with the yards. - Page 19 FIG. G-10 MAINSTAY FIG. G-11 MIDDLE STAY EYEBOLT IN CAP EYE AT MAIN MASTHEAD SIMILAR TO FORE STAY SEIZE FOREMAST BULLSEYES & LANYARDS STOP MAINMAST HEAD CHOCK SEIZE DOUBLE LINE SEIZE STAY AROUND METAL THIMBLE - CAN BE OMITTED ON MODEL STROP AROUND FOREMAST...
-
Page 20: Stage H: Running Rigging
STAGE H: RUNNING RIGGING FIG. H-1 STAYSAIL RIGGING FIG. H-2 BOOM TOPPING LIFT EYEBOLT IN SINGLE BLOCK TOPPING LIFT MAINMAST COLLAR HALLIARD AROUND BOOM STAY CLEAT(S) HOOK STOP TOGETHER SEIZE CHOCKP/S BLOCK TO STAY DOWNHAUL BELAY HOLE IN BOOM Before starting on the running rigging, have all Figure H-1 illustrates some of the staysail topping lift first to position the boom, then the your blocks stropped and/or seized to a line as... -
Page 21: Fore Course Yard Rigging
FIG. H-3 BOOM SHEET FIG. H-4 GAFF HALLIARDS HALLIARD METAL CRANE BAND FITTING EYEBOLTS PEAK HALLIARD TRIPLE BLOCK BELAY TO THROAT STBD BANDS HALLIARD BELAY TO PIN RAIL CLEAT SEIZE ON BULWARK STANCHION EYEBOLT DOUBLE BLOCK BELAY TO PORT FIFE RAIL EYEBOLT ON STARBOARD STERN CENTERLINE... -
Page 22: Fore Upper Topsail Yard Rigging
Braces - The braces are rigged similar to the FIG. H-7 BUNTLINES & LEECHLINES course yard except the standing end of the brace is seized to the mainstay instead of the shrouds as in the case of the course yard. FORE TOP CROSS TREES 6. -
Page 23: Bibliography
Comprehensive reference covers construction methods for solid hull, plank-on-bulkhead, and plank-on-frame kits. The book is profusely illustrated and includes glossary of nautical terms. Note: Many books are available through Model Shipways website, www.modelexpo-online.com. Please check current catalog or website for availability. - Page 24 Model Shipways Kit No. MS2110 Model Shipways Kit No. MS2120 MODEL SHIPWAYS Sold & distributed by Model Expo, a division of Model Shipways, Inc. 3850 N. 29th Terrace, Hollywood, FL 33020 Toll-Free 800-222-3876 Monday - Friday 9-5 ET • Fax 800-742-7171 SAVE TIME &...
Need help?
Do you have a question about the Newsboy and is the answer not in the manual?
Questions and answers