Table of Contents
Advertisement
Quick Links
Advertisement
Table of Contents

Related Manuals for Janam XM60+


Summary of Contents for Janam XM60+
- Page 1 XM60+ User Guide Version 4 March, 2011...
-
Page 2: About The Janam Xm60
(DDR) memory, the XM60+ brings impressive horsepower to the point of activity. Features designed for the front line and a price that drives the bottom line set Janam’s XM Series ahead of its class. Janam’s XM Series mobile computers are sculpted to fit in the hand and are the only products in the category that weigh less than 10 ounces and still have a full 3.5”... -
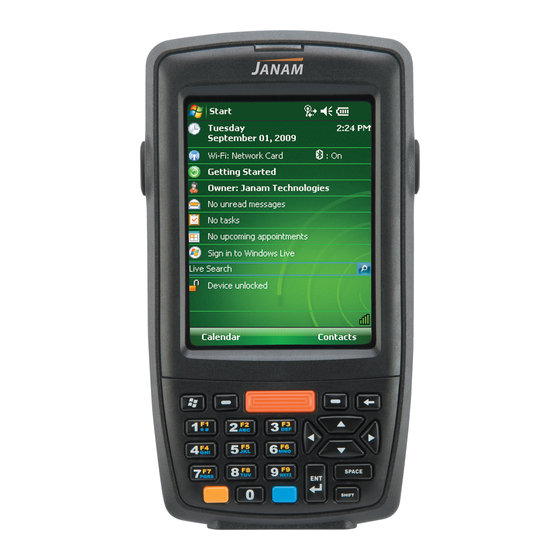
Page 3: Hardware Overview
Right trigger trigger Scan Programmable trigger Backspace Home Navigation Space Programmable Front view PDA keypad Shift Function Indicator Power on/off Enter Alpha/numeric shift Connector Left Right trigger trigger Scan trigger Function Function Navigation Home Enter Connector Brightness/contrast Janam Technologies LLC... -
Page 4: Top View
Power on/off Back view Stylus Tether Connection Port (in) Stylus Tether Connection Port (out) Handstrap Screw Ports Stylus Speaker IrDA window Stylus slot Battery Compartment Microphone microSD Card Slot Battery door Reset Handstrap Bar Battery screw Janam Technologies LLC... -
Page 5: Get Started
Recommended host computer configuration/requirements The Janam XM Series Development Kit helps assist programmers with the development of applications for Janam XM Series rugged barcode scanners running the Microsoft® Windows® CE 5.0 operating system. It contains all necessary details and instructions for developing applications that access Janam XM Series libraries, including scanning, imaging and hardware utilities. -
Page 6: Attach The Handstrap
2. Position the battery lift strap against the back of battery well, ensuring tab extension is on left side. 3. Place a Janam Lithium-ion rechargeable battery in and snap into place. 4. Replace the battery cover by positioning the top prongs first and sliding into place. Tighten battery screw by turning clockwise. - Page 7 To calibrate, simply follow the onscreen instructions and remember to save your settings. Note: If your XM60+ came pre-loaded with a custom software application, a welcome utility may not appear. Follow the onscreen instructions. Janam Technologies LLC...
-
Page 8: Understanding The Home Screen
XM60+ User Guide Understanding the Home Screen Command bar Your XM60+ mobile computer desktop includes a command bar with the following features. Toggle between desktop MS Windows and applications Time Keyboard WLAN Current Signal Janam Technologies LLC ... -
Page 9: Set Up Your Janam Xm60
Do not use a pen, pencil or any other sharp object to write on the screen. Recalibrate the screen The first time you start the Janam XM60+ handheld computer, setup instructions appear onscreen. These instructions include a calibration screen, or digitizer. -
Page 10: Open Applications
Go to MS Windows icon > settings > control panel. Locate the owner icon and tap twice. Tap identification, and enter appropriate information. Tap notes, and enter data. Tap network ID, and enter user name, password and domain. 7. Tap OK to save changes. Janam Technologies LLC... - Page 11 Go to MS Windows icon > settings > control panel. Tap twice on regional settings icon. In the region tab, tap on customize. 4. Using the dropdown menus, make your changes and click OK to save the changes. Number Currency Time Date Janam Technologies LLC...
-
Page 12: Set The Display Properties
XM60+ User Guide Set the display properties You can easily change the background and appearance on your Janam XM60+, including the colors. In addition, you can save battery life by turning off the backlight when not needed. To change the background: Go to MS Windows icon >... -
Page 13: Select Volume And Enable Sounds
ActiveX controls and plug-ins. Privacy: offers a way to accept, block or prompt for first- and third-party cookies. Advanced: gives accessibility, browsing, multimedia, TV features and security options. Popups: lets you block popups, set exceptions and enable advanced event options. Janam Technologies LLC... - Page 14 XM60+ User Guide Connection Security Privacy Advanced Popups After you finish making your selections in each screen, click OK to save settings. Janam Technologies LLC...
-
Page 15: Reset The Xm60
4. After the reset has occurred and the calibration screen appears on the screen, release the arrow-up key. E A T U R E D H O R T C U T (Numeric Keypad) Simultaneously press the yellow key and the power button and hold for five seconds. When the Janam logo appears on the display, release Yellow Key both the blue key and the power button. Perform touch‐screen calibration. Janam Technologies LLC ... - Page 16 XM60+ User Guide – B M P O R T A N T N O T E A T T E R Y O O R XM60+ mobile computers feature a battery door removal detection switch. This is designed to protect against data loss if the battery is removed during data collection or processing. The system will not fully operate when the battery cover is removed. As a result of this feature, XM60+ devices automatically create a safe state until the battery cover is secured, meaning a device will power‐down until the battery door is closed. It will recall and resume from the user’s most recent screen when the battery door is fully in place. Janam Technologies LLC ...
-
Page 17: Barcode Scanning Demonstration And Setup
5. Tap OK to return to the main demo. 6. Select setup > symbology config. 7. Tap enable all to let the scanner decide the best method of decoding the barcode. 8. Tap OK to save. Janam Technologies LLC... -
Page 18: Enable The Scanwedge Feature
4. Tap OK. Note: The ScanWedge function will be disabled if manual scanning is initiated either by a command API or by using the Janam Barcode Test program. Janam Technologies LLC... -
Page 19: Unlock 2D Scanning
XM60+ User Guide Unlock 2D scanning All Janam mobile computers can be upgraded in the field to read 2D barcodes with a simple firmware upgrade (Part Number 2D-XP-1). With each upgrade, a key code is provided that unlocks 2D scanning capability on the device. -
Page 20: Enable Scancapture Feature
1. Click single. 2. Point scan window at barcode. 3. A preview appears on the screen. 4. Click save. 5. Enter image name and select folder. 6. Click OK. 7. Below is the image that is captured. Janam Technologies LLC... - Page 21 1. Go to settings > intel img. 2. Set up appropriate settings. Click address or signature > OK. 3. Select intel button and aim at any support barcode. If you need to capture a 2D barcode, be sure to unlock your 2D feature. Janam Technologies LLC...
- Page 22 XM60+ User Guide 4. Select save. 5. Enter image name and save to appropriate folder. 6. Click OK. 7. The below image is captured. Janam Technologies LLC...
-
Page 23: Enter Data
XM60+ User Guide Enter Data You can enter data into your Janam XM60+ handheld computer by using the stylus or touch screen with the onscreen keyboard or by scanning barcodes. Use the stylus or touch screen with the onscreen keyboard You can open the onscreen keyboard when you need to enter text or numbers. -
Page 24: Import Data
If you have data stored in computer applications such as spreadsheets and databases, or if you want to import data from another device, you can transfer the data to your Janam XM60+ handheld computer without having to key it in manually. See chapter 7 for more details on how to transfer files and applications. -
Page 25: Exchange And Update Data Using Activesync
Create a user profile You can create a user profile to load data into a Janam XM60+ without associating that data with a user name. If you didn’t set up a user profile in chapter 3, follow the instructions below. - Page 26 8. Add the files you want to sync with the files on your mobile device. 9. Click OK > next to continue the setup. 10. Your partnership setup is complete, and you may need to accept the partnership on your Janam XM60+. Janam Technologies LLC...
- Page 27 1. Go to file > delete partnership in the ActiveSync manager. 2. Click yes when confirmation screen appears. 3. You will need to re-establish the partnership when you connect your Janam XM60+ to your PC, or you will need to connect as a guest. To set up a guest partnership: 1.
-
Page 28: Partnership Settings
Partnership settings To change partnership connection settings: 1. Click the ActiveSync icon in your Windows system tray (bottom right corner of taskbar). 2. Choose file > connection settings from the ActiveSync manager menu. 3. Make changes > OK. Janam Technologies LLC... -
Page 29: Wireless Local Area Network Access
XM60+ User Guide 802.11 Wireless Configuration The following section details the basic 802.11 wireless configuration for your Janam XM60+. Wireless local area network access To set up network profile: 1. Tap Start > Settings > Control Panel. 2. Double click the WiFi icon. - Page 30 6. Select the desired network and click Configure button to set the network profile. 7. Click Yes button to complete the new profile configuration. 8. On the Main tab change active profile to the new profile created in the last step. Janam Technologies LLC...
- Page 31 XM60+ User Guide 9. Click tab Status tab to check the connection status. Janam Technologies LLC...
-
Page 32: Start Bluetooth Manager
There are several ways to set up your computer for wireless access, and the following section details the general instructions needed to set up Bluetooth on your Janam XM60+. Please note that complex or custom installations may require additional expertise from Janam’s technical and support team. - Page 33 To use Scan Device Wizard: 1. Tap the scan device icon to start the wizard. 2. Tap next. 3. Wait until searching is finished. 4. Choose the device you want to add > next. 5. Tap finish. Janam Technologies LLC...
- Page 34 To use Bond Wizard: 1. Tap the Bond Wizard icon. 2. Press next. 3. Press yes to authenticate. 4. Insert a PIN for pairing and enter the same number on the pairing device. 5. Tap finish to exit. Janam Technologies LLC...
- Page 35 3. When you see your target device, select it. 4. Choose the file you want to send. 5. Your target device will ask you to accept the file. Transfer will start after you accept it. 6. Wait until transfer is finished. Janam Technologies LLC...
-
Page 36: File Browser
1. Go to MS Windows icon > settings > control panel. 2. Select Bluetooth devices > COM ports. 3. Add a COM port if needed. 4. At the ActiveSync option, allow connections to the BT COM port (e.g., COM10). Janam Technologies LLC... - Page 37 XM60+ User Guide 5. Choose Bluetooth ActiveSync on your Janam device. 6. Pick the device that can accept Bluetooth ActiveSync. • You will see the serial port provided by the PC (make sure that your PC is not currently synching with another device.
- Page 38 3. The two tabs – general and services – will show what service the other device supports. Settings To change the Bluetooth settings: 1. Go to device > my Bluetooth device in the Bluetooth device manager. 2. Change the name and other settings. Janam Technologies LLC...
- Page 39 XM60+ User Guide To check Bluetooth chip setting: 1. Go to tools > about. 2. The next screen will show the chip setting. Janam Technologies LLC...
-
Page 40: Beam Information
XM60+ User Guide Beam Information Turn beaming on/off To turn beaming on or off: Go to MS Windows icon > settings > control panel. Double tap Irda icon. 3. Click on or off > OK. Janam Technologies LLC 10-1... - Page 41 4. From the top menu, select file > send to > beam files. 5. Aim the sending device IRDA window at the receiving XM60+ IRDA window, about 6 inches apart. • You will have to acknowledge and accept the receipt of the file on the receiving device. 10-2 Janam Technologies LLC ...
-
Page 42: Regulatory And Maintenance
Janam Technologies LLC assumes no responsibility for any damage or loss resulting from the use of this guide. Janam Technologies LLC assumes no responsibility for any loss or claims by third parties which may arise through the use of this product. -
Page 43: Xm Series Batch Terminal
The user may find the following booklet helpful: “Something about Interference.” This is available at local FCC regional offices. Our company is not responsible for any radio or television interference caused by unauthorized modifications of this equipment or the substitution or attachment of 11-2 Janam Technologies LLC ... -
Page 44: Rf, Regulatory And Safety Approvals
EN 60950-1:2001+A11 EN 50371:2002 AS/NZS CISPR 22:2004 Hereby, Janam Technologies LLC declares that this product is in compliance with the essential requirements and other relevant provisions of Directive 100/5/EC. The equipment is intended for use throughout the European Community. Care and cleaning of terminals When needed, clean the image engine window and the LCD display with a clean, non-abrasive, lint-free cloth. -
Page 45: Battery Warning
RISK OF EXPLOSION IF BATTERY IS REPLACED BY AN INCORRECT TYPE. DISPOSE OF USED BATTERIES ACCORDING TO THE INSTRUCTIONS. Use only Janam-approved batteries such as the BA-XP-1 and recharge batteries using only Janam- approved chargers. Use only easily accessible wall outlets that are reached with the length of the supplied power cables.
Need help?
Do you have a question about the XM60+ and is the answer not in the manual?
Questions and answers