Table of Contents
Advertisement
Quick Links
Advertisement
Table of Contents

Related Manuals for Janam XG100CE Series


Summary of Contents for Janam XG100CE Series
- Page 1 XG100CE User Guide Version 7 April, 2012...
-
Page 2: Table Of Contents
Attach the tether to the stylus and hand strap Install/Charge the battery Turn on the XG100CE Understanding the desktop Update your ROM Chapter 3: Set Up Your Janam XG100CE Locate front panel controls Locate back panel components Recalibrate the screen Use regional and language features... - Page 3 XG100CE User Manual Chapter 9: Bluetooth Manager Start Bluetooth Manager Scan device Device pairing File transfer Object push Exit Bluetooth application Serial Bluetooth Dial-up networking Bluetooth toolbar Chapter 10: Regulatory and Maintenance Regulatory and safety approvals 10-1 FCC and Canadian compliance 10-1 XG Series RF terminals with 802.11b/g and Bluetooth...
-
Page 4: Chapter 1: Introduction
6’ drops to concrete on all sides across wide temperature range and survives 2,000 tumbles in a rotating test chamber. Further enhancing its value, the XG100CE features integrated 1D barcode scanning as well as built-in 2D barcode scanning capability. Janam’s 2D scanning solution enables users to upgrade barcode scanning capability from 1D to 1D/2D on any device at any time with a simple firmware upgrade. -
Page 5: Hardware Overview
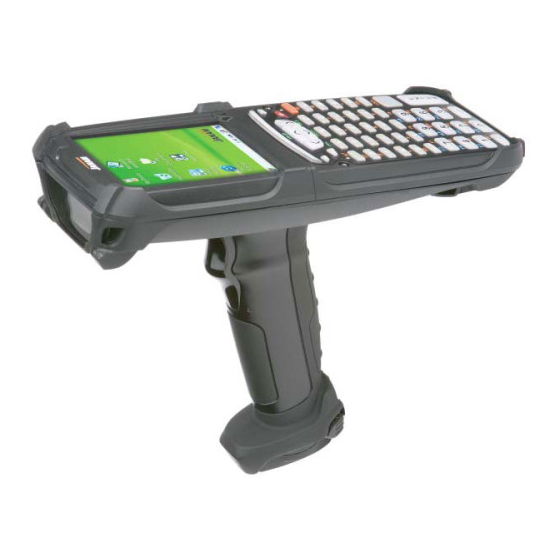
XG100CE User Manual Hardware Overview Top View Microphone 2 Programmable keys LED Indicators Escape key Power On/Off Function key Control key Navigation keys Syncing/Charging Connector Front View Rear View Syncing/Charging Connector Barcode Scan Window Rear LED Indicators Scan Trigger Gun Handle... - Page 6 XG100CE User Manual Bottom View Battery Speaker (on bottom housing) Battery Lock Battery Chamber MicroSD Card Slot Compartment Rear LED Indicators Upper Handstrap Connectors Janam Technologies LLC...
- Page 7 XG100CE User Manual Side View Scan Window Upper Handstrap Scan Connectors (left and Trigger right side) Handle/ Lower Handstrap Battery Connector Chamber Base of Battery & Battery Release Plunger Rear-Bottom Sectional View MicroSD Memory MicroSD Memory Card Door Screws Syncing/Charging...
-
Page 8: Chapter 2: Get Started
Janam XG Series libraries, including scanning, imaging and hardware utilities. The development kit, which can be downloaded from Janam’s Partnerzone site (login required) is designed for use with Microsoft® embedded Visual C++ 4.0 (SP4 or above) or Microsoft Visual Studio 2005. - Page 9 XG100CE User Manual Attach the Handstrap to the XG100CE 1. Push the long-looped end of the handstrap through the left- or right-side upper handstrap connector (at the back of the handheld). 2. Push the metal hook (the other side of handstrap) through the loop that comes through the upper handstrap connecter in step 1.
- Page 10 XG100CE User Manual Attach the Stylus Tether to the Handstrap 1. Push the loop of the loose end of the stylus tether through one of the slits in the handstrap adjustment slider. 2. Push the stylus (now attached to the stylus tether) through the stylus tether’s loop that comes through the slit on the adjustment slider.
- Page 11 XG100CE User Manual Install the Battery IMPORTANT Battery Warning! CAUTION: Use only Janam-approved batteries. There is the risk of explosion if battery is replaced by an incorrect type. Always dispose of used batteries according to the instructions. INSTALLING THE BATTERY: Insert the top of battery into chamber opening and gently slide battery into battery chamber.
-
Page 12: Turn On The Xg100Ce
Connect snap-on end of USB or serial synching/charging cable to syncing/charging connector at the bottom of device, making sure the JANAM logo on the connector faces up. Insert appropriate AC adapter and plug in the power supply. Use only easily accessible wall outlets that are easily reached with the length of supplied power cable. -
Page 13: Understanding The Desktop
XG100CE User Manual Understanding the Desktop Command bar Your XG100CE mobile computer desktop includes a command bar with the following features. Toggle between desktop MS Windows icon and applications Current application Keypad/input panel Wireless LAN status Bluetooth icon Time/date Janam Technologies LLC... -
Page 14: Chapter 3: Set Up Your Janam Xg100Ce
Important: Always use the stylus for tapping or making strokes on the handheld computer screen. DO NOT use a pen, pencil or any other object on the touch screen of the XG100CE. Recalibrate the Screen The first time you start the Janam XG100CE handheld computer, setup instructions will appear on screen. -
Page 15: Use Regional And Language Features
XG100CE User Manual Use the Regional and Language Features The Janam XG100CE comes with a number of regional, language and input settings. These settings can be changed. Note: If you change to a language other than English, you will have to perform a hard reset which will erase all data on your handheld computer. -
Page 16: Open Applications
Click OK. To change backlight preferences: Tap Start > Settings > Control Panel. Tap XG100CE Panel icon. Select Backlight Tab. Adjust Brightness by moving slider with the stylus or using the LEFT or RIGHT arrow keys. To disable the backlight, uncheck the “Enable Backlight” box. -
Page 17: Set Volume And Enable Sounds
To change keylight preferences: Tap Start > Settings > Control Panel. Tap XG100CE Panel icon. Select Backlight Tab. To disable the keylight, uncheck the “Enable Keylight” box. Janam Technologies LLC... - Page 18 XG100CE User Manual To assign applications to the Programmable Keys Tap Start > Settings > Control Panel. Tap XG100CE Panel icon. Select Button tab. Tap the Key 1 or Key 2 field box you wish to assign an application. Tap Browse and locate the appropriate executable file.
-
Page 19: Set Internet Options
Tap Start > Settings > Control Panel. Double-tap Internet Options icon. There are six tabs for Internet options to enable you to customize the XG100CE to meet network requirements. a. General – to select your start page, search page and user agent. You can also clear cache and delete history from this tab. -
Page 20: Chapter 4: Reset The Xg100Ce
1. Press and hold the CTRL key, BKSP key and the trigger. 2. Wait for 5 seconds, then release all three. 3. Press the Power key. 4. When Janam logo appears, press and hold CTRL and the ORANGE key until calibration screen appears. 5. Calibrate unit. -
Page 21: Chapter 5: Barcode Scanning
XG100CE User Manual Barcode Scanning Barcode Scanning Demonstration and Setup To run the demo: 1. Tap the Start > Programs > Scan > ScanDemo. Three menus will appear (Setup, OCR, Options) on the top of the screen. 2. To review all the scanning functions to check that everything is working properly In the Setup menu, select Hardware Test. -
Page 22: Enable The Scanwedge Feature
Test program. Unlock 2D Scanning All of Janam’s mobile computers can be upgraded in the field to read both 1D and 2D barcodes with a simple firmware upgrade (Part Number 2D-XP-1). With each upgrade, a key code is provided that unlocks 2D scanning capability on the device. - Page 23 After receiving your six-digit key code, follow these steps to enable 2D scanning. 1. Go to the Start > Settings > Control Panel. 2. Tap XG100CE Panel icon. 3. Select Scanner tab. 4. Enter your six-digit key code > Unlock.
-
Page 24: Enable Scancapture Feature
Intel for intelligent signature capture. To take a single image: 1. Select Single. 2. Aim the XG100CE at the subject, hold the device steady and press the Single button. The unit will function as a digital camera and take a single picture. - Page 25 To use continuous preview: 1. Select Cont or continue button. 2. Aim the XG100CE at the subject, hold the device steady and press the Cont button. This will start video record. 3. Press the Cont button again to stop video recording and display a single image.
- Page 26 XG100CE User Manual 3. Select Intel button and aim at any support barcode. 4. Press the Intel button to capture the image. Note: If you need to capture a 2D barcode, be sure to unlock your 2D feature. 5. Select Save button.
-
Page 27: Chapter 6: Enter Data
XG100CE User Manual Enter Data You can enter data into your Janam XG100CE handheld computer by using the keypad, touch screen (with the onscreen keyboard) or by scanning barcodes. Use the Touch Screen with the Onscreen Keyboard Important Always use the stylus for tapping or making strokes on the handheld computer screen. -
Page 28: Import Data
If you have data stored in computer applications such as spreadsheets and databases, or if you want to import data from another device, you can transfer the data to your Janam XG100CE handheld computer without having to key it in manually. See chapter 6 for details on how to transfer files and applications. -
Page 29: Chapter 7: Exchange And Update Data Using Activesync
Create a User Profile You can create a user profile to load data into a Janam XG100CE without associating that data with a user name. If you didn’t set up a user profile in chapter 4, follow the instructions below. - Page 30 8. Add the Files you want to sync with the files on your mobile device. 9. Click OK > Next to continue the setup. 10. The partnership setup is complete. You may need to accept the partnership on your Janam XG100CE. Janam Technologies LLC...
- Page 31 1. Go to File > Delete Partnership in the ActiveSync manager. 2. Click Yes when confirmation screen appears. 3. You will need to re-establish the partnership when you connect your Janam XG100CE to your PC, or you will need to connect as a guest. To set up a guest partnership: 1.
-
Page 32: Partnership Settings
XG100CE User Manual Partnership Settings To change partnership connection settings: 1. Click the ActiveSync icon in your Windows system tray (bottom right corner of taskbar). 2. Choose File > Connection Settings from the ActiveSync manager menu. 3. Make changes and tap OK. -
Page 33: Wireless Local Area Network Access
XG100CE User Manual 802.11 Wireless Configuration The following section details the basic 802.11 wireless configuration for your Janam XG100CE. Wireless Local Area Network Access To set up network profile: 1. Click Start > Programs > Summit > scu. Or Control Panel > Wi-Fi. - Page 34 XG100CE User Manual 4. Click the Profile tab and double-tap the Scan button to search for nearby access points. 5. Select the desired network and click Configure to set the network profile. Eg: SOFTWARE. 6. Click Yes to complete the new profile configuration.
- Page 35 XG100CE User Manual 7. On the Main tab, change the Active Profile to the new profile created in the last step. Eg: SOFTWARE 8. Click the Status tab to check the connection status. Note: For more detailed information regarding the Summit Client Utility, please refer to the Summit User’s Guide for Software Version 2.01.
-
Page 36: Chapter 9: Bluetooth Manager
XG100CE User Manual Bluetooth Manager The following chapter provides general instructions to set up Bluetooth on your Janam XG100CE. Complex or custom installations may require additional expertise from Janam’s technical support team. Start Bluetooth Manager Double-tap Bluetooth Manager Icon on the desktop. -
Page 37: File Transfer
XG100CE User Manual File Transfer To transfer files: 1. Pair the device. See Device Pairing (page 10-1). 2. Double-tap the paired device 3. Double-tap File Transfer. This will show files from the paired device which are located on your workstation’s Bluetooth exchange folder. -
Page 38: Object Push
1. Pair the device. See Device Pairing (page 10-1). 2. Double-tap the paired device and double-tap Object Push. 3. This will show My Device and files that can be transferred from the XG100CE to the paired device. 4. Select any file to be transferred. -
Page 39: Serial Bluetooth
XG100CE User Manual Serial Bluetooth Note: Please refer to the specific instructions provided with the device you wish to communicate with for proper setup via serial Bluetooth profiles. To connect Bluetooth by means of serial. 1. Double tap the Bluetooth on the desktop. -
Page 40: Dial-Up Networking
XG100CE User Manual Dial Up Networking To use DUN (usually used to tether to a cellular handset): • Not all handsets support tethering. Consult your service carrier • To determine if your handset is supported under DUN. 1. Pair the device. See Device Pairing (page 10-1). - Page 41 XG100CE User Manual 7. Use Dial-Up Connection and assign a name for your connection. Tap “next” 8. From the drop down select your paired Bluetooth device. 9. Enter phone dialing information 10. Tap and hold your connection and slide your stylus to “Connect”...
-
Page 42: Bluetooth Toolbar
XG100CE User Manual Bluetooth Toolbar STOP the current action REFRESH Parent Folder (FTP) Show favorite list Show distant devices Show local devices Configure the application Show the about box Janam Technologies LLC... -
Page 43: Chapter 10: Regulatory And Maintenance
For further information, please contact: Janam Technologies; 100 Crossways Park West, Suite 105, Woodbury, NY 11797. Janam Technologies shall not be liable for use of our product with equipment (i.e., power supplies, personal computers, etc.) that is not CE marked and does not comply with the Low Voltage Directive. -
Page 44: Rf, Regulatory And Safety Approvals
The user may find the following booklet helpful: “Something about Interference.” This is available at local FCC regional offices. Janam is not responsible for any radio or television interference caused by unauthorized modifications of this equipment or the substitution or attachment of connective cables and equipment other than those specified by our company. -
Page 45: Other Electrically Powered Devices
The radio in the XG Series terminal operates on the same frequency band as a microwave oven. Therefore, if you use a microwave within range of the XG100CE you may notice performance degradation in your wireless network. However, both your microwave and your wireless network will continue to function. -
Page 46: Battery Warning
DISPOSE OF USED BATTERIES ACCORDING TO THE INSTRUCTIONS Use only Janam approved batteries such as the BAT-G1-001 and recharge batteries using only Janam approved chargers. Use only easily accessible wall outlets that are easily reached with the length of the supplied power cables.
Need help?
Do you have a question about the XG100CE Series and is the answer not in the manual?
Questions and answers