Table of Contents
Advertisement
Advertisement
Table of Contents

Related Manuals for Planet PL-510W


Summary of Contents for Planet PL-510W
- Page 1 User’s Manual of PL-510W 200M Powerline Wireless N Extender ►PL-510W...
- Page 2 PLANET Technology. Disclaimer PLANET Technology does not warrant that the hardware will work properly in all environments and applications, and makes no warranty and representation, either implied or expressed, with respect to the quality, performance, merchantability, or fitness for a particular purpose.
- Page 3 WEEE separately. Trademarks The PLANET logo is a trademark of PLANET Technology. This documentation may refer to numerous hardware and software products by their trade names. In most, if not all cases, these designations are claimed as trademarks or registered trademarks by their respective companies.
-
Page 4: Table Of Contents
User’s Manual of PL-510W Contents CHAPTER 1: PRODUCT INTRODUCTION....................5 ..........................5 ACKAGE ONTENTS ..........................5 RODUCT ESCRIPTION ..........................8 RODUCT EATURES .......................... 9 RODUCT PECIFICATION .......................... 11 HYSICAL ESCRIPTION ............................ -
Page 5: Chapter 1: Product Introduction
No more tripping over tangled, messy wires running through your house, the PL-510W is an ideal solution to create a wall-to-wall home network and extend the connection wirelessly. - Page 6 Secures the network connection with the touch of a button, no need to remember passwords Simply by pushing the button on the PL-510W, users can easily set up a hassle-free secure Powerline network within minutes. It provides 128-bit AES encryption for...
- Page 7 Step 3: Wireless connection is done Efficient Bandwidth Management by QoS (Quality of Service) Quality of Service (QoS) is provided by the PL-510W enabling a network to provide better service to selected network traffic over various technologies. The PL-510W provides 5 priorities of QoS for quick setup such as internet, online game, IPTV,...
-
Page 8: Product Features
User’s Manual of PL-510W 1.3 Product Features IEEE Compliant HomePlug AV & LAN Designed for high-definition multimedia streaming Data rate up to 200Mbps and distance up to 300 Meters over existing electrical wiring IEEE 802.3, IEEE 802.3u, IEEE 802.11n, IEEE 1901 and HomePlug AV... -
Page 9: Product Specification
User’s Manual of PL-510W 1.4 Product Specification Model PL-510W Hardware Specification One RJ-45 port (10/100Base-T Ethernet) Network Interface One 200Mbps power line port supporting co-existence with HomePlug 1.0 Gain: 2 x Internal 2.5dBi Antenna Antenna Orientation: Horizontal and Vertical Cabling Cat. - Page 10 User’s Manual of PL-510W Security 128-bit AES link encryption with key management Data PHY Rate 200Mbps over Powerline and 10/100Mbps over Ethernet OFDM symbol modulation on line synchronization Modulation Schemes 1024/256/64/16/8 - QAM, QPSK, BPSK, ROBO carrier modulation Frequency Band 2 ~ 30 MHz Mix of TDMA and CSMA/CA channel access scheme;...
-
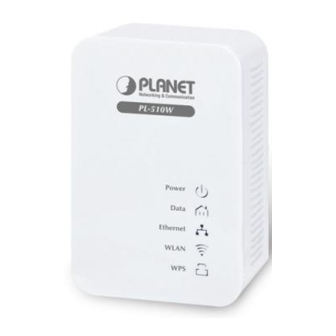
Page 11: Physical Description
The PLC connection is in the non-communication state. Data Quick Data is being transmitted. blink Slow A terminal is attempting to connect to the PL-510W. blink The Ethernet port is in the communication state. Ethernet The Ethernet port is in the non-communication state. Blink The Ethernet port is transmitting and receiving data. -
Page 12: Wire Diagram
Internet access sharing at home. As illustrated, users may connect an 802.11n Wireless IP STB to the Powerline Wireless N Extender PL-510W, or connect a PC to the PL-510W in the house freely. With the PLANET powerline products applied, no messy network cables and additional switches are required at home and users can entirely enjoy home broadband network from now on. -
Page 13: Chapter2: Hardware Installation
Step2 Plug the PL-510W to a wall outlet within the same power circuitry as another PL- 510W and connect your PC to it via a wireless or wired connection (The latter requires an Ethernet cable). -
Page 14: Internet Connection Setup
Step4 Simply set all PCs connected to the PL-510W to "Obtain an IP address automatically", and they may be able to access Internet then. 2.2 Internet Connection Setup 2.2.1 Config TCP/IP settings on your PC... - Page 15 User’s Manual of PL-510W 2. Right-click on the Local Area Connection and select Properties. 3. Select Internet Protocol (TCP/IP) and click Properties. 4. Select "Use the following IP address". IP address: Enter 192.168.0.xxx where xxx can be any number between 2 and 253).
- Page 16 User’s Manual of PL-510W you may enter one from your ISP. Click OK twice to save your settings. If you are using Windows 7, do as follows: 1. Click on Start > Control Panel > Network and Internet > Network and Sharing...
- Page 17 User’s Manual of PL-510W 2. Click "Change adapter settings". 3. Right-click on the Local Area Connection and select Properties. 4. Select Internet Protocol Version 4 (TCP/IPv4) and click Properties or directly double-click on Internet Protocol Version 4 (TCP/IPv4).
- Page 18 User’s Manual of PL-510W 5. Select "Use the following IP address".
-
Page 19: Login To Web Utility
User’s Manual of PL-510W IP address: Enter 192.168.0.xxx where xxx can be any number between 2 and 253). Subnet mask: Enter 255.255.255.0. Default gateway: Enter 192.168.0.1. Preferred DNS server: Set Preferred (Primary) DNS the same as the LAN IP address of your Device (192.168.0.1) if you don’t know your local DNS server’s address (Or consult your ISP). - Page 20 User’s Manual of PL-510W 2.2.1 Quick Encryption On the home page, you can quickly encrypt your wireless network. The default security settings preset on this page are as follows: Security Mode: WPA2-PSK Cipher Type: Security Key: 12345678 The security key is configurable. You can change it to something catchy or meaningful.
-
Page 21: Chapter3: Status
User’s Manual of PL-510W Chapter 3: Status 3.1 LAN Status IP Address Displays Device’s LAN IP, namely the management IP. Subnet Mask Displays Device's LAN subnet mask. LAN MAC Address Displays Device's LAN MAC address. 3.2 PLC Status Network Name Displays Device's network name. -
Page 22: Wireless Status
User’s Manual of PL-510W 3.3 Wireless Status Wireless Status Displays whether wireless is enabled on the Device. 802.11 Mode Displays current network mode. SSID Displays Device's wireless network name. Current Channel Displays the channel on which Device is currently operating. -
Page 23: Chapter4: Lan Settings
User’s Manual of PL-510W Chapter 4: LAN Settings This section allows you to configure Device’s LAN settings. Device’s LAN IP, namely the management IP. The default is IP Address 192.168.0.1. You can change it according to your need. Device’s LAN subnet mask. The default is 255.255.255.0. You can Subnet Mask change it according to your need. -
Page 24: Chapter5: Wireless Settings
User’s Manual of PL-510W Chapter 5: Wireless Settings 5.1 Wireless Basic Settings Check/uncheck to enable/disable the wireless feature. If disabled, all Wireless wireless-dependent features will be disabled accordingly. Region Select your location (country or region). Select a right mode according to your wireless client. The default mode is 11b/g/n mixed. -
Page 25: Wireless Security
User’s Manual of PL-510W 11b/g/n mixed mode: Select it if you have Wireless-B, Wireless-G and Wireless-N clients concurrently present in your wireless network. A SSID (Service Set Identifier) is the unique name of a wireless SSID network. This field is configurable. - Page 26 User’s Manual of PL-510W Selecting Open WEP, Shared WEP or WPA-PSK will automatically disable the WPS encryption while selecting None, WPA2-PSK or Mixed WPA/WPA2-PSK will automatically enable the WPS encryption. NOTE WEP is intended to provide data confidentiality comparable to that of a traditional wired network.
-
Page 27: Wireless Access Control
User’s Manual of PL-510W (temporary key integrity protocol) or TKIP &AES. Security Key: Enter a security key, which must be between 8-63 ASCII characters long or 64 HEX characters long. Key Renewal Interval: Specify a valid time interval for the key to be updated. -
Page 28: Wps Settings
User’s Manual of PL-510W 5.4 WPS Settings Wi-Fi Protected Setup makes it easy for home users who know little of wireless security to establish a home network, as well as to add new devices to an existing network without entering long passphrases or configuring complicated settings. -
Page 29: Connection Status
User’s Manual of PL-510W light, which indicates the wireless client has connected to the Device successfully. Repeat steps mentioned above if you want to connect more wireless clients to the Device. To use this option, you must know the wireless client's PIN code and enter it in the corresponding field on your device while using the same PIN code on client side for connection. -
Page 30: Chapter6: Plc Settings
Displays the MAC address of Device's PLC interface (equivalent to the MAC Address identifier on PLC network). This value is unchangeable! Displays Device's password. Each PLANET Powerline device has a factory preset, unique password for authentication on remote Device Password management. -
Page 31: Plc Member Settings
User’s Manual of PL-510W 6.2 PLC Member Settings This section allows you to view information of other PLC devices on the same Powerline network. You can also perform authentication on these devices by entering their MAC addresses and Device Passwords as well as view the authentication results. - Page 32 Powerline devices, open or refresh the web page. NOTE 4. The PLC authentication feature works only on PLANET Powerline devices. Authentication on Powerline devices of other brands will fail whether a correct MAC address and a correct Device Password are provided or not.
-
Page 33: Plc Qos Settings
User’s Manual of PL-510W 6.3 PLC QoS Settings QoS prioritizes bandwidth-intensive and latency-sensitive applications and services such as Internet/IPTV/audio/video/VOIP/online game services, ensuring high reliability and least latency in transmission of these real-time data. The Device provides 4 priority levels: Highest, High, Medium and Low. It is advisable to assign the highest priority to essential data traffic. -
Page 34: Advanced Priority Mapping
User’s Manual of PL-510W Select it to prioritize VoIP data. The device supports SIP-compliant and H.323-compliant data prioritization. However, some VoIP devices from other manufacturers may use different protocols other than the VoIP above 2. So if the device does not prioritize VoIP data from your VoIP... - Page 35 User’s Manual of PL-510W 1. The Simple Priority Mapping feature and Advanced Priority Mapping feature can be only used alone instead of concurrently. 2. The QoS feature does not increase your existing bandwidth. It only prioritizes specified data over your existing bandwidth.
-
Page 36: Chapter7: Plc Tools
User’s Manual of PL-510W Chapter 7: PLC Tools 7.1 Firmware Update Firmware upgrade is released periodically to improve the functionality of your Device and also to add new features. 1. Click "Browse" to locate and select the firmware. 2. Click "Update" to upgrade your firmware. Do not disconnect Device from the management PC (the PC you use to configure the Device) or power supply while upgrade is in process;... - Page 37 User’s Manual of PL-510W To backup settings 1. Once you have configured the device the way you want it, you can save these settings to a configuration file on your local hard drive that can later be imported to your device in case that the device is restored to factory default settings.
- Page 38 User’s Manual of PL-510W To restore settings 1. Click the "Browse" button to open "Choose file" window. 2. Select a configuration file that is saved previously to your local hard drive and click "Open".
- Page 39 User’s Manual of PL-510W 3. Click the "Restore" button to reset your device to previous settings.
-
Page 40: Restore To Factory Default Settings
User’s Manual of PL-510W 7.3 Restore to Factory Default Settings Click the "Restore to Factory Default" button to reset Device to factory default settings. 1. Device will restart automatically after reset. 2. You can also reset Device by pressing the WPS/RST button on its back panel for 6-10 seconds. -
Page 41: Syslog
User’s Manual of PL-510W 1. For security purpose, it is highly recommended that you change Device's default login password. 2. If you unfortunately forget the new password/user name, press the hardware NOTE WPS/RST button for 6-10 seconds to reset Device. -
Page 42: Reboot
User’s Manual of PL-510W 7.6 Reboot Reboot Click to restart Device 1. All connections will be disconnected during reboot. 2. The reboot process lasts tens of seconds. When it completes system will be redirected to home page automatically. NOTE... -
Page 43: Appendix
Q5: I have installed two PL-510W devices under a single electric meter. How am I supposed to manage them? By default, the two PL-510W devices cannot be managed concurrently as both shares the same IP address of "192.168.0.1". However, below steps may help:... - Page 44 User’s Manual of PL-510W a) Disconnect either PL-510W from the power supply first; b). Access the connected PL-510W's web utility to change its IP address to a different one such as "192.168.0.2"; c). Connect the disconnected PL-510W back to the power supply. Now, you can manage both PL-510W devices concurrently.
- Page 45 ΟΥΣΙΩΔΕΙΣ ΑΠΑΙΤΗΣΕΙΣ ΚΑΙ ΤΙΣ ΛΟΙΠΕΣ Directiva 1999/5/CE. ΣΧΕΤΙΚΕΣ ΔΙΑΤΑΞΕΙΣ ΤΗΣ ΟΔΗΓΙΑΣ 1999/5/ΕΚ Español Por medio de la presente, PLANET Technology Slovensky Výrobca PLANET Technology Corporation, týmto Corporation, declara que 200M Powerline Wireless N deklaruje, že táto 200M Powerline Wireless N Extender Extender cumple con los requisitos esenciales y je v súlade so základnými požiadavkami a ďalšími...
Need help?
Do you have a question about the PL-510W and is the answer not in the manual?
Questions and answers