Advertisement
Table of Contents
- 1 Table of Contents
- 2 Introduction
- 3 Safety Precautions
- 4 Dehumidifier Description
- 5 Electric Circuit Diagrams
- 6 Electric Circuit Diagrams
- 7 Installation Instructions
- 8 Startup and Operation
- 9 Error Messages
- 10 Denumidifier Maintenance
- 11 Technical Specifications
- 12 Warranty Obligations
- Download this manual
See also:
Instruction Manual
Advertisement
Table of Contents

Related Manuals for DanVex DEH-600wp


Summary of Contents for DanVex DEH-600wp
- Page 1 EH 600wp, DEH-1000wp, DEH-1700wp, DEH-2000wp, DEH-2500wp, DEH-4000wp. Dehumidifiers Operation manual...
- Page 2 Please read this manual carefully before using your dehumidifier and keep it well. If you have any question of using your dehumidifier please contact your local dealer. www.danvex.fi...
-
Page 3: Table Of Contents
CONTENT Introduction..........................3 Safety precautions........................4 Dehumidifier description......................6 Electric circuit diagrams......................10 Installation instructions......................13 Start-up and operation......................15 Error messages........................16 Denumidifier maintenance.......................18 Technical specifications......................19 Warranty obligations........................20 www.danvex.fi... -
Page 4: Introduction
INTRODUCTION MODELS: DEH-600wp DEH-1000wp DEH-1700wp DEH-2000wp DEH-2500wp DEH-4000wp All the dehumidifiers described in this manual are designed to adjust the indoor relative humidity from 40% RH to 99 % RH at the ambient temperature from +1O°C up to +32°C. www.danvex.fi... -
Page 5: Safety Precautions
Contact your local dealer. Prevent the contact of the grounding wire with a gas pipe, water pipe, lightning rod or telephone cable. If the grounding is made incorrectly, it may cause the electric shock. www.danvex.fi... - Page 6 Don't try to install the unit by yourself. Do not operate switches with wet hands. If this is done incorrectly, it may cause the fire, electric shock, water leakage, etc. Contact your local dealer. It may cause the electric shock. www.danvex.fi...
-
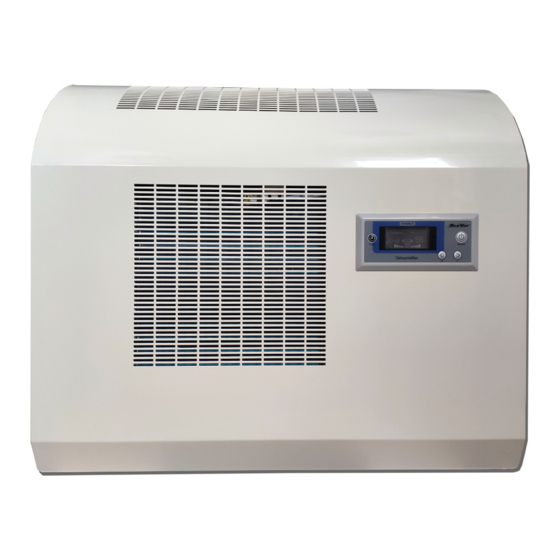
Page 7: Dehumidifier Description
DEHUMIDIFIER DESCRIPTION Dehumidifiers: DEH-600wp and DEH-1000wp Control panel Air outlet Power cord LEFT SIDE FRONT SIDE RIGHT SIDE Air inlet Drain hose Base www.danvex.fi... - Page 8 DEHUMIDIFIER DESCRIPTION Dehumidifiers: DEH-1700wp и DEH-2000wp Control panel Air outlet Power cord LEFT SIDE FRONT SIDE RIGHT SIDE Air inlet Drain hose Base www.danvex.fi...
- Page 9 DEHUMIDIFIER DESCRIPTION Dehumidifiers: DEH-2500wp и DEH-4000wp Control panel Air outlet Power cord LEFT SIDE FRONT SIDE RIGHT SIDE Air inlet Drain hose Base www.danvex.fi...
- Page 10 3. Mounting screw, 4 pcs. per humidifier set (used for unit wall mounting). 4. Floor foot, 4 pcs. per humidifier set (used for unit floor mounting). 5. Wheel, 4 pc. per humidifier set (used for unit mobile mounting). 6. Drain hose, 1 pc. per humidifier set. www.danvex.fi...
-
Page 11: Electric Circuit Diagrams
ELECTRIC CIRCUIT DIAGRAMS DEH-600wp, DEH-1000wp Single phase (1PH/5o Hz) Humidity sensor To display PCB Internal temperature sensor External temperature sensor Main controller PCB Power supply motor Compressor www.danvex.fi... -
Page 12: Electric Circuit Diagrams
ELECTRIC CIRCUIT DIAGRAMS DEH-1700wp, DEH-2000wp Single phase (1PH/50 Hz) To display PCB Humidity sensor Internal temperature sensor External temperature sensor Main controller PCB Power supply Pressure control valve motor Compressor www.danvex.fi... - Page 13 ELECTRIC CIRCUIT DIAGRAMS DEH-2500wp, DEH-4000wp Three phases (3PH/50 Hz) To display PCB Internal temperature sensor External temperature sensor PCB protection phases Main controller PCB sequence Pressure control valve motor Red Black White Gray Green Compressor www.danvex.fi...
-
Page 14: Installation Instructions
Step 5: Connect the drain hose to the dehumidifier. Switch the dehumidifier on for the trial operation. Check whether there is any abnormal vibration and noise. Step 6: Installation is finished and the dehumidifier is ready for the use. www.danvex.fi... - Page 15 Step 5: Connect the drain hose to the dehumidifier. Switch the dehumidifier on for the trial operation. Check whether there is any abnormal vibration and noise. Step 6: Installation is finished and the dehumidifier is ready for the use. www.danvex.fi...
-
Page 16: Startup And Operation
UP button 4. Button is used to turn the electric DOWN button heater (option) on and off. REMOTE CONTROL UNIT ATTENTION! Please study the control functions carefully or make the necessary adjustments prior to the dehumidifier operation. www.danvex.fi... -
Page 17: Error Messages
E3: Ambient temperature is over the working temperature. If the ambient temperature is over 32°C or below 10°C, it will display error message E3 too. Please contact your dealer. The defrosting temperature sensor is not working correctly. Please contact your dealer. www.danvex.fi... - Page 18 Clean the evaporator and condenser. Please contact your dealer. Indicates the low pressure level. Please contact your dealer. E7: Indicates the high pressure level. Please contact your dealer. E8: The refrigerant level is insufficient. Please contact your dealer. www.danvex.fi...
-
Page 19: Denumidifier Maintenance
Switch the dehumidifier off or disconnect the plug from the socket if you are not going to use it fro a long time. Dirt can be accumulated and cause the fire. Remove the batteries from the remote control unit. www.danvex.fi... -
Page 20: Technical Specifications
3. Test data: ambient temperature is 30 C, and the ambient humidity is 80%RH. SPECIAL INSTRUCTIONS: 1. Customer should contact the special service department for the qualified installation and repair. 2. If any flexible cable is damaged, contact the special service department to replace it with the original cable. www.danvex.fi... -
Page 21: Warranty Obligations
The warranty does not cover wearable parts such as filters. The warranty covers the defects in workmanship and materials. During the warranty period DanVex repairs and replaces the part having a defect of material or an manufacturing error. DanVex completely fulfills its warranty obligations when it supplies the Customer a repaired or a spare part.
Need help?
Do you have a question about the DEH-600wp and is the answer not in the manual?
Questions and answers