Royal Sovereign RSL-2701 Owner's Manual
Table top laminator 380-series; 2701-series
Hide thumbs
Also See for RSL-2701:
- User manual (42 pages) ,
- Owner's manual (7 pages) ,
- Manual (20 pages)

Related Manuals for Royal Sovereign RSL-2701


Summary of Contents for Royal Sovereign RSL-2701
- Page 1 OWNER'S MANUAL Table Top Laminator Read all instructions carefully before use. For any Customer Support needs please choose the Customer Support tab on www.royalsovereign.com Royal Sovereign International Inc. www.royalsovereign.com...
-
Page 2: Table Of Contents
TABLE OF CONTENTS TOPIC PAgE 1. Introduction ....................... 3 2. Package Contents ....................3 3. Safety Precautions ....................4 4. Parts ........................5 5. Features Guide ....................6 6. Operation Instructions ..................9 7. Film Loading and Threading ................10 8. -
Page 3: Introduction
Table Top Laminator 1. INTRODUCTION Thank you for purchasing RS Table Top Laminator. It has been designed and manufactured to provide years of continuous service. For high quality lamination, please read this instruction manual thoroughly. This manual will provide you with complete operating and maintenance information. -
Page 4: Safety Precautions
7. Ensure the unit is turned off, cooled, and unplugged from the outlet prior to moving and/ or repairing. 8. Keep out of reach of children. 9. Only Royal Sovereign authorized maintenance and service technicians should make repairs. 10. Do not attempt to laminate items that exceed total recommended material thickness for the unit 11. -
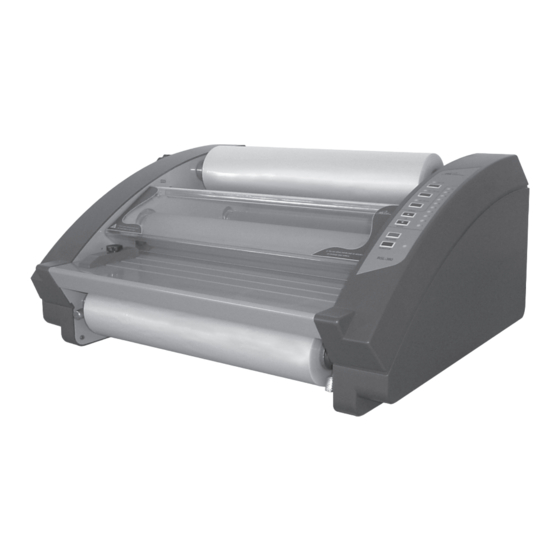
Page 5: Parts
Table Top Laminator 4. PARTS 1.Upper Film 2.Lower Film 3.Idle Bar 4.Hot Rollers 5.Feed Table 6.Paper Guide 7.Control Panel 8.Tension Knob 9.Power Switch *10.Single/Double Laminating Switch “O” (on) “I” (off). * For Single Laminator. -
Page 6: Features Guide
5. FEATURES gUIDE-1 Run and stop the machine RUN/STOP Reverse the rollers to undo jams 125 mic 270-310 F and correct misfed documents REVERSE Reduce roller speed 50-100 mic 230-270 F (1~10 speed settings) DOWN 25-38 mic 210-230 F Increase roller speed (1~10 speed settings) 125mic Film Application Thickness... -
Page 7: Figure
Table Top Laminator 5. FEATURES gUIDE-2 Run and stop the machine RUN/STOP Reverse the rollers to undo jams 270-310 F and correct misfed documents REVERSE Reduce roller speed 230-270 F (1~10 speed settings) DOWN 210-230 F Increase roller speed (1~10 speed settings) Film Application Temperature 210 ~230 F 210~230 F... -
Page 8: Figure
Power Switch (1) - Located on the rear of the machine. “I” (on) “0” (off). (Fig. 2) Cross Cutter (2) - Used to cut off the laminated web. (Fig. 2) Figure 2 Feed guide (3) -The feed guide permits alignment of the item(s) to be laminated. To position the adjustable guide, loosen the knob, slide it to the desired position and tighten the knob to secure the feed guide in place. -
Page 9: Operation Instructions
Table Top Laminator 6. OPERATION INSTRUCTIONS 1. Turn the laminator ON (I) located on the rear of the machine. (Fig. 2) 2. Choose appropriate laminating thickness and speed. (Fig. 1) 3. Do not begin laminating until the blinking light is steady (approximately 8 minutes). 4. -
Page 10: Film Loading And Threading
7. FILM LOADINg & THREADINg Figure 6 1. Slightly slide the shaft to the right and pull it out from the machine. (Fig. 7) Figure 7 2. Take both lock core adapters off from the shaft. Figure 8... -
Page 11: 5. Center The Film On The Shaft And Lock It In
Table Top Laminator 3. Insert one of the core adapters into the right end of the film core. For film with poly-in (adhesive side is inside the web), make sure the adhesive side is facing upward. (Fig. 9) Figure 9 4. -
Page 12: Maintenance
LOADINg LOWER ROLL FILM ¡ ø 1. Repeat steps 1-5 to load the lower roll film. 2. Once the upper and lower film is on the shaft, pull the film from the top and roll down to the bottom roll to make certain that the film is aligned properly. Then tighten the lower locking core screws. -
Page 13: Trouble Shooting Guide
Table Top Laminator 9.TROUBLE SHOOTINg gUIDE Symptom Cause Possible Solution 1.Safety cover is opened 1. Check safety cover is properlyclosed Rollers do not operate 2. Power cord is not after the RUN/STOP plugged in 2. Plug in the power cord button is pressed 3.Machine is not turned on 3. -
Page 14: Specification
Table Top Laminator 10. SPECIFICATIONS... -
Page 15: Warranty
Royal Sovereign International and cannot be modified or amended. Royal Sovereign’s sole and exclusive liability and the customer’s sole and exclusive remedy under this warranty shall be, at Royal Sovereign’s option, to repair or replace any such defective part or product. These remedies are only available if Royal Sovereign’s examination of the product discloses to Royal Sovereign’s satisfaction that such defects...
Need help?
Do you have a question about the RSL-2701 and is the answer not in the manual?
Questions and answers