
Related Manuals for Excalibur AL-1650-EDPB


Summary of Contents for Excalibur AL-1650-EDPB
- Page 1 AL-1650-EDPB / AL-1750-EDPB Deluxe Alarm & Remote Start July 11, 2012 Operation Guide Temporary cover. Color cover is in a separate file.
-
Page 2: Table Of Contents
Table Of Contents Transmitter Overview ��������������������������������������������������������������������������������������������������� 3 The Transmitter �������������������������������������������������������������������������������������������������������� 3 Transmitter Functions ��������������������������������������������������������������������������������������������������� 3 Other Remote Start Features ��������������������������������������������������������������������������������������� 6 Low Battery/Low Temp Automatic Starting ��������������������������������������������������������������� 6 Turbo Timer Feature ������������������������������������������������������������������������������������������������� 7 Pit-Stop Feature ������������������������������������������������������������������������������������������������������� 7 Manual Transmission Starting ���������������������������������������������������������������������������������� 7 Security System Features ��������������������������������������������������������������������������������������������... -
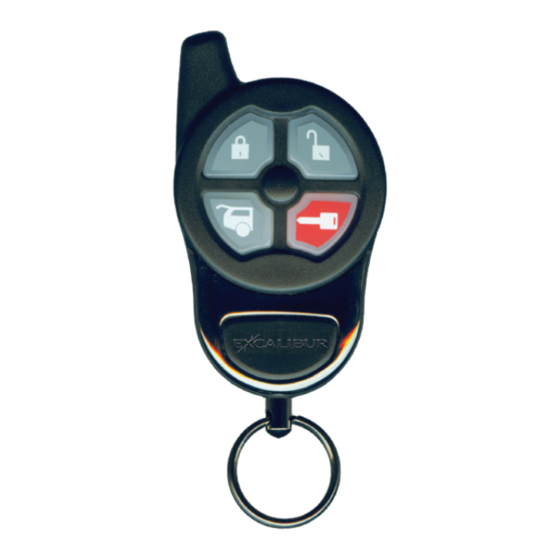
Page 3: Transmitter Overview
Transmitter Overview ThE TRAnSmiTTER AL-1650-EDPB part number: 147-03 AL-1750-EDPB part number: 1410-03 Call your dealer or visit www.caralarm.com to order replacement transmitters. 1) Antenna 2) Lock Button 3) Unlock Button 4) Trunk Button 5) Start Button Transmitter battery replacement: Remove the small screw from the lower back case, and separate the transmitter halves�... - Page 4 Transmitter Functions (cont’d) TRUnK RELEASE / ChAnnEL 2: Press the “TRUnK” button for 3 seconds� • ThE SySTEM WILL DISARM AnD ThE TRUnK WILL OPEn (IF EqUIPPED)� REmOTE START: Press and release the “START” button twice within 5 seconds� (see user feature #17 for additional options) •...
- Page 5 Transmitter Functions (cont’d) ChAnnEL 4: Press and hold the “LOCK” & “TRUnK” buttons for 3 seconds� • yOUR SySTEM WILL ACTIVATE ThE ChAnnEL 4 OUTPUT� ChAnnEL 5: Press and hold the “UnLOCK” & “START“ buttons for 3 seconds� • yOUR SySTEM WILL ACTIVATE ThE ChAnnEL 5 OUTPUT�...
-
Page 6: Other Remote Start Features
Transmitter Functions (cont’d) SEnSOR BYPASS: Press and release the “TRUnK” button within 5 seconds of locking/arming the alarm system� • ThE SySTEM WILL gIVE OnE ChIRP TO InDICATE ThE SEnSOR IS ByPASSED� LOw VOLTAGE/TEmP AUTO START: Press and release the “START”... -
Page 7: Turbo Timer Feature
Other Remote Start Features (cont’d) method 2 - with The Controller (Low Volt + Low Temp - 15 Degrees Only) • Within 5 seconds of pressing LOCK, press the START button. You will get one chirp and the 2-way controller will alternate between “ARM” and “RS AUTO”� nOTE: When low temp start mode is activated, low voltage start is also activated�... -
Page 8: Pre-Warn Detection
Security System Features (cont’d) PRE-wARn DETECTiOn This system’s impact sensor is designed, in addition to detecting a full impact, will warn away potential violators when it detects a light impact to the vehicle� The system will respond by chirping the siren/horn 3 times and locking the doors� This is very use- ful when an intruder attempts to unlock the door with “slim jim”... -
Page 9: Securecode
Using The Valet Switch (cont’d) REmOTE START VALET mODE, disables remote start� Keyless entry and alarm functions still operate� To enter remote start valet mode, perform the following steps: STEP 1 - Disarm the system (by remote or by emergency override) STEP 2 - hold the brake pedal then press and hold the valet switch for 2 seconds�... -
Page 10: Anti-Carjacking Protection
The Status Light (cont’d) flash a number of times to indicate exactly which zone(s), has been violated. It will store the last 2 violated circuits and continually repeat the flash pattern until the sys- tem is disarmed and the vehicle’s ignition key is turned On� 2 FLAShES: hood trigger 3 FLAShES: Door trigger 4 FLAShES: Sensor port trigger... -
Page 11: Programming Transmitters
Anti-Carjacking Protection (cont’d) tion, it will not respond to the transmitter, nor will the system reset automatically after 60 seconds, and it can only be disengaged by: Step 1 Turning the vehicle’s ignition off� Step 2 Turning the ignition back on� Step 3 Within 5 seconds, perform an Emergency Override using the Valet Switch�... -
Page 12: Programming Features
Programming Features Step 1 Turn the ignition key “On”, then “OFF” Step 2 Within 5 seconds of step 1, press the valet switch 5 times to access user features (10 times to access installer features)� ~ The siren/horn will sound and the status light will turn on� Step 3 Within 10 seconds of step 2, press the valet switch the number of times cor- responding with the desired feature’s number�... - Page 13 User Programmable Features (cont’d) Feature #4 - Starter interrupt Functions Alarm Only (press “lock” button to program) - DEFAULT Anti-Grind Only (press “unlock” button to program) Alarm & Anti-Grind (press “trunk” button to program) Automatic (press “start” button to program) Alarm Only - The Starter Interrupt is operable whenever the alarm is armed�...
- Page 14 User Programmable Features (cont’d) Feature #9 - Confirmation Chirp Volume medium high (press “trunk” button to program) - DEFAULT Low (softest) (press “lock” button to program) medium Low (press “unlock” button to program) high (loudest) (press “start” button to program) This feature allows the choice of four different volume levels of the system’s confirma- tion chirps, and when programming it, the buttons can be repeatedly and sequen- tially pressed, thus making it easy to hear and choose the setting with the best chirp...
-
Page 15: Installer Programmable Features
User Programmable Features (cont’d) Feature #14 - Alarm Functions Bypass (press “unlock” button to program) - DEFAULT (press “lock” button to program) This feature converts the system into a strictly Keyless Entry/Remote Start System by eliminating all antitheft alarm-oriented operations and features� Feature #15 - Anti-Carjacking (press “start”... - Page 16 installer Programmable Features (cont’d) Feature #2 - Light Relay Functions Dome Light Output (press “lock” button to program) - DEFAULT Door Lock (press “unlock” button to program) ignition Output (press “trunk” button to program) Accessory Output (press “start” button to program) The system has two built-in relays, which can be programmed to perform several different func- tions�...
- Page 17 installer Programmable Features (cont’d) “Tach wire” Before this setting is programmed, refer to the “Violet/White wire” section of the installation manual for proper wiring connection and the Tach Learn Procedure� It will crank the engine for up to 3 seconds or until a tach signal is detected� “Data Tach”...
- Page 18 installer Programmable Features (cont’d) Feature #11 Remote Start Lock Control (press “lock” button to program) - DEFAULT Lock After Start (press “unlock” button to program) Unlock before start (press “trunk” button to program) Unlock Before+Lock After Start (press “start” button to program) This feature allows for OEM alarm/lock control in relation to remote start operations thus eliminat- ing extra wiring�...
-
Page 19: Programmable Features Matrix
Programmable Features matrix User Feature Programming: Ignition on, off, press valet 5 times # Feature Lock Button Unlock button Trunk button ”START” button 1 Secure Code 1, 0 (default) 2 Last Door Arming On w/o lock On w/ Lock 3 Automatic Rearming On w/o lock On w/ Lock Enhanced Rearm... - Page 20 Back Cover Color cover is in a separate file.
Need help?
Do you have a question about the AL-1650-EDPB and is the answer not in the manual?
Questions and answers