
Subscribe to Our Youtube Channel
Related Manuals for Excalibur AL-1950-EDPB


Summary of Contents for Excalibur AL-1950-EDPB
- Page 1 AL-1950-EDPB / AL-2050-EDPB OLED Color 2-way Alarm & Remote Start July 12, 2012 Operation Guide Temporary cover. Color cover is in a separate file.
-
Page 2: Table Of Contents
Table Of Contents Introduction ������������������������������������������������������������������������������������������������������������������� 3 Controller & Transmitter Overview�������������������������������������������������������������������������������� 4 The 2-Way Controller ����������������������������������������������������������������������������������������������� 4 The Controller Status Screen ����������������������������������������������������������������������������������� 4 The 1-Way Transmitter ��������������������������������������������������������������������������������������������� 5 Controller & Transmitter Functions ������������������������������������������������������������������������������� 5 Other Remote Start Features ��������������������������������������������������������������������������������������� 9 Low Battery/Low Temp Automatic Starting ��������������������������������������������������������������� 9 Turbo Timer Feature �������������������������������������������������������������������������������������������������... -
Page 3: Introduction
Introduction Congratulations for choosing one of the most versatile, fully-featured vehicle secu- rity and convenience systems available today� Omega Research & Development has been a leader in vehicle security products for nearly 4 decades� Please take the time to read this manual thoroughly so you can fully enjoy the benefits and features this system offers�... -
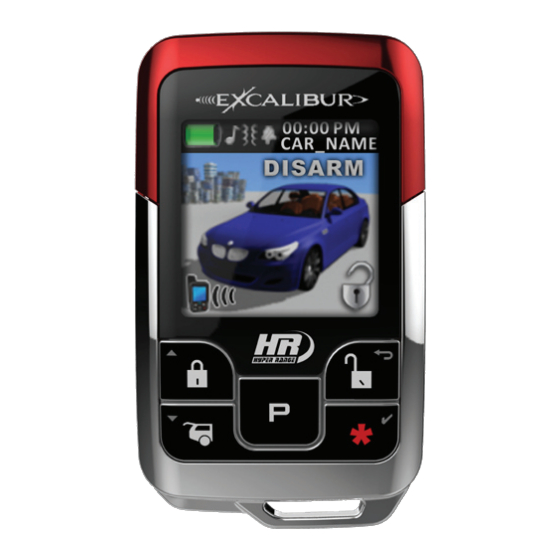
Page 4: Controller & Transmitter Overview
Controller & Transmitter Overview THE 2-WAy COnTROLLER AL-1950-EDPB Controller part number: 155-03 AL-2050-EDPB Controller part number: 156-03 1) Antenna: Sends commands to the system and receives confirmations for 2-way functions. 2) OLED Display: Displays all controller functions as well as the status of your system�... -
Page 5: The 1-Way Transmitter
POWER On: Press and hold the “P” button for at least 1 second POWER OFF: Press the “P” and “ “ buttons for at least 1 second THE 1-WAy TRAnSmITTER AL-1950-EDPB part number: 148-03 “lock” “unlock” AL-2050-EDPB part number: 1410-03... - Page 6 Controller & Transmitter Functions (cont’d) TRunK RELEASE / CHAnnEL 2: Press the “TRUNK” button for 3 seconds� • ThE SYSTEM WILL DISARM AND ThE TRUNK WILL OPEN (IF EqUIPPED)� • UPON RECEIVINg CONFIRMATION FROM YOUR SYSTEM, ThE CONTROLLER WILL PLAY ThE TRUNK RELEASE ANIMATION AND BEEP TWICE (1-way transmitter: press anD holD the trunk button for 3 seConDs)
- Page 7 Controller & Transmitter Functions (cont’d) CHAnnEL 3: Press and hold the “TRUNK” & “ “ buttons for 3 seconds� • YOUR SYSTEM WILL ACTIVATE ThE ChANNEL 3 OUTPUT� • UPON RECEIVINg CONFIRMATION FROM YOUR SYSTEM, ThE CONTROLLER WILL PLAY ThE ChANNEL 3 ANIMATION�...
- Page 8 Controller & Transmitter Functions (cont’d) PAnIC: Press and hold the “LOCK” or “UNLOCK” button for 3 seconds� • ThE SIREN/hORN WILL SOUND, ThE PARKINg LIghTS WILL FLASh, AND ThE DOORS WILL LOCK OR UNLOCK DEPENDINg WhICh BUTTON IS PRESSED� (1-way transmitter: press anD holD the loCk or unloCk button for 3 seConDs) SILEnT ARm / DISARm: Press and release the “TRUNK”...
-
Page 9: Other Remote Start Features
Controller & Transmitter Functions (cont’d) AuXILIARy FunCTIOnS 1-4: The actual operation of these functions will vary from car to car� They are designed to operate extra vehicle functions like automatic sliding doors or motorized hatches. Aux 1-4 are virtual outputs only available on certain vehicles when this system is integrated with the vehicle’s data network. -
Page 10: Pit-Stop Feature
Other Remote Start Features (cont’d) PIT-STOP FEATuRE This feature allows you to leave your engine running for making quick errands� To use this feature, have the engine running normally from the ignition switch and your foot off the brake pedal. Press the Valet Switch twice; the parking lights will flash and the horn chirps 5 times�... -
Page 11: When The System Triggers
Security System Features (cont’d) WHEn THE SySTEm TRIGGERS If the system were to be compromised while armed, it will trigger sounding the siren/horn and flashing the parking lights for 30 seconds (programmable). At this point you will also be notified on the controller as to which zone is violated (if in range of the system)�... -
Page 12: Securecode
using The Valet Switch (cont’d) REmOTE START VALET mODE, while active, disables remote start� Keyless entry and alarm functions are still operable� To enter remote start valet mode, perform the following steps: STEP 1 - Disarm the system either with the controller or by performing an emergency override and hold the brake pedal�... - Page 13 The Status Light (cont’d) AuTOmATIC TRAnSmITTER VERIFICATIOn (RED LIGHT): Every time you turn on the ignition key, the status light will flash a number of times equal to the number of controllers/transmitters programmed to the system� This unique security feature protects you from a potential thief (valet attendant, mechanic, installer, etc�) from adding their own transmitter without your knowledge and access- ing your vehicle and it’s contents at a later time (the perfect crime!)�...
-
Page 14: Multi-Car Operation & Vehicle Profiles
Multi-Car Operation & Vehicle Profiles muLTI-CAR OPERATIOn The controller can operate up to 2 different systems� When controlling 2 systems, it will receive all status updates on the currently selected vehicle profile and will receive only trigger alerts for the 2nd vehicle� You can switch from one car to the other at any- time as well as choose a unique image and name for each vehicle�... -
Page 15: Programming Controller Options
Programming Controller Options Each function button on the controller also serves for navigating through the option menus and making changes to the controller options� These secondary functions are indicated by small icons in the upper corners of each button� See below for an expla- nation of each button’s function�... -
Page 16: Setting The Clock
Programming Controller Options (cont’d) SETTInG THE CLOCK 1) Press the “P” button to access the options menu� 2) Scroll down until “Set Clock” is highlighted 3) Press the 4 button to select� 4) Scroll to highlight either 12 (AM/PM) or 24 hour format� 5) Press the 4 button to select�... -
Page 17: Selecting Button Beep
Programming Controller Options (cont’d) SELECTInG BuTTOn BEEP With this option turned ON, the controller will beep to con- firm each button press. The default setting is OFF. To turn ON/OFF, use the following procedure: 1) Press the “P” button for 3 seconds to access options� 2) Scroll down until “Button Beep”... -
Page 18: Anti-Carjacking Protection
Anti-Carjacking Protection The system is equipped with two separate Anti-Carjacking protection features (igni- tion, open door, or both)� All are programmable, and must be turned on to operate� Once activated, the user has 53 seconds to cancel the Anti-Carjacking protection process (described below)�... -
Page 19: Programming Controllers/Transmitters (Cont'd)
Programming Controllers/Transmitters (cont’d) Step 3 Press the “lock” button on each transmitter one at a time� The system will chirp the siren/horn once to confirm that each was learned. When programming the 2-way controller, the system’s ID is sent to the controller� Wait for the controller to beep twice, indicating it has learned the system’s ID*�... -
Page 20: User Programmable Features
user Programmable Features Feature #1 - SecureCode DEFAuLT - 1 Press SecureCode is a unique patented feature which allows you to custom select the num- ber of Valet Switch presses in two stages, instead of a single “1 press”, which would be required in order to perform an Emergency Override�... - Page 21 user Programmable Features (cont’d) Feature #5 - Ignition Activated Override (press “unlock” button to program) - DEFAuLT (press “lock” button to program) This feature allows an activated system to be overridden and disarmed by simply turning the ignition switch on within 10 seconds of the system’s activation� After 10 seconds, the Emergency Override must be performed�...
- Page 22 user Programmable Features (cont’d) Feature #11 - Flashing Light Confirmations On w/ Disarm, Flash w/ RS (press “unlock” button to program) - DEFAuLT On w/ Disarm & Remote Start (press “lock” button to program) On During Remote Start (press “trunk” button to program) Flashing During Remote Start (press “start”...
-
Page 23: Installer Programmable Features
user Programmable Features (cont’d) Feature #17 - Remote Start Activation Press “start” button 2 times (press “lock” button to program) - DEFAuLT Press “start” button 1 time (press “unlock” button to program) Press Lock & unlock (press “trunk” button to program) This feature changes how the remote start feature is activated using the controller or transmitter�... - Page 24 Installer Programmable Features (cont’d) Feature #3 - Horn Relay Functions Horn Output (press “lock” button to program) - DEFAuLT Door unlock (press “unlock” button to program) Trunk Release (press “trunk” button to program) Pulse After Start (press “start” button to program) The primary function of this second relay, is to operate the vehicle’s existing horn;...
- Page 25 Installer Programmable Features (cont’d) Feature #7 - Starter Cranking Time 0.75 Second (press “lock” button to program) - DEFAuLT 1.00 Second (press “unlock” button to program) 1.5 Seconds (press “trunk” button to program) 2.25 Seconds (press “start” button to program) This feature determines the crank time of the 1st start attempt when in “Tachless”...
- Page 26 Installer Programmable Features (cont’d) Feature #12 Low Temp Crank Extender 0ms (Off) (press “lock” button to program) 200ms (press “unlock” button to program) - DEFAuLT 300ms (press “trunk” button to program) 400ms (press “start” button to program) When the vehicle’s interior temperature is below freezing, this feature adds extra crank time to the base timing (see installer feature #7)�...
-
Page 27: Programmable Features Matrix
Programmable Features matrix User Feature Programming: Ignition on, off, press valet 5 times # Feature Lock Button Unlock button Trunk button ”START” button 1 Secure Code 1, 0 (default) 2 Last Door Arming On w/o lock On w/ Lock 3 Automatic Rearming On w/o lock On w/ Lock Enhanced Rearm... - Page 28 Back Cover Color cover is in a separate file.
Need help?
Do you have a question about the AL-1950-EDPB and is the answer not in the manual?
Questions and answers