Table of Contents
Advertisement
Advertisement
Table of Contents

Related Manuals for M-Audio Trigger Finger Pro


Summary of Contents for M-Audio Trigger Finger Pro
- Page 1 User Guide Manual Version 1.0...
-
Page 2: Table Of Contents
Quick Start ..........................12 1. Download and Install the Software ................12 2. Connect ..........................12 3. Set Up Trigger Finger Pro with Your Software ............13 Trigger Finger Pro with Your DAW .................. 13 Trigger Finger Pro with Arsenal ..................14 Basics ........................... - Page 3 Operation ..........................23 Navigation ..........................23 Modes ..........................24 Performance Mode ......................24 Pad Mode ........................25 Control Mode ........................26 Sequence Mode ......................27 Select Mode ........................28 Saving and Loading ......................29 Working with Presets ......................31 Pads..........................31 Settings ........................
- Page 4 Working with Sequences....................58 Recording ........................59 Transport Controls......................60 Steps ..........................61 Velocities ........................65 Bars ..........................67 Timing ..........................69 Tempo ........................69 Swing ......................... 70 Gate ..........................71 Time Division ......................72 Clock .......................... 72 Copying and Pasting ....................... 73 Duplicating ........................
- Page 5 Preferences ......................... 84 Tempo ..........................85 Tap LED ........................85 Tap Average ....................... 86 Clock ..........................87 MIDI ..........................88 Velocity ..........................89 Fixed Mode Velocity ....................89 Sequencer Velocity ....................90 Display ..........................91 Pads..........................92 Saving and Loading ......................93 Using an External MIDI Module ..................
-
Page 6: Introduction
User Guide (download) (download) Software Download Card Safety & Warranty Manual Important: Visit m-audio.com/softwaredownload to download the included software applications. Support For the latest information about this product (system requirements, compatibility information, etc.) and product registration, visit m-audio.com/TFP. For additional product support, visit m-audio.com/support. -
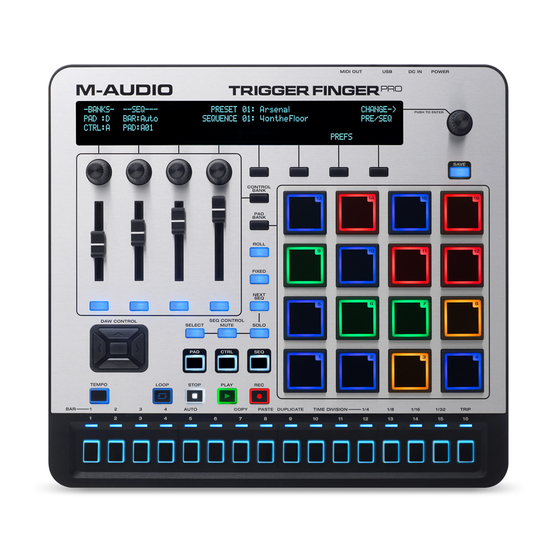
Page 7: Features Overview
Features Overview 28 29... - Page 8 Trigger Finger Pro to control an external MIDI module), connect this input to a power outlet using an optional power adapter (6V DC, 1A, center-positive, sold separately). You do not need this connection when using Trigger Finger Pro with a computer; it will be powered by the USB bus.
- Page 9 10. Assignable Faders: Use these faders to send MIDI CC messages to your software or external MIDI device. Alternatively, you can set the faders to communicate with your software using the Mackie Control or HUI protocols or to communicate with Arsenal. See Working with Presets: Assignable Controls for more information.
- Page 10 (which can be set in Pad Mode), regardless of how hard you hit them. 17. Play: Press this button to start playback of Trigger Finger Pro's Sequencer and your DAW. 18. Stop: Press this button to stop playback of Trigger Finger Pro's Sequencer and your DAW.
- Page 11 23. Select: Press and hold this button to enter Select Mode in which you can access the secondary functions of the Step Switches (which will appear in the display). Release the button to exit Select Mode. See the Operation: Modes: Select Mode section for more information.
-
Page 12: Quick Start
Open the first file and double-click the .exe (Windows) or .dmg (Mac OS X). Follow the on-screen instructions to complete the installation. Repeat Steps 2-3 for the remaining files. 2. Connect Here is just an example of how to use Trigger Finger Pro to your setup: Wall Power (optional, power adapter... -
Page 13: Set Up Trigger Finger Pro With Your Software
3. Set Up Trigger Finger Pro with Your Software Trigger Finger Pro with Your DAW To set up Trigger Finger Pro as a controller for your digital audio workstation (DAW): Connect Trigger Finger Pro to your computer using a standard USB cable. (If you are connecting Trigger Finger Pro to a USB hub, make sure it is a powered hub.) -
Page 14: Trigger Finger Pro With Arsenal
Important: To use Arsenal in Standalone Mode (without a DAW), please see the steps on following page instead. Open your DAW and make sure Trigger Finger Pro is selected as a controller for your DAW (described above). Create a MIDI track in your DAW, and load Arsenal onto that track as you would with a typical plugin, and select and record-arm that track. - Page 15 Important: To use Arsenal in Plugin Mode (with a DAW), please see the steps on previous page instead. Connect Trigger Finger Pro to your computer using a standard USB cable. (If you are connecting Trigger Finger Pro to a USB hub, make sure it is a powered hub.) Power-on Trigger Finger Pro.
-
Page 16: Basics
Basics This chapter covers some of Trigger Finger Pro's basic functions. We also highly recommend reading the Operation chapter to learn how to get the most out of using Trigger Finger Pro. Using the Pads The velocity- and pressure-sensitive pads are easy to play and responsive to your touch. You can use them to record a Sequence, to play over a Sequence, or even to trigger entire Sequences in Next Sequence Mode. -
Page 17: Using The Assignable Controls
Using the Assignable Controls The Assignable Controls—the four knobs, faders, and buttons below the display on the left— can serve several functions. You can easily change the controls' MIDI messages and values in Control Mode: Enter Control Mode by pressing the Control Mode Button (Ctrl). While viewing the options in the display, turn the Assignable Knobs to change the settings above each knob, or press the Function Buttons to select the option or to change the setting above each button. -
Page 18: Loading And Saving Presets, Sequences, Or Preferences
Loading and Saving Presets, Sequences, or Preferences Trigger Finger Pro's Presets, Sequences, and Preferences are independent groups of settings that can be saved to its internal memory and can be loaded later. You can mix and match them as desired; they are not dependent on each other. - Page 19 To load a Preset and/or Sequence: In Performance Mode or Sequence Mode, press the Value Dial (Change->). Press the Value Dial (Change->) to select either the Preset or Sequence field. An arrow (<-) is next to the one that the Value Dial will change. Turn the Value Dial to scroll through the available Presets or Sequences (depending on which field is selected).
-
Page 20: Creating A Sequence
Creating a Sequence There are two ways to create or edit a Sequence with Trigger Finger Pro: (A) using the pads in real time or (B) using the Step Switches. To record a Sequence in real time: Press Trigger Finger Pro's Record button. Its Sequencer is record-armed. -
Page 21: Setting The Tempo
Each Sequence has its own tempo, which is saved with the Sequence. To set the Tempo, do one of the following: Tap the Tempo button at the desired rate. Trigger Finger Pro's Sequencer will detect and enter the new tempo based on the average the speed at which you tap. -
Page 22: Edit Your Preferences
Edit Your Preferences Trigger Finger Pro's Preferences affect its "global" operation. To edit your Preferences: In Performance Mode, press the third Function Button (Prefs). While viewing the options in the display, turn the Assignable Knobs to change the settings above each knob, or press the Function Buttons to select the option or to change the setting above each button. -
Page 23: Operation
This chapter briefly explains Trigger Finger Pro's most basic features to help you get started quickly. To learn more and get the most use out of your Trigger Finger Pro, though, we recommend reading the rest of this User Guide. -
Page 24: Modes
Performance Mode, Pad Mode, Control Mode, Sequence Mode, and Select Mode. This User Guide describes additional modes (e.g., Pad Mute Mode or Pad Solo Mode), but those modes do not affect Trigger Finger Pro's settings per se like the five modes described in this chapter. -
Page 25: Pad Mode
Pad Mode Pad Mode lets you adjust various parameters that determine how the pads behave. Press the Pad Button to enter or exit this mode. When in Pad Mode, the button will light up and Trigger Pads will appear in the display. In Pad Mode, you can: •... -
Page 26: Control Mode
Control Mode Control Mode lets you adjust various parameters affecting the knobs, faders, and assignable buttons. Press the Control Button (Ctrl) to enter or exit this mode. When in Control Mode, the button will light up and Knobs, Faders, Buttons, or Advanced will appear in the display, depending on what page you are viewing. -
Page 27: Sequence Mode
Sequence Mode Sequence Mode lets you adjust various parameters affecting the Sequencer's overall function. Press the Sequence Button (Seq) to enter or exit this mode. When in Sequence Mode, the button will light up and Sequencer will appear in the display. -
Page 28: Select Mode
Select Mode Select Mode lets you use the Step Switches to view or edit settings that affect the current Sequence (rather than the Sequencer's overall function). Press and hold the Select Button to enter this mode. When in Select Mode, the button will light up and Select Mode will appear in the display. -
Page 29: Saving And Loading
Saving and Loading Trigger Finger Pro lets you save Presets, Sequences, and Preferences to its internal memory. You can then load your saved Presets and Sequences later, while your saved Preferences are stored globally, remaining in place until you edit and save them again. - Page 30 SAVE PRESET Preset --> 01: Preset SELECT-> PRESET Choose ALL to save everything SAVE EDIT with current num and name TYPE NAME SAVE CANCEL To load a Preset and Sequence: In Performance Mode or Sequence Mode, press the Value Dial (Change->). The display will show the number and name of both a Preset and a Sequence.
-
Page 31: Working With Presets
Working with Presets A Preset in Trigger Finger Pro is stored in its internal memory. When you save a Preset, you are saving settings that are specific to the pads, Assignable Controls (knobs, faders, and buttons), DAW Control buttons, and transport buttons. -
Page 32: Settings
Settings You can select specific settings for each pad or pad bank while in Pad Mode. These settings will be saved with the Preset. Important: To view and edit your pads' settings, their mapping must be set to MIDI instead of Arsenal. - Page 33 Mapping The pads' mapping determines how the pads communicate with your software. To change the pads' mapping: Enter Pad Mode by pressing the Pad Mode Button (Pad). Press the third Function Button (Mapping). The mapping of each pad bank will appear on the left of the display.
- Page 34 Note The Note setting determines what MIDI note each pad sends out. To change a pad's note: Enter Pad Mode by pressing the Pad Mode Button (Pad). Press the second Function Button (Edit Pads). Use the Pad Bank button to select the desired pad bank, and press the pad whose note you want to edit.
- Page 35 Velocity The Velocity settings determine the minimum (Min Vel) and maximum (Max Vel) velocities each pad is capable of sending out. To change a pad's minimum and maximum velocities: Enter Pad Mode by pressing the Pad Mode Button (Pad). Press the second Function Button (Edit Pads). Use the Pad Bank button to select the desired pad bank, and press the pad whose velocities you want to edit.
- Page 36 Pressure Trigger Finger Pro's pads are pressure-sensitive. They respond to changes in pressure after the initial press. The Pressure setting determines what kind of pressure message each pad sends out. To change a pad's pressure settings: Enter Pad Mode by pressing the Pad Mode Button (Pad).
- Page 37 Colors The Color settings determine each pad's LED color when pressed/"on" (Pad On) and when not pressed/"off" (Pad Off). Tip: Select contrasting colors for a pad's on and off states to easily see your presses. Also, select different colors for each pad bank to easily determine which bank is selected. To change a pad's colors: Enter Pad Mode by pressing the Pad Mode Button (Pad).
- Page 38 MIDI Channel and Output The MIDI settings determine over which MIDI channel each pad sends its messages and whether the messages are sent over Trigger Finger Pro's USB Port, MIDI Out jack, or both. To change a pad's MIDI channel and output configuration: Enter Pad Mode by pressing the Pad Mode Button (Pad).
-
Page 39: Assignable Controls (Knobs, Faders, And Buttons)
Assignable Controls (Knobs, Faders, and Buttons) Trigger Finger Pro's Assignable Controls are the knobs, faders, and buttons below the display on the left side. You can use these controls to send MIDI CC or Program Change messages to your software or external MIDI device. Alternatively, you can set them to communicate with your software using the Mackie Control or HUI protocols or to communicate with Arsenal. -
Page 40: Settings
Settings You can select specific settings for each assignable control or control bank while in Control Mode. These settings will be saved with the Preset. Important: To view and edit your assignable controls' settings, their mapping must be set to MIDI instead of Arsenal. - Page 41 Mapping The assignable controls' mapping determines how they will communicate with your software. Tip: You can see an overview of all assignable controls' mapping in the display by pressing and holding the Control Bank button (in any mode). To change the assignable controls' mapping: Enter Control Mode by pressing the Control Mode Button (Ctrl).
- Page 42 Message The Message determines what kind of MIDI message each assignable control sends out. Additional settings are associated with each Message. To change an assignable control's message: Enter Control Mode by pressing the Control Mode Button (Ctrl). Press the second Function Button (Edit Controls). The display will tell you to move the desired control.
- Page 43 KNOBS 01: Preset BANK:A KNOB:A01 SEL-> MIN VAL: MAX VAL: MESSAGE: MORE EXIT KNOBS 01: Preset BANK:A KNOB:A01 SEL-> MSB: LSB: MIN VAL: MAX VAL: MESSAGE: MORE EXIT NRPN KNOBS 01: Preset BANK:A KNOB:A01 SEL-> MSB: LSB: PROG: MESSAGE: MORE EXIT Prog Ch...
- Page 44 Value (Assignable Knobs and Assignable Faders only) The Value settings determine the minimum (Min Val) and maximum (Max Val) values each assignable control is capable of sending out. To change a control's minimum and maximum values: Enter Control Mode by pressing the Control Mode Button (Ctrl). Press the second Function Button (Edit Control).
- Page 45 Colors (Assignable Buttons only) The Color settings determine each Assignable Button's LED color when pressed/"on" (Btn On) and when not pressed/"off" (Btn Off). Tip: Select contrasting colors for a button's on and off states to easily see your presses. Also, select different colors for each control bank to easily determine which bank is selected.
- Page 46 BUTTONS 01: Preset BANK:A BUTTON:A01 SEL-> BTN ON: BTN OFF: MIDI-CH: OUTPUT: Green Indigo UsePrefs EXIT UsePrefs...
- Page 47 Type (Assignable Buttons only) The Type determines how the Assignable Buttons function when pressed. Additional settings are associated with each Type. To change a button's type: Enter Control Mode by pressing the Control Mode Button (Ctrl). Press the second Function Button (Edit Controls). The display will tell you to move the desired control.
- Page 48 BUTTONS 01: Preset BANK:A BUTTON:01 SEL-> PRESS: RELEASE: MESSAGE: TYPE: Moment MORE EXIT BUTTONS 01: Preset BANK:A BUTTON:01 SEL-> OFF: MESSAGE: TYPE: Toggle MORE EXIT BUTTONS 01: Preset BANK:A BUTTON:01 SEL-> VALUE: MESSAGE: TYPE: Single MORE EXIT...
- Page 49 MIDI Channel and Output The MIDI settings determine over which MIDI channel each control sends its messages and whether the messages are sent over Trigger Finger Pro's USB Port, MIDI Out jack, or both. To change a control's MIDI channel and output configuration: Enter Control Mode by pressing the Control Mode Button (Ctrl).
- Page 50 BUTTONS 01: Preset BANK:A BUTTON:A01 SEL-> BTN ON: BTN OFF: MIDI-CH: OUTPUT: Green Indigo UsePrefs EXIT UsePrefs...
- Page 51 Mackie Control When a control bank's mapping is set to Mackie, they are automatically set to control one of a set group of functions. You can use Control Mode to switch between their various functions easily. To set the Mackie Control functions of the Assignable Controls: Enter Control Mode by pressing the Control Mode Button (Ctrl).
- Page 52 KNOBS 01: Preset BANK:A CTRL-> TYPE V-POT1: V-POT2: V-POT3: V-POT4: TRACKS: MAPPING: ASSIGN Mackie EXIT FADERS 01: Preset BANK:A CTRL-> TYPE FADER1: FADER2: FADER3: FADER4: TRACKS: MAPPING: |----- |----- |----- |----- Mackie EXIT BUTTONS 01: Preset BANK:A CTRL-> TYPE MUTE1: MUTE2: MUTE3: MUTE4:...
- Page 53 When a control bank's mapping is set to HUI, they are automatically set to control one of a set group of functions. You can use Control Mode to switch between their various functions easily. To set the HUI functions of the Assignable Controls: Enter Control Mode by pressing the Control Mode Button (Ctrl).
- Page 54 KNOBS 01: Preset BANK:A CTRL-> TYPE V-POT1: V-POT2: V-POT3: V-POT4: TRACKS: MAPPING: ASSIGN EXIT FADERS 01: Preset BANK:A CTRL-> TYPE FADER1: FADER2: FADER3: FADER4: TRACKS: MAPPING: |----- |----- |----- |----- EXIT BUTTONS 01: Preset BANK:A CTRL-> TYPE MUTE1: MUTE2: MUTE3: MUTE4: FUNC: TRACKS:...
-
Page 55: Daw Control Buttons
DAW Control Buttons You can configure the DAW Control buttons to send messages to your DAW using the Mackie Control or HUI protocol. To configure the DAW Control buttons: Enter Control Mode by pressing the Control Mode Button (Ctrl). Use the Value Dial to select Advanced (which will appear in the upper left corner of the display). -
Page 56: Transport Buttons
Transport Buttons You can configure how the Stop and Play transport buttons communicate with your DAW. To configure the Stop and Play transport buttons: Enter Control Mode by pressing the Control Mode Button (Ctrl). Use the Value Dial to select Advanced (which will appear in the upper left corner of the display). -
Page 57: Saving And Loading
Saving and Loading Trigger Finger Pro lets you save Presets to its internal memory. See the earlier Saving and Loading section to learn how to save your Presets to Trigger Finger Pro. -
Page 58: Working With Sequences
Sequence while others may use several Sequences in a complex song structure. Trigger Finger Pro's Sequences may be one to four bars long, and each bar can have up to 16 steps. Each step is a "note event" (a MIDI Note On message). -
Page 59: Recording
Sequences quickly and intuitively. To record a Sequence in real time: In any mode, press Trigger Finger Pro's Record button. Its Sequencer is now record- armed. If the Sequence is not already playing, press Play to start recording. -
Page 60: Transport Controls
Transport Controls The transport controls work in any mode. Some control both Trigger Finger Pro's Sequencer and your DAW while others control the Sequencer only. Play: Press this to start playback of Trigger Finger Pro's Sequencer and your DAW. Stop: Press this to stop playback of Trigger Finger Pro's Sequencer and your DAW. -
Page 61: Steps
Steps The subdivisions of a bar within a Sequence are represented in 16 "steps" by the Step Switches. The Step Switches show the steps for one pad at a time, indicated in the display. You can use the Step Switches to quickly add or remove steps to or from a Sequence. To set the number of steps in each bar of a Sequence: Enter Sequence Mode by pressing the Sequence Mode (Seq) button. - Page 62 To enter or erase steps in a Sequence: Enter Sequence Mode by pressing the Sequence Mode (Seq) button. Check above the third Function Button (Page) to make sure you are viewing Page 1. If you are on Page 2, press the button to move to Page 1. Press the pad whose sound you want to use in the current bar.
- Page 63 You can also use other Sequence Mode options to erase all steps for a single pad or to erase all steps from the entire Sequence. To erase all steps for a single pad: Enter Sequence Mode by pressing the Sequence Mode (Seq) button. Check above the third Function Button (Page) to make sure you are viewing Page 1.
- Page 64 To erase all steps from the entire Sequence: Enter Sequence Mode by pressing the Sequence Mode (Seq) button. Check above the third Function Button (Page) to make sure you are viewing Page 2. If you are on Page 1, press the button to move to Page 2. To erase all steps for all pads in the Sequence, press the second Function Button (Clear All).
-
Page 65: Velocities
Velocities Each pad used in a Sequence can play its notes at independent velocities for each step, which you can edit. To edit step velocities: Enter Sequence Mode by pressing the Sequence Mode (Seq) button. Check above the third Function Button (Page) to make sure you are viewing Page 1. If you are on Page 2, press the button to move to Page 1. - Page 66 13: 14: 15: 16: BANK:A PAD:A01 BAR:Auto VEL:127 CLR PAD CLR ALL EXIT The Sequencer Velocity determines the default velocity level of steps you enter with the Step Switches. To edit the Sequencer Velocity: Enter Sequence Mode by pressing the Sequence Mode (Seq) button. Check above the third Function Button (Page) to make sure you are viewing Page 1.
-
Page 67: Bars
Bars You can create Sequences with a total length of one to four bars. To set/change the number of bars in a Sequence: Enter Sequence Mode by pressing the Sequence Mode (Seq) button. Check above the third Function Button (Page) to make sure you are viewing Page 1. If you are on Page 2, press the button to move to Page 1. - Page 68 The 16 Step Switches show one bar at a time. You can set them either (A) to show a specific bar (regardless of the current position of the Sequencer's playhead) or (B) to "follow" the Sequencer's playhead. To set which bar you viewing/editing in the Step Switches: Enter Select Mode by pressing and holding the Select Button.
-
Page 69: Timing
MIDI Clock to external MIDI devices and/or some DAWs that support it. Similarly, if you want Trigger Finger Pro to follow your DAW's tempo, set your DAW to use its own MIDI Clock (if applicable) and set Trigger Finger Pro to receive it. See Preferences: Clock to learn how to do this. -
Page 70: Swing
CHANGE-> SEQUENCER 01: Sequence BANK:A BAR:01 PAD:A01 SEQUENCE TEMPO: SWING: GATE FIX VEL: BARS: EDIT PAGE: VELOCITY 1 of 2 EXIT Swing The Swing setting determines the amount of swing—a "shuffle" or triplet-based feel—that is applied to the Sequence. Important: The Swing setting is affected by the Time Division. Furthermore, if your Time Division is triplet-based, Swing will not be applied. -
Page 71: Gate
Gate The Gate setting determines the length of the notes (steps) of the Sequence. With a small Gate setting, the note events of the Sequence will be very short and staccato-sounding. With a large Gate setting, the note events will be longer and more legato-sounding. To set the Gate of a Sequence: Enter Sequence Mode by pressing the Sequence Mode (Seq) button. -
Page 72: Time Division
Steps section of this chapter. Clock Trigger Finger Pro can either use its internal MIDI Clock or an external one from a DAW. See Preferences: Clock to learn how to change Trigger Finger Pro's MIDI clock source. -
Page 73: Copying And Pasting
Copying and Pasting When creating and editing Sequences, you can quickly copy and paste bars. You do not have to be in Sequence Mode to do this; rather, you do this in Select Mode. To copy and paste: Enter Select Mode by pressing and holding the Select button. (Although you must hold the Select button down before each step of this process, you can release it at any time without undoing anything—just remember to press and hold it again before resuming.) Select the pad whose step pattern you want to copy by pressing it. -
Page 74: Duplicating
Duplicating When creating and editing Sequences, you can duplicate a pad's step pattern to the next bar. Duplicating is different from copying and pasting in the following ways: It always copies and pastes to the next bar in the Sequence. It always copies and pastes the same pad. -
Page 75: Next Sequence Mode
Now!: The next Sequence will start immediately, regardless of where you are in the current Sequence. Important: If Trigger Finger Pro's Loop button is activated, the current bar will repeat until it you press the Loop button again, overriding the When setting (i.e., the next Sequence will not start playing). -
Page 76: Timing
Timing This determines how timing-related settings—Tempo, Swing, Gate, and Time Division— affect the Sequences: • Locked: The next Sequence will use the same timing settings as the current Sequence. If you choose this setting before starting playback, the first Sequence you play determines the timing settings. -
Page 77: Pad Mute Mode
Pad Mute Mode Pad Mute Mode lets you mute all sounds in a Sequence that are played by a pad (or multiple pads). You can do this during Sequence playback or while the Sequence is stopped. This can be useful for simply removing certain sounds from a Sequence. It is also an interesting production/performance technique in and of itself! Note: Muting a pad does not disable it;... - Page 78 You can also mute an entire pad bank. This can be done whether or not you are in Pad Mute Mode. Important: The mute states of your pad banks will be saved with the Sequence. To mute one or more pad banks: Press and hold the Pad Bank button.
- Page 79 You can quickly disable all mutes (and solos) by using the Enable All feature. To activate Enable All: Enter Sequence Mode by pressing the Sequence Mode (Seq) button. Check above the third Function Button (Page) to make sure you are viewing Page 2. If you are on Page 1, press the button to move to Page 2.
-
Page 80: Pad Solo Mode
Pad Solo Mode Pad Solo Mode lets you solo all sounds in a Sequence that are played by a pad (or multiple pads). You can do this during Sequence playback or while the Sequence is stopped. This can be useful for isolating certain sounds in a Sequence. Important: Soloing a muted pad will override its muted state. - Page 81 You can quickly disable all solos (and mutes) by using the Enable All feature. To activate Enable All: Enter Sequence Mode by pressing the Sequence Mode (Seq) button. Check above the third Function Button (Page) to make sure you are viewing Page 2. If you are on Page 1, press the button to move to Page 2.
-
Page 82: Pad Roll Mode
Pad Roll Mode Pad Roll Mode causes pads, when pressed and held, to automatically retrigger at a regular rate in quick succession, similar to a drum roll. This is useful for creating fills during performance. Press the Roll button to activate or deactivate Pad Roll Mode. When you press and hold a pad while in this mode, the pad's sound will repeat at the rate determined by the current Time Division setting. -
Page 83: Fixed Mode
GATE FIX VEL: EDIT MAPPING: PADS MIDI EXIT Saving and Loading Trigger Finger Pro lets you save Sequences to its internal memory. See the earlier Saving and Loading section to learn how to save your Sequences to Trigger Finger Pro. -
Page 84: Preferences
Preferences Trigger Finger Pro's Preferences affect its "global" operation. In other words, these settings determine how it works regardless of what Preset or Sequence is currently selected. This chapter describes how to edit the Preferences, which you can save and then load in future sessions. -
Page 85: Tempo
Tempo button functions. Tap LED The Tempo button's LED flashes in time with Trigger Finger Pro's internal Clock (if Clock is set to External, this button will be lit blue). You can turn this LED on or off. -
Page 86: Tap Average
Tap Average Pressing the Tempo button repeatedly at the desired rate will change the Sequence's tempo. You can set how many presses ("taps") are required before the new tempo is detected and changed. To set how many taps are required to enter a new tempo: Enter Preferences by pressing the third Function Button (Prefs) while in Performance Mode. -
Page 87: Clock
Clock Trigger Finger Pro can either use its internal MIDI Clock or an external one from a DAW. To set the MIDI Clock source: Enter Preferences by pressing the third Function Button (Prefs) while in Performance Mode. Press the second Function Button (Clock) to switch the MIDI Clock setting: •... -
Page 88: Midi
MIDI Your Preferences' MIDI settings determine over which MIDI channel the pads or assignable control send their messages and whether the messages are sent over Trigger Finger Pro's USB Port, MIDI Out jack, or both. Important: This applies only to pads or assignable controls that have UsePrefs selected as their MIDI channel or MIDI output. -
Page 89: Velocity
Velocity The Preferences let you set two kinds of "global" velocities: the velocity used in Fixed Mode and the default velocity for the Step Switches. Fixed Mode Velocity Fixed Mode lets you play all pads with their sounds at the same velocity level, regardless of how hard you hit them. -
Page 90: Sequencer Velocity
Sequencer Velocity The Sequencer Velocity determines the default velocity level of steps entered by using the Step Switches. To set the Fixed Mode velocity in your Preferences: Enter Preferences by pressing the third Function Button (Prefs) while in Performance Mode. Turn the fourth Assignable Knob (Seq Vel) to set the desired velocity (00–127). -
Page 91: Display
Display The Preferences let you adjust certain settings that affect Trigger Finger Pro's display. To adjust the display settings: Enter Preferences by pressing the third Function Button (Prefs) while in Performance Mode. Press the third Function Button (More). Turn the first Assignable Knob (LCD: Bright) to set the display's brightness (00–100%). -
Page 92: Pads
Pads The Preferences also let you can set the gain, sensitivity, and velocity curves used for all of Trigger Finger Pro's pads. To adjust the pad settings: Enter Preferences by pressing the third Function Button (Prefs) while in Performance Mode. -
Page 93: Saving And Loading
GAIN: SENS: CURVE: MODE: AVERAGE: 100% Log1 EXIT Saving and Loading Trigger Finger Pro lets you save Preferences to its internal memory. See the earlier Saving and Loading section to learn how to save your Preferences to Trigger Finger Pro. -
Page 94: Using An External Midi Module
Using an External MIDI Module You can use Trigger Finger Pro as a controller for an external MIDI device. Use a standard 5- pin MIDI cable to connect your external device's MIDI input to Trigger Finger Pro's MIDI Out. Also, make sure Trigger Finger Pro's Preferences are set properly depending on your setup:... -
Page 95: Appendix
Appendix Technical Specifications Display Monochromatic LCD, 68x4 characters Pads 16 pads (in a 4x4 grid), velocity- and pressure-sensitive, RGB-backlit with assignable colors; 4 banks Assignable Knobs 4 360º encoders; 4 banks Assignable Faders 4 60mm faders; 4 banks Assignable Buttons 4 RGB-backlit buttons; 4 banks Step Switches 16 backlit buttons with 16 LED indicators above Inputs / Outputs... -
Page 96: Trademarks And Licenses
Trademarks and Licenses M-Audio and AIR Music Technology are trademarks of inMusic Brands, Inc., registered in the U.S. and other countries. Mac and OS X are trademarks or service marks of Apple Inc., registered in the U.S. and other countries. - Page 97 m-audio.com...
Need help?
Do you have a question about the Trigger Finger Pro and is the answer not in the manual?
Questions and answers