Table of Contents
Advertisement
Advertisement
Table of Contents

Subscribe to Our Youtube Channel
Related Manuals for M-Audio code25


Summary of Contents for M-Audio code25
- Page 1 User Guide English Manual Version 1.0...
-
Page 2: Table Of Contents
Table of Contents Introduction..........................9 Box Contents ......................... 9 Support ..........................9 Quick Start / Connection Diagram .................... 9 Features ............................ 10 Code 25 ..........................10 Top Panel ........................10 Rear Panel ........................14 Code 49 ..........................15 Top Panel ........................15 Rear Panel ........................ - Page 3 Zones ..........................30 Assigning Keys to a Zone .................... 30 Zone Channel ......................31 Zone Octave and Transposition ................... 32 Zone Program Change ....................33 Zone Bank Change ..................... 34 Channels .......................... 35 Control Channel ......................35 Zone Channel ......................36 Global Channel ......................
- Page 4 Faders ..........................43 Editing Assignments ......................43 Channel ........................43 Messages........................44 MIDI CCs ......................... 44 Relative Messages ....................45 Modes ..........................46 MIDI Mode ........................46 Mackie Control/HUI Mode ................... 46 Buttons ..........................47 Editing Assignments ......................47 Channel ........................47 Messages........................
- Page 5 Encoders ..........................60 Editing Assignments ......................60 Channel ........................60 Messages........................61 MIDI CCs ......................... 61 Relative Messages ....................62 Curve .......................... 63 Modes ..........................64 MIDI Mode ........................64 Mackie Control/HUI Mode ................... 64 X-Y Pad ..........................65 Editing Assignments ......................65 Channel ........................
- Page 6 Pads............................71 Editing Assignments ......................71 Channel ........................71 Messages........................72 MIDI Notes ......................72 MIDI CCs ......................... 73 MIDI CC Value Increment/Decrement ..............74 MIDI CC Value Cycle....................75 Program, Bank LSB, and Bank MSB ............... 76 Program Increment/Decrement ................77 Program Cycle ......................
- Page 7 Volume Pedal ........................94 Editing Assignments ......................94 Channel ........................94 Messages........................95 MIDI CCs ......................... 95 ® ® Mackie Control and HUI ....................96 Using Mackie Control ...................... 96 Using HUI ........................97 MIDI Out ..........................98 MIDI Panic ........................... 98 Program Changes .......................
- Page 8 Presets ..........................107 Colors ..........................108 Buttons .......................... 108 Pads..........................108 Velocity Curves ......................... 109 Keyboard (VCrV) ......................109 Pads (PCrV) ........................109 Encoders (ECrV) ......................110 X-Y Pad (TCrV) ......................110 Technical Specifications ....................111 Code 25 ......................... 111 Code 49 .........................
-
Page 9: Introduction
Safety & Warranty Manual Support For the latest information about this product (system requirements, compatibility information, etc.) and product registration, visit m-audio.com. For additional product support, visit m-audio.com/support. Quick Start / Connection Diagram Remember to select Code 25, Code 49, or Code 61 as the controller in the Preferences, Device Setup, or Options of your digital audio workstation (DAW). -
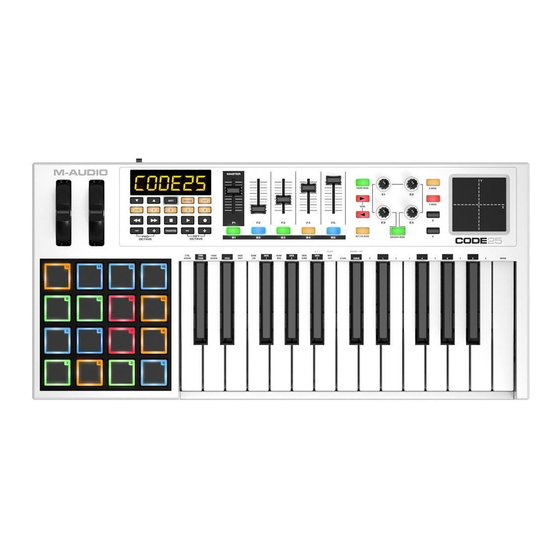
Page 10: Features
Features Code 25 Top Panel Important: For more complete explanations of how to use all of these controls, please see the Operation chapter. 1. Keyboard: This 25-note keyboard is velocity-sensitive with aftertouch and, in conjunction with the Key Octave –/+ buttons, can access the full range of 127 available MIDI notes (10 octaves). - Page 11 ® ® 7. Faders (F1–F5): Use these faders to send MIDI CC or Mackie Control /HUI messages to your software or external MIDI device. Use the Fader Mode button to change their current mode. You can also change these faders’ MIDI assignments. See Operation >...
- Page 12 16 17 18 19 14. Transport Controls: These six buttons are dedicated buttons for sending conventional Mackie Control/HUI transport control commands: Rewind (), Fast-Forward (), Stop (), Play (), and Record (). 15. Display: Use this screen to view parameter values, settings, and messages relevant to Code 25’s current operation.
- Page 13 22. X/Y Pad: This touch-sensitive pad lets you control two parameters simultaneously in a two-dimensional way (rather than a traditional one-dimensional modulation wheel). You can assign the parameter and range of each axis, X (horizontal) and Y (vertical). This pad can be in one of three modes as determined by the X-Mode and Y-Mode buttons.
-
Page 14: Rear Panel
Rear Panel 1. Power Input: If you do not want to use a computer in your setup (i.e., if you are using Code 25 to control an external MIDI module), connect Code 25’s power input to a power outlet using an optional power adapter (9 VDC, 1 A, center-positive, sold separately). Alternatively, you can connect Code 25’s USB Port to a power outlet using a standard USB charger (sold separately). -
Page 15: Code 49
Code 49 Top Panel Important: For more complete explanations of how to use all of these controls, please see the Operation chapter. 1. Keyboard: This 49-note keyboard is velocity-sensitive with aftertouch and, in conjunction with the Key Octave –/+ buttons, can access the full range of 127 available MIDI notes (10 octaves). - Page 16 ® ® 7. Faders (F1–F9): Use these faders to send MIDI CC or Mackie Control /HUI messages to your software or external MIDI device. Use the Fader Mode button to change their current mode. You can also change these faders’ MIDI assignments. See Operation >...
- Page 17 16 17 18 19 14. Transport Controls: These six buttons are dedicated buttons for sending conventional Mackie Control/HUI transport control commands: Rewind (), Fast-Forward (), Stop (), Play (), and Record (). 15. Display: Use this screen to view parameter values, settings, and messages relevant to Code 49’s current operation.
- Page 18 22. X-Y Pad: This touch-sensitive pad lets you control two parameters simultaneously in a two-dimensional way (rather than a traditional one-dimensional modulation wheel). You can assign the parameter and range of each axis, X (horizontal) and Y (vertical). This pad can be in one of three modes as determined by the X-Mode and Y-Mode buttons.
-
Page 19: Rear Panel
Rear Panel 1. Power Input: If you do not want to use a computer in your setup (i.e., if you are using Code 49 to control an external MIDI module), connect Code 49’s power input to a power outlet using an optional power adapter (9 VDC, 1 A, center-positive, sold separately). Alternatively, you can connect Code 49’s USB Port to a power outlet using a standard USB charger (sold separately). -
Page 20: Code 61
Code 61 Top Panel Important: For more complete explanations of how to use all of these controls, please see the Operation chapter. 1. Keyboard: This 61-note keyboard is velocity-sensitive with aftertouch and, in conjunction with the Key Octave –/+ buttons, can access the full range of 127 available MIDI notes (10 octaves). - Page 21 ® ® 7. Faders (F1–F9): Use these faders to send MIDI CC or Mackie Control /HUI messages to your software or external MIDI device. Use the Fader Mode button to change their current mode. You can also change these faders’ MIDI assignments. See Operation >...
- Page 22 16 17 18 19 14. Transport Controls: These six buttons are dedicated buttons for sending conventional Mackie Control/HUI transport control commands: Rewind (), Fast-Forward (), Stop (), Play (), and Record (). 15. Display: Use this screen to view parameter values, settings, and messages relevant to Code 61’s current operation.
- Page 23 22. X-Y Pad: This touch-sensitive pad lets you control two parameters simultaneously in a two-dimensional way (rather than a traditional one-dimensional modulation wheel). You can assign the parameter and range of each axis, X (horizontal) and Y (vertical). This pad can be in one of three modes as determined by the X-Mode and Y-Mode buttons.
-
Page 24: Rear Panel
Rear Panel 1. Power Input: If you do not want to use a computer in your setup (i.e., if you are using Code 61 to control an external MIDI module), connect Code 61’s power input to a power outlet using an optional power adapter (9 VDC, 1 A, center-positive, sold separately). Alternatively, you can connect Code 61’s USB Port to a power outlet using a standard USB charger (sold separately). -
Page 25: Operation
Operation This chapter describes the features of your Code Series keyboard. Basic Concepts This chapter gives an overview of some fundamental concepts that will help you understand and use your Code Series keyboard: Presets Zones Control Modes Channels Edit Mode Each section contains links to other relevant sections of this guide, which we recommend reading, as well. -
Page 26: Control Modes
Control Modes Fader Modes: The faders are always in one of two modes. Press Fader Mode to switch between them, distinguishable by the Fader Mode button’s color: MIDI Mode (red): Moving the faders will send MIDI CC messages. Mackie Control/HUI Mode (green): Moving the faders will send messages using the Mackie Control/HUI protocol. -
Page 27: Using The Bank Buttons
Using the Bank Buttons The faders, buttons, and encoders all have multiple banks. You can use the Bank Right/Left () buttons to move to the next or previous bank. You can set these buttons to change the bank for all controls or for controls in a specific mode only. The mode of the Bank Right/Left () buttons determines which controls it affects. -
Page 28: Edit Mode
Edit Mode Edit Mode lets you set various functions on Code 61. For instance, you can assign MIDI parameters, set MIDI value ranges, change the colors of buttons, or assign MIDI channels. To enter or exit Edit Mode, press Edit. The button will light up while in Edit Mode. Overview of Control Assignments When you select a control to edit, you can set any of the following: •... - Page 29 Enter Ctrl Assign Numeric Keys (0–9) To assign or edit a control: 1. Press Edit to enter Edit Mode. The button will light up. 2. Select the control you want to assign or edit by moving or pressing it. Its name (and number, if available) will appear in the display.
-
Page 30: Zones
Zones The keyboard can be divided into 1–4 “zones.” When zones are active (when the Zone button and one or more Zone 1–4 buttons are lit), each zone can send its controls’ MIDI messages over its own MIDI channel. Tip: This feature is great for dividing your Code keyboard between different virtual instruments or synthesizers. -
Page 31: Zone Channel
Zone Channel You can set each zone to a different MIDI channel. Each zone (controls and keys) can then control a different virtual instrument or synthesizer (set to receive MIDI messages on those channels). By default, all zone channels are set to Channel “00,” which is the global channel (see Channels >... -
Page 32: Zone Octave And Transposition
Zone Octave and Transposition You can set each zone to a different octave or transposition. The keys of each zone can then send different notes to a different virtual instrument or synthesizer (set to receive MIDI messages on those channels). The zone octave and transposition are independent from the keyboard’s overall octave and transposition;... -
Page 33: Zone Program Change
Zone Program Change Each zone can send Zone Program Change messages when you activate it, ensuring that the zone always uses the same program. To set the zone program change: 1. Press and hold Zone for 1 second to enter Zone Edit Mode. The active Zone Buttons 1–4 will flash. -
Page 34: Zone Bank Change
Zone Bank Change Zone Bank Change messages are sent on the channel(s) of active zones, thus accessing additional banks of instrument sound presets (if available) for each zone. Each bank change consists of an LSB number (Least Signficant Byte) and an MSB number (Most Significant Byte). -
Page 35: Channels
Channels Your Code Series keyboard uses three different types of MIDI channels, each described in this section: • Control Channel (the channel used by a specific control, which you can assign) • Zone Channel (the channel used by a zone, which can contain multiple controls and a section of the keyboard) •... -
Page 36: Zone Channel
Zone Channel Like individual controls, a zone can send its MIDI messages over a specified MIDI channel. By default, all zone channels are set to Channel “00,” which is the global channel (see the following Global Channel section). If you want each zone to control only a specific virtual instrument or synthesizer, you should set each zone to a different channel, and then set each virtual instrument or synthesizer to receive messages on those channels. -
Page 37: Keyboard
Keyboard The keyboard is velocity-sensitive with aftertouch and can access the full range of 127 available MIDI notes across 10 octaves. This chapter explains how to use the keyboard to perform different commands while configuring the assignable controls. See the Commands section to learn how to do this. -
Page 38: Chan Assign
Chan Assign Press this key to view or enter the MIDI channel (using the numeric keys (0–9)) for the currently selected control. The control will send its MIDI messages over this MIDI channel. When assigning the MIDI channel for a control, you can select one of the standard MIDI channels (00–16), Code 61’s global MIDI channel (00), or one of Values 17–20, which correspond to channels used by Zones 1–4 (z1–z4). -
Page 39: Memory Dump
Memory Dump Press this key to send a “System Exclusive” (SysEx) memory dump for all 12 presets. You can later send the SysEx file back to your Code Series keyboard to restore your presets. Presets and Memory > Sending and Restoring SysEx Memory to learn more. -
Page 40: Store
Store Press this key to save the current assignments to one of 12 presets. This will overwrite the preset currently stored there. See Presets and Memory > Storing Presets to learn more about this. ® ® Curve / Mackie /HUI Press this key to set the velocity curve of the keyboard, pads, encoders, or X-Y pad (when set to Note Mode). -
Page 41: Editing Assignments
Editing Assignments You can set the keyboard’s channel (which is the “global” channel). See Channel to learn how to do this. To learn how to set the keyboard’s response curve, see the Curve section. Channel Any sections of the keyboard that are not in an active zone (described in Zones >... -
Page 42: Octaves And Transposition
Octaves and Transposition By using the Key Octave –/+ buttons, the keyboard can access the full range of 127 available MIDI notes (10 octaves). Additionally, you can transpose the keyboard up to 12 semitones (1 octave) in either direction. To change the octave of the keyboard, use the Key Octave –/+ buttons to lower or raise the octave, respectively. -
Page 43: Faders
Faders This chapter explains how to assign the faders to different commands. See the Editing Assignments section to learn how to do this. The faders’ functions also depend on their current mode. See the Modes section to learn about their modes. Editing Assignments You can set the channel of each fader. -
Page 44: Messages
Messages MIDI CCs You can assign the faders to send MIDI CC messages with values within a specified range. To assign a MIDI CC to a fader: 1. Press Edit to enter Edit Mode. The Edit button will light up. 2. -
Page 45: Relative Messages
Relative Messages Most software controls receive “absolute” messages by scanning the position of a fader or encoder and using that position’s value. Some other software controls, however, receive “relative” messages, which simply increment/decrement the value (as opposed to sending a precise value to designate a position). -
Page 46: Modes
Modes The faders are always in one of two modes. Press Fader Mode to switch between them, distinguishable by the Fader Mode button’s color. MIDI Mode In this mode, the Fader Mode button will be lit red. Moving the faders will send MIDI CC messages, which you can assign (described earlier in Editing Assignments >... -
Page 47: Buttons
Buttons This chapter explains how to assign the buttons to different commands. See the Editing Assignments section to learn how to do this. The buttons’ functions also depend on their current mode. See the Modes section to learn about their modes. Editing Assignments You can set the channel of each button. -
Page 48: Messages
Messages MIDI CCs You can assign the buttons to send MIDI CC messages with a “pressed” value and a “released” value. The buttons must be in MIDI Mode to do this (see Modes > MIDI Mode). To assign a MIDI CC to a button: 1. -
Page 49: Midi Cc Value Increment/Decrement
MIDI CC Value Increment/Decrement You can set a button to increment/decrement a MIDI CC value by 1 each time you press it. After it reaches its highest or lowest value, it will “wrap around” and start again at its lowest or highest value, respectively. -
Page 50: Midi Cc Value Cycle
MIDI CC Value Cycle You can set a button to cycle through or switch between 2, 3, or 4 MIDI CC values by each time you press it. To assign a button to cycle through or switch between 2, 3, or 4 MIDI CC values: 1. -
Page 51: Program, Bank Lsb, And Bank Msb
Program, Bank LSB, and Bank MSB You can set a button to send a combined program number, Bank LSB, and Bank MSB number. This can be useful for selecting a preset from a specific bank of a virtual instrument or synthesizer (the instrument or synthesizer must support these messages). -
Page 52: Program Increment/Decrement
Program Increment/Decrement You can set a button to increment/decrement the program number by 1 each time you press it. After it reaches its highest or lowest program, it will “wrap around” and start again at its lowest or highest program, respectively. In other words, pressing the button causes the value to cycle through its entire range by increments of 1. -
Page 53: Program Cycle
Program Cycle You can also set a button to cycle through 2, 3, or 4 program numbers by each time you press it. To assign a button to cycle through 2, 3, or 4 program numbers: 1. Press Edit to enter Edit Mode. The Edit button will light up. 2. -
Page 54: Midi Notes
MIDI Notes You can assign the buttons to send MIDI note numbers. The buttons must be in MIDI Mode to do this (see Modes > MIDI Mode). To assign a MIDI note to a button: 1. Press Edit to enter Edit Mode. The Edit button will light up. 2. -
Page 55: Mmc (Midi Machine Control)
MMC (MIDI Machine Control) Some recording hardware and DAWs can be controlled remotely via MMC (MIDI Machine Control) messages. MMC is a transport control protocol. The buttons must be in MIDI Mode to do this (see Modes > MIDI Mode). To assign a MMC message to a button: 1. -
Page 56: Keystrokes
Keystrokes The HID (human interface device) protocol lets devices send standard computer keyboard keystrokes. USB game controllers are an example of this, acting as an alternative to your computer’s keyboard. Your Code Series keyboard’s assignable buttons can also use the HID protocol, letting you configure certain buttons to send your most-often used keystrokes to your software (for example, Control + C to copy). -
Page 57: Latching
Latching By default, the buttons are set to send one value when pressed and one value when released. This is often called “momentary” behavior. You can change this so that a button sends one value when pressed and a different value when pressed a second time, alternating between the two values with each press. -
Page 58: Colors
Colors Each button can have a set of colors assigned to it, making it easier to distinguish between their different functions, notes, etc. Each button can use up to 4 colors, depending on its function. To set the color(s) of a button: 1. -
Page 59: Modes
Modes The buttons are always in one of three modes. Press Button Mode to switch between them, distinguishable by the Button Mode button’s color. MIDI Mode In this mode, the Button Mode button will be lit red. Pressing the buttons will send MIDI CC messages, which you can assign (described earlier in Editing Assignments >... -
Page 60: Encoders
Encoders This chapter explains how to assign the encoders to different commands. See the Editing Assignments section to learn how to do this. The encoders’ functions also depend on their current mode. See the Modes section to learn about their modes. Editing Assignments You can set the channel of each encoder. -
Page 61: Messages
Messages MIDI CCs You can assign the encoders to send MIDI CC messages when you turn them. The encoders must be in MIDI Mode to do this (see Modes > MIDI Mode). To assign a MIDI CC to an encoder: 1. -
Page 62: Relative Messages
Relative Messages Most software controls receive “absolute” messages by scanning the position of a fader or encoder and using that position’s value. Some other software controls, however, receive “relative” messages, which simply increment/decrement the value (as opposed to sending a precise value to designate a position). -
Page 63: Curve
Curve The curve setting for an encoder determines its rate of acceleration as you turn it. To set the encoder curve: 1. Press Edit to enter Edit Mode. The Edit button will light up. 2. Press the Curve key four times. The display will show ECrV and the current curve setting: Display Curve Description... -
Page 64: Modes
Modes The encoders are always in one of two modes. Press Encoder Mode to switch between them, distinguishable by the Encoder Mode button’s color. MIDI Mode In this mode, the Encoder Mode button will be lit red. Turning the encoders will send MIDI CC messages, which you can assign (described earlier in Editing Assignments >... -
Page 65: X-Y Pad
X-Y Pad This chapter explains how to assign the axes of the X-Y pad to different commands. See the Editing Assignments section to learn how to do this. The axes’ functions also depend on their current modes. See the Modes section to learn about their modes. -
Page 66: Messages
Messages MIDI CCs You can assign an axis of the X-Y pad to send a MIDI CC message when you move your finger along it. The X-Y pad must be in MIDI Mode to do this (see Modes > MIDI Mode). -
Page 67: Relative Messages
Relative Messages Most software controls receive “absolute” messages by scanning the position of a fader or encoder and using that position’s value. Some other software controls, however, receive “relative” messages, which simply increment/decrement the value (as opposed to sending a precise value to designate a position). -
Page 68: Midi Notes
MIDI Notes When an axis of the X-Y pad is in MIDI Note Mode, you can move your finger along it to send a range of MIDI notes. The X-Y pad must be in MIDI Note Mode to do this (see Modes >... -
Page 69: Curve
Curve The curve setting for the X-Y pad determines the velocities of the notes it sends out as you move your finger across it. The curve setting affects the X-Y pad in MIDI Note Mode only. To set the X-Y pad curve: 1. -
Page 70: Modes
Modes Each axis of the X-Y pad is always in one of three modes. Press X-Mode or Y-Mode to cycle through them, distinguishable by the X-Mode or Y-Mode button’s color. MIDI Mode In this mode, the X-Mode or Y-Mode button will be lit red. Moving your finger along the axis will send a MIDI CC message, which you can assign (described earlier in Editing Assignments >... -
Page 71: Pads
Pads This chapter explains how to assign the pads to different commands. See the Editing Assignments section to learn how to do this. You can also shift the range of the pads by octave or semitones. See the Octaves and Transposition section to learn about this. -
Page 72: Messages
Messages By default, the pads are set to send MIDI notes on Channel 10, which is commonly reserved for drums and percussion in the General MIDI (GM) specification. You can change this setting if you want, though. MIDI Notes You can assign the pads to send MIDI note numbers. To assign a MIDI note to a pad: 1. -
Page 73: Midi Ccs
MIDI CCs You can assign the pads to send MIDI CC messages with a “pressed” value and a “released” value. To assign a MIDI CC to a pad: 1. Press Edit to enter Edit Mode. The Edit button will light up. 2. -
Page 74: Midi Cc Value Increment/Decrement
MIDI CC Value Increment/Decrement You can set a pad to increment/decrement a MIDI CC value by 1 each time you press it. After it reaches its highest or lowest value, it will “wrap around” and start again at its lowest or highest value, respectively. -
Page 75: Midi Cc Value Cycle
MIDI CC Value Cycle You can also set a pad to cycle through 3 or 4 MIDI CC values by each time you press it. To assign a pad to cycle through 3 or 4 MIDI CC values: 1. Press Edit to enter Edit Mode. The Edit button will light up. 2. -
Page 76: Program, Bank Lsb, And Bank Msb
Program, Bank LSB, and Bank MSB You can set a pad to send a combined program number, Bank LSB, and Bank MSB number. This can be useful for selecting a preset from a specific bank of a virtual instrument or synthesizer (the instrument or synthesizer must support these messages). -
Page 77: Program Increment/Decrement
Program Increment/Decrement You can set a pad to increment/decrement the program number by 1 each time you press it. After it reaches its highest or lowest program, it will “wrap around” and start again at its lowest or highest program, respectively. In other words, pressing the pad causes the value to cycle through its entire range by increments of 1. -
Page 78: Program Cycle
Program Cycle You can also set a pad to cycle through 3 or 4 program numbers by each time you press it. To assign a pad to cycle through 3 or 4 program numbers: 1. Press Edit to enter Edit Mode. The Edit button will light up. 2. -
Page 79: Mmc (Midi Machine Control)
MMC (MIDI Machine Control) Some recording hardware and DAWs can be controlled remotely via MMC (MIDI Machine Control) messages. MMC is a transport control protocol. To assign a MMC message to a pad: 1. Press Edit to enter Edit Mode. The Edit button will light up. 2. -
Page 80: Latching
Latching By default, the pads are set to send one value when pressed and one value when released. This is often called “momentary” behavior. You can change this so that a pad sends one value when pressed and a different value when pressed a second time, alternating between the two values with each press. -
Page 81: Curve
Curve The curve setting for the pads determines their velocity sensitivity—the amount of force required to generate a note with a specific velocity. To set the pad curve: 1. Press Edit to enter Edit Mode. The Edit button will light up. 2. -
Page 82: Colors
Colors Each pad can have a set of colors assigned to it, making it easier to distinguish between their different functions, notes, etc. Each pad can use up to 4 colors, depending on its function (in other words, you can assign all 4 colors to a pad, but it may use only some of them). To set the color(s) of a pad: 1. -
Page 83: Octaves And Transposition
Octaves and Transposition By using the Pad Octave –/+ buttons, the pads can access the full range of 127 available MIDI notes (10 octaves). Additionally, you can transpose the pads up to 12 semitones (1 octave) in either direction. To change the octave of the pads, use the Pad Octave –/+ buttons to lower or raise the octave, respectively. -
Page 84: Wheels
Wheels Editing Assignments You can set the channel of each wheel. See Channel to learn how to do this. To learn how to assign a MIDI CC message to a wheel, see the Messages section. Channel To set the MIDI channel for a wheel: 1. -
Page 85: Messages
Messages MIDI CCs You can assign the wheels to send MIDI CC messages when you move them. To assign a MIDI CC to a wheel: 1. Press Edit to enter Edit Mode. The Edit button will light up. 2. Move the desired wheel. PW (pitch-bend wheel) or MW (modulation wheel) will appear in the display. -
Page 86: Sustain Pedal
Sustain Pedal Editing Assignments You can set the channel of the sustain pedal. See Channel to learn how to do this. To learn how to assign different types of messages to the sustain pedal, see the Messages section. You can also whether the sustain pedal is “momentary” (the default) or “latching” (also known as “toggle”). -
Page 87: Messages
Messages MIDI CCs You can assign the sustain pedal to send a MIDI CC message when you press it. To assign a MIDI CC to the sustain pedal: 1. Press Edit to enter Edit Mode. The Edit button will light up. 2. -
Page 88: Midi Notes
MIDI Notes You can assign the sustain pedal to send a MIDI note number when you press it. To assign a MIDI note to the sustain pedal: 1. Press Edit to enter Edit Mode. The Edit button will light up. 2. -
Page 89: Midi Cc Value Increment/Decrement
MIDI CC Value Increment/Decrement You can set the sustain pedal to increment/decrement a MIDI CC value by 1 each time you press it. After it reaches its highest or lowest value, it will “wrap around” and start again at its lowest or highest value, respectively. -
Page 90: Program, Bank Lsb, And Bank Msb
Program, Bank LSB, and Bank MSB You can set the sustain pedal to send a combined program number, Bank LSB, and Bank MSB number. This can be useful for selecting a preset from a specific bank of a virtual instrument or synthesizer (the instrument or synthesizer must support these messages). To assign the sustain pedal to send a combined program, Bank LSB, and Bank MSB number: 1. -
Page 91: Program Increment/Decrement
Program Increment/Decrement You can set the sustain pedal to increment/decrement the program number by 1 each time you press it. After it reaches its highest or lowest program, it will “wrap around” and start again at its lowest or highest program, respectively. In other words, pressing the sustain pedal causes the value to cycle through its entire range by increments of 1. -
Page 92: Mmc (Midi Machine Control)
MMC (MIDI Machine Control) Some recording hardware and DAWs can be controlled remotely via MMC (MIDI Machine Control) messages. MMC is a transport control protocol. To assign a MMC message to the sustain pedal: 1. Press Edit to enter Edit Mode. The Edit button will light up. 2. -
Page 93: Latching
Latching By default, the sustain pedal is set to send one value when pressed and one value when released. This is often called “momentary” behavior. You can change this so that the sustain pedal sends one value when pressed and a different value when pressed a second time, alternating between the two values with each press. -
Page 94: Volume Pedal
Volume Pedal Editing Assignments You can set the channel of the volume pedal. See Channel to learn how to do this. To learn how to assign MIDI CC messages to the volume pedal, see the Messages section. Channel To set the MIDI channel for the volume pedal: 1. -
Page 95: Messages
Messages MIDI CCs You can assign the sustain pedal to send a MIDI CC message when you press it. To assign a MIDI CC to the volume pedal: 1. Press Edit to enter Edit Mode. The Edit button will light up. 2. -
Page 96: Mackie Control And Hui
® ® Mackie Control and HUI ® ® Your Code Series keyboard can send messages using the Mackie Control or HUI (Human User Interface) protocols rather than standard MIDI communication. You must first select which one it will use. Remember that the faders, buttons, and/or encoders you want to use with this protocol must be set to Mackie Control/HUI Mode for this to work properly. -
Page 97: Using Hui
Using HUI When your faders, buttons, and/or encoders are in Mackie Control/HUI Mode, their respective Fader Mode, Button Mode, or Encoder Mode button will be lit green. Use the Bank Right/Left () buttons to move to another bank of tracks. Important note if you are using Code 25: In your DAW, it may look like you are controlling 8 tracks, but you can control only 4 tracks at a time. -
Page 98: Midi Out
MIDI Out The MIDI Out port sends out MIDI messages from your Code Series keyboard. You can enable or disable this port. By default, it is disabled. It will not send out incoming MIDI messages from your DAW or the MIDI In port. To enable or disable the MIDI Out port: 1. -
Page 99: Program Changes
Program Changes To send a program change message, do one of the following sets of steps: To send a program change message in Edit Mode: 1. Press Edit to enter Edit Mode. The Edit button will light up. (You can cancel this procedure at any time by pressing Edit to exit Edit Mode.) 2. -
Page 100: Bank Changes
Bank Changes Bank LSB and Bank MSB messages are used to access additional banks of presets on virtual instruments, MIDI sound modules, etc. (if available). Note: A Bank LSB or Bank MSB number may not have any effect until you send a program change message after it. -
Page 101: Presets And Memory
Presets and Memory A preset is a saved collection of MIDI assignments for your Code Series keyboard’s controls, channel settings, keyboard zone settings, etc. You can store up to 12 presets in its internal memory, enabling you to use a dedicated preset for each digital audio workstation (DAW), virtual instrument, or project/session, for example. -
Page 102: Sending And Restoring Sysex Memory
Sending and Restoring SysEx Memory A “System Exclusive” (SysEx) file contains the settings for all 12 of your presets. You can send out a SysEx file, and then send it back to your Code Series keyboard later to restore those presets. -
Page 103: Appendix
Appendix Parameter Numbers Faders, Encoders, X-Y Pad, Wheels, and Volume Pedal Registered Parameter Numbers (RPNs) (000–127) 00 Bank Select 37 Portamento Time LSB 01 Modulation 38 Data Entry LSB 02 Breath Control 39 Channel Volume LSB 03 Controller 3 40 Balance LSB 04 Foot Control 41 Controller 41 05 Portamento Time... -
Page 104: Non-Registered Parameter Numbers (Nrpns) (128-144)
Registered Parameter Numbers (RPNs) (000–127, continued) 74 Cut-off Frequency 102 Controller 102 75 Controller 75 103 Controller 103 76 Controller 76 104 Controller 104 77 Controller 77 105 Controller 105 78 Controller 78 106 Controller 106 79 Controller 79 107 Controller 107 80 General Purpose 5 108 Controller 108 81 General Purpose 6... -
Page 105: Buttons, Pads, And Sustain Pedal
Buttons, Pads, and Sustain Pedal Registered Parameter Numbers (RPNs) (000–127) 00 Bank Select 41 Controller 41 01 Modulation 42 Pan LSB 02 Breath Control 43 Expression LSB 03 Controller 3 44 Controller 44 04 Foot Control 45 Controller 45 05 Portamento Time 46 Controller 46 06 Data Entry MSB 47 Controller 47... -
Page 106: Non-Registered Parameter Numbers (Nrpns) (128-156)
Registered Parameter Numbers (RPNs) (000–127, continued) 82 General Purpose 7 106 Controller 108 83 General Purpose 8 107 Controller 107 84 Portamento Control 108 Controller 108 85 Controller 85 109 Controller 109 86 Controller 86 110 Controller 110 87 Controller 87 111 Controller 111 88 High-Resolution Velocity Prefix 112 Controller 112... -
Page 107: Presets
Presets Your Code Series keyboard includes 12 presets with pre-assigned controls for various plugins and digital audio workstations (DAWs). When using each of these presets: • The faders, buttons, encoders, and X-Y pad in MIDI Mode will control the plugin/plugins. •... -
Page 108: Colors
Colors Buttons Each button can use up to 4 colors, depending on its function. The display will show COLOR1, COLOR2, COLOR3, or COLOR4. 0 Off 4 Magenta 1 Green 5 Red 2 Cyan 6 Yellow 3 Blue 7 White Pads Each pad can use up to 4 colors, depending on its function. -
Page 109: Velocity Curves
Velocity Curves Keyboard (VCrV) VCrV will appear in the display when you are selecting the keyboard velocity curve. Display Curve Description Number This is a low-sensitivity setting, useful for playing notes with mostly low VCrVC1 velocities. This is a medium-sensitivity setting (the default), useful for playing with VCrVC2 an average amount of force. -
Page 110: Encoders (Ecrv)
Encoders (ECrV) ECrV will appear in the display when you are selecting the encoders’ velocity curve. Display Curve Description Number ECrVOf Turning the encoder will always send a value change of one step in either direction regardless of how quickly/slowly you turn it. ECrVC2 This is a slow acceleration curve, useful for making fine adjustments. -
Page 111: Technical Specifications
Technical Specifications Specifications are subject to change without notice. Code 25 Keyboard 25 velocity- and pressure-sensitive keys (with aftertouch) 10-octave range available with Key Octave –/+ buttons 4 assignable zones All 25 keys send secondary commands in Edit Mode Pads 16 assignable velocity-sensitive pads, multicolor-backlit Faders 5 30mm assignable faders... -
Page 112: Code 49
Code 49 Keyboard 49 velocity- and pressure-sensitive keys (with aftertouch) 10-octave range available with Key Octave –/+ buttons 4 assignable zones Lowest 25 keys send secondary commands in Edit Mode Pads 16 assignable velocity-sensitive pads, multicolor-backlit Faders 9 30mm assignable faders 4 banks available with Bank /... -
Page 113: Code 61
Code 61 Keyboard 61 velocity- and pressure-sensitive keys (with aftertouch) 10-octave range available with Key Octave –/+ buttons 4 assignable zones Lowest 25 keys send secondary commands in Edit Mode Pads 16 assignable velocity-sensitive pads, multicolor-backlit Faders 9 30mm assignable faders 4 banks available with Bank /... -
Page 114: Trademarks And Licenses
Trademarks and Licenses M-Audio and AIR Music Technology are trademarks of inMusic Brands, Inc., registered in the U.S. and other countries. Mackie Control and HUI are trademarks or registered trademarks of LOUD Technologies Inc. Kensington and the K & Lock logo are registered trademarks of ACCO Brands. - Page 115 Manual Version 1.0...
Need help?
Do you have a question about the code25 and is the answer not in the manual?
Questions and answers