Avaya 2420 User Manual
2420 digital telephone
Hide thumbs
Also See for 2420:
- User manual (69 pages) ,
- Quick reference (21 pages) ,
- End user manual (19 pages)
Table of Contents
Advertisement
Advertisement
Chapters
Table of Contents

Related Manuals for Avaya 2420


Summary of Contents for Avaya 2420
- Page 1 2420 Digital Telephone User’s Guide 555-250-701 Issue 2 November 2002...
- Page 2 YOUR RESPONSIBILITY FOR YOUR SYSTEM’S SECURITY Avaya Inc. does not warrant that this product is immune from or will prevent unauthorized use of common-carrier telecommunication services or facilities accessed through or connected to it. Avaya Inc. will not be responsible for any charges that result from such unauthorized use.
-
Page 3: Table Of Contents
Safety Information ......3 2420 Telephone Components ..... . 4 2420 Telephone User Checklist . - Page 4 Using Display Features ......45 Tones and Their Meaning ......47 Index .
-
Page 5: Overview
Up to 13 characters can be displayed for each label. As soon as you install the 2420 telephone, you can take advantage of these powerful features because your telephone is instantly recognized by your call processing system. Depending on how it is administered at the call processing system, the 2420 telephone can also be moved to another office at your location and begin working without interruption. -
Page 6: Support For Call Center Users
Support for Call Center Users To meet the needs of those working in call centers, the 2420 telephone offers the following: • Call Center Mode operation—available from the Options Screen, this setting changes the standard display from 8 to 12 call appearance/feature button labels. -
Page 7: Support For Optional Devices
• 20A Stand—Every 2420 telephone comes equipped with a convertible stand that allows you to install the 2420 telephone on your desktop or on a wall. You must replace this convertible stand with the 20A stand if you are using a 200A or 201A module. -
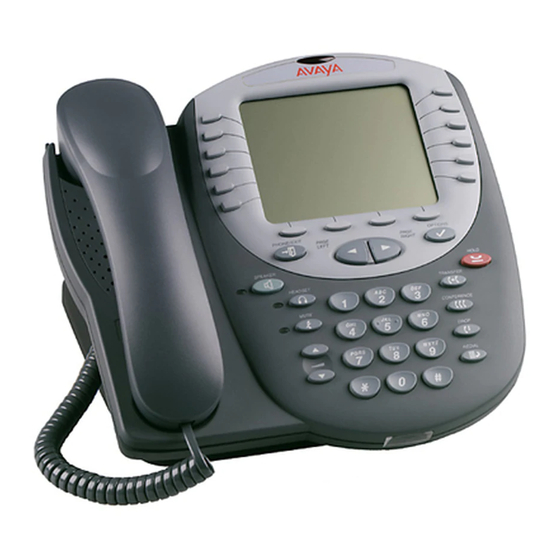
Page 8: 2420 Telephone Components
2420 Telephone Components Refer to Figure 1 below to familiarize yourself with your 2420 telephone screen display, buttons, and programmable features. MESSA GES EXIT SPEAKER HOLD TRANSFER HEADSET MUTE CONFERENCE DR OP REDIAL FIGURE 1 2420 Telephone Components Table 1 describes the 2420 telephone components presented in Figure 1. - Page 9 TABLE 1 The 2420 Telephone Components The following items correspond to the numbers in Figure 1. 1) Call appearance/feature buttons 7) Dialpad — Standard 12-button pad — For accessing incoming/outgoing for dialing telephone numbers. lines and programmed features. An underscore indicates the currently selected call appearance.
-
Page 10: 2420 Telephone User Checklist
2420 Telephone User Checklist The remainder of this guide contains procedures for using specific screens, features, and keys on the 2420 telephone. The following table directs you to sections explaining specific activities you may want to perform. Understand call appearance/ “The Home Screen”... -
Page 11: The Home Screen
Note: After initially plugging in a 2420 telephone or after a power outage, it may take several minutes before the time and date appear on the screen. -
Page 12: Navigating In The Home Screen Pages
(if available), “OUTSIDE CALL,” or a trunk identifier is shown. One call appearance is underlined at all times. When a call arrives at the 2420 telephone, the bell icon blinks on the corresponding call appearance (see “Status Icons”... -
Page 13: Status Icons
Status Icons The icons displayed on the call appearance/feature buttons of your 2420 telephone are explained in the following table. These icons replace the functionality of the green LEDs and equivalent flash rates. Status Icons Icon Definition Ringing An incoming call is waiting to be answered. -
Page 14: Call-Handling Features
MultiVantage™ Software (555-233-767) for alternate procedures. Answer a call When a call arrives at your 2420 telephone, you hear a ringing tone and a blinking bell icon appears on the associated call appearance. In addition, call identification information is displayed (see “Call Appearance and Call Identification Displays”... -
Page 15: Speed Dial
Speed Dial The Speed Dial feature allows you to have the 2420 telephone automatically dial calls to telephone numbers stored in your personal directory. See the procedures in “Managing Your Speed Dial List” on page 17 for creating and maintaining your personal 2420 telephone directory. - Page 16 (or headset) and the speaker are active at the same time While you are active on the handset (or headset), press Note: When the 201A Recorder Interface Module is installed with the 2420 telephone and administered to use the headset jacks on the 20A, you cannot use the Group Listen feature in which the headset and speaker are active simultaneously.
- Page 17 Transfer The Transfer feature allows you to transfer a call from your telephone to another extension or outside number. To transfer the current call to another extension 1. While on a call, press 2. When you hear dial tone, dial the number to which the call is to be transferred.
-
Page 18: Getting Messages
Message button. Please see your system manager if the message lamp is not working properly. See Chapter 21, “Features and Technical Reference,” of the Administrator’s Guide for Avaya MultiVantage™ Software, Document No. 555-233-506 for Message button programming information. -
Page 19: The Speed Dial Screen
The Speed Dial Screen Using the Speed Dial screen, you can store up to 104 speed dial entries in the personal directory of your 2420 telephone. You can access this screen by pressing the SpDial softkey at the Home screen. -
Page 20: Working In The Speed Dial Screen
Working in the Speed Dial Screen Working in the Speed Dial Screen Press Place a call to a displayed entry The button associated with the entry and return to the current Home screen View the next page of speed dial entries View the previous page of speed dial entries... -
Page 21: Managing Your Speed Dial List
Managing Your Speed Dial List Using the Speed Dial screen, you can store up to 104 speed dial entries in your personal 2420 telephone directory. You can access this screen by pressing the SpDial softkey at the Home screen. When you have created a speed dial list, the Speed Dial screen displays the saved entries in alphabetical order. -
Page 22: Dialing Conventions
Adding Speed Dial Entries You can store up to 104 personal speed dial entries in the 2420 telephone. When the maximum number of entries is stored, you must delete existing entries before the 2420 telephone allows you to enter new ones. -
Page 23: Editing Speed Dial Entries
7. Repeat Steps 2 through 6 to add more entries. Editing Speed Dial Entries You can edit information for any of the speed dial entries saved in your personal 2420 telephone directory. To edit stored speed dial entries 1. From the Home screen, press the SpDial softkey. -
Page 24: Deleting Speed Dial Entries
8. Repeat Steps 3 through 7 to edit more entries. Deleting Speed Dial Entries You can delete any of the speed dial entries saved in your personal 2420 telephone directory. To delete stored speed dial entries 1. From the Home screen, press the SpDial softkey. -
Page 25: The Call Log Screens
The Call Log Screens The 2420 telephone can store up to 100 entries in the Call Log. By default, all new calls are logged, and the number of new calls is displayed below the date and time on your 2420 telephone (see “The Home Screen” on page 7). -
Page 26: Working In The Call Log Summary Screen
The most recent call is displayed in the top-most position of the first page. When the log is full (that is, 100 calls), the log automatically deletes the oldest call information to allow for continuous logging without interruption. In addition, you can delete specific entries from the Call Log Detail screen. -
Page 27: Call Log Detail Screen
Call Log Detail Screen The Call Log Detail screen, which is accessed from the Call Log Summary screen, allows you to: • View additional information, such as call type and the date and time that the call was processed. • Make a call to the entry displayed directly from this screen (see “Using the Call Log”... -
Page 28: Working In The Call Log Detail Screen
Working in the Call Log Detail Screen Working in the Call Log Detail Screen Press Make a call to the entry The Call softkey displayed View the next call log entry View the previous call log entry Remove the selected entry The Delete softkey Save the selected entry as a The Save softkey... -
Page 29: Using The Call Log
Using the Call Log The Call Log feature is factory set to record answered, unanswered, and outgoing calls. For information on disabling the Call Log or changing the call types you want logged, see “Call Log Setup” on page 35 in “Selecting Personalized Options.”... -
Page 30: Saving A Call Log Entry To Your Speed Dial List
Saving a Call Log Entry to Your Speed Dial List To save an entry in the Call Log to your Speed Dial List 1. From the Home screen, press the Log softkey. The Call Log Summary screen is displayed. 2. Use to scroll through the Call Log Summary pages. -
Page 31: The Label Action Screen
The Label Action Screen The Label Action screen, which is accessed by pressing the Label softkey at the Home screen, allows you to: • customize the labels for the call appearance/feature buttons programmed on the call processing system • view the default labels for the call appearance/feature buttons programmed on the call processing system •... -
Page 32: Working In The Label Action Screen
Working in the Label Action Screen Working in the Label Action Screen Press Change the label of a call The Edit softkey appearance/feature button View the system default labels The Inspect softkey for the call appearance/feature buttons Delete the customized labels of The Restore softkey all the call appearance/feature buttons and restore all the... -
Page 33: Managing Your Call Appearance/Feature Button
Note: You can use to locate the label you want to edit. 3. Press the feature button on the 2420 telephone or EU24 Expansion Module (if installed) corresponding to the label you want to edit. The Label Edit screen is displayed. The New Label field displays the current customized label (if any), and the System Label fields displays the system default label. - Page 34 EU24 Expansion Module. 3. Use to scroll through the Label Inspect screen pages on the 2420 telephone. If an EU24 Expansion Module is installed, use the Alternate Display button on the EU24 Expansion Module to view its default labels.
- Page 35 Restoring the Default Labels You can delete the custom labels you created for the call appearance/feature buttons and restore the default labels from the call processing system. To restore the default labels 1. From the Home screen, press the Label softkey. The Label Action screen is displayed.
-
Page 36: The Options Screen
Japanese (Katakana) • erase all personal settings (except contrast level), stored Call Log, speed dial entries, and customized labels, and return the 2420 telephone to its default settings A sample Options screen is shown in Figure 7. Ring Pattern... -
Page 37: Working In The Options Screen
Working in the Options Screen Working in the Options Screen Press Select an option The associated button Return to the Home screen in The Done softkey which you were working previously Return to Page 1 of the Home at any time screen Note: If you press , a second screen is displayed that allows you to... -
Page 38: Selecting Personalized Options
Selecting Personalized Options Ring Pattern The Ring Pattern option on the Options screen allows you to choose a personalized ringing pattern for your telephone. You can choose from among eight different patterns. Note: If you receive an incoming call while you are working in the Ring Pattern option screen, you are automatically returned to the Home screen to facilitate call handling. -
Page 39: Call Log Setup
3. Use to adjust the level of contrast. Note: If an EU24 is connected to your 2420 telephone, the display shows the contrast level for the EU24 as well. Press the appropriate button to indicate whether you want to adjust the contrast for the telephone or the EU24. -
Page 40: Self Test
The Visual Ring option on the Options screen allows you to choose a visual alert for incoming calls. When you enable this option, the telephone rings and the lamp above the 2420 display area flashes when an incoming call arrives. To set the Visual Ring option 1. - Page 41 Display Mode (Call Center Mode) When the 2420 telephone is first installed, it is set to display 8 call appearance/feature buttons per screen page. The Display Mode option on the Options screen allows users (particularly those working in Call Centers) to choose an alternate display of 12 call appearance/feature buttons on each of the first two screen pages.
- Page 42 Erase All The Erase All option on the Options screen allows you to erase all of the personalized settings and reset the 2420 telephone to its default settings. This option erases your customized call appearance/feature button labels and all entries saved in your Call Log and Speed Dial List.
- Page 43 Language When the 2420 telephone is first installed, it is set to display screen text in English. The Language option on the Options screen allows you to choose another language, including: • German (Deutsch) • French (Français) • Spanish (Español) •...
-
Page 44: Using Selected Voice Features
Using Selected Voice Features The following features are available only if your system manager has administered them as feature buttons on your 2420 telephone or has supplied you with the required feature access codes. Abbreviated Dialing/Automatic Dialing (AD) The Abbreviated Dialing (AD) feature allows you to store selected telephone numbers for quick and easy dialing. -
Page 45: Call Forwarding All Calls
Call Forwarding All Calls The Call Forwarding feature temporarily forwards all your calls to another extension or to an outside number, depending on your system. To temporarily redirect all calls to an extension or outside number of your choice 1. Press the button (if administered) (while on-hook or off-hook) Call Fwd or Dial the Call Forward feature access code (while off-hook). -
Page 46: Call Pickup And Directed Call Pickup
Call Pickup and Directed Call Pickup The Call Pickup feature lets you answer a call at your telephone for another extension in your pickup group. If you can use the Directed Call Pickup feature, you can pick up a call ringing at a specific extension without the extension being a member of your pickup group. -
Page 47: Send All Calls
To leave a message without ringing an extension 1. Press the button or Dial the Leave Word Calling access code (while off-hook). 2. When you hear dial tone, dial the extension and listen for the confirmation tone. Message lamp goes on at the called telephone (if so equipped). 3. -
Page 48: Whisper Page
Whisper Page The Whisper Page feature allows you, if you have appropriate permissions, to make an announcement to a person at another extension currently on another call. Only the person at the other extension hears the announcement; the other person on the call cannot hear the message. To make an important announcement (such as an incoming call) to someone at another extension busy on another call 1. -
Page 49: Using Display Features
Using Display Features The following features are available only if your system manager has administered them as feature buttons on your 2420 telephone. Call Timer and Timer The Call Timer and the Timer features are used to measure elapsed time on a call. - Page 50 To place a call to the name shown on the display 1. Pick up the handset. 2. While the name is shown, press the button (if administered) Call Disp or, if you do not have a button on your set, press Call Disp then dial the number using the dial pad.
-
Page 51: Tones And Their Meaning
Tones and Their Meaning Note: The tables below describe the defaults for each ringing and feedback tone. Check with your system manager to verify if the descriptions in the Meaning column are accurate for your system. Ringing Tones are produced by an incoming call. Ringing Tones Rings Meaning... - Page 52 Feedback Tones (continued) Tones Meaning coverage One short burst of tone; indicates your call will be sent to another extension to be answered by a covering user. dial A continuous tone; indicates dialing can begin. intercept/ An alternating high and low tone; time-out indicates a dialing error, a denial of the service requested, or a failure to...
- Page 53 2420 telephone call type display features calls feedbacktones answering personal directory conferencing ringing tones holding supported languages making 2420 telephone components redialing 2420 telephone display speakerphone Speed Dial transferring Case softkey checklist Conference feature Abbreviated Dialing Contrast feature button AD button...
- Page 54 editing Speed Dial entries Label Action screen Erase All feature button navigating Erase All option Label softkey Erase softkey Labels EU24 Expansion Module Language feature button Exit button Language option Last Number Dialed feature Leave Word Calling Log Setup feature button Log Setup option Log softkey feature...
- Page 55 personal directory user checklist personal directory calls personalized options Play softkey Visual Ring feature button Visual Ring option voice features Redial feature Abbreviated Dialing ring pattern Call Park Ring Pattern feature button Call Pickup ringing Leave Word Calling ringing tones Send All Calls Whisper Page volume control buttons...
Need help?
Do you have a question about the 2420 and is the answer not in the manual?
Questions and answers