
Subscribe to Our Youtube Channel
Related Manuals for Datavideo HS-1000


Summary of Contents for Datavideo HS-1000
- Page 1 Mobile Video Studio HS-1000 INSTRUCTION MANUAL http://www.datavideo-tek.com Rev 060809...
-
Page 2: Table Of Contents
Opening the case ....................6 HS-1000 Monitor Set Up ..................7 Powering On ....................... 9 Front Overview ....................9 Optional HS-1000 recorders DN-500 and HDR-200 ........... 9 HS-1000 RP-22 External Audio Inputs ..............9 Rear Overview ....................10 Powering off ...................... 10 Packing away .................... -
Page 3: Warnings And Precautions
The HS-1000 is heavy – approximately 54Kg. A minimum of 2 people are required to lift or move this product. The HS-1000 should be always lifted and placed in an upright position; do not place or try to move the unit in any other position as damage or injury could result. There are two carry handles on either side of the product, please use these handles to safely share the weight between the people lifting the HS-1000. -
Page 4: Warranty
Equipment that fails after the warranty period, has been operated or installed in a manner other than that specified by Datavideo, or has been subjected to abuse or modification, will be repaired for time and material charges at the Buyer’s expense. This warranty does not affect your statutory rights within the Country of purchase. -
Page 5: Hs-1000 Packing List & Accessories
HS-1000 Packing List & Accessories HS-1000 case including the following factory fitted and pre-cabled items DN-500 SD Recorder (optional) or HDR-200 HD Recorder (optional) SE-1000 Mixer ITC-100KF1000 Talk back system TLM-433 Source Monitors RP36 – Rear connection plate for SE-1000 i/o RP22 –... -
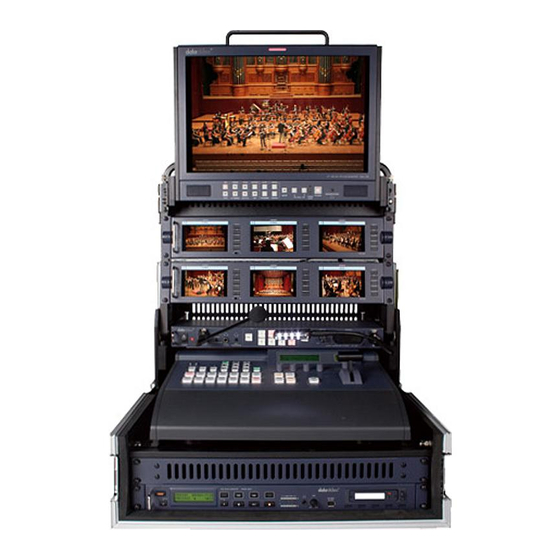
Page 6: Introduction
Introduction The Datavideo HS-1000 mobile video studio is a ready to go solution; it will save a lot of your valuable time when setting up or breaking down in the field. To get the most out of this product please read this user manual in full, and the other associated user manuals supplied within the Manual Binder to familiarise yourself with all the products within the HS-1000. -
Page 7: Hs-1000 Monitor Set Up
HS-1000 Monitor Set Up Lift up the monitor rack’s handle until the monitor rack is fully upright as below. Now unpack the TLM-170D 17” Monitor from its separate flight case... - Page 8 Once in place tighten the securing screws on both sides to hold the TLM-170D in place. Now the factory fitted cables can be un-packed from the storage box on the top of the HS-1000 monitor rack. The cables are numbered so they can be identified and connected correctly to the TLM-170D.
-
Page 9: Powering On
Each product built into the HS-1000 receives DC power from the PD-1 unit on the rear of the HS-1000. Please ensure the PD-1 is fed with either an AC or DC feed before attempting to switch on the HS-1000. For more information on the PD-1 please refer to its manual. -
Page 10: Rear Overview
Now carefully remove the 17” TLM-170D monitor cabling and place it back into its flight case. Return the cables for the TLM-170D to their storage box on the top of the HS-1000 monitor rack. Once the storage box is secured you can then lower the monitor rack to the shipping position and secure the front cover. -
Page 11: Service & Support
It is our goal to make your products ownership a satisfying experience. Our support staff are available to assist you in setting up and operating your system. Please refer to our web site www.datavideo-tek.com for answers to common questions, support requests or contact your local office below.
Need help?
Do you have a question about the HS-1000 and is the answer not in the manual?
Questions and answers