Table of Contents
Advertisement
Quick Links
Download this manual
See also:
Instruction Manual
Advertisement
Table of Contents

Subscribe to Our Youtube Channel
Related Manuals for Datavideo HDR-70


Summary of Contents for Datavideo HDR-70
-
Page 1: Quick Start Guide
HD/SD Recorder HDR-70 Quick Start Guide www.datavideo.com Apr-19.2013 P/N: G082060648B1... -
Page 2: Table Of Contents
RECORD SETUP ............................12 PLAY SETUP ..............................12 SYSTEM SETUP ............................. 13 SAVE SETUP ..............................13 RECALL SETUP .............................. 14 STATUS ................................15 HDR-70/70 RS-232/422 Control Command ......................... 16 Dimension ..................................18 Specifications ................................19 Service & Support ................................ 20... -
Page 3: Warnings And Precautions
7. This product should only be operated from the type of power source indicated on the marking label of the AC adapter. If you are not sure of the type of power available, consult your Datavideo dealer or your local power company. -
Page 4: Warranty
Datavideo warrants that the equipment it manufactures shall be free from defects in material and workmanship for a period of 2 years from the date of product purchased. If equipment fails due to such defects, Datavideo will, at its option, repair or provide a replacement for the defective part or product. -
Page 5: Packing List
HDR-70 complies with NTFS file system. There would be no problem if you need to record big file. In addition, HDR-70 can store MXF file format. It helps on equipment’s effect & saving producing time. -
Page 6: How To Assemble 2.5" Hdd In Removable Rack
2. Assemble four screws to fasten 2.5" HDD on PCB 3. Push PCB into the HDD rack 4. Assemble two screws to fasten HD rack rear cover 5. Push 2.5" HDD Removable rack into HDR-70 then turn button to left lock the rack... -
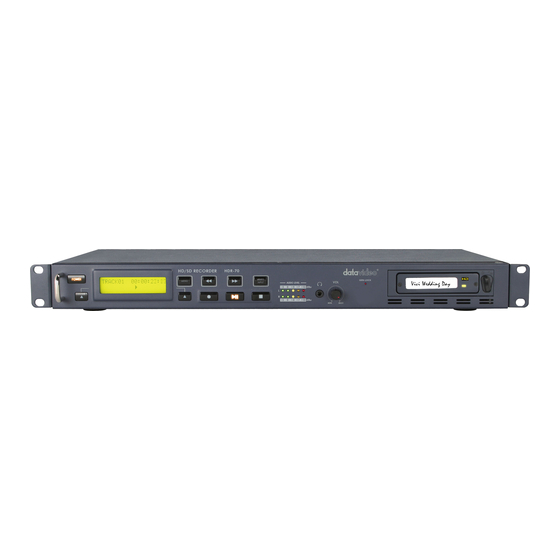
Page 7: Connections & Controls
/ off switch is on the rear panel. Display Panel. Displays the status of the HDR-70. The display will show Bin Number, time code, or if the Menu Button is pressed the Menu Display. -
Page 8: Rear Panel
Rear Panel XLR inputs and Outputs for Balanced Audio Connection. The GPI socket can be used for simple external control. The HDR-70 can accept pulse or level trigger inputs, which can trigger record or playback and pause commands. RS-232/422 user selectable remote control (select in menu) Black Burst input/ output Can be used as a video reference source when synchronization other devices to the HDR-70. -
Page 9: Powering On
Powering On Connect the HDR-70 power supply to the DC In socket. Ensure the power cable is connected to a suitable mains socket. Press the Power Button until it lights up The LCD display panel should show the bin display appear and the HDR-70 is ready... -
Page 10: Uprgrade Firmware
5. Rename FW file to “flash.bin” 6. Copy the firmware update file to the root directory, level where all bin folders appear. 7. Insert the 2.5’’ HDD in the HDR-70 and select the UPGRADE FIRMWARE option and follow the instructions UPGRADE FINISH! WARNING: Wait until you see then reboot system. -
Page 11: Firmware Revision
FIRMWARE REVISION Display the Rev No. and Firmware Revision, CODEC, HOST REV, of the HDR-70 Press the (MENU) button into the menu mode Press the (ENTER) button into the TOOL menu Press the (NEXT) button to select the FIRMWARE REVISION menu... -
Page 12: Setup
SETUP RECORD SETUP Press the (MENU) button into the menu mode Press the (NEXT) button to select the SETUP menu Press the (ENTER) button into the SETUP menu Press the (ENTER) button into the RECORD SETUP menu Press the (ENTER) button into the SET HD ENCODE FORMAT / SET SD ENCODE FORMAT / SET SD ASPECT RATIO / TIME-LAPSE SETUP / PWR ON AUTO- RECORD menu SET HD ENCODE FORMAT Setting the HD LONG GOP or HD I FRAME ONLY (encode Intra frame only). -
Page 13: System Setup
SYSTEM SETUP Press the (MENU) button into the menu mode Press the (NEXT) button to select the SETUP menu Press the (ENTER) button into the SETUP menu Press the (NEXT) button to select the SYSTEM SETUP menu Press the (ENTER) button into the SYSTEM SETUP menu Press the (ENTER) button into the SET AUDIO SOURCE / SET TIMECODE DISPLY / SET GPI / SET AUDIO MONITOR / SET REMOTE CONTROL / SET LONG TIME STOP / DATE &... -
Page 14: Recall Setup
RECALL SETUP Press the (MENU) button into the menu mode Press the (NEXT) button into the SETUP menu Press the (ENTER) button into the SETUP menu Press the (NEXT) button to select the RECALL SETUP menu Press the (ENTER) button into the RECALL SETUP menu Press the (NEXT) button to select load FACTORY D / USER #1 or USER #2 file. -
Page 15: Status
STATUS Press the (MENU) button into the menu mode Press the (NEXT) button into the STATUS menu Press the (ENTER) button into the STATUS menu Press the (NEXT) button to see the FILE / BIT-RATE / INPUT (When RECORD MODE on) / RECORDER status... -
Page 16: Hdr-70/70 Rs-232/422 Control Command
HDR-60/70 RS-232/422 Control Command Revised on 11/14/2012 Command Name Response Data Common Transport Control 20h, 00h, 20h Stop 10h, 01h, 11h 20h, 01h, 21h Play 10h, 01h, 11h 20h, 02h, 22h Record 10h, 01h, 11h 20h, 10h, 30h Fast Forward 10h, 01h, 11h 20h, 20h, 40h Fast Rewind... - Page 17 Status Sense Control Command Response Bytes Status Bit 7 Bit 6 Bit 5 Bit 4 Bit 3 Bit 2 Bit 1 Bit 0 Byte Busy Cartridge Local enable Stop Rewind Fast Record Play Forward Reverse Still (Pause) Audio in Video Near End End of of Disk...
-
Page 18: Dimension
Dimension... -
Page 19: Specifications
Specifications HDD: 250/320/500/750 GB HDD Size SSD: 120GB/240 GB HD/SD-SDI Video Input Time code HD/SD-SDI Video Output HDMI Time code IN/OUT Time code Balance Audio Analog 2-CH Audio Input HD/SD-SDI ( 8CH) Balance Audio Analog 2-CH Audio Output HD/SD-SDI (8CH) HDMI / 4 CH Headphone REC / PLAY... -
Page 20: Service & Support
It is our goal to make your products ownership a satisfying experience. Our supporting staff is available to assist you in setting up and operating your system. Please refer to our web site www.datavideo.com for answers to common questions, support requests or contact your local office below.
Need help?
Do you have a question about the HDR-70 and is the answer not in the manual?
Questions and answers