
Related Manuals for Network Technologies SERIMUX-S-x


Summary of Contents for Network Technologies SERIMUX-S-x
- Page 1 SERIMUX Series ® SERIMUX-S-x SECURE SSH CONSOLE SERIAL SWITCH Installation and Operation Manual MAN107 V1.20 Rev 6/4/09...
-
Page 2: Typographic Conventions
SERIMUX is a registered trademark of Network Technologies Inc in the U.S. and other countries. COPYRIGHT Copyright © 2009 by Network Technologies Inc. All rights reserved. No part of this publication may be reproduced, stored in a retrieval system, or transmitted, in any form or by any means, electronic, mechanical, photocopying, recording, or otherwise, without the prior written consent of Network Technologies Inc, 1275 Danner Drive, Aurora, Ohio 44202. -
Page 3: Table Of Contents
TABLE OF CONTENTS Introduction..................................1 Serial Interface Specifications ............................. 1 Network Interface ................................ 1 RJ45 Sensor Ports ..............................1 Protocols..................................2 Supported Web Browsers ............................2 Definitions..................................2 Materials ..................................3 Default User Name and Password..........................4 Features and Functions..............................5 Installation.................................. - Page 4 Unit Setting->Change Admin Password......................28 Unit Settings->Date Time Settings ........................29 Security Settings ..............................31 Syslog ..................................32 Firmware Update ..............................34 User Management ..............................36 System Users................................36 Access Group ................................. 37 Administrative Info ..............................38 System Log ................................38 System Information ..............................
- Page 5 Security Settings ..............................59 Syslog ..................................60 Firmware Update ..............................61 User Management ..............................62 System Users................................62 Access Groups................................ 64 Administrative Information............................65 System Log ................................65 System Information ..............................65 Network Information..............................66 Support ..................................66 Reboot ..................................67 Logout..................................
- Page 6 Figure 20- Port Management- event notification for Port 1 ......................19 Figure 21- Port Management-port access list for Port 1........................20 Figure 22- Port Management-add users to access list........................20 Figure 23- Port Management-add group to access list ........................20 Figure 24- Port Management- remove group from access list ......................
- Page 7 Figure 70- SSH Port connected ............................... 46 Figure 71- Serial connection-"offline"-properly exited ........................47 Figure 72- Port Configuration page..............................48 Figure 73- Port Settings ................................... 48 Figure 74- Serial Settings ................................49 Figure 75- Port Logging settings..............................49 Figure 76- View or Clear Port Log ..............................50 Figure 77- Modem settings ................................
- Page 8 Appendix A - SERIMUX Port Characteristics........................... 71 Appendix B-SERIMUX User and Administrator Characteristics....................... 71 Appendix C- Cable Adapters ................................72 Appendix D- Common Commands from Shell Command Line ......................74 Appendix E- SERIMUX-S-x Default Paths ............................74 Appendix F- SERIMUX-S-x Default Network Settings ........................74...
-
Page 9: Introduction
INTRODUCTION The NTI SERIMUX-S-x SSH Console Serial Switch (SERIMUX) is a serial port switch that delivers secure management of up to 32 serial devices via the internet, TCP/IP network, or dial-up modem connections. It combines the advanced security of Secure Shell v2 with unlimited access to remote network management. -
Page 10: Protocols
NTI SERIMUX SERIES SSH CONSOLE SWITCH Protocols SSH V2, Telnet ,IPMI • IPV4, IPV6 • TCP/IP, TFTP, DHCP, ICMP, UDP, ARP • HTTP, HTTPS, SMTP, SNMP V1/V2c, Syslog, SMTP • IPMI v2, RMCP • Alerts are sent using email, and/or SNMP traps when any monitored environmental condition exceeds a user-specified •... -
Page 11: Materials
NTI SERIMUX SERIES SSH CONSOLE SWITCH Materials Materials Supplied with this kit: SERIMUX-S-x Manual CD IEC Power cord 5 Foot RJ45-to- 4-#10-32 X ¾” Pan Head Screws (country specific) RJ45 Cat5 Quick Start Guide and Administrator’s 4-#10-32 Cage Nuts (x2 with Dual AC... -
Page 12: Default User Name And Password
NTI SERIMUX SERIES SSH CONSOLE SWITCH DEFAULT USER NAME AND PASSWORD root The default user name is (lower case letters only). The default password is (lower case letters only). -
Page 13: Features And Functions
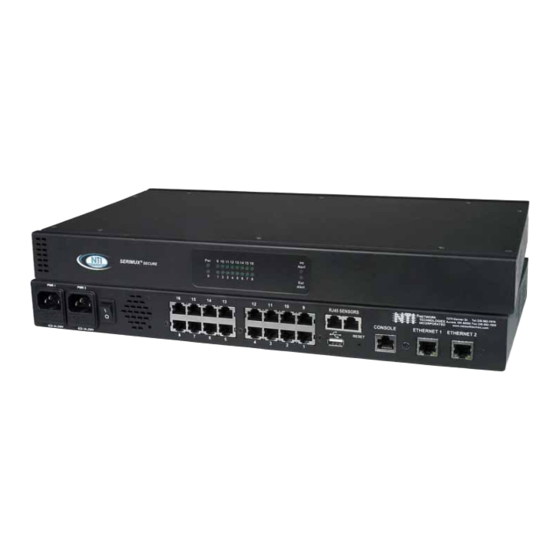
NTI SERIMUX SERIES SSH CONSOLE SWITCH FEATURES AND FUNCTIONS Front and Rear Views of SERIMUX-S-16DP 9 10 11 12 13 14 15 16 Alert SERIMUX SECURE Network Te chnologies Inc 2 3 4 5 6 7 8 Alert PWR 1 PWR 2 AC INPUT RJ45 SENSORS... -
Page 14: Installation
NTI SERIMUX SERIES SSH CONSOLE SWITCH INSTALLATION This NTI switch was designed to be mounted to a rack or to set on a desktop. It includes rack mount ears to make attachment to a rack easy, and rubber feet to be applied to the bottom of the case if it will instead sit on a flat surface. If this will sit on a flat surface, simply apply the rubber feet to the bottom of the case in each of the 4 corners. -
Page 15: Cable Connections
NTI SERIMUX SERIES SSH CONSOLE SWITCH Cable Connections Connect a serial console to the port labeled "CONSOLE" on the SERIMUX using a serial cable with an RJ45 male connector (Cat5 patch cable supplied). This will be the default administrator device. (Figure 3) Connect each additional serial user device or host device to be connected by the SERIMUX to any remaining port (1- 4/8/16/24/32) using a serial cable with an RJ45 male connector (see cable specification on page 70). -
Page 16: Dual Power Option
Figure 5- Power connections for SERIMUX with Dual Power option DC Power Option The SERIMUX-S-x-48V has connections on the rear for a user-supplied 48VDC power supply. This is typically used when the SERIMUX is installed in a Telecom environment. The SERIMUX-S-x-48V will accept a DC power source between 36~72VDC (48VDC nominal), positive or negative polarity. -
Page 17: Connect Sensors
Connect Sensors (not supported as of this printing) The SERIMUX-S-x has two RJ45 connectors for attachment of up to two sensors to monitor environmental conditions. Sensors can be connected to measure temperature (ENVIROMUX-STS), humidity (ENVIROMUX-SHS), temperature and humidity (ENVIROMUX-STHS), temperature and wide range humidity (ENVIROMUX-STHS-99). A sensor can also be connected to detect liquids (ENVIROMUX-LDSx-y). -
Page 18: Initial Startup
NTI SERIMUX SERIES SSH CONSOLE SWITCH INITIAL STARTUP The following instruction will enable the user to quickly make port connections using a terminal connected to the “CONSOLE” port. For instruction to make quick connection using the Ethernet port and Web Interface, see page 43. Make sure the SERIMUX is turned OFF. -
Page 19: Connect Direct To Serial Port From Command Line
NTI SERIMUX SERIES SSH CONSOLE SWITCH Figure 9- Serimux Secure Port Connect menu Note: To connect to a host, the host must first be configured with the same communication settings as the port (default serial settings = 9600 baud, 8 bits, no parity, 1 stop bit, no flow control). If needed, see “Serial Settings” on page 16 to change the SERIMUX port serial settings. -
Page 20: Using The Serimux Console Switch
NTI SERIMUX SERIES SSH CONSOLE SWITCH USING THE SERIMUX CONSOLE SWITCH The SERIMUX Console Switch is controlled using Serial Control- from a "dumb" terminal- locally-connected • - through an external modem from a remote location - through a CPU connected to a “User” port Ethernet Connection (through a LAN or the Internet) •... -
Page 21: Login As The Administrator
NTI SERIMUX SERIES SSH CONSOLE SWITCH Login as the administrator From the user terminal connected to the “Console” port, open the terminal program (configured as described on page 10 under "Initial Startup"). Power ON the SERIMUX. Wait for the SERIMUX login prompt. root At “login as: “... -
Page 22: Port Management
NTI SERIMUX SERIES SSH CONSOLE SWITCH Port Management From the Configuration menu, press <1> to open the “Port Management” menu. Figure 11- Port Management- complete ports list All ports, whether devices are connected to them or not, are listed in the Port Management menu. To make changes to a specific port’s configuration, enter the port number and press <Enter>. -
Page 23: Common Settings
NTI SERIMUX SERIES SSH CONSOLE SWITCH Common Settings Before making changes to settings for specific ports, it would be quicker to apply settings to the “common” port, by pressing <o> from the Port Management menu. This will open a menu (below) where the settings most common to the greatest number of ports can be configured. -
Page 24: Serial Settings
NTI SERIMUX SERIES SSH CONSOLE SWITCH Setting Valid Entries Port Name the name as it will appear in the port list- max. 50 characters. Port Enable Enable or Disable. If disabled, no user can connect to it. Port Type Host : for device connection User: for direct user connection Dial-in User: for connection via modem Assign IP Enable... -
Page 25: Port Logging
NTI SERIMUX SERIES SSH CONSOLE SWITCH Port Logging From the Port Management menu, with Port x (any port) selected, press <3>-<Enter> to open the “Port Logging” menu. Port logging is used to record data received on the serial port. Figure 16- Port Management-port logging for Port 1 Only 1 menu item will be displayed, indicating that port logging is disabled. -
Page 26: Modem Setting
NTI SERIMUX SERIES SSH CONSOLE SWITCH Modem Setting From the Port Management menu, with Port x (any port) selected, press <4>-<Enter> to open the “Modem Setting” menu. Figure 17- Port Management-modem setting for Port 1 If the port is set for a port type “Dial-In User” (see page 15), it will require a modem to be connected. Refer to your modem instructions for appropriate settings to be applied here. -
Page 27: Event Notification
NTI SERIMUX SERIES SSH CONSOLE SWITCH Authentication options that include Radius, TacacsPlus, Kerberos, and LDAP will require additional configuration when selected. Figure 19- Authentication server configuration Apply the appropriate authentication server IP addresses and additional configuration settings for your authentication method of choice. -
Page 28: Port Access List
NTI SERIMUX SERIES SSH CONSOLE SWITCH Port Access List From the Port Management menu, with Port x (any port) selected, press <7>-<Enter> to open the “Port Access List”. Figure 21- Port Management-port access list for Port 1 Each port can have individual user names and group names (pre-defined groups of users- see page 37) added to it that the connected device will recognize as valid users. -
Page 29: Port Disconnect
NTI SERIMUX SERIES SSH CONSOLE SWITCH To remove a group from the list, press <2> (from the Port Access List menu), then <r> (for remove). You will be prompted for the group number in the list to remove. Enter the group number and press <Enter> to remove it from the list. Figure 24- Port Management- remove group from access list Port Disconnect From the Port Management menu, with Port x (any port) selected, press <8>-<Enter>... -
Page 30: Apply Common Settings
NTI SERIMUX SERIES SSH CONSOLE SWITCH Apply Common Settings To quickly apply settings to a port that are commonly used by many other ports, the “Apply Common Setting” option is provided. Once common settings are configured (page 15), this feature will help to save time in configuring a port for use. From the Port Management menu, with Port x (any port) selected, press <9>-<Enter>... -
Page 31: Network Management
NTI SERIMUX SERIES SSH CONSOLE SWITCH Network Management From the Configuration menu, press <2> to open the Network Management menu. The Network Management menu provides selections to open configuration menus for the “Ethernet 1” and “Ethernet 2” ports on the SERIMUX as well as web server configuration and TCP keepalive settings. -
Page 32: Figure 30- Network Management- Ipv6 Settings
NTI SERIMUX SERIES SSH CONSOLE SWITCH Figure 30- Network Management- IPv6 settings Be sure to apply valid information in the fields provided. Default Settings include: IP address: 192.168.1.91 Subnet Mask: 255.255.255.0 Default Gateway: 192.168.1.1 The Ethernet Mode in the IPv4 settings can be set for : 100 Base T Full Duplex 100 Base T Half Duplex 10 Base T Full Duplex... -
Page 33: Server Configuration
NTI SERIMUX SERIES SSH CONSOLE SWITCH Server Configuration The Server Configuration section is provided to apply settings for Web Server connection and behavior as well as the SMTP server for e-mail functions. From the Network Management menu, press <3>-<Enter> to open Server Configuration menus. Figure 32-Network Management- Server Configuration From the Server Configuration menu, press <1>, <2>, <3>... -
Page 34: Figure 35- Network Management- Nfs Server Configuration
NTI SERIMUX SERIES SSH CONSOLE SWITCH Figure 35- Network Management- NFS server configuration Figure 36- Network Management-SNMP configuration See table on page 27 for configuration values. -
Page 35: Snmp
NTI SERIMUX SERIES SSH CONSOLE SWITCH Server Configuration Settings Setting Value Web Server Web Page Refresh Rate (sec) 0-999 seconds Login Timeout (minutes) 0-999 minutes Authentication Type Many including local, Radius, Tacacs, TacacsPlus, Kerberos, LDAP, or combinations HTTP Port 0-65535 HTTPS Port 0-65535 HTTP Enable... -
Page 36: Administration Settings
NTI SERIMUX SERIES SSH CONSOLE SWITCH Administration Settings From the Configuration menu, press <3>-<Enter> to open the “Administration Settings” menu. The Administration Settings menu provides selections to configure the SERIMUX name, root password, date and time, security, and syslog. It also includes a selection for performing firmware updates. -
Page 37: Unit Settings->Date Time Settings
NTI SERIMUX SERIES SSH CONSOLE SWITCH Figure 40-Unit Settings-change password Be sure to press “Save” to have the change take effect after the next reboot of the SERIMUX, or “Save & Apply” to have the change take effect immediately. NOTE: The password entered will be case sensitive so be sure to note what characters are upper or lower case if any are alphabetical. -
Page 38: Figure 42-Unit Settings-Ntp Server Settings
NTI SERIMUX SERIES SSH CONSOLE SWITCH Figure 42-Unit Settings-NTP Server settings To synchronize the SERIMUX with an NTP Server, set the “Enable NTP” value to “Enable”. Enter values for: IP address of the NTP Server • Frequency (how often, in hours (0-99), the SERIMUX will query the NTP Server) •... -
Page 39: Security Settings
NTI SERIMUX SERIES SSH CONSOLE SWITCH Security Settings Security settings enable the administrator to configure the CLI (Command Line Interpreter) authentication type to be used to connect with serial devices through the web interface or through the SERIMUX shell. Choose from various common CLI authentication methods. -
Page 40: Syslog
NTI SERIMUX SERIES SSH CONSOLE SWITCH Configuration options for CLI authentication are the same as those shown under Port authentication (page 19), except that an additional option for setting the CLI Config menu timeout is present. The CLI Config Menu Timeout is the time period (in minutes) before an idle user will be automatically exited from the configuration menu and returned to their point of connection when logging into the SERIMUX. -
Page 41: Figure 48- Administration Settings-System Log Settings
NTI SERIMUX SERIES SSH CONSOLE SWITCH Figure 48- Administration Settings-System Log settings Figure 49- Administration Settings-Syslog-ng Configuration Setting Value System Log Settings Syslog Location System Memory (no options as of this printing) Syslog Facility Local0 (no options as of this printing) Log Buffer Size 0-999 K bytes Log File name... -
Page 42: Firmware Update
NTI SERIMUX SERIES SSH CONSOLE SWITCH Firmware Update The Firmware Update menu is used to introduce firmware files that provide the architecture of the user interface. Occasionally new features or changes to existing features will be introduced and new firmware with these changes will be made available on the NTI website (http://www.networktechinc.com/srvsw-term-ssh.html). -
Page 43: Figure 52- Firmware Update- Confirm To Perform Update
NTI SERIMUX SERIES SSH CONSOLE SWITCH The update firmware path, when using a tftp server will be: /tmp/serimux_ssh_vx_xx.tar.gz When using a tftp server, before using the Update Firmware command, run the following commands from the shell prompt: cd /tmp tftp -r serimux_ssh_v1_10.tar.gz -g <tftp-server-ip> (i.e. -
Page 44: User Management
NTI SERIMUX SERIES SSH CONSOLE SWITCH User Management From the Configuration menu, press <4>-<Enter> to open the “User Management” menu. The User Management menu provides selections to configure user access to the SERIMUX configuration menus and to the devices attached to the SERIMUX. Users can be assigned to specific groups, and group names can be assigned to make port management easier. -
Page 45: Access Group
NTI SERIMUX SERIES SSH CONSOLE SWITCH User configuration has the following options: Setting Valid Entry User Name Up to 50 alphabetical or numeric characters Group Admin - assign administrative rights User- assign limited user rights. Shell Command line- SERIMUX will open a command line interface when user logs in Config menu- SERIMUX will open configuration menu when user logs in Port connect menu- SERIMUX will open port connection menu when user logs in Password... -
Page 46: Administrative Info
NTI SERIMUX SERIES SSH CONSOLE SWITCH Administrative Info From the Configuration menu, press <5>-<Enter> to open the “Administrative Info” menu. The Administrative Info menu provides selections to view pieces of information quickly that are useful to review the settings and status of the SERIMUX. The administrator can view the System Log to review user access and changes to the SERIMUX, network, Ethernet, and system settings, and review the status of each of the SERIMUX ports. -
Page 47: System Information
NTI SERIMUX SERIES SSH CONSOLE SWITCH System Information The System Information list displays the model name of the SERIMUX, the firmware version in the SERIMUX, the MAC addresses of the Ethernet ports, the date in the system, and syslog status. From the Administrative Info menu, press <2>-<Enter> to display the “System Information”... -
Page 48: Port List
NTI SERIMUX SERIES SSH CONSOLE SWITCH Port List The port list displays the status of device ports on the SERIMUX. It provides a quick overview of names of all users and hosts connected, the port serial settings, port escape sequence, protocol, and port numbers. From the Administrative Info menu, press <4>-<Enter>... -
Page 49: Serial Control-Users
NTI SERIMUX SERIES SSH CONSOLE SWITCH SERIAL CONTROL-USERS Operators with “User” rights can connect only to accessible ports as defined by the administrator. A list of those ports will be displayed with a successful login. To login, using a serial terminal or an emulator (e.g. Windows HyperTerminal), connect the terminal to the SERIMUX at an accessible user port (users may limited access through specific “user”... -
Page 50: Device Discovery Tool
NTI SERIMUX SERIES SSH CONSOLE SWITCH DEVICE DISCOVERY TOOL In order to easily locate the SERIMUX on a network, the NTI Device Discovery Tool may be used. A link to the Discovery Tool is provided on the web page that appears when you insert the instruction manual CD provided into your CD ROM drive. Click on the link or browse the CD and click on the file discover.html . -
Page 51: Web Interface
NTI SERIMUX SERIES SSH CONSOLE SWITCH WEB INTERFACE A user may control the connections of the SERIMUX using a Web Interface via any web browser (see page 2 for web supported browsers) provided the Ethernet is connected. With the SERIMUX connected to a LAN through an Ethernet cable, a user can access the web interface controls inside the SERIMUX. -
Page 52: Menu Overview
NTI SERIMUX SERIES SSH CONSOLE SWITCH Menu Overview The SERIMUX menu may be navigated using the left mouse button. The list below summarizes the function of each topic in the menu for quick reference. Connect Port- Click to return to the Ports List, a listing of all Host ports. Click any port to make a connection to that port. Port Management- Click to display the following three Port Management topics: Port Configuration- Click to display the port list. -
Page 53: Main Menu And Port List
NTI SERIMUX SERIES SSH CONSOLE SWITCH Main Menu and Port List The first screen displayed in the Web Interface after a valid login shows the main menu on the left side and a complete port list on the right. The Port List details, from left to right: Port No. -
Page 54: Figure 69- Ssh Port Connection Via Java Applet
NTI SERIMUX SERIES SSH CONSOLE SWITCH Note: The user must click inside the window before typing any characters. A host using SSH v.2 protocol will require user name and password to be entered in the above window for connection This window will not appear when authentication is disabled. -
Page 55: Figure 71- Serial Connection-"Offline"-Properly Exited
NTI SERIMUX SERIES SSH CONSOLE SWITCH To properly exit a completed serial connection, type <Ctrl>-<z> to open the port escape menu, then press <x> to exit the serial connection. The green “online” in the bottom right corner of the window will change to a red “offline”. Then press “Close”... -
Page 56: Port Management
NTI SERIMUX SERIES SSH CONSOLE SWITCH Port Management Port Configuration The Port Configuration page is used to setup all of the criteria necessary to communicate between the user and host devices. Figure 72- Port Configuration page Under “Port Management” in the main menu, select “Port Configuration” to display a ports list. Click on a port to display the current configuration settings for the selected port and the configurable setting categories. -
Page 57: Port Configuration->Serial Settings
NTI SERIMUX SERIES SSH CONSOLE SWITCH Port Settings (Cont’d) Setting Description TCP Port Number Assign number used for TCP communication Be careful not to assign the same number used by another port, or the second port with a duplicate TCP port assignment will not work. Connection Protocol Select Telnet for non-secure connection, or SSH to require secure connections only... -
Page 58: Port Configuration->View Port Log
NTI SERIMUX SERIES SSH CONSOLE SWITCH Port Configuration->View Port Log Select to view log records for selected port. The viewing window will display up to 1K bytes of records. To view the next 1K bytes, press the “Next>>” button. The SERIMUX will record all data passing through the port. Press “Clear Log”... -
Page 59: Port Configuration->Event Notification
NTI SERIMUX SERIES SSH CONSOLE SWITCH Port Configuration->Event Notification If desired, an e-mail and/or SNMP message can be sent each time a port is connected to, and / or disconnected from. recipient’s can be the same for each event, or different. Simply enter valid e-mail addresses and SNMP addresses and make sure the SERIMUX web server is properly configured to send e-mails (page 55). -
Page 60: Port Configuration->Disconnect Port
NTI SERIMUX SERIES SSH CONSOLE SWITCH Port Configuration->Disconnect Port To quickly disconnect any communication through a port in use, press the “Disconnect Port” button. Figure 82- Disconnect Port button With the selections made in the Port Configuration page (and on any other pages throughout the Web Interface), press “Save” to save the changes without immediately applying them. -
Page 61: Copy Paste Port
NTI SERIMUX SERIES SSH CONSOLE SWITCH Copy Paste Port The Copy Paste Port page is provided in the event the settings in the Common Port Configuration aren’t what you need but the settings of another port are. This provides yet another way to save time in configuring the SERIMUX. Figure 84- Copy Paste Port page Under “Port Management”... -
Page 62: Network Management
NTI SERIMUX SERIES SSH CONSOLE SWITCH Network Management IP Configuration The IP Configuration page is where the settings are applied to enable the SERIMUX to connect to the local LAN or Internet. Only one connection is necessary, but two can be configured for remote SERIMUX access redundancy. For “Ethernet 1”... -
Page 63: Server Configuration
NTI SERIMUX SERIES SSH CONSOLE SWITCH Server Configuration The Server Configuration page is where the settings are applied to enable the SERIMUX to send e-mail and SNMP messages to users and to establish behavioral characteristics for the web interface. Figure 86- Server Configuration Page Under “Network Management”... -
Page 64: Snmp
NTI SERIMUX SERIES SSH CONSOLE SWITCH Setting Value SNMP Configuration SNMP Enable Enable or Disable System Name Up to 50 characters Contact Up to 50 characters Location Up to 50 characters Community 1 Name– example “private” (up to 50 characters) Permission Community 1 Read only / read-write Community 2... -
Page 65: Administrative Settings
NTI SERIMUX SERIES SSH CONSOLE SWITCH Administrative Settings Unit Settings The Unit Settings page provides fields for setting up the name, administrative password, and system date and time settings. Figure 89- Unit Settings page Under “Administrative Settings” in the main menu, select “Unit Settings”. Fields are provided as described below: Setting Description Value... -
Page 66: Unit Settings->Date And Time Settings
NTI SERIMUX SERIES SSH CONSOLE SWITCH Unit Settings->Date and Time Settings Figure 91- Unit Settings page, date and time The Date and Time of the SERIMUX (Administrative Settings->Unit Settings->Date & Time Settings) can be either manually setup to use an onboard clock or set to be synchronized with an NTP server. To synchronize it, change the “Enable NTP”... -
Page 67: Security Settings
NTI SERIMUX SERIES SSH CONSOLE SWITCH Security Settings The Security Settings page enables the administrator to configure the CLI (Command Line Interpreter) authentication type to be used to connect with serial devices. Choose from many common CLI authentication methods. Figure 92- Security Settings page Under “Administrative Settings”... -
Page 68: Syslog
NTI SERIMUX SERIES SSH CONSOLE SWITCH Syslog The Syslog page contains the settings that effect the location, size, name, and destination when downloaded of the System Log. The System log displays a listing of all users that have logged in and out of the SERIMUX, providing the date and time of their login and logout. -
Page 69: Firmware Update
NTI SERIMUX SERIES SSH CONSOLE SWITCH Firmware Update The Firmware Update page is used to introduce firmware files that provide the architecture of the user interface. Occasionally new features or changes to existing features will be introduced and new firmware with these changes will be made available on the NTI website (http://www.networktechinc.com/srvsw-term-ssh.html). -
Page 70: User Management
NTI SERIMUX SERIES SSH CONSOLE SWITCH To see the effects of the new firmware file the SERIMUX must be rebooted using either of three methods: use the “Reboot” feature in the main menu (see page 67) power cycle the SERIMUX press the “Reset”... -
Page 71: Figure 99- User Configuration
NTI SERIMUX SERIES SSH CONSOLE SWITCH Under “User Management” in the main menu, select “System Users”. To delete a user, or several users, click with the mouse to place a check mark in the check boxes to the left of the user number(s). (The user “root”... -
Page 72: Access Groups
NTI SERIMUX SERIES SSH CONSOLE SWITCH Access Groups The Access Groups page lists the assigned access group names. Access groups are used to provide a quick method of defining which users have accesses to devices. Once access group names are assigned, users are specified to be included in those groups. -
Page 73: Administrative Information
NTI SERIMUX SERIES SSH CONSOLE SWITCH Administrative Information System Log The System Log page displays a listing of all user access to the SERIMUX, providing the date and time of their login and logout. It also displays when configuration changes are made. Figure 102- System Log displayed Under “Administrative Information”... -
Page 74: Network Information
NTI SERIMUX SERIES SSH CONSOLE SWITCH Network Information The Network Information page displays all of the current network settings for the Ethernet ports on the SERIMUX. Settings include IP mode, IP address, netmask, gateway, and DNS addresses. To view the network settings, under “Administrative Information”... -
Page 75: Reboot
NTI SERIMUX SERIES SSH CONSOLE SWITCH Reboot The Reboot page enables the user with administrative rights to easily reboot the SERIMUX as needed. Figure 106- Reboot page To use the Reboot page, select “Reboot” from the main menu. Press “Reboot” button to force the SERIMUX to log all users out and power cycle its processor. -
Page 76: Telnet Or Ssh Connection
NTI SERIMUX SERIES SSH CONSOLE SWITCH TELNET OR SSH CONNECTION The SERIMUX shell, configuration menu and port connection menu can be accessed using a Telnet or SSH client. Connect to the SERIMUX using a standard port configuration (23 for Telnet, 22 for SSH) and login as either the “root” user or any system user (page 62). -
Page 77: Reset Button
NTI SERIMUX SERIES SSH CONSOLE SWITCH RESET BUTTON The "RESET" button on the back of the SERIMUX may be used for power cycling the SERIMUX processor without actually power cycling the rest of the SERIMUX. Reset button Rear View of SERIMUX-S-16DP PWR 1 PWR 2 AC INPUT... -
Page 78: Interconnection Cable Wiring Method
NTI SERIMUX SERIES SSH CONSOLE SWITCH INTERCONNECTION CABLE WIRING METHOD The cable connecting the terminals and devices to the SERIMUX must be terminated with RJ45 connectors and must be wired according to the EIA/TIA 568 B industry standard. Wiring is as per the table and drawing below. Pair 3 Pair 2 Pair 1... -
Page 79: Appendix A - Serimux Port Characteristics
NTI SERIMUX SERIES SSH CONSOLE SWITCH Appendix A - SERIMUX Port Characteristics Every port is defined through the following parameters: Description Acceptable Value Default Value Number 1-4/8/16/24/32 Same (not changeable) Name Up to 50 characters “Port00” to “Port32” Type User or Host Host Baud rate–... -
Page 80: Appendix C- Cable Adapters
NTI SERIMUX SERIES SSH CONSOLE SWITCH Appendix C- Cable Adapters Four cable adapters are included with the SERIMUX with RJ45 connectors (to purchase more please contact NTI at (800) 742- 8324 (800-RGB-TECH) or (330) 562-7070). The following illustrations show cable adapter pin outs. DB-25 Male Console Adapter (NTI P/N DB25M-RJ45F-T) DB-25 Male to RJ45 Connector Pin Assignments RJ45... - Page 81 NTI SERIMUX SERIES SSH CONSOLE SWITCH DB-25 Female Console Adapter (NTI P/N DB25F-RJ45F) DB-25 Female to RJ45 Pin Assignments RJ45 Signal DB-25F Signal Connected to Connected to Connected to Connected to Connected to Connected to Connected to DB-25 Male Modem Adapter (NTI P/N DB25M-RJ45F-C) DB-25 Male Modem to RJ45 Pin Assignment RJ45 Signal...
-
Page 82: Appendix D- Common Commands From Shell Command Line
System Log /var/run/databuf/ttyXRxx.data Port data buffering /mnt/nfs Mount for NFS /mnt/src Mount for USB /usr1/conf.tar.gz SERIMUX Complete Configuration file (password is encrypted) Appendix F- SERIMUX-S-x Default Network Settings Setting Purpose 192.168.1.91 IP address 255.255.255.0 Subnet Mask 192.168.1.1 Default Gateway Ethernet Pinouts The SERIMUX with RJ45 connectors uses a standard Ethernet connector that is a shielded and compliant with AT&T 258... -
Page 83: Specifications
NTI SERIMUX SERIES SSH CONSOLE SWITCH SPECIFICATIONS Description Specification Connectors RJ45 Female DTE configuration via RS232 Operating temperature 32°F - 100°F (0°C - 38°C) (17-90% non-condensing RH) Storage temperature -20°F - 140°F (-30°C - 60°C). (17-90% non-condensing RH) Power requirements 100-240VAC, 50 or 60Hz AC models Size (In.) WxDxH... -
Page 84: Index
NTI SERIMUX SERIES SSH CONSOLE SWITCH INDEX access groups, 37, 64 port configuration, 15, 48 accessible host list, 41 port logging, 17 ANSI, 1 port management, 14 base TCP port, 53 Quick start, 10 cable adapters, 72 rack mounting, 6 cable connections, 7 reboot-serial, 40 change console baud rate, 69...
Need help?
Do you have a question about the SERIMUX-S-x and is the answer not in the manual?
Questions and answers