
Related Manuals for Network Technologies UNIMUX-USBV-xO


Summary of Contents for Network Technologies UNIMUX-USBV-xO
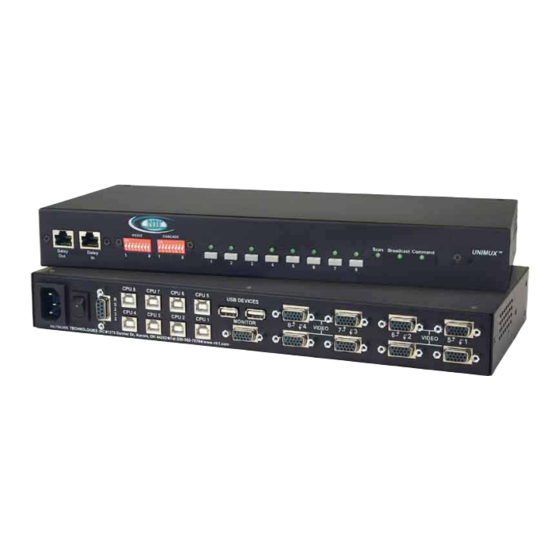
- Page 1 UNIMUX Series UNIMUX-USBV-xO USB KVM Switch Installation and Operation Manual UNIMUX-USBV-8O-RS (Front and Rear View) MAN035 Rev Date 2/12/2013...
-
Page 2: Typographic Conventions
Network Technologies Inc, 1275 Danner Drive, Aurora, Ohio 44202. CHANGES The material in this guide is for information only and is subject to change without notice. Network Technologies Inc reserves the right to make changes in the product design without reservation and without notification to its users. -
Page 3: Table Of Contents
TABLE OF CONTENTS INTRODUCTION................................1 MATERIALS ..................................2 DEFINITIONS.................................. 2 FEATURES AND FUNCTIONS............................3 RACKMOUNTING INSTRUCTIONS..........................4 To Mount to a Rack ..............................4 INSTALLATION................................5 Power-Up Sequence..............................7 Limitations..................................7 USING THE UNIMUX USB KVM SWITCH ........................8 Front Panel Control..............................8 Keyboard Control................................. - Page 4 Keyboard-To-Computer Translation .......................... 31 Translation Capabilities ............................31 Translation Tables ..............................31 International Sun Keyboards ............................. 32 CASCADING ................................. 33 Configuration ................................33 Cascaded Installation ..............................33 Limitations.................................. 35 Port Assignments in OSD ............................36 AUDIO SUPPORT................................. 37 TROUBLESHOOTING ..............................37 RS232 Connection Cables ............................
-
Page 5: Introduction
INTRODUCTION The UNIMUX-USBV-xO (formerly referred to as KEEMUX-USBV-xU) USB KVM switch (UNIMUX) allows access to any Windows, MAC, or SUN USB CPUs from one monitor, USB keyboard and USB mouse (up to 32 CPUs as a single switch or 512 CPUs when cascaded). -
Page 6: Materials
SA-xx-MM cables are available from NTI in 3,6,10, 15, 25, 35, 50 and 100 foot lengths where: xx is the length of the cable in feet MM indicates male-to-male connector Cables can be purchased from Network Technologies Inc by calling (800) 742-8324 (800-RGB-TECH) in the US and Canada or (330) 562-7070 (worldwide). DEFINITIONS •... -
Page 7: Features And Functions
MONITOR CPU 4 CPU 2 CPU 1 CPU 3 NETWORK TECHNOLOGIES INC 1275 Danner Dr, Aurora, OH 44202 Tel:330-562-7070 www.nti1.com CPU Status LEDs- for visual indication of connection between the user and a specific CPU. RS232- (optional) DIP switches for configuring switch address when RS232 is used... -
Page 8: Rackmounting Instructions
NTI UNIMUX SERIES USB KVM SWITCH RACKMOUNTING INSTRUCTIONS This NTI switch was designed to be mounted to a rack or to sit on a desktop. It includes rackmount ears to make attachment to a rack easy, and rubber feet to be applied to the bottom of the case if it will instead sit on a flat surface. If this will sit on a flat surface, simply apply the rubber feet to the bottom of the case in each of the 4 corners. -
Page 9: Installation
CPU 6 CPU 5 USB DEVICES VIDEO VIDEO MONITOR CPU 4 CPU 3 CPU 2 CPU 1 NETWORK TECHNOLOGIES INC 1275 Danner Dr, Aurora, OH 44202 Tel:330-562-7070 www.nti1.com 15HD Female Video Connector Multi-Scan Monitor 15HD Male Video Connector Figure 3- Connect a VGA multi-scan monitor Connect the male USB type A connector on the keyboard cable to either one of the two USB type A female connectors labeled "DEVICES"... -
Page 10: Figure 5- Connect The Ac Line Cord
VIDEO MONITOR CPU 4 CPU 3 CPU 2 CPU 1 NETWORK TECHNOLOGIES INC 1275 Danner Dr, Aurora, OH 44202 Tel:330-562-7070 www.nti1.com IEC Powercord Figure 5- Connect the AC line cord Connect each CPU to the USB switch using a USBVEXT-xx-MM video and input device interface cable – REQUIRED (not supplied). -
Page 11: Power-Up Sequence
NTI UNIMUX SERIES USB KVM SWITCH Power-Up Sequence • The UNIMUX can be powered at any time. • The CPUs can be powered at any time although if a CPU needs a keyboard and/or mouse at power-ON it should be powered after connecting to and powering-ON the UNIMUX. -
Page 12: Using The Unimux Usb Kvm Switch
NTI UNIMUX SERIES USB KVM SWITCH USING THE UNIMUX USB KVM SWITCH Once the UNIMUX is properly connected, the UNIMUX will enable a connection to be made between the CPUs attached to its VIDEO and CPU ports and the monitor and input devices attached to the MONITOR and DEVICES ports. The LEDs on the control panel of the UNIMUX will illuminate depending on which port (and corresponding CPU) is being connected to the monitor and input devices. -
Page 13: Modes Of Operation
NTI UNIMUX SERIES USB KVM SWITCH MODES OF OPERATION Basic Command Mode In order to control the UNIMUX with the keyboard connected, Command Mode must be enabled. To enter Command Mode from the keyboard: (ACCENT Ctrl Press KEY) NOTE: Basic Command mode is only used in a UNIMUX-USBV-2. All other UNIMUX- USBV-x switches have OSD installed. -
Page 14: Broadcast Mode
NTI UNIMUX SERIES USB KVM SWITCH Broadcast Mode To activate or deactivate Broadcast Mode press <B> while in Command Mode. Broadcast Mode enables the user to type characters to both computers simultaneously. NOTE: The user must type somewhat slowly when in Broadcast Mode (less than 20 wpm) and cannot use the <Backspace>... -
Page 15: Mice And Trackballs With Macs
NTI UNIMUX SERIES USB KVM SWITCH Mice and Trackballs with MACs The UNIMUX can be configured to enable full functionality between mice and trackballs having two or more buttons and USB MAC CPUs. By default, the ports on the UNIMUX are configured for use with WINDOWS and SUN CPUs and have no special translation for using multi-function mice and trackballs when a MAC CPU is connected. -
Page 16: Osd Control
NTI UNIMUX SERIES USB KVM SWITCH OSD CONTROL OSD superimposes a menu system on the user’s video screen with a list of all connected CPUs. OSD allows CPUs to be named (with up to 12-character names). OSD then allows selection of CPUs by that name. Connected CPUs can be listed by name or by port number. -
Page 17: User Login Mode
NTI UNIMUX SERIES USB KVM SWITCH User Login Mode User login mode requires a user to login with a user name and password from the list created by the administrator. This mode will also disable use of the front panel until the user logs in. Function: Keystroke: Add a character to the... -
Page 18: Additional Modes Available With Security
NTI UNIMUX SERIES USB KVM SWITCH ADDITIONAL MODES AVAILABLE WITH SECURITY The three modes that follow are only available if the administrator is logged in. Administration Mode To enter the Administration Mode menu press <A> from the Maintenance Mode menu (page 24). Administration Mode allows the administrator to use the following functions: Function:... -
Page 19: User Name List
NTI UNIMUX SERIES USB KVM SWITCH (If Password string and Verify Password string Enter are different, this command will have no effect, Save new password. enabling the administrator to correct the password) Move to next field to be edited Return to Administration Mode User Name List To enter the User Name List press <U>... -
Page 20: Alternate Command Hot Key
NTI UNIMUX SERIES USB KVM SWITCH The list below describes the functions available in the Edit User mode: Function: Keystroke: Add a character to user name string, (Type any upper or lower case password string, or verify password Shift alphabetical or numeric character) string, whichever is selected Switch sequentially between the User Name edit box, Password... -
Page 21: Usage Statistics
NTI UNIMUX SERIES USB KVM SWITCH Usage Statistics To view the Usage Statistics press <D> from the Administration Mode menu. The Usage Statistic screen has two resetable counters. • “Power-on cycles” indicates how many times the UNIMUX has been powered-cycled since the counter was last reset. To reset the “Power-on cycles”... -
Page 22: User Access Functions
NTI UNIMUX SERIES USB KVM SWITCH USER ACCESS FUNCTIONS Introduction The OSD menu enables a user to name the CPUs connected to the UNIMUX and connect to them using that name from a single keyboard and mouse. The OSD is positioned on the user's monitor, displaying 8 CPU names at a time. The screen can be used for switching as well as editing the CPUs’... -
Page 23: Broadcast Mode
NTI UNIMUX SERIES USB KVM SWITCH OSD Command Mode (Cont'd) Function: Keystroke: Enter Switch to a selected port (Use this command to update the information Update Configuration Ctrl describing the structure of the cascaded switches. Used if a slave is powered-ON or OFF at any time after initial startup.) (Display information about the selected port. -
Page 24: Normal Mode
NTI UNIMUX SERIES USB KVM SWITCH Note: The scan dwell time set by the user only effects that user and has no effect on other switch users. Normal Mode When the UNIMUX is not in Command, Broadcast, or Scan mode and all of the UNIMUX mode LEDs are OFF, the user is in Normal Mode, controlling the CPU to which the user is connected through the USB KVM switch. -
Page 25: Change Settings
NTI UNIMUX SERIES USB KVM SWITCH Change Settings To enter the Change Settings menu (see Fig. 20) press <Ctrl>+<T> from the Command Mode menu. The list below describes the Change Settings menu functions available from the keyboard: Function: Keystroke: Go to Broadcast Mode Configuration Go to Scan Mode Configuration Go to Language Selection Menu (Option only available if the... -
Page 26: Select Ports For Scan
NTI UNIMUX SERIES USB KVM SWITCH Select Ports For Scan To Select Ports For Scanning, press <S> from the Change Settings menu described on page 21. The Select Ports For Scan menu enables the user to select specific ports to be active in Scan Mode. Only the selected ports will be scanned in Scan Mode. -
Page 27: Search Mode
NTI UNIMUX SERIES USB KVM SWITCH A checklist with all the ports numbers preceded by a check box will be displayed in the window. • unchecked box = the corresponding port is set as connected to a non-MAC CPU • checked box = the corresponding port is set as connected to a MAC CPU In order to change the status of a port, the administrator has to first... -
Page 28: Maintenance Mode
NTI UNIMUX SERIES USB KVM SWITCH Maintenance Mode To enter Maintenance Mode press <Ctrl>+<M> from the Command Mode menu. Maintenance Mode enables a user to customize the On Screen Display to their requirements. Function: Keystroke: Reset all of the port names Toggle between numeric and alphabetic listing of ports Move On Screen Display (OSD) -
Page 29: Help Mode
NTI UNIMUX SERIES USB KVM SWITCH Help Mode To enter Help Mode press the <F1> key from the Command Mode menu (on page 17). Help Mode displays a list of commands with a short explanation of their function. These lists are organized in pages for each mode (i.e. -
Page 30: Rs232 Control
NTI UNIMUX SERIES USB KVM SWITCH RS232 CONTROL (Optional) RS232 enables the UNIMUX to be remotely controlled via RS232. To control the UNIMUX via RS232 the user has three options: • write a program that runs on a PC using the Command Protocol (page 27) •... -
Page 31: Unit Address And Loop Back
NTI UNIMUX SERIES USB KVM SWITCH Unit Address and Loop Back To allow multiple units to be controlled from a single CPU serial port, the RS232 control interface is designed to allow "daisy chaining" up to 15 units. By setting the appropriate RS232 DIP switches, each unit can be given a unique address (1-15). Then the unit will only respond to commands on the bus if its address is embedded in the command. - Page 32 NTI UNIMUX SERIES USB KVM SWITCH Note: To use this command protocol, the user is required to write a program that will send an entire command string all at once, not character by character. Programs that send one character at a time (such as HyperTerminal) cannot be used to control the UNIMUX.
-
Page 33: Nti Switch Control Program For Windows 9X, Nt, 2000, Vista And 7
NTI UNIMUX SERIES USB KVM SWITCH NTI Switch Control Program For Windows 9X, NT, 2000, Vista and 7 The NTI Switch Control Program is an easy and powerful graphical program that controls NTI switches through an RS232 interface. The NTI Switch Control Program is included on the CD packaged with the UNIMUX. The NTI Switch Control Program is downloaded by clicking on the link "Download NTI Switch Control Program". - Page 34 NTI UNIMUX SERIES USB KVM SWITCH Read Connection for Output/User - read what input is connected to the specified output Read Connection for Audio Output/User (not applicable to this model) - read what input is connected to the specified output Read Mute Status and Volume for Audio Output/User (not applicable to this model) - read the volume and the mute status of the specified output Read Unit Size...
-
Page 35: Mouse Click Equivalents
NTI UNIMUX SERIES USB KVM SWITCH MOUSE CLICK EQUIVALENTS To emulate a right button click using Apple 1 button mouse, hold down the Command key ( ) while pressing the mouse button. Note: Right mouse button emulation must be enabled (see Change Settings on page 19) for this to work. KEYBOARD FEATURES The keyboard configuration of each CPU is saved in the UNIMUX. -
Page 36: International Sun Keyboards
NTI UNIMUX SERIES USB KVM SWITCH Backspace Lock Enter Caps Lock Shift Shift Enter Ctrl Ctrl Typical 101 Keyboard Print Scroll Screen Pause Lock SysRq Break Backspace Lock Enter Caps Lock Shift Shift Enter Ctrl Ctrl Windows Logo Key Application Key Windows Logo Key Windows USB Keyboard CD Eject... -
Page 37: Cascading
NTI UNIMUX SERIES USB KVM SWITCH CASCADING The UNIMUX-USBV-x USB KVM switch can be cascaded as shown in Fig. 33 below. Single user and multi-user UNIMUX switches may be connected downstream (see Figs.35 and 36). The first switch in a cascaded system is referred to as the "master", while all downstream switches are referred to as "slaves". -
Page 38: Figure 34- Cascaded Configuration With Multi-User Slaves
CPU 6 CPU 5 USB DEVICES MONITOR VIDEO VIDEO CPU 4 CPU 3 CPU 2 CPU 1 NETWORK TECHNOLOGIES INC 1275 Danner Dr, Aurora, OH 44202 Tel:330-562-7070 www.nti1.com USBVEXT-xx-MM USBVEXT-xx-MM SLAVE #2 (UNIMUX-USBV-8-RS) SLAVE #1 (UNIMUX-USBV-8-RS) CPU 8 CPU 7... -
Page 39: Limitations
USB DEVICES MONITOR VIDEO VIDEO CPU 4 CPU 3 CPU 2 CPU 1 NETWORK TECHNOLOGIES INC 1275 Danner Dr, Aurora, OH 44202 Tel:330-562-7070 www.nti1.com USBVEXT-xx-MM USBVEXT-xx-MM CONNECT MASTER CPU PORT 1 TO ONE USER PORT ON SLAVE1 CONNECT MASTER CPU PORT 2... -
Page 40: Port Assignments In Osd
NTI UNIMUX SERIES USB KVM SWITCH Port Assignments in OSD When the Master powers up with the powered-ON Index Number Slave switches connected, you will need to enter Command Mode (page 12) to view the updated port list. Port Identification Rules: 1. -
Page 41: Audio Support
NTI UNIMUX SERIES USB KVM SWITCH AUDIO SUPPORT (Optional) Models with audio support include 3.5mm stereo jacks for connection to audio sources and an output device. Audio from either the same sources as the video, keyboard, and mouse or from separate sources (any standard line level audio (4Vp-p)) will be heard through devices such as self-powered stereo speakers or headphones. -
Page 42: Rs232 Connection Cables
NTI UNIMUX SERIES USB KVM SWITCH RS232 CONNECTION CABLES Pinout of RS232 port on UNIMUX The UNIMUX RS232 serial port is a DB-9F (female) connector configured as a DCE (data communication equipment) port. The RS232 port interface signals are listed below, including equivalent CCITT V.24 identification, and signal direction: DB-9F Common CCITT... -
Page 43: Index
NTI UNIMUX SERIES USB KVM SWITCH INDEX MAC Ports Configuration, 22 administration mode, 14 Maintenance Mode, 24 administrator login, 12 alternate command hot key, 16 NTI Switch Control Program, 29 options available, 1 Audio support, 37 basic command mode, 9 OSD command mode, 12 Rack mounting, 4 baud rate, 26...
Need help?
Do you have a question about the UNIMUX-USBV-xO and is the answer not in the manual?
Questions and answers