Table of Contents

Related Manuals for Network Technologies PWR-RMT-RBT


Summary of Contents for Network Technologies PWR-RMT-RBT
- Page 1 NETWORK 1275 Danner Dr Tel:330-562-7070 TECHNOLOGIES Aurora, OH 44202 Fax:330-562-1999 INCORPORATED www.networktechinc.com ® ENVIROMUX Series PWR-RMT-RBT Remote Power Reboot Switch Installation and Operation Manual Man095 Rev 10/23/07...
- Page 2 ENVIROMUX is a registered trademark of Network Technologies Inc in the U.S. and other countries. COPYRIGHT Copyright © 2007 by Network Technologies Inc. All rights reserved. No part of this publication may be reproduced, stored in a retrieval system, or transmitted, in any form or by any means, electronic, mechanical, photocopying, recording, or otherwise, without the prior written consent of Network Technologies Inc, 1275 Danner Drive, Aurora, Ohio 44202.
- Page 3 Man095 Rev 10/23/07...
- Page 4 Man095 Rev 10/23/07...
-
Page 5: Important Safety Instructions
Page 2 Important Safety Instructions When using this product, basic safety precautions should always be followed to reduce the risk of fire, electric shock, and injury to persons, including the following: Read and understand all instructions. Follow all warnings and marked on the product. Unplug this product from the wall outlet before cleaning. -
Page 6: General Description
Page 3 General Description The PWR-RMT-RBT (iBoot) is a network attached, IP addressed, web controlled AC power switch. Anyone with a web browser can access the switch to perform power On, Off or Power Cycle (Reboot or Power Burst). PWR-RMT-RBT is password protected for security. -
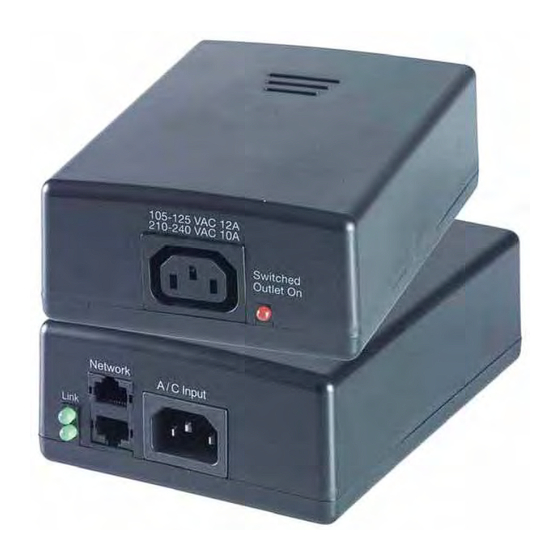
Page 7: Hardware Installation
Page 4 Hardware Installation Ethernet Connections Networked Device iBoot supports 10/100 Ethernet using unshielded twisted PC Workstation, Router Etc. pair (Cat 5) cabling. Two network jacks, with built-in Ethernet switch, are provided. They are auto-sensing for 10/100 and Uplink/Downlink. A Link LED for each jack indicates when the connection to the network is properly A/C Input established. -
Page 8: Initial Configuration
Page 5 Initial Configuration The iBoot Setup Utility supplied on the distribution CD provides the easiest means to find and configure your iBoot for use. It can discover all the iBoots on your network, display the current IP address of each, and allow setting of any valid IP address. The Setup Utility is available on the distribution CD. - Page 9 Page 6 Once the IP Address is set and the iBoot is power cycled, other all other operational features of the iBoot can be set up. Click on Discover again to refresh the display, highlight the desired iBoot and click on Launch Browser. Follow the instructions on Page 9 to configure the iBoot. The iBoot Setup Utility can also be used to return an iBoot to its Factory Default condition.
- Page 10 Page 7 Windows (98 and Later) Open a DOS window. (Run: Command) Type the following command: arp -s <IP Address> <MAC Address> Where <IP Address> is the desired IP address (in dotted decimal) for the iBoot and the <MAC address> is the MAC Address of the iBoot. The MAC Address of the iBoot is located on bottom of the unit.
-
Page 11: Web Browser Operation
Page 8 Web Browser Operation Password Protection iBoot uses two passwords, one for normal power control use and one that also provides access to the setup functions. From the factory, both passwords are the same. (PASS) Open your browser and enter the IP address of iBoot into the address bar. -
Page 12: Device Settings
Page 9 iBoot Setup iBoot setup section consists of several pages. Access any page via the buttons on the left of the page. Each time a setting is changed click on the Apply button for that page to save the changes in iBoot. Device Settings Device Name: Set a 20 Character name to be... - Page 13 Page 10 Auto Ping The AutoPing feature allows iBoot to automatically detect failed equipment and perform a timed reboot or other power control function (like turning on an indicator or siren). You set any IP address to be periodically pinged. When iBoot no longer detects a response from the address, the programmed power control function is actuated.
- Page 14 Page 11 Heartbeat Monitor See Advanced Operation for Heartbeat Monitor Setup Power and System Passwords Two passwords are used by iBoot. The Power Password allows access to the control of iBoot, but not to the Setup functions. When this password is used, the main screen will not have a link to Setup.
-
Page 15: Advanced Operation
Page 12 Advanced Operation Heartbeat Monitor Like AutoPing, the Heartbeat monitor Example: allows iBoot to monitor an external Kiosk generates heartbeat at a regular interval to inform iBoot that operations device and take action when this are normal. When kiosk crashes, device fails. - Page 16 Page 13 Action: select from None Heartbeat not used Power On – Latch Upon triggering, iBoot will power on and remain so until changed via the web, ibootctl.exe or direct messaging. Power On – Follow Upon triggering, iBoot will power on. When the heartbeat returns, iBoot will power off.
- Page 17 Page 14 Direct TCP/Telnet Control The iBoot uses the TCP (Transport Communication Protocol) to communicate with the client system. To communicate with iBoot, establish a TCP connection using the Port as assigned in iBoot Setup. Once connected use the Send() function to send the commands to the iBoot and the Recv() function to receive the response.
-
Page 18: Specifications
Page 15 Specifications Physical Height 2.25 in. Width 4.50 in. Depth 6.00 in. Weight 1.25 lb. MTBF 160,100 hrs Temperature 0 to 40 Deg. C Input 3 Prong, Male, IEC 320 input connector. Input Cord 16AWGX3C 10A 250 UL/CSA/VDE Rated (1.25mm2X3C) Voltage Range Auto Sensing 105-240 VAC...
Need help?
Do you have a question about the PWR-RMT-RBT and is the answer not in the manual?
Questions and answers