
Related Manuals for Network Technologies ST-xUO


Summary of Contents for Network Technologies ST-xUO
- Page 1 ® NODEMUX Series ST-xUO Universal KVM Switch Installation and Operation Manual MAN064 Rev Date 9/4/2008...
- Page 2 Network Technologies Inc, 1275 Danner Drive, Aurora, Ohio 44202. CHANGES The material in this guide is for information only and is subject to change without notice. Network Technologies Inc reserves the right to make changes in the product design without reservation and without notification to its users.
-
Page 3: Table Of Contents
TABLE OF CONTENTS INTRODUCTION ....................................1 MATERIALS ...................................... 2 FEATURES AND FUNCTIONS ................................. 3 RACKMOUNTING INSTRUCTIONS..............................4 To Mount to a Rack..................................4 INSTALLATION ....................................5 OPERATION...................................... 9 Front Panel Control..................................9 Keyboard Control ................................... 9 OSD ........................................9 Security Option ....................................9 Enabling the Security Feature.............................. - Page 4 TABLE OF FIGURES Figure 1- Secure rackmount ears to switch............................4 Figure 2- Secure switch to rack ................................. 4 Figure 3- Connect the monitor ................................5 Figure 4- Connect a PS/2 keyboard and mouse ..........................5 Figure 5- Connect a SUN keyboard/mouse ............................6 Figure 6- Connect a PS/2 CPU................................
-
Page 5: Introduction
INTRODUCTION The NTI ST-xUO UNIVERSAL KVM switch (NODEMUX) allows the user’s keyboard, monitor, and mouse to directly control any legacy PC or SUN CPU connected to the switch (up to 32 CPUs as a single switch). These CPUs can be file servers, network managers, etc. -
Page 6: Materials
• None needed. SUN keyboard plugs directly in. SUN keyboard/mouse Where: xx is the length of the cable in feet. MM indicates male-to-male connector, and Cables can be purchased from Network Technologies Inc by calling 800-RGB-TECH (800-742-8324) or (330)-562- 7070. -
Page 7: Features And Functions
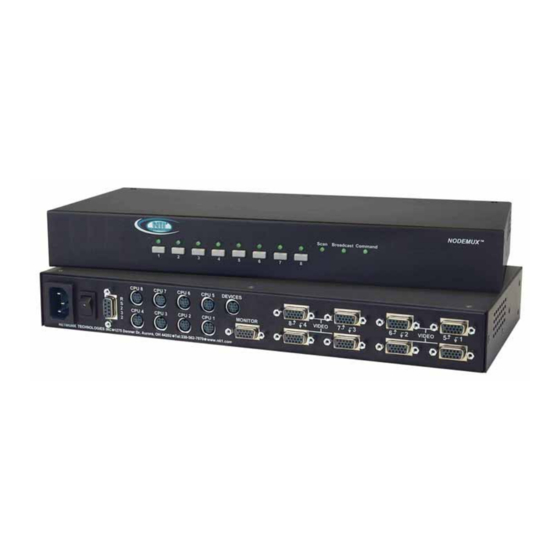
NTI NODEMUX SERIES UNIVERSAL KVM SWITCH FEATURES AND FUNCTIONS Front View of NODEMUX NODEMUX Network Technologies Inc Scan Broadcast Command Rear View of NODEMUX DEVICES CPU 8 CPU 7 CPU 6 CPU 5 VIDEO VIDEO MONITOR CPU 4 CPU 3... -
Page 8: Rackmounting Instructions
NTI NODEMUX SERIES UNIVERSAL KVM SWITCH RACKMOUNTING INSTRUCTIONS This NTI switch was designed to be mounted to a rack or to set on a desktop. It includes rackmount ears to make attachment to a rack easy, and rubber feet to be applied to the bottom of the case if it will instead sit on a flat surface. If this will sit on a flat surface, simply apply the rubber feet to the bottom of the case in each of the 4 corners. -
Page 9: Installation
CPU 6 CPU 5 VIDEO VIDEO CPU 4 CPU 3 CPU 2 CPU 1 MONITOR NETWORK TECHNOLOGIES INC 1275 Danner Dr, Aur ora, OH 44202 Tel:330-562-7070 www.nti1.com MONITOR 15HD Male Video Connector 15HD Female Video Connector Figure 3- Connect the monitor... -
Page 10: Figure 5- Connect A Sun Keyboard/Mouse
DEVICES VIDEO VIDEO MONITOR CPU 4 CPU 3 CPU 2 CPU 1 NETWORK TECHNOLOGIES INC 1275 Danner Dr, Aur ora, OH 44202 Tel:330-562-7070 www.nti1.com 8 Pin miniDIN Female SUN Keyboard / Mouse Connector DEVICES Figure 5- Connect a SUN keyboard/mouse 4. -
Page 11: Figure 7- Connect A Sun Cpu
CPU 7 CPU 6 CPU 5 DEVICES VIDEO VIDEO MONITOR CPU 4 CPU 3 CPU 2 CPU 1 NETWORK TECHNOLOGIES INC 1275 Danner Dr, Aurora, OH 44202 Tel:330-562-7070 www.nti1.com 8 Pin miniDIN Male Connector 15HD Male Video Connector 13W3M-15HDF SKTINT-xx-MM VEXT-xx-MM... -
Page 12: Figure 9- Connect A Ps/2 Cpu To An St-8U-Ts-R
NTI NODEMUX SERIES UNIVERSAL KVM SWITCH Rear View of ST-8UTSO-R NETWORK 1275 Danner Dr Tel:330-562-7070 TECHNOLOGIES Aurora, OH 44202 Fax:330-562-1999 INCORPORATED www.nti1.com 5VDC CPU 8 CPU 7 CPU 6 CPU 5 CPU 4 CPU 3 CPU 2 CPU 1 DEVICES PS/2 CPU MMEXT-xx VKTINT-xx-MM... -
Page 13: Operation
NTI NODEMUX SERIES UNIVERSAL KVM SWITCH OPERATION Control over the CPUs attached to the NODEMUX is achieved through operation of the NODEMUX. Once the NODEMUX is properly connected, the NODEMUX will enable a connection to be made between the CPUs attached to its "VIDEO x" and "CPU x"... -
Page 14: Enabling The Security Feature
NTI NODEMUX SERIES UNIVERSAL KVM SWITCH Enabling the Security Feature To enable the security feature the administrator must first enter Command Mode from the keyboard using the sequence <Ctrl> + <`> (accent key). The OSD menu will automatically appear on the monitor in addition to illuminating the Command Mode indicator LED on the KVM switch. -
Page 15: Additional Modes Available With Security
NTI NODEMUX SERIES UNIVERSAL KVM SWITCH Additional Modes Available With Security Note: The three modes that follow are only available if the administrator is logged in. Administration Mode Administration Mode allows the administrator to use the following functions: Function: Keystroke: Configure switch- for application and RS232 communication (not found in legacy NODEMUX) -
Page 16: Administrator Password
NTI NODEMUX SERIES UNIVERSAL KVM SWITCH Administrator Password To change the administrator password press <C> from the Administration Mode menu. The administrator is able to change the administrator password as needed (see Fig. 12). Two edit fields are available, one for password, the other for verify password. The password can be up to 13 characters in length. -
Page 17: System Access List
NTI NODEMUX SERIES UNIVERSAL KVM SWITCH System Access List The System Access List displays a list of numbers representing the ports so the administrator can change access rights to the ports for the selected user. The user’s name is displayed at the top of the access list. The mouse is used to change access rights by clicking on a given number to toggle a port’s status. -
Page 18: Figure 13- Command Mode Menus
NTI NODEMUX SERIES UNIVERSAL KVM SWITCH Figure 13- Command Mode menus Command Mode (Cont’d) Function: Keystroke: Ctrl Enter Edit Mode Ctrl Enter Maintenance Mode See Touch Screen Support option Enter Touch Maintenance on page 19 for more on Touch Ctrl Mode (only if the Touch Screen Maintenance Mode option is installed) -
Page 19: Scan Mode
CPU 5 VIDEO VIDEO MONITOR CPU 4 CPU 3 CPU 2 CPU 1 NETWORK TECHNOLOGIES INC 1275 Danner Dr, Aurora, OH 44202 Tel:330-562-7070 www.nti1.com PORT 1 PORT 4 Figure 14- Video and Device connections identified with port numbers Scan Mode When in Command Mode, press <Ctrl>-<S>... -
Page 20: Edit Mode
NTI NODEMUX SERIES UNIVERSAL KVM SWITCH Edit Mode Edit Mode allows the user to modify the names of the CPUs connected to the switch. Names of CPUs can be up to 12 characters in length. When in Edit Mode, multiple keystroke combinations are not valid (<SHIFT>+<P>, <CTRL>+<P>, <ALT>+ <P>, and <P> will all type a “P”... -
Page 21: Search Mode
NTI NODEMUX SERIES UNIVERSAL KVM SWITCH Search Mode Search Mode allows the user to enter and maneuver through a list of CPU names. As the user types, the best matching CPU name is selected. The list of CPUs may also be searched for a specific (or similar) name. The following commands are valid when the search option has been invoked from Command Mode. -
Page 22: Maintenance Mode
NTI NODEMUX SERIES UNIVERSAL KVM SWITCH Maintenance Mode Maintenance Mode allows a user to customize the On Screen Display to their requirements Function: Keystroke: Reset all of the port names Toggle between numeric and alphabetic listing of ports Move On Screen Display (OSD) window up on monitor Move OSD window down on monitor... -
Page 23: Help Mode
NTI NODEMUX SERIES UNIVERSAL KVM SWITCH Help Mode This mode displays a list of commands with a short explanation of their function. These lists are organized in pages for each mode (i.e. COMMAND, EDIT, SEARCH, and HELP). The following options allow the user to quickly obtain information on any command Function: Keystroke:... -
Page 24: Reset Default Values
NTI NODEMUX SERIES UNIVERSAL KVM SWITCH Reset Default Values The default operating values of the connected touch screen monitor must be communicated to the NODEMUX before any connected CPUs are powered up. To reset default values, 1. Press <Ctrl> + <`> (accent key) to enter Command Mode 2. -
Page 25: Rs232 Control
NTI NODEMUX SERIES UNIVERSAL KVM SWITCH RS232 CONTROL RS232 Connections and Configuration Remote Connection The RS232 Interface is designed to meet the RS232C standard and can be controlled from any terminal (CPU or other controller with an RS232 communications port.). The pin-out for the DB-9 connector on the unit is as follows: RS232 Connector (DB-9 FEMALE) SIGNAL FUNCTION... -
Page 26: Loop Back
NTI NODEMUX SERIES UNIVERSAL KVM SWITCH Loop Back In order for an RS232 command and a response to the command to be viewed at the terminal screen, the NODEMUX must have its Loop Back feature enabled. More than one NODEMUX may be connected to a terminal at a time. To do so, a Matrix-Y-1 cable (available from NTI) must be used. -
Page 27: Command Protocol
NTI NODEMUX SERIES UNIVERSAL KVM SWITCH Wiring Schematic of Matrix-Y-1 cable 9D Male 9D Female 9D Male (Unit #1) (Source) (Unit #2) Not connected to source connector Jumper Jumpers Figure 24- Pinout of Matrix-Y-1 cable Command Protocol CPU controller commands supported by the unit are defined below. All commands should be terminated with a <CR> (carriage return). - Page 28 NTI NODEMUX SERIES UNIVERSAL KVM SWITCH CA - change all output channels FORMAT: CA AA,XX<CR> CA = "change all outputs" command followed by at least one space AA = unit address XX = input /CPU to connect to all outputs/USERS RESPONSE: *<CR>...
-
Page 29: Nti Switch Control Program For Windows 9X, Nt, 2000, Xp And Vista
NTI NODEMUX SERIES UNIVERSAL KVM SWITCH NTI Switch Control Program For Windows 9X, NT, 2000, XP and Vista The NTI Switch Control Program is an easy and powerful graphical program that controls NTI switches through an RS232 interface. The NTI Switch Control Program is included on the CD packaged with the NODEMUX. The NTI Switch Control Program is downloaded by clicking on the link "Download NTI Switch Control Program"... -
Page 30: Setup Options
NTI NODEMUX SERIES UNIVERSAL KVM SWITCH Setup Options Selection Description select Com port current: - select PC serial port (COM1:) - the current PC serial port is displayed in parentheses select Baud rate current: - select PC serial port baud rate (9600) - the current baud rate is displayed in parentheses set unit Address current:... -
Page 31: Keyboard-To-Cpu Translation
NTI NODEMUX SERIES UNIVERSAL KVM SWITCH KEYBOARD-TO-CPU TRANSLATION The NTI NODEMUX enables the mixture of otherwise incompatible devices and CPUs to control each other. It accomplishes this by performing keyboard-to-CPU translations automatically (i.e. connect a SUN keyboard and mouse to a PS/2 type CPU). The chart below shows the key commands that will be recognized and translated for the different types of CPUs. -
Page 32: Non-Osd Touch Screen Support
NTI NODEMUX SERIES UNIVERSAL KVM SWITCH NON-OSD TOUCH SCREEN SUPPORT (Optional-4 and 8 port models only) NON-OSD touch screen support allows a single touch-screen monitor, and SUN or PS/2 mouse and keyboard to communicate directly with any PS/2 workstations connected to the switch. The NTI ST-xU-TS includes serial cable connection ports in addition to the video and keyboard/mouse ports. -
Page 33: Troubleshooting
NTI NODEMUX SERIES UNIVERSAL KVM SWITCH TROUBLESHOOTING PROBLEM: Keyboard Errors SOLUTION: Check cable connections on each CPU and the switch. NOTE: If the cable from a CPU’s keyboard port is disconnected from the NTI Universal KVM switch while power is ON, turn the power OFF to the CPU before plugging the cable back in. PROBLEM: No Video SOLUTION:...
Need help?
Do you have a question about the ST-xUO and is the answer not in the manual?
Questions and answers