Table of Contents
Advertisement
Advertisement
Table of Contents

Related Manuals for Motorola DCX700


Summary of Contents for Motorola DCX700
- Page 1 User Guide DCX700 High-Definition Digital Set-Top Box...
- Page 2 © 2010 Motorola, Inc. All rights reserved. No part of this publication may be reproduced in any form or by any means or used to make any derivative work (such as translation, transformation, or adaptation) without written permission from Motorola, Inc.
-
Page 3: Safety & Regulatory Information
During Transportation to the Subscriber Home • Transport the cable terminal in its shipping box or an equally padded container. • Do not expose the terminal to rain or moisture. DCX700 High-Definition Digital Set-Top Box • User Guide 365-095-14284 x.1... - Page 4 • For DCX700 North American models, only use power supplies with Motorola part number 524475-034. FCC Compliance Note: This equipment has been tested and found to comply with the limits for a Class B digital device, pursuant to part 15 of the FCC Rules.
- Page 5 FCC Declaration of Conformity Motorola Inc., Home & Network Mobility, 101 Tournament Drive, Horsham, PA 19044, 1-215-323-1000, declares that the DCX700 set-top complies with 47 CFR Parts 2 and 15 of the FCC rules as a Class B digital device. Industry Canada (IC) This Class B digital device complies with Canadian ICES-003.
-
Page 6: Software License
Software. The Software is never sold. Motorola licenses the Software to the original customer and to any subsequent licensee for personal use only on the terms of this License. Motorola and its third party licensors retain the ownership of the Software. - Page 7 License. The Software, including any images, graphics, photographs, animation, video, audio, music and text incorporated therein is owned by Motorola or its third party licensors and is protected by United States copyright laws and international treaty provisions. Except as otherwise expressly provided in this License, the copying, reproduction, distribution or preparation of derivative works of the Software, any portion of the Product or the documentation is strictly prohibited by such laws and treaty provisions.
-
Page 8: Table Of Contents
Connecting Your DCX Set-top to an SDTV ..................13 Connecting an SDTV and VCR/DVD Recorder................14 Connecting Your DCX Set-top to an SDTV and VCR/DVD Recorder ..........14 Connecting an A/V Receiver, SDTV, and VCR/DVD Recorder............15 DCX700 High-Definition Digital Set-Top Box • User Guide 365-095-14284 x.1... - Page 9 Additional HDMI Settings Screen ................... 28 Additional Closed Caption Settings Screen................30 Subtitle and DVS Settings Screen................... 32 Advanced Audio/Video Settings Screen.................. 34 Troubleshooting .......................... 36 Appendix A........................... 39 Wall Mounting Your DCX700......................39 DCX700 High-Definition Digital Set-Top Box • User Guide 365-095-14284 x.1...
-
Page 10: Introduction
Introduction Congratulations on receiving a Motorola DCX700 High-Definition All-Digital Cable Set-top box, one of the most advanced interactive digital cable set-tops available today. Motorola has merged the extraordinary features of digital cable — the seemingly endless programming options, interactive program guides, Video on Demand (VOD), commercial- free, CD quality music, and the incredible picture quality and sound of High-Definition TV (HDTV). -
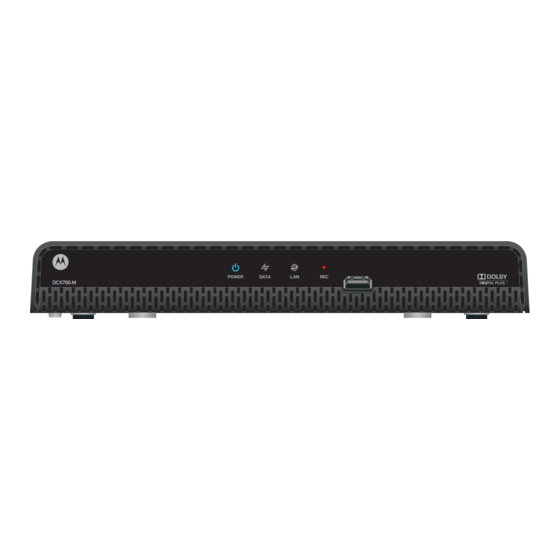
Page 11: Front Panel
Introduction Front Panel POWER DATA DCX700 M Power LED — Illuminates when the DCX700 is powered on Data — Dual function LED • Flashes to indicate unit is booting/provisioning • Extinguished when unit is provisioned LAN — Illuminates to indicate one or more set-top boxes and/or DVR devices are detected on the home network Rec —... -
Page 12: Rear Panel
Ext IR Input – Connects to a remote control receiver accessory cable IEEE-1394 — Audio and video device connection Power connector * Availability of certain features is dependent upon application support. DCX700 High-Definition Digital Set-Top Box • User Guide 365-095-14284 x.1... -
Page 13: Operation
Refer to the Interactive Program Guide’s instruction manual for detailed instructions. M-Card™ The M-Card is required to view cable television programs and interactive on-demand programs. The M-Card should not be removed. DCX700 High-Definition Digital Set-Top Box • User Guide 365-095-14284 x.1... -
Page 14: Connecting Your Set-Top
If your TV has an HDMI input, this is for both audio and video. Connect a Standard HDMI cable to the TV and to the HDMI connector on your DCX set-top. DCX700 High-Definition Digital Set-Top Box • User Guide 365-095-14284 x.1... -
Page 15: Component Video (Ypbpr) - Hdtv And Sdtv
DCX set-top. Refer to Section 5 for more information. If you have an audio/video receiver and are not using your TV’s speakers, go to Connecting Your DCX Set-top to an A/V Receiver — Audio. DCX700 High-Definition Digital Set-Top Box • User Guide 365-095-14284 x.1... -
Page 16: Connecting Your Dcx Set-Top To An Hdtv - Video
Note: Because HDMI provides both video and audio output, no additional audio connections to the TV are required. Note: Only (1) HDTV video connection needs to be made to an HDTV. Note: Solid lines indicate optimum connections. DCX700 High-Definition Digital Set-Top Box • User Guide 365-095-14284 x.1... -
Page 17: Connecting Hdtv - Separate Video/Audio Connections
S/PDIF offers better audio quality, including support ® for Dolby Digital audio. For information on configuring your DCX set-top settings, go to Configuring the Audio, Video, and Closed Caption Settings. DCX700 High-Definition Digital Set-Top Box • User Guide 365-095-14284 x.1... -
Page 18: Connecting Your Dcx Set-Top To An Hdtv - Audio
Connecting Your DCX Set-top to an HDTV — Audio Note: Only (1) video connection and (1) audio connection needs to be made to an HDTV. Note: Solid lines indicate optimum connections. DCX700 High-Definition Digital Set-Top Box • User Guide 365-095-14284 x.1... -
Page 19: Connecting An Hdtv And An A/V Receiver
AUDIO L/R the DCX set-top and the connectors on the A/V receiver. For information on configuring your DCX set-top settings, see Configuring the Audio, Video, and Closed Caption Settings. DCX700 High-Definition Digital Set-Top Box • User Guide 365-095-14284 x.1... -
Page 20: Connecting Your Dcx Set-Top To An A/V Receiver - Video
Connecting Your DCX Set-top to an A/V Receiver — Video Note: Solid lines indicate optimum connections. Note: Because HDMI provides both video and audio output, no additional audio connections to the TV or A/V Receiver are required. DCX700 High-Definition Digital Set-Top Box • User Guide 365-095-14284 x.1... -
Page 21: Connecting Your Dcx Set-Top To An A/V Receiver - Audio
Connecting Your Set-Top Connecting Your DCX Set-top to an A/V Receiver — Audio Note: Solid lines indicate optimum connections. DCX700 High-Definition Digital Set-Top Box • User Guide 365-095-14284 x.1... -
Page 22: Connecting An Sdtv
AUDIO AUDIO VIDEO IEEE 1394 Cable in Standard-Definition TV INPUT AUDIO LEFT AUDIO RIGHT VIDEO CABLE/ ANTENNA IN S-VIDEO Note: Only (1) video connection and (1) audio connection is required. DCX700 High-Definition Digital Set-Top Box • User Guide 365-095-14284 x.1... -
Page 23: Connecting An Sdtv And Vcr/Dvd Recorder
AUDIO VIDEO IEEE 1394 Cable in VCR/DVD Standard-Definition TV Recorder INPUT AUDIO LEFT INPUT OUTPUT CABLE/ AUDIO VIDEO AUDIO VIDEO AUDIO RIGHT ANTENNA IN VIDEO CABLE/ ToTV ANTENNA IN S-VIDEO DCX700 High-Definition Digital Set-Top Box • User Guide 365-095-14284 x.1... -
Page 24: Connecting An A/V Receiver, Sdtv, And Vcr/Dvd Recorder
(audio L/R). These outputs offer a higher level of audio quality, including support for Dolby Digital audio. These video connection methods do not support HD video. If you have an HDTV, see Connecting HDTV — Single Connection for Video/Audio. DCX700 High-Definition Digital Set-Top Box • User Guide 365-095-14284 x.1... -
Page 25: Connecting Your Dcx Set-Top To An A/V Receiver, Sdtv, And Vcr/Dvd Recorder
OUTPUT VIDEO S-VIDEO Alternate Note: Solid lines indicate optimum connections. Note: Consult your A/V receiver manual for additional wiring options or constraints when including a VCR/DVD recorder in your configuration. DCX700 High-Definition Digital Set-Top Box • User Guide 365-095-14284 x.1... -
Page 26: Recording Your Connections
A/V receiver AUDIO VIDEO DIGITAL AUDIO 5.1 CH INPUT COMPONENT VIDEO VIDEO S-VIDEO COAX IN CENTER OPTICAL IN CABLE/TV FRONT SURROUND SUB- WOOFER VIDEO 2 TV/MONITOR HDMI OUTPUT VIDEO S-VIDEO DCX700 High-Definition Digital Set-Top Box • User Guide 365-095-14284 x.1... -
Page 27: Data Devices
Internet access, e-mail, IP telephony, e-commerce, and home banking. Note: Your DCX set-top may be equipped with the interface connections illustrated, but their functionality depends on the services offered by your service provider. DCX700 High-Definition Digital Set-Top Box • User Guide 365-095-14284 x.1... -
Page 28: On-Screen Graphics
On-screen graphics are not available on all video output combinations. • On-screen graphics will not be displayed when you are using the IEEE-1394 connection on the rear panel of the DCX set-top. DCX700 High-Definition Digital Set-Top Box • User Guide 365-095-14284 x.1... -
Page 29: Configuring A/V And Closed Caption Settings
2. Press POWER to put the set-top in stand-by mode. Within two (2) seconds press the MENU key on the remote control. 3. If the TV is on, the on-screen User Settings menu lists the DCX700 settings that can be adjusted:... - Page 30 Press the ► key to select an option. To exit the setting and move to another setting, press the ▲ or ▼ key. To exit the menu and save your settings, press the POWER or MENU key. DCX700 High-Definition Digital Set-Top Box • User Guide 365-095-14284 x.1...
- Page 31 • The DCX700 can detect when the HDMI connection is in use. If you are not using the HDMI connection on the DCX700, the “HDMI/YPbPr Output” setting will display as ”YPbPr Output” in the User Settings Menu.
- Page 32 The Closed Captions setting turns closed captions off or on. Captions When this option is set to Disabled, the DCX700 does not render (draw) closed captions on any video output. When this option is set to Enabled, the DCX700 will render (draw) closed captions on all video outputs if closed captions are included within the program.
- Page 33 An alert screen will be displayed on your television indicating that the DCX700 is about to power itself down. You may press any key on the remote control, or the Power button on the front panel, while the alert screen is being displayed to prevent the DCX700 from powering itself down.
-
Page 34: Native Mode Settings Screen
When using the native mode feature of the DCX700, please exercise caution when selecting the formats from the checklist. If a format is selected that is not compatible with the television, there may be a loss of video whenever the DCX700 is tuned to a channel which is broadcast in that format. - Page 35 1080p30 is a high-definition video image with 1920 x 1080 pixels, progressive scanning, and a frame rate of 30 frames per second. This option is only available if the DCX700 is connected to an HDMI display device. If no HDMI connection is detected, this option is disabled and no longer selectable in the menu.
- Page 36 Configuring A/V and Closed Caption Settings Setting Description Selecting this option will return you to the User Settings Menu main screen. Return to Main Menu DCX700 High-Definition Digital Set-Top Box • User Guide 365-095-14284 x.1...
-
Page 37: Additional Hdmi Settings Screen
Additional HDMI Settings Screen To configure the DCX700 settings on the Additional HDMI Settings menu screen: 1. With an HDMI connection in place, power off the DCX700 and then immediately press the MENU key on the remote control. 2. This will display the main User Settings menu. - Page 38 Auto – The DCX700 will automatically delay the audio signal on the HDMI output by the amount of time requested by the connected HDMI device. • Manual – The DCX700 will delay the audio signal on the HDMI output by the amount of time selected for the Lip Sync Delay setting. •...
-
Page 39: Additional Closed Caption Settings Screen
To configure the DCX700 settings on the Additional Closed Caption Settings menu screen: 1. Power off the DCX700 and then immediately press the menu key on the front panel. This will display the main User Settings menu. 2. Move the cursor next to the “Closed Caption” option and adjust this setting to “Enabled.”... - Page 40 Configuring A/V and Closed Caption Settings The Additional Closed Caption Settings menu options are: Setting Description Sets the service used by the DCX700 to render (draw) the closed captions: Service • Analog – This setting affects closed captions for analog and digital standard Selection definition services.
-
Page 41: Subtitle And Dvs Settings Screen
The Subtitle and DVS Settings menu is used to customize the language and appearance of subtitles and to turn the descriptive video service feature on and off on the DCX700. Subtitles allow a viewer to watch television programs and movies which contain dialogue that is not in the viewer’s native language. - Page 42 Off – The DVS audio track is not played by the DCX700. • On – The DVS audio track is player by the DCX700 if it is included within the program. Note: If the DVS setting is disabled and not selectable from the menu, the software installed on the DCX700 is not yet capable of supporting the DVS feature.
-
Page 43: Advanced Audio/Video Settings Screen
Advanced Audio/Video Settings Screen The Advanced Audio/Video Settings menu is used to customize several advanced audio and video features of the DCX700, most notably the Dolby Volume feature and the Video Sharpness feature. The Dolby Volume feature provides volume normalization across channels, programs, and commercials. - Page 44 Off – The Dolby Volume feature is turned off and the output volume may fluctuate during commercials or when changing channels. • On – The Dolby Volume feature is turned on and the DCX700 will maintain a more consistent output volume regardless of the channel or program being viewed.
-
Page 45: Troubleshooting
Verify that you have the correct cables for the audio connections. • Verify that the audio cables are firmly connected between the DCX set-top and the audio playback device (TV, receiver, DVD player, etc.). DCX700 High-Definition Digital Set-Top Box • User Guide 365-095-14284 x.1... - Page 46 Verify on the User Settings menu that closed captions are enabled on the DCX set-top. Verify that closed captions are enabled on the TV. Note: Closed captioning may not be available on the current program. DCX700 High-Definition Digital Set-Top Box • User Guide 365-095-14284 x.1...
- Page 47 (see your TV manual for information about stretching 4:3 video). • If the DCX700 is connected to a wide screen TV, verify that the TV TYPE is set to 16:9 in the User Settings menu. Many HD programs are broadcast in pillar-box format with black bars to the left and right of the picture.
-
Page 48: Appendix A
If possible, mount the unit to concrete, masonry, a wooden stud, or some other very solid wall material. Use anchors if necessary (for example, if you must mount the unit on drywall). Note: Motorola recommends the use of an External IR receiver Cord (part number 571984) if wall mounting the DCX700. Caution! Before drilling holes, check the structure for potential damage to water, gas, or electric lines. - Page 49 There must be 0.10 inches (2.5 mm) between the wall and the underside of the screw head. 6. Place the DCX700 so the keyholes on the back of the unit are aligned above the mounting screws. 7. Slide the DCX700 down until it stops against the top of the keyhole opening.
- Page 50 Motorola, Inc. 101 Tournament Drive Horsham, PA 19044 U.S.A. http://www.motorola.com 365-095-14284 x.1 04/2010...
Need help?
Do you have a question about the DCX700 and is the answer not in the manual?
Questions and answers