
Related Manuals for Alloy GSS-16T4SFP


Summary of Contents for Alloy GSS-16T4SFP
-
Page 1: User Manual
GSS Series User Manual User Manual GSS Series 16/24 Port Gigabit Web Managed Switch (GSS-16T4SFP & GSS-24T4SFP) Version 1.0 Sep. 2007 Alloy Computer Products Pty Ltd Copyright ©2007... -
Page 2: Table Of Contents
3.3.3 RSTP Status..........................45 3.3.4 IGMP Status.........................46 3.3.5 Ping............................47 3.4 M ..........................48 AINTENANCE 3.4.1 Warm Restart ........................48 3.4.2 Factory Default........................49 3.4.3 Software Upgrade ........................50 3.4.4 Configuration File Transfer....................51 3.4.5 Logout ..........................52 APPENDIX A – TECHNICAL SPECIFICATIONS.................53 Alloy Computer Products Pty Ltd Copyright ©2007... -
Page 3: Caution
A EN60555-3 IEC1000-4-2(1995) 4K V CD, 8KV, AD IEC1000-4-3(1995) 3V/m IEC1000-4-4(1995) 1KV – (power line), 0.5KV – (signal line) Australian C-Tick Compliance. This equipment is compliant with the required Australian C-Tick standards Alloy Computer Products Pty Ltd Copyright ©2007... -
Page 4: About This User Manual
GSS Series User Manual About this User Manual This User Manual will guide you on procedures to install, configure and monitor Alloy 16 port Gigabit (GSS-16T4SFP) and 24 port (GSS-24T4SFP) Gigabit web Managed Switch models utilizing the built-in web management interface. -
Page 5: Introduction
1. Introduction 1.1 Overview Alloy 16/24 Port Gigabit Switches meet all IEEE 802.3/u/x/z standards Gigabit and Fast Ethernet specifications. The 16 Port Gigabit Switch model features 16x 10/100/1000Mbps copper RJ-45 ports and 4x Gigabit Ethernet SFP Ports. The SFP ports can be used to install a range of optional mini-GBIC Gigabit Ethernet Port Modules (which provide the ability to connect multimode and/or single mode fibre optic cable links –... -
Page 6: Key Features
Port Trunking with flexible load distribution and failover function • Port mirroring function 1.3 Checklist Before you start installing your switch, verify that the package contains the following: • A GSS-16T4SFP or GSS-24T4SFP Gigabit Web Managed Switch • Mounting Accessories (for 19” Rack Shelf mounting) • CD-ROM •... -
Page 7: User Interfaces On The Front Panel
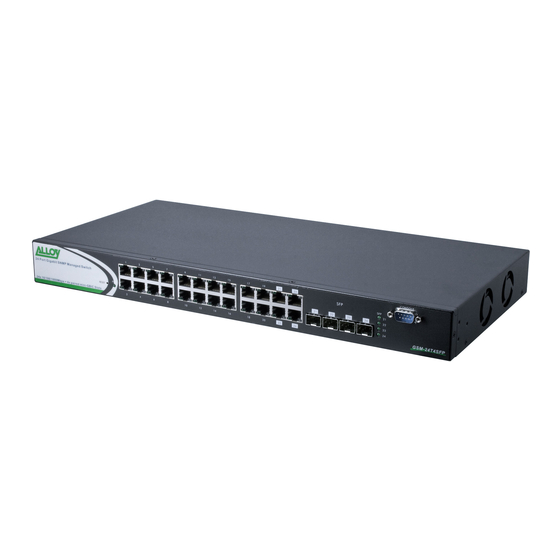
GSS Series User Manual 1.4.1 User interfaces on the front panel The front panel of the GSS-16T4SFP and GSS-24T4SFP consists of 16x or 24x 10/100/1000Mbps Copper Gigabit Ethernet ports, 4x SFP fibre ports and 1x reset button to restore factory configuration. -
Page 8: User Interfaces On The Rear Panel
Note: All SFP ports are paired with one of the 10/100/1000Mbps copper RJ-45 ports. Only one of the paired ports can be used. 1.4.2 User interfaces on the rear panel Mains Power Plug Fig. 1.5 Rear Panel of the GSS-16T4SFP & GSS-24T4SFP Alloy Computer Products Pty Ltd Copyright ©2007... -
Page 9: Overview Of The Optional Sfp Modules
1.5. Overview of the Optional SFP Modules With the GSS-16T4SFP switch, the SFP ports are paired with RJ-45 copper ports 13, 14, 15 and 16. In the case of the GSS-24T4SFP, the SFP ports are paired with RJ-45 copper ports 21, 22, 23 and 24. -
Page 10: Installation
4. Slide the module along the slot and ensure that the module is properly seated against the SFP slot socket/connector. 5. Install the media cable for network connection 6. Repeat the above steps, as needed, for each module to be installed into the switch Alloy Computer Products Pty Ltd Copyright ©2007... - Page 11 • Power On Please Note: ⇒ Alloy GSS series switches use a 100-240 VAC, 50-60 Hz power supply. The power supply will automatically convert your local AC power source to DC power for use by the switch. 1. Ensure that the power switch is turned off before connecting mains power 2.
-
Page 12: Cabling Requirements
These are SX, LX, LHX, ZX and EZX. The majority of mini-GBIC modules available use a LC type connector. The connector types used currently on Alloy mini-GBIC modules are LC and WDM SC, for the following module types: •... - Page 13 All figures denoting the range a given cable type can achieve must be treated as maximum values. A number of variables can limit the actual range that can be achieved – grade of cable used, quality of cable, and presence of joins in cable runs, for example Alloy Computer Products Pty Ltd Copyright ©2007...
-
Page 14: Operation Of The Web Based Management
Once you have entered the IP address of the GSS Series switch into a web browser you will be prompted with a login screen where you will need to enter a valid password to gain access to the switch. The default password is shown above. Fig. 3.1 Alloy Computer Products Pty Ltd Copyright ©2007... -
Page 15: Web Management Home Overview
Software Upgrade – Used to upgrade the firmware in the switch. • Configuration File Transfer– Used to backup and restore the configuration of the switch. • Logout – Used to Logout of the web management. Alloy Computer Products Pty Ltd Copyright ©2007... -
Page 16: Configuration
If you are not using the DHCP client and want to configure a static IP Address into the switch, enter it here. Subnet Mask: Enter a valid subnet mask into the space provided. Gateway: Enter a valid gateway address into the space provided. Alloy Computer Products Pty Ltd Copyright ©2007... - Page 17 Time is measured in Seconds, Default value is 0. Apply Button: The Apply button must be pressed after making any changes to any of the values on this screen. Refresh Button: Used to refresh the current settings displayed on the screen. Alloy Computer Products Pty Ltd Copyright ©2007...
-
Page 18: Ports
Fibre ports only have three options Auto Speed, 1000 Full and Disabled. Flow Control: Used to enable Flow Control on the port. Flow Control Status: Displays the current flow control status. Alloy Computer Products Pty Ltd Copyright ©2007... - Page 19 Apply Button: The Apply button must be pressed after making any changes to any of the values on this screen. Refresh Button: Used to refresh the current settings displayed on the screen. Alloy Computer Products Pty Ltd Copyright ©2007...
-
Page 20: Vlan Mode
VLAN’s. Up to 16 active Port Based VLAN groups can be configured with a PVID from 1 ~ 4094 for the GSS-16T4SFP and 24 active Port Based VLAN groups can be configured for the GSS-24T4SFP. 24 802.1q Tagged based VLAN’s can be created on both models with a PVID ranging from 1 ~ 4094. - Page 21 VLAN tag is used by the service provider for their network. Apply Button: The Apply button must be pressed after making any changes to any of the values on this screen. Alloy Computer Products Pty Ltd Copyright ©2007...
-
Page 22: Vlan Group
Select what ports you want to be members of this VLAN and tick there corresponding check boxes. Select All: Used to automatically select all ports. Refresh Button: Used to refresh the current settings displayed on the screen. Alloy Computer Products Pty Ltd Copyright ©2007... - Page 23 The Apply button must be pressed after making any changes to any of the values on this screen. Cancel Button: By pressing the cancel button, you will discard any changes that you have made. Alloy Computer Products Pty Ltd Copyright ©2007...
- Page 24 Select the radio button next to the VLAN you wish to modify and click modify. Delete: Select the radio button next to the VLAN you wish to delete and click delete. Refresh Button: Used to refresh the current settings displayed on the screen. Alloy Computer Products Pty Ltd Copyright ©2007...
- Page 25 Select what ports you want to be members of this VLAN and tick there corresponding check boxes. Select All: Used to automatically select all ports. Refresh Button: Used to refresh the current settings displayed on the screen. Alloy Computer Products Pty Ltd Copyright ©2007...
- Page 26 Select the radio button next to the VLAN you wish to modify and click modify. Delete: Select the radio button next to the VLAN you wish to delete and click delete. Refresh Button: Used to refresh the current settings displayed on the screen. Alloy Computer Products Pty Ltd Copyright ©2007...
- Page 27 Select the radio button next to the VLAN you wish to modify and click modify. Delete: Select the radio button next to the VLAN you wish to delete and click delete. Refresh Button: Used to refresh the current settings displayed on the screen. Alloy Computer Products Pty Ltd Copyright ©2007...
-
Page 28: Aggregation
Group. Refresh Button: Used to refresh the current settings displayed on the screen. Apply Button: The Apply button must be pressed after making any changes to any of the values on this screen. Alloy Computer Products Pty Ltd Copyright ©2007... -
Page 29: Lacp
Protocol Enabled: Tick the checkbox to enable LACP on the particular port. Apply Button: The Apply button must be pressed after making any changes to any of the values on this screen. Refresh Button: Used to refresh the current settings displayed on the screen. Alloy Computer Products Pty Ltd Copyright ©2007... -
Page 30: Rstp
STP. Port Configuration: Port: Is the physical port number of the switch. Aggregations: Used if you would like to enable RSTP on any port aggregation groups. Alloy Computer Products Pty Ltd Copyright ©2007... - Page 31 Auto to be automatically generated. Refresh Button: Used to refresh the current settings displayed on the screen. Apply Button: The Apply button must be pressed after making any changes to any of the values on this screen. Alloy Computer Products Pty Ltd Copyright ©2007...
-
Page 32: 802.1X
Force Authorised forces the port to be authenticated with the RADIUS server. Force Unauthorised allows the port to be used without authentication. Auto allows the port to be authenticated or unauthenticated. Port State: Displays the current mode the port is running in. Alloy Computer Products Pty Ltd Copyright ©2007... - Page 33 Force Re-initialise forces the port to re-initialise with the RADIUS server. Statistics displays the 802.1x statistics of each individual port. Fig. 3.16 Refresh Button: Used to refresh the current settings displayed on the screen. Alloy Computer Products Pty Ltd Copyright ©2007...
- Page 34 1 and 255 seconds. Refresh Button: Used to refresh the current settings displayed on the screen. Apply Button: The Apply button must be pressed after making any changes to any of the values on this screen. Alloy Computer Products Pty Ltd Copyright ©2007...
-
Page 35: Igmp
Used to enable IGMP querying on the VLAN group. Refresh Button: Used to refresh the current settings displayed on the screen. Apply Button: The Apply button must be pressed after making any changes to any of the values on this screen. Alloy Computer Products Pty Ltd Copyright ©2007... -
Page 36: Port Mirroring
Mirror port. Refresh Button: Used to refresh the current settings displayed on the screen. Apply Button: The Apply button must be pressed after making any changes to any of the values on this screen. Alloy Computer Products Pty Ltd Copyright ©2007... -
Page 37: Quality Of Service
The Apply button must be pressed after making any changes to any of the values on this screen. Cancel Button: By pressing the cancel button, you will discard any changes that you have made. Alloy Computer Products Pty Ltd Copyright ©2007... - Page 38 The Apply button must be pressed after making any changes to any of the values on this screen. Cancel Button: By pressing the cancel button, you will discard any changes that you have made. Alloy Computer Products Pty Ltd Copyright ©2007...
-
Page 39: Filter
Tick the check box to allow DHCP Servers to use this port. Apply Button: The Apply button must be pressed after making any changes to any of the values on this screen. Refresh Button: Used to refresh the current settings displayed on the screen. Alloy Computer Products Pty Ltd Copyright ©2007... -
Page 40: Rate Limit
Apply Button: The Apply button must be pressed after making any changes to any of the values on this screen. Refresh Button: Used to refresh the current settings displayed on the screen. Alloy Computer Products Pty Ltd Copyright ©2007... -
Page 41: Storm Control
1K, 2K, 4K, 8K, 16K, 32K, 64K, 128K, 256K, 512K, 1024K or No Limit. Refresh Button: Used to refresh the current settings displayed on the screen. Apply Button: The Apply button must be pressed after making any changes to any of the values on this screen. Alloy Computer Products Pty Ltd Copyright ©2007... -
Page 42: Snmp
Tick this check box for an SNMP trap to be sent when the event occurs. Refresh Button: Used to refresh the current settings displayed on the screen. Apply Button: The Apply button must be pressed after making any changes to any of the values on this screen. Alloy Computer Products Pty Ltd Copyright ©2007... -
Page 43: Monitoring
The Apply button must be pressed after making any changes to any of the values on this screen. Refresh Button: Used to refresh the current settings displayed on the screen. Clear Button: Used to clear the current statistics from the table. Alloy Computer Products Pty Ltd Copyright ©2007... -
Page 44: Lacp Status
GSS Series User Manual 3.3.2 LACP Status Displays the status of all LACP based port aggregation groups. Fig. 3.28 Refresh Button: Used to refresh the current settings displayed on the screen. Alloy Computer Products Pty Ltd Copyright ©2007... -
Page 45: Rstp Status
GSS Series User Manual 3.3.3 RSTP Status Displays the current status of RSTP. Fig. 3.29 Refresh Button: Used to refresh the current settings displayed on the screen. Alloy Computer Products Pty Ltd Copyright ©2007... -
Page 46: Igmp Status
GSS Series User Manual 3.3.4 IGMP Status Displays the current status of multicast groups learnt by the switch. Fig. 3.30 Refresh Button: Used to refresh the current settings displayed on the screen. Alloy Computer Products Pty Ltd Copyright ©2007... -
Page 47: Ping
Ping Results: Displays the results of the ping operation performed. Apply Button: Click the apply button to perform the ping test. Refresh Button: Used to refresh the current settings displayed on the screen. Alloy Computer Products Pty Ltd Copyright ©2007... -
Page 48: Maintenance
GSS Series User Manual 3.4 Maintenance 3.4.1 Warm Restart Fig. 3.32 Click Yes to reboot the device or No to cancel the operation. Alloy Computer Products Pty Ltd Copyright ©2007... -
Page 49: Factory Default
GSS Series User Manual 3.4.2 Factory Default Fig. 3.33 Click Yes to restore the factory default settings on the switch, or No to cancel the operation. Alloy Computer Products Pty Ltd Copyright ©2007... -
Page 50: Software Upgrade
Used to select the firmware file to load into the switch. Upload: Once the file has been located, press the upload button to upgrade the switches firmware. Cancel: Press cancel to cancel the operation. Alloy Computer Products Pty Ltd Copyright ©2007... -
Page 51: Configuration File Transfer
Click the browse button to search for the backed up configuration file of the switch. Upload: Once the configuration file has been located click on the restore button to load the backed up configuration. Alloy Computer Products Pty Ltd Copyright ©2007... -
Page 52: Logout
GSS Series User Manual 3.4.5 Logout Press the logout button to logout of the web management. Alloy Computer Products Pty Ltd Copyright ©2007... -
Page 53: Appendix A - Technical Specifications
Cable and Maximum Length: Cat. 5 UTP cable, up to 100m Up to 220/275/500/550m, 1000Base-SX which depends on Multi-Mode Fibre type Single-Mode Fibre, up to10/30/50Km 1000Base-LX 1000Base-LX WDM (BiDi) Single-Mode Single Fibre, up to 20Km Alloy Computer Products Pty Ltd Copyright ©2007... - Page 54 100∼240 V Frequency 50∼60 Hz Consumption Ambient Temperature 0° to 50°C Humidity 5% to 90% 44(H) × 442(W) × 209(D) mm Dimensions Comply with FCC Part 15 Class A, C-Tick & CE Mark Approval Alloy Computer Products Pty Ltd Copyright ©2007...
Need help?
Do you have a question about the GSS-16T4SFP and is the answer not in the manual?
Questions and answers