Classe Audio CP-700 Owner's Manual
Hide thumbs
Also See for CP-700:
- Owner's manual (76 pages) ,
- Owner's manual (44 pages) ,
- Owner's manual (44 pages)
Table of Contents
Advertisement
Quick Links
Download this manual
See also:
Owner's Manual
Advertisement
Table of Contents

Related Manuals for Classe Audio CP-700


Summary of Contents for Classe Audio CP-700
- Page 1 Owner’s Manual CP-700 Preamplifier...
- Page 2 (Electromagnetic Compatibility) and LVD (Low Voltage Directive) standards of the European Community. Classe products are designed to comply with international directives on the Restriction of Hazardous Substances (RoHS) in electrical and electronic equipment and the disposal of Waste Electrical and Electronic Equipment (WEEE).
- Page 3 Important Safety Instructions Caution: Please read and observe all warnings and instructions in this owner’s manual and all those marked on the unit. Retain this owner’s manual for future reference. 1. Do not attempt to service this product yourself. Do not open the cover for any reason. There are no user-serviceable parts inside.
-
Page 4: Table Of Contents
Contents Welcome to the Classé family................5 a word about installation................5 Unpacking and Placement................6 unpacking your preamplifier ..............6 placement ....................6 ventilation ....................6 custom installations.................. 6 serial number ................... 6 register your purchase! ................7 operating voltage..................7 warm up/break-in period................ -
Page 5: Welcome To The Classé Family
You will find the warranty registration card at the end of the separate warranty policy booklet, enclosed. a word about installation Every effort has been made to make the Classé CP-700 simple and straightforward to install and use. Still, we have no way to evaluate many other variables such as the size and shape of your room, its acoustics, and the associated equipment you have chosen to use with your preamplifier. -
Page 6: Unpacking And Placement
As with any preamplifier, it is best to place the CP-700 centrally within your system, since it is the hub to which all other components are connected. It should also be located at a convenient height for both visibility and use, since you generally interact with your preamplifier more than any other component... -
Page 7: Register Your Purchase
It will take only a minute or so. Please complete the card now, before you forget. operating voltage The CP-700 preamplifier is set at the factory for 100V, 120V, 230V, or 240V AC mains operation, as appropriate for the country in which it is to be sold (230V only in European Union countries, in compliance with CE regulations). -
Page 8: Warm Up/Break-In Period
warm up/break-in period Your new Classé preamplifier will deliver outstanding performance immediately. However, you should expect to hear it improve somewhat as it reaches its normal operating temperatures and its various components “break-in.” It has been our experience that the greatest changes occur within the first 300 hours, as the preamplifier reaches thermal equilibrium and the capacitors fully form. -
Page 9: Special Design Features
For example, if you are not using one or more of the inputs on your CP-700, you can delete the unnecessary buttons from the operational menu. Doing so prevents anyone from trying to select a non-existent source component, with the resulting confusion stemming from the lack of any sound. -
Page 10: Extensive Listening Tests
DC power it needs for handling the music signals, while the high-voltage AC mains is kept safely away from your music. In short, it creates an ideal environment in which the refined circuitry of the CP-700 can operate to its full potential in service of your musical enjoyment. -
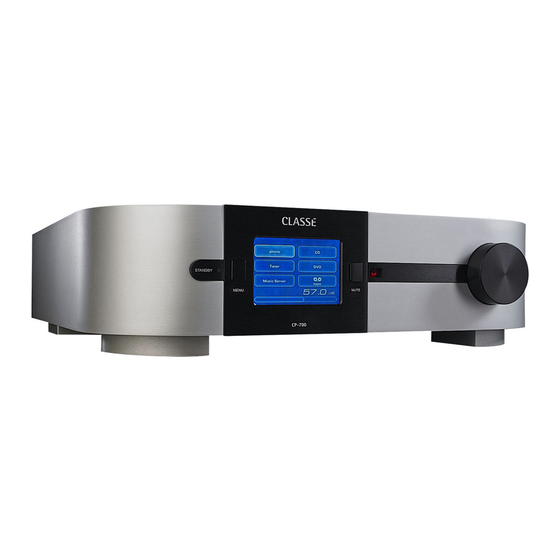
Page 11: Front Panel
MUTE MENU CP-700 �� � �� � Front Panel Standby button & LED indicator The front panel Standby button will toggle the preamplifier between operate, its fully operational state, and a standby mode that leaves the preamplifier off, yet ready to respond to system commands via any of the supported control options (e.g. -
Page 12: Mute Button
IR input and output mini-jacks and an IR repeater system to solve the problem. For more information about using an infrared repeater system to route signals to and from the CP-700, refer to the section Rear Panel later in this manual, or contact your local... - Page 13 Volume Knob The large knob on the right side of the front panel of the CP-700 is used to control the volume of the system. The volume is raised or lowered in precise 0.5dB increments throughout the range of the control most likely to be used while listening to music.
-
Page 14: Rear Panel
CD recorder, etc.) you may have to these single-ended RCA connectors. You may select to hear the output of your recording device by touching the tape button on the main operational screen of the CP-700. Single-ended (RCA) inputs These RCA jacks accept right-channel and left-channel (single-ended) inputs from line-level source equipment such as tuners, CD players, and tape decks. - Page 15 Refer to the operating manuals of your balanced-output line-level sources to verify that the pin assignments of their output connectors correspond to the CP-700. If not, wire the cables so that the appropriate output pin connects to the equivalent input pin.
- Page 16 If you are using another brand of power amplifier, please refer to the operating manual of your amplifier to verify that the pin assignments of its input connectors correspond to those of the CP-700. If not, have your dealer wire the cables so that the appropriate output pin connects to the equivalent input pin.
- Page 17 Classé CAN Bus Control Ports These RJ-45 connectors are reserved for future control and communication applications using Classé Audio’s implementation of the Controller Area Network (CAN) Bus specification. IR Input and Output Your Classé preamplifier includes two 1/8th-inch mini mono-jacks in order to support the infrared (IR) remote controls that are ubiquitous today.
- Page 18 Classé dealer can assist you in handling this problem if it should arise. DC Power Input The DC Power Input for the CP-700 is located near the middle of the rear panel. Connect the provided multi-pin “umbilical cord” between the outboard power supply and this connector to provide the preamplifier with the clean, pure DC power it needs to do its job.
-
Page 19: The Remote Control
The Remote Control Your new preamplifier comes with a versatile remote control which can control both the CP-700 itself and several aspects of the rest of a Classé-based system. � ������� The buttons are arranged in logical groups according to their functions. - Page 20 The F1/F2/F3/F4 keys are available for controlling aspects of the CP- 700 not covered by the other buttons on the remote control. You are able to choose what the CP-700 should do in response to receiving the infrared signal that a particular Fkey has been pressed. The list of possible functions is quite extensive, and is found in the menu system (see the next section in this manual, entitled The Menu System).
-
Page 21: The Menu System
In addition, the CP-700 has a dedicated tape loop for use with sources that can both record and play back, bringing the total number of sources you can connect to the CP-700 to six (four single-ended and two balanced). -
Page 22: Main Menu System
This menu provides access to many installation-specific features that let you customize how the CP-700 works within the context of your particular system. system setup The first button on the control menu takes you to a series of submenus that... -
Page 23: Volume
volume Pressing the volume button takes you to the volume setup menu, which in turn has four submenus, all pertaining to how the volume of the system is managed. • rotary • max volume • startup volume • mute setup Each of these topics will be addressed in turn, below. - Page 24 Thus, if the CP-700 sees the knob moving relatively quickly, it uses coarse steps to effectively accelerate the action of the circuitry.
-
Page 25: Max Volume
This setting is interactive. You can set the value to something less than 100, and then adjust the volume to see whether it is appropriate. startup volume The startup volume screen allows you to define how the CP-700 handles its initial volume upon starting up. Your choices are: •... -
Page 26: Mute Setup
mute setup Pressing the mute setup button allows you to select one of three different muting functions: • Classic muting literally mutes the output when you engage the mute button; no sound will be heard. • Specific muting allows you to select a specific volume setting that you want used when you engage mute, regardless of what setting you might have been using the moment before. - Page 27 When an input is renamed ‘SSP’, it becomes a unity gain input. When such an input is selected, the volume control of the CP-700 is disabled, all outputs are driven at line level and the volume indication is removed from the main menu.
-
Page 28: Phono Gain
Each of the CP-700’s trigger outputs may be programmed as to its “logic level,” which is to say, whether its voltage is low (essentially 0V), or high (approximately 12V) when the trigger is activated. -
Page 29: Display Setup
For example, if you reduce the timeout to its minimum setting, the backlighting will illuminate the display as soon as you interact with any of the CP-700 controls, and stay on for only three seconds – just long enough for you to check on something. -
Page 30: Language
If you prefer the display of the CP-700 to remain on whenever not in standby, choose the never timeout setting. The lamp in the LCD display was designed for harsh automotive environments and will give you many years of reliable operation. If you plan to leave the unit on continuously, however, we recommend that you keep the timeout delay set to less than one minute. -
Page 31: Cautionary Note On Fkey Use
For example, if you use the balance control frequently, you may want to consider programming one of the Fkeys to take you straight to that screen. Doing so will save you having to access the control menu, followed by pressing the balance button (which might be hard to see from across the room). -
Page 32: Status
The status screen provides several items of information about the current operation status of the CP-700, as well as access to information on the software used in and the internal sensors of the CP-700. version info The version info button on the status screen takes you to the version information screen, which displays information on various pieces of software used by your CP-700. -
Page 33: Troubleshooting
Troubleshooting In general, you should refer any service problems to your Classé dealer. Before contacting your dealer, check to see if the problem is listed here. If it is, try the suggested solutions. If none of these solves the problem, contact your Classé dealer. - Page 34 Only one speaker seems to be playing. • Check the main balance control setting of the CP-700 by pressing the Menu button, followed by the balance button (or simply press Bal on the remote control). • Does the problem occur with all inputs? If so, check the interconnect cables between the preamp and the power amp.
- Page 35 There is a mechanical hum coming from the unit. • This symptom suggests you have a lot of electrical noise on your AC mains line. Try connecting to another AC circuit (not merely a different plug, but a different circuit). •...
-
Page 36: Care And Maintenance
Care and Maintenance cleaning the cabinet To remove dust from the cabinet of your preamplifier, use a feather duster or a soft, lint-free cloth. To remove dirt and fingerprints, we recommend isopropyl alcohol and a soft cloth. Dampen the cloth with alcohol first and then lightly clean the surface of the preamplifier with the cloth. -
Page 37: Specifications
Specifications All specifications are accurate at the time of printing. Classé reserves the right to make improvements without notice. ■ Frequency response 20 Hz – 200kHz ± 0.1dB ■ Distortion (THD + noise) 0.0012% ■ Maximum input voltage (single-ended) 5Vrms ■... -
Page 38: Dimensions
Dimensions ����� ����� ����� ����� ��� � ���� ������ ����� ���� ������ ����� ���� ����� ����� � ��� ������ ������ ������ ����� ����� ����� ����� ���� ����� ������ ���� ����� ����� ����� ����� ���� ����� ����� ���� ����� ����� ���� �����... - Page 40 Classé Audio 5070 François Cusson Lachine, Quebec Canada H8T 1B3 +1 (514) 636-6384 +1 (514) 636-1428 (fax) http://www.classeaudio.com email: cservice@classeaudio.com Copyright © 2005 Classé Audio Inc. Printed in Canada. v1.3 100805...
Need help?
Do you have a question about the CP-700 and is the answer not in the manual?
Questions and answers