Smeg Oven Instructions For The User
Hide thumbs
Also See for Oven:
- Instructions for the user (64 pages) ,
- User manual (48 pages) ,
- Instructions for use manual (44 pages)
Table of Contents
Advertisement
1.
INSTRUCTIONS FOR USE ......................................................................... 36
2.
SAFETY PRECAUTIONS ............................................................................ 38
3.
ENVIRONMENTAL RESPONSIBILITY ........................................................ 40
4.
GET TO KNOW YOUR APPLIANCE ........................................................... 41
5.
AVAILABLE ACCESSORIES - USING THE OVEN...................................... 42
6.
FRONT PANEL ............................................................................................ 43
7.
CLOCK WITH TIMER AND COOKING END TIME...................................... 46
8.
USING THE COOKING HOB....................................................................... 49
9.
USING THE OVEN ...................................................................................... 51
10. COOKING WITH THE OVEN....................................................................... 56
11. CLEANING AND MAINTENANCE ............................................................... 59
12. EXTRAORDINARY MAINTENANCE ........................................................... 61
13. INSTALLING THE APPLIANCE ................................................................... 63
INSTRUCTIONS FOR THE USER: these instructions contain user
recommendations, a description of the controls and the correct
procedures for cleaning and maintenance of the appliance.
technician who must install the appliance, set it functioning and carry out
an inspection test.
@
Further product information is available from the website www.smeg.com
Contents
35
Advertisement
Table of Contents

Subscribe to Our Youtube Channel
Related Manuals for Smeg Oven


Summary of Contents for Smeg Oven
-
Page 1: Table Of Contents
INSTRUCTIONS FOR THE INSTALLER: these are intended for the qualified technician who must install the appliance, set it functioning and carry out an inspection test. Further product information is available from the website www.smeg.com... -
Page 2: Instructions For Use
BRAND NAME HAS BEEN VISIBLY AFFIXED TO THE APPLIANCE. DO NOT REMOVE THIS PLATE FOR ANY REASON. BEFORE THE APPLIANCE IS PUT INTO OPERATION, ALL THE PROTECTIVE FILMS APPLIED INSIDE OR OUTSIDE MUST BE REMOVED. TAKE CARE THAT NO OBJECTS ARE STUCK IN THE DOOR OF THE OVEN. -
Page 3: General Instructions
USING A SOFT CLOTH OR CHAMOIS LEATHER. DO NOT ALLOW RESIDUES OF SUGARY FOODS (SUCH AS JAM) TO SET INSIDE THE OVEN. IF THEY ARE ALLOWED TO SET FOR TOO LONG, THEY COULD RUIN THE ENAMEL COVERING THE INSIDE OF THE OVEN. -
Page 4: Safety Precautions
NEVER DISCONNECT THE PLUG BY PULLING ON THE CABLE. THIS APPLIANCE MUST NEVER BE INSTALLED ON A STAND. NEVER PLACE FLAMMABLE OBJECTS IN THE OVEN: IF IT SHOULD ACCIDENTALLY BE SWITCHED ON, THIS MIGHT CAUSE A FIRE. PEOPLE WHO HAVE PACEMAKERS OR OTHER SIMILAR DEVICES FITTED MUST... - Page 5 THE FOOD WARMING COMPARTMENT. DURING USE THE APPLIANCE BECOMES VERY HOT. TAKE CARE NOT TO TOUCH THE HEATING ELEMENTS OF THE HOB AND OVEN. THIS APPLIANCE MUST NOT BE USED BY PEOPLE (INCLUDING CHILDREN) OF REDUCED PHYSICAL AND MENTAL CAPACITY, OR LACKING IN EXPERIENCE IN THE USE OF ELECTRICAL APPLIANCES, UNLESS THEY ARE SUPERVISED OR INSTRUCTED BY ADULTS WHO ARE RESPONSIBLE FOR THEIR SAFETY.
-
Page 6: Environmental Responsibility
Instructions for disposal 3. ENVIRONMENTAL RESPONSIBILITY Our environmental responsibility Pursuant to Directives 2002/95/EC, 2002/96/EC and 2003/108/EC relating to the reduction of the use of hazardous substances in electrical and electronic appliances, as well as to the disposal of refuse, the crossed out bin symbol on the appliance indicates that the product, at the end of its useful life, must be collected separately from other refuse. -
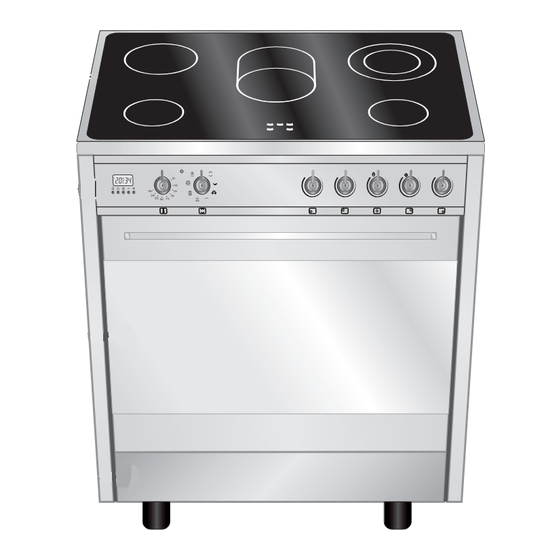
Page 7: Get To Know Your Appliance
Instructions for the user 4. KNOW YOUR APPLIANCE Glass ceramic hob Oven Hob and oven control panel Storage compartment... -
Page 8: Available Accessories - Using The Oven
NOTE: Some models are not provided with all accessories. Rack: for holding cooking containers. Tray rack: to be placed over the top of the oven tray; for cooking foods which may drip. Oven tray: for collecting fat from foods placed on the rack above. -
Page 9: Front Panel
50° and 260°C. When the red light beside the knob is flashing, it indicates that the oven is heating up to reach the temperature set using the thermostat knob. Once the oven has reached the selected temperature, the light stops flashing and remains lit steadily until the oven is switched off. - Page 10 Instructions for the user OVEN FUNCTION SELECTOR KNOB Turn the knob clockwise or anti-clockwise to select one of the functions described below. STATIC OVEN FUNCTION FAN-ASSISTED GRILL FUNCTION LOWER HEATING ELEMENT TURBO FUNCTION FAN + CIRCULAR HEATING ROTISSERIE ELEMENT FUNCTION...
- Page 11 Instructions for the user COOKING HOB CONTROL KNOB Standard heating Using these knobs it is possible to control the cooking zones of the hob. The burner controlled is indicated below every knob. The drawing to the left refers to the knob of the the back left cooking zone.
-
Page 12: Clock With Timer And Cooking End Time
VALUE DECREASE BUTTON VALUE INCREASE BUTTON Setting the time When the oven is used for the first time, or after an interruption in the electricity supply, the display flashes at regular intervals, showing . Press the buttons together, and at the same time press the buttons: this will increase or decrease the setting by one minute for each pressure. -
Page 13: Automatic Cooking
After the setting, to display the time left press the button. In timer mode, the system will not cut out operation of the oven at the end of the set time. Adjusting the buzzer volume The buzzer has 3 different volume settings. - Page 14 Instructions for the user Stopping the buzzer The buzzer stops automatically after seven minutes. It can be stopped manually by pressing the buttons together. To switch off the appliance, return the knobs to the 0 setting. Deleting the set data With the program set, keep the button of the function for deletion pressed, while at the same time setting the value by pressing the value modification buttons to reach the value...
-
Page 15: Using The Cooking Hob
Instructions for the user 8. USING THE COOKING HOB Before using the appliance Metal objects such as cutlery or lids must not be placed on the hob surface as they can become very hot. Before using the hob for the first time, pre-heat it to the maximum temperature long enough to burn any manufacturing oily residues which could give the food unpleasant odours. - Page 16 Instructions for the user To obtain better results and save energy, only use containers suitable for cooking on electric cookers. • The base of the containers must be thick and completely flat. Before placing a container on the hob, check that both hob and container are completely clean and dry.
-
Page 17: Using The Oven
9.2.2 Oven inside lights The oven light comes on every time the oven door is opened or when any function is set using the function selector knob. See “12.1 Replacing the light bulb” for instructions on replacing the oven light. - Page 18 All cooking operations must be carried out with the door closed. During cooking, do not cover the bottom of the oven with aluminium or tin foil and do not place pans or oven trays on it as this may damage the enamel coating. If you wish to use greaseproof paper, place it so that it will not interfere with the hot air circulation inside the oven.
- Page 19 (in all cases no more than 200°C). 9.5.1 How to use the grill When the oven has come on, confirmed by the red light switching on, leave it to heat up for 5 minutes before placing foods inside.
- Page 20 Position the rod as shown in figure (1) and push the frame into the oven until the end of the rod lines up with the rotisserie motor’s hole. At this point, raise the rotisserie rod and push it to the left until it is in the position illustrated in figure (2).
- Page 21 Never use it to store flammable materials such as rags, paper, etc.; it is intended for storing the appliance’s metal accessories only. Do not open the storage compartment when the oven is on and still hot. The temperatures inside it may be very high.
-
Page 22: Cooking With The Oven
Instructions for the user 10.COOKING WITH THE OVEN STATIC: As the heat comes from above and below at the same time, this system is particularly suitable for certain types of food. Traditional cooking, also known as static or thermal radiation cooking, is suitable for cooking just one dish at a time. -
Page 23: Cooking Advice And Instructions
If the dough does not stick to the toothpick, the dessert is cooked. • If the dessert collapses when it comes out of the oven, on the next occasion reduce the set temperature by about 10 °C, selecting a longer cooking time if necessary. -
Page 24: To Save Energy
10.1.5 Advice for cooking with the Grill and the Fan-assisted grill • Using the Grill function , meat can be grilled even when it is put into the oven cold; preheating is recommended if you wish to change the effect of the cooking. •... -
Page 25: Cleaning And Maintenance
Rinse thoroughly and dry with a soft cloth or chamois leather. Do not allow residues of sugary foods (such as jam) to set inside the oven. If left to set for too long, they might damage the enamel lining of the oven. 11.4 Cleaning the door glazing The glass in the door should always be kept thoroughly clean. - Page 26 Instructions for the user 11.5 Cleaning the inside of the oven For the best oven upkeep, clean it regularly after having allowed it to cool. • Take out all removable parts. • Clean the oven racks with hot water and non-abrasive detergent. Rinse and dry.
-
Page 27: Extraordinary Maintenance
Instructions for the user 12.EXTRAORDINARY MAINTENANCE The oven may require extraordinary maintenance or replacement of parts subject to wear such as gaskets, bulbs, etc. The following instructions describe how to carry out these minor maintenance operations. Before any intervention that requires access to live parts, disconnect the appliance from the power supply. - Page 28 45° To reassemble the door, put the hinges in the relevant slots in the oven, making sure that grooved sections C are resting completely in the slots. Lower the door and, once it is in position, disengage...
-
Page 29: Installing The Appliance
Instructions for the installer 13.INSTALLING THE APPLIANCE The appliance must be installed by a qualified technician and according to the regulations in force. Depending on the type of installation, it belongs to class 1 (Fig.A) or to class 2, subclass 1 (Fig.B-C). This appliance may be installed next to walls, one of which must be higher than the appliance, at a minimum distance of 50 mm from the side of the appliance, as shown in drawings A and B relative to the installation classes. -
Page 30: Instructions For The Installer
Instructions for the installer 13.1 Electrical connection The identification plate bearing the technical data, serial number and brand name is visibly positioned on the appliance. Make sure the voltage and the cross-section of the power supply line match the specifications indicated on the identification plate positioned in the storage compartment. - Page 31 Instructions for the installer 13.1.1 Room ventilation The room containing the appliance should have a permanent air supply in accordance with the standards in force. The room where the appliance is installed must have enough air flow as required for the regular combustion of gas and by the necessary air exchange of the same room.
- Page 32 Instructions for the installer 13.3 Assembling the skirt • Loosen nuts B. • Position the skirt above the top, taking care to align pins C with holes D. • Secure the skirt to the top by tightening screws A.
Need help?
Do you have a question about the Oven and is the answer not in the manual?
Questions and answers
Once the timer has beeped, and the food is not ready for example and I want to add a few more minutes, is there any easy way to do this or do I need to start the whole cooking function again choosing the setting, temperature etc