Table of Contents
Advertisement
Quick Links
Advertisement
Table of Contents

Related Manuals for SPHINX MYTH 5


Summary of Contents for SPHINX MYTH 5
-
Page 1: User Manual
USER MANUAL MYTH 5 INTEGRATED STEREO AMPLIFIER... -
Page 2: Table Of Contents
SPHINX Myth 5 1. UNPACKING ............................3 2. SPHINX WARRANTY CARD ......................3 3. THE AMP AT A GLANCE ........................4 Front panel..............................4 Rear panel ..............................5 4. INSTALLATION AND CONNECTIONS ....................6 Installation..............................6 Connecting the mains cable ........................6 Audio connections ............................6 Connecting loudspeakers .......................... -
Page 3: Sphinx Myth
The Myth 5 uses an active pre-amp, that is built still should keep the packing materials. If you need around Dual FET’s. to transport your Myth 5 at a later time it will be best The power amp use specially selected power FET's protected by the original packing materials. -
Page 4: The Amp At A Glance
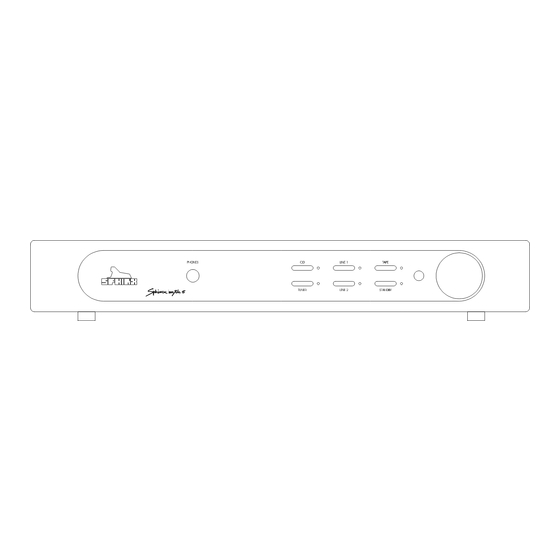
SPHINX Myth 5 3. THE AMP AT A GLANCE Front panel PHONES: To connect dynamic stereo STANDBY: Press this button to temporarily headphones. standby the sound. The red LED will light. CD: To select the CD input. Sensor window for the IR signal from the Remote Control TUNER: To select the TUNER input. -
Page 5: Rear Panel
SPHINX Myth 5 Rear panel 10 11 12 13 10. L2: To connect the cinch signal cable from the 17. LEFT OUTPUT: To connect the cable from the signal source for LINE 2. left loudspeaker: 11. L1: To connect the cinch signal cable from the black signal source for LINE 1. -
Page 6: Installation And Connections
Installation All cinch connectors on the Myth 5's rear panel Make sure you place the Myth 5 on a stable and have a red centre for the right channel and a white sturdy support, it weights more than 8 kg! -
Page 7: Connecting The Inputs
SPHINX Myth 5 Connecting the inputs Connecting a CD player The amp has five unbalanced inputs. Connect the unbalanced output of a CD player to The unbalanced line inputs are: the CD input (13.). LINE 1 and LINE 2 for any unbalanced... -
Page 8: Operation
The Standby function has no The Myth 5 is now switched on and ready for use. influence on the signal to the headphones. This function can also be controlled via the Remote You can leave the amp on. -
Page 9: Sphinx Remote Control
Myth 5 6. SPHINX REMOTE CONTROL This single Sphinx Remote Control lets you control all functions: not only of the Myth 5, but of all other Sphinx equipment. Only the following buttons and indications of the Remote apply to the Myth 5 (the others will not... -
Page 10: Operation
(3.). Wrong component selected Select the correct one Important: Always press the AMP button before you send a command (even if you only have one Sphinx Distance to component Use Remote at closer exceeds 7 m range component). -
Page 11: Care And Maintenance
This unit conforms to the EMC interference regulations from the EU and to the CE standards. This unit complies with safety regulation VDE 0860 and thus with international safety regulation IEC 65. Technical specifications can be changed by SPHINX without prior notice if technical developments make this necessary.
Need help?
Do you have a question about the MYTH 5 and is the answer not in the manual?
Questions and answers