Avaya 9608 User Manual
One-x deskphone h.323
Hide thumbs
Also See for 9608:
- Administration (188 pages) ,
- Administrator's manual (176 pages) ,
- User manual (104 pages)
Table of Contents
Advertisement
Quick Links
Advertisement
Table of Contents

Related Manuals for Avaya 9608


Summary of Contents for Avaya 9608
- Page 1 ™ Avaya one-X Deskphone H.323 9608/9611G User Guide 16-603593 Issue 1 August 2010...
- Page 2 Avaya. All content on this site, the documentation(s) and the Avaya does not guarantee that these links will work all the time and has product(s) provided by Avaya including the selection, arrangement and no control over the availability of the linked pages.
- Page 3 Web site: http://www.avaya.com/support Contact Avaya Support Avaya provides a telephone number for you to use to report problems or to ask questions about your product. The support telephone number is 1-800-242-2121 in the United States. For additional support telephone numbers, see the Avaya Web site: http://www.avaya.com/...
- Page 4 ™ Avaya one-X Deskphone H.323 9608/9611G User Guide August 2010...
-
Page 5: Table Of Contents
Contents Chapter 1: Introduction to the 9608/9611G Deskphone............7 Overview................................7 Scrolling and navigation............................9 About icons..............................10 Administrative messages..........................11 Telephone stand..............................11 Viewing Network Information...........................12 Chapter 2: Avaya Menu......................13 Options & Settings............................14 Setting Go To Phone Screen on Calling....................15 Setting Go To Phone Screen on Ringing....................15 Setting Go To Phone Screen on Answer....................15... - Page 6 Chapter 12: About Logging In to and Out of Your Telephone..........59 Logging in to your telephone extension......................59 Logging in as a guest user..........................60 Logging out of your telephone extension......................60 Index............................61 ™ Avaya one-X Deskphone H.323 9608/9611G User Guide August 2010...
-
Page 7: Chapter 1: Introduction To The 9608/9611G Deskphone
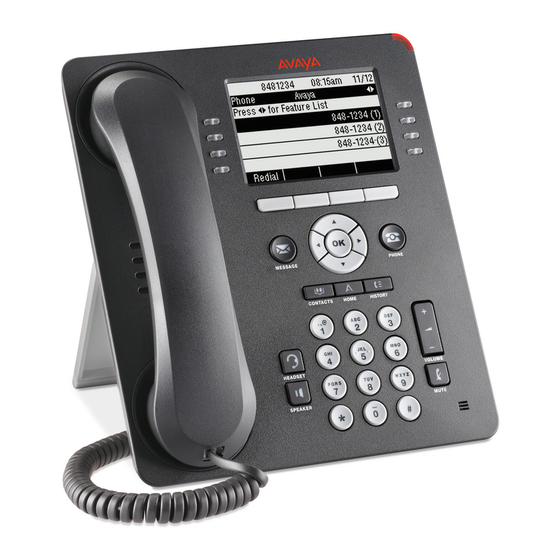
The 9611G Deskphone provides this information in color, while the 9608 model provides this information in black and white. The "G" designation in 9611G means this deskphone model has a built-in Gigabit Ethernet adapter which speeds data transmission. - Page 8 You can also recharge some battery-powered devices by using a USB cable to connect the device to your deskphone's USB port. Note: the 9608 does not have a USB port. Message Waiting An illuminated red light in the upper-right corner of your phone Indicator indicates you have voicemail messages waiting.
-
Page 9: Scrolling And Navigation
A navigation icon appears in the phone display to indicate that you can scroll to more options or information. Use the right and left navigation arrows to go to other screens when the paging ™ Avaya one-X Deskphone H.323 9608/9611G User Guide August 2010... -
Page 10: About Icons
Introduction to the 9608/9611G Deskphone icon (left- and right-facing arrows) displays on the Title Line or to move the cursor right or left when entering text. The softkey labels will change according to the options available for the selected line. The OK button is a shortcut for the default action. -
Page 11: Administrative Messages
The telephone stand attaches to the phone in one of two ways so that you can place the phone in a relatively flat position or at an angle. If your phone is in the upright position for wall ™ Avaya one-X Deskphone H.323 9608/9611G User Guide August 2010... -
Page 12: Viewing Network Information
Introduction to the 9608/9611G Deskphone mounting, reverse the tab located below the switchhook in the top ear piece pocket (on the front of the phone). This will keep the handset seated in the correct position. You will need a small screwdriver to lift this tab out. -
Page 13: Chapter 2: Avaya Menu
Chapter 2: Avaya Menu You can use the Avaya Menu to adjust and customize options and settings for your telephone, access additional Web-based applications, get information about your phone and network settings, and log out. When you press the Home button, you see one of the following menus,... -
Page 14: Options & Settings
VPN Settings, if your deskphone is part of a Virtual Private Network and if you have authorization to view or change associated settings. If you are an authorized VPN user, see the VPN Setup Guide for 9600 Series IP Telephones (Document Number 16–602968) for information. ™ Avaya one-X Deskphone H.323 9608/9611G User Guide August 2010... -
Page 15: Setting Go To Phone Screen On Calling
2. Select Options & Settings or Phone Settings. 3. Press Select or OK. 4. Select Call Settings. 5. Press Select or OK. 6. Select Go to Phone Screen on Answer. ™ Avaya one-X Deskphone H.323 9608/9611G User Guide August 2010... -
Page 16: Changing The Display Language
2. Select Options & Settings or Phone Settings. 3. Select Call Settings. 4. Press Select or OK. 5. Select Redial. 6. Press Change or OK to toggle between One Number and List. 7. Press Save. ™ Avaya one-X Deskphone H.323 9608/9611G User Guide August 2010... -
Page 17: Setting Dialing Options
1. Press Home. 2. Select Options & Settings or Phone Settings. 3. Press Select or OK. 4. Select Call Settings. 5. Press Select or OK. 6. Select Display Call Timers. ™ Avaya one-X Deskphone H.323 9608/9611G User Guide August 2010... -
Page 18: Configuring Visual Alerts
1. Press Home. 2. Select Options & Settings or Phone Settings. 3. Press Select or OK. 4. Select Call Settings. 5. Press Select or OK. 6. Select Audio Path. ™ Avaya one-X Deskphone H.323 9608/9611G User Guide August 2010... -
Page 19: Setting Contact Names To Display During Calls
Note: Contrast adjustment applies only to a button module attached to a deskphone with a color display screen. You cannot adjust the contrast of the deskphone's color display screen itself. ™ Avaya one-X Deskphone H.323 9608/9611G User Guide August 2010... -
Page 20: Turning Button Click Sounds On And Off
1. Press Home. 2. Select Options & Settings or Phone Settings. 3. Press Select or OK. 4. Select Screen & Sound Options. 5. Press Select or OK. 6. Select Error Tones. ™ Avaya one-X Deskphone H.323 9608/9611G User Guide August 2010... -
Page 21: Turning Large Text On Or Off
Half (each call appearance or feature occupies half the width of a line, effectively splitting the screen in half) or Half to Full. 8. Press Save. ™ Avaya one-X Deskphone H.323 9608/9611G User Guide August 2010... -
Page 22: Changing The Ring Pattern
Help Desk extension to read “Help Desk.” 1. Press Home. Note: To edit a label on an attached Avaya BM12 Button Module, press the Edit button on the module instead and proceed to Step 9. 2. Select Options & Settings or Phone Settings. -
Page 23: Backing Up And Restoring Your Data Files
Avaya Menu. Likewise, if administered, you can restore your data files to their previous settings using the manual restore option. -
Page 24: Turning Automatic Gain Control On Or Off
The items available through the Web browser vary depending upon how your telephone is administered. Contact your system administrator with any questions. Access the browser through the Avaya Menu. If you don't see the Browser option on the Avaya Menu, no Web applications are available for your phone. -
Page 25: Accessing Your Browser
Browser Accessing your browser 1. Press Home. 2. Press Browser or OK. ™ Avaya one-X Deskphone H.323 9608/9611G User Guide August 2010... - Page 26 Avaya Menu ™ Avaya one-X Deskphone H.323 9608/9611G User Guide August 2010...
-
Page 27: Chapter 3: About Features
Feature Table Feature names are often abbreviated to fit your deskphone or button module display area. Use this table as a cross-reference to some standard feature names and their corresponding ™ Avaya one-X Deskphone H.323 9608/9611G User Guide August 2010... - Page 28 Whisper Page Whisper Act Note: If you have personalized labels for any of the features available to you, the personalized label is displayed instead of the feature abbreviations shown here. ™ Avaya one-X Deskphone H.323 9608/9611G User Guide August 2010...
-
Page 29: Calling A Person From The Directory
The cell phone number is programmed by your system administrator. 1. From the Phone screen, scroll right to access the Features menu. 2. Select EC 500. 3. Press OK to turn simultaneous ringing on or off. ™ Avaya one-X Deskphone H.323 9608/9611G User Guide August 2010... - Page 30 About Features ™ Avaya one-X Deskphone H.323 9608/9611G User Guide August 2010...
-
Page 31: Chapter 4: Answering A Call
• To automatically display the Phone screen whenever you receive an incoming call, set the Go to Phone Screen on Ringing option to Yes (see Setting Go To Phone Screen on Ringing on page 15). ™ Avaya one-X Deskphone H.323 9608/9611G User Guide August 2010... - Page 32 Answering a call ™ Avaya one-X Deskphone H.323 9608/9611G User Guide August 2010...
-
Page 33: Chapter 5: Making A Call
3. To end the emergency call, press the Drop softkey or press the Speaker button. Clearing a number Press Clear to erase all dialed digits and enter a new number. ™ Avaya one-X Deskphone H.323 9608/9611G User Guide August 2010... -
Page 34: Redialing A Number
Use the dialpad keys to enter the first few letters of the name and the screen will scroll to the first match in your list. ™ Avaya one-X Deskphone H.323 9608/9611G User Guide August 2010... -
Page 35: Calling A Person From Call History
1. Select the line with the link for the person or number you want to call. 2. Press the line button corresponding to the line with the link or press OK. ™ Avaya one-X Deskphone H.323 9608/9611G User Guide August 2010... - Page 36 Making a call The deskphone initiates a call to the person or number associated with the click to dial link. ™ Avaya one-X Deskphone H.323 9608/9611G User Guide August 2010...
-
Page 37: Chapter 6: Standard Call-Related Features
A hold timer may display when you put a call on hold. For more information, see Displaying call timers on page 17. 4. Press Resume or the line button of the held call to retrieve the call. ™ Avaya one-X Deskphone H.323 9608/9611G User Guide August 2010... -
Page 38: Muting A Call
Related topics: Setting up a conference call on page 39 Adding a person on hold to a conference call on page 39 Putting a conference call on hold on page 39 ™ Avaya one-X Deskphone H.323 9608/9611G User Guide August 2010... -
Page 39: Setting Up A Conference Call
5. Press Join to add the person to the conference call. Putting a conference call on hold When you put a conference call on hold, the other parties can still talk to each other. ™ Avaya one-X Deskphone H.323 9608/9611G User Guide August 2010... -
Page 40: Muting A Person On A Conference Call
2. Press Drop. Dropping a person from a conference call This feature is not available on all systems. 1. From the Phone screen, select your active call. 2. Press Details. ™ Avaya one-X Deskphone H.323 9608/9611G User Guide August 2010... -
Page 41: Forwarding Calls
Incoming calls ring once at your extension and then go directly to a number which is set by your system administrator. If the SAC feature is administered on ™ Avaya one-X Deskphone H.323 9608/9611G User Guide August 2010... - Page 42 All Calls on or off by using the telephone Features list. 1. From the Phone screen, scroll right to access the Features menu. 2. Select SendAllCalls. 3. Press Select or OKto turn Send All Calls on or off. ™ Avaya one-X Deskphone H.323 9608/9611G User Guide August 2010...
-
Page 43: Chapter 7: Bridged Call Appearances
Joining a call on a bridged line You can join an existing call on a bridged line. 1. Select the bridged call in progress that you want to join. 2. Press Bridge. ™ Avaya one-X Deskphone H.323 9608/9611G User Guide August 2010... -
Page 44: Making An Outgoing Call On A Bridged Line
1. Select the bridged line you want to use. 2. Press OK to get a dial tone. 3. Dial the telephone number, or call the person from the Contacts list, or call the person from the History list. ™ Avaya one-X Deskphone H.323 9608/9611G User Guide August 2010... -
Page 45: Chapter 8: Contacts
3. Press Call to call the person or press More then Edit to edit contact information. Viewing a contact's details 1. Press Contacts. 2. Select the contact you want to view. ™ Avaya one-X Deskphone H.323 9608/9611G User Guide August 2010... -
Page 46: Adding A New Contact
6. Select the next field. 7. Select the type of number entered (general,work, mobile, home). 8. If you have another number for this contact, scroll down and repeat Steps 5 - 7. ™ Avaya one-X Deskphone H.323 9608/9611G User Guide August 2010... -
Page 47: Editing A Contact
6. Press Save or OK. Deleting a contact 1. Press Contacts. 2. Select the contact you want to delete. 3. Press More > Delete. 4. Press Delete to confirm or Cancel to cancel. ™ Avaya one-X Deskphone H.323 9608/9611G User Guide August 2010... - Page 48 Contacts ™ Avaya one-X Deskphone H.323 9608/9611G User Guide August 2010...
-
Page 49: Chapter 9: Call History
See About icons on page 10 for a description of presence icons. 3. Scroll up or down to view the entries on the list. ™ Avaya one-X Deskphone H.323 9608/9611G User Guide August 2010... -
Page 50: Viewing Call History Details
1. Press History. 2. Select the number you want to add to your Contacts list. 3. Press +Contact. 4. Edit the name and telephone number, if necessary. 5. Press Save. ™ Avaya one-X Deskphone H.323 9608/9611G User Guide August 2010... -
Page 51: Removing An Entry From Call History
1. Press Home. 2. Select Options & Settings or Phone Settings. 3. Press Select or OK. 4. Select Application Settings. ™ Avaya one-X Deskphone H.323 9608/9611G User Guide August 2010... - Page 52 To turn off logging your calls, select History. To turn logging of bridged lines on or off, select Log Bridged Calls. 7. Press Change or OK to turn call history logging on or off. 8. Press Save. ™ Avaya one-X Deskphone H.323 9608/9611G User Guide August 2010...
-
Page 53: Chapter 10: Using Usb Flash Drives With Your Phone
Avaya also provides a spreadsheet tool that uses macros to convert your Outlook contacts into the Contacts format the telephone uses. For information on this tool, search for “Avaya one-X USB Companion” on the Avaya support site at http://www.avaya.com/support. -
Page 54: Replacing Your Contacts List With An External File
5. Press Save or OK to overwrite and replace your contacts list with the file on your USB device or Cancel to cancel the replacement and retain your current contact list. ™ Avaya one-X Deskphone H.323 9608/9611G User Guide August 2010... -
Page 55: Copying Your Contacts List To A Usb Flash Drive
Using pictures from your USB device as a screensaver If your USB device has a top level directory named \Pictures or another picture directory that is properly administered, you can use pictures in that directory as your phone's ™ Avaya one-X Deskphone H.323 9608/9611G User Guide August 2010... - Page 56 Each picture displays for 5 seconds unless you specify a different value (from 5 seconds to 999 seconds). The maximum allowable height and width for each picture on a 9608 IP Deskphone is 180 x 120 pixels. The maximum allowable height and width for each picture on a 9611G IP Deskphone is 240 x 320 pixels.
-
Page 57: Chapter 11: Getting Your Messages
Contact your system administrator with any questions. Logging into your voice mail 1. To log in to your voice mail, press the Message button. 2. Follow the voice prompts from your voice mail system. ™ Avaya one-X Deskphone H.323 9608/9611G User Guide August 2010... - Page 58 Getting your messages ™ Avaya one-X Deskphone H.323 9608/9611G User Guide August 2010...
-
Page 59: Chapter 12: About Logging In To And Out Of Your Telephone
Log in from the initial screen when it prompts you for your extension. 1. Enter your extension. 2. Press Enter or OK. 3. Enter your password. 4. Press Enter or OK. ™ Avaya one-X Deskphone H.323 9608/9611G User Guide August 2010... -
Page 60: Logging In As A Guest User
You can log out as a guest at any time despite the duration you select. 7. Press Enter or OK. Logging out of your telephone extension 1. Press Home. 2. Scroll down and select Log Out. 4. Press Log Out to confirm. ™ Avaya one-X Deskphone H.323 9608/9611G User Guide August 2010... -
Page 61: Index
............. Call-Related Features about ..............calling using a click to dial link ........Edit dialing ............calling a person Emergency call ............from the contacts list ..........error tones ™ Avaya one-X Deskphone H.323 9608/9611G User Guide August 2010... - Page 62 Setting dialing options .......... sending to coverage ..........Options & Settingscall history ........transferring ............outgoing calls Incoming calls making a call ............answering ............. making a call on a bridged line ......™ Avaya one-X Deskphone H.323 9608/9611G User Guide August 2010...
- Page 63 Restore data files ............merging with contacts list ........Ring Pattern pictures ..............changing .............. USB flash drives working with ............screen width Visual Alerts configuring ............Voice mail logging in .............. ™ Avaya one-X Deskphone H.323 9608/9611G User Guide August 2010...
- Page 64 ™ Avaya one-X Deskphone H.323 9608/9611G User Guide August 2010...
Need help?
Do you have a question about the 9608 and is the answer not in the manual?
Questions and answers