Table of Contents
Advertisement
Quick Links
Advertisement
Table of Contents
Troubleshooting

Related Manuals for Grizzly G0664


Summary of Contents for Grizzly G0664
- Page 1 HEAVY DUTY METAL CUTTING BANDSAW w/ROLLERS OWNER'S MANUAL Copyright © May, 2008 By grizzly industrial, inC. WARNING: NO pORTION Of THIS MANUAL MAY BE REpRODUCED IN ANY SHApE OR fORM WITHOUT THE WRITTEN AppROVAL Of GRIzzLY INDUSTRIAL, INC. #JB10466 printed in taiWan...
-
Page 3: Table Of Contents
INTRODUCTION ... 4 Foreword ... 4 Contact info... 4 Functional overview ... 4 identification ... 5 Machine data sheet ... 6 SECTION 1: SAfETY ... 8 safety instructions for Machinery ... 8 additional safety instructions for Bandsaws ... 10 SECTION 2: CIRCUIT REQUIREMENTS ... 11 220V operation ... -
Page 4: Introduction
INTRODUCTION foreword We are proud to offer the Model g0664 heavy duty Metal Cutting Bandsaw w/rollers. this machine is part of a growing grizzly family of fine metalworking machinery. When used according to the guidelines set forth in this manual, you can expect years of trouble-free, enjoyable operation and proof of grizzly’s commitment to customer... -
Page 5: Identification
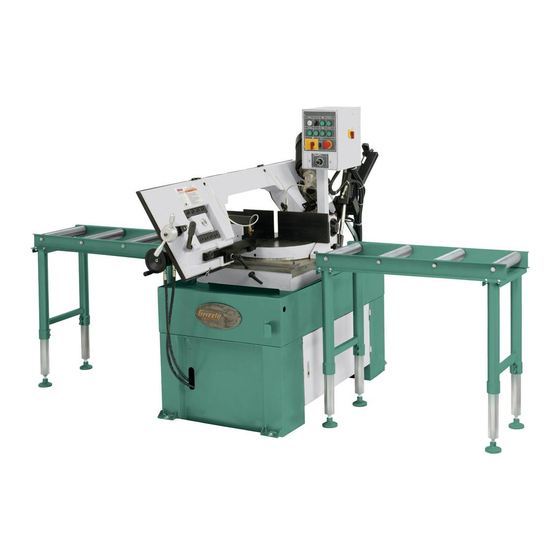
Metal-Cutting Bandsaw Identification figure 2. g0664 Machine identification. A. Blade tension handwheel B. Cutting Fluid Flow Valve C. Cut alignment laser D. Bandsaw Motor E. Control panel Machine on/oFF switch G. Feed pressure adjust spring H. saw Control ram... -
Page 6: Machine Data Sheet
Machine Data Sheet MACHINE DATA SHEET MODEL G0664 HEAVY DUTY METAL CUTTING BANDSAW Product Dimensions: Shipping Dimensions: Electrical: Motors: Main Hydraulic Motor Model G0664 Page 1 of 2 g0664 heavy duty Metal-Cutting Bandsaw... - Page 7 Coolant Pump Motor Main Specifications: Operation Information Cutting Capacities Construction Other Other Specifications: Features: Model G0664 g0664 heavy duty Metal-Cutting Bandsaw Page 2 of 2...
-
Page 8: Section 1: Safety
Safety Instructions for Machinery g0664 heavy duty Metal-Cutting Bandsaw... - Page 9 Metal-Cutting Bandsaw...
-
Page 10: Additional Safety Instructions For Bandsaws
Use this and other machinery with caution and respect. failure to do so could result in serious per- sonal injury, damage to equipment, or poor work results. g0664 heavy duty Metal-Cutting Bandsaw... -
Page 11: Section 2: Circuit Requirements
Minimum Circuit size ... 15 amps g0664 heavy duty Metal-Cutting Bandsaw power Connection Device the type of plug required to connect your machine to power depends on the type of service you cur- rently have or plan to install. -
Page 12: Section 3: Setup
• lifting straps and hooks (rated for at least 1200 lbs.) ... as needed Unpacking the Model g0664 was carefully packed when it left our warehouse. if you discover the machine heavy is damaged after you have signed for delivery, please immediately call Customer Service at (570) 546-9663 for advise. -
Page 13: Inventory
SUffOCATION HAzARD! Immediately discard all plas- tic bags and packing materi- als to eliminate choking/suf- focation hazards for children and animals. g0664 heavy duty Metal-Cutting Bandsaw figure 4. inventory. figure 5. roller table inventory. -13-... -
Page 14: Hardware Recognition Chart
Hardware Recognition Chart -14- g0664 heavy duty Metal-Cutting Bandsaw... -
Page 15: Clean Up
6. Cleaner/degreaser available from grizzly. g0664 heavy duty Metal-Cutting Bandsaw Site Considerations floor Load refer to the Machine Data Sheet for the weight and footprint specifications of your machine. -
Page 16: Moving & Placing
Moving & placing the base of the Model g0664 contains four lift- ing points to allow the machine to be moved into position. To move the machine: remove the four lag screws that mount the machine to the pallet at the base of the ship- ping crate. -
Page 17: Mounting To Shop Floor
& lag Bolt figure 9. typical fasteners for mounting to concrete floors. g0664 heavy duty Metal-Cutting Bandsaw Using Machine Mounts using machine mounts, shown in figure 10, gives the advantage of fast leveling and vibration reduc- tion. -
Page 18: Leveling Feet
Leveling feet each corner of the Model g0664 base has a foot with a threaded hole that can be used to level the machine. To install the leveling feet: place the machine on blocks at least 4" above the ground so that each threaded hole can be accessed from underneath. -
Page 19: Roller Table Assembly
Roller Table Assembly the Model g0664 comes with two auxiliary roller tables to support long workpieces during opera- tion. To assemble the roller tables: insert one lower leg into the upper leg assem- bly, as shown in figure 12. tighten one of the cap screws to temporarily hold the leg in place. -
Page 20: Required Adjustments
25,000 and 28,000 psi (page 36). g0664 heavy duty Metal-Cutting Bandsaw... -
Page 21: Test Run
(570) 546-9663 for assistance. refer to the diagram below during the test run procedure. figure 18. Control panel. g0664 heavy duty Metal-Cutting Bandsaw Before starting the saw, make sure you have performed the preceding assembly and adjustment instructions, and you have... -
Page 22: Recommended Adjustments
Call tech support for help. Recommended Adjustments Blade tension (not set at factory. refer to page 36). Feed stop (refer to page 51). limit switches (refer to page 51). g0664 heavy duty Metal-Cutting Bandsaw , e). the... -
Page 23: Section 4: Operations
OMMEND that you read books, trade maga- zines, or get formal training before begin- ning any projects. Regardless of the con- tent in this section, Grizzly Industrial will not be held liable for accidents caused by lack of training. Loose hair, clothing, or... -
Page 24: Basic Controls
Vise Quick Release: releases the vise to allow rapid opening/closing without using the handwheel. Vise position Lock: locks the vise in position to prevent lateral movement during use. Vise handwheel Vise Quick release Vise position lock figure 22. Vise controls. g0664 heavy duty Metal-Cutting Bandsaw... -
Page 25: Control Panel
): hydraulically closes the vise approximately ⁄ ". Must be activated before saw motor will turn ON. g0664 heavy duty Metal-Cutting Bandsaw Control panel figure 23. G0664 control panel. H. Lower Bow Button ( lowers the saw blade at the rate determined by the downfeed knob (l). -
Page 26: Cutting Angle
Make sure the vise is clear of the path of the saw before proceeding. g0664 heavy duty Metal-Cutting Bandsaw Vise position lock lever... -
Page 27: Coolant Catch Tray
27. Catch tray figure 27. Catch tray installation. g0664 heavy duty Metal-Cutting Bandsaw Blade Guide position the blade guide supports the blade during opera- tion and the attached blade guard protects the operator from the exposed portion of the blade. -
Page 28: Workstop
Workstop the Model g0664 has an adjustable workstop that is easy to install and use. To install the workstop: thread the workstop rod into the base and tighten. slide the workstop onto the rod. hex Bolt Jam nut Workpiece Workstop rod Workstop figure 29. - Page 29 Bundled. one or more workpieces will slip and damage the saw blade. g0664 heavy duty Metal-Cutting Bandsaw Always turn the saw OFF and allow the blade to come to a complete stop before using the vise! failure to follow this caution may lead to injury.
-
Page 30: Cutting Fluid System
Monitor the cutting fluid level frequently to keep the system working properly. do not let the cutting fluid pump run dry. g0664 heavy duty Metal-Cutting Bandsaw ) to Fluid nozzle Valve... -
Page 31: Cutting Fluid Tips
Metal-Cutting Bandsaw Use the selections below to choose the appro- priate cutting fluids: •... -
Page 32: Blade Selection
Metal-Cutting Bandsaw Material Width/ diameter Material shapes Blade pitch... -
Page 33: Blade Length
Blade width dictates the largest and smallest curve that can be cut, as well as how accurately it can cut a straight line—generally the wider the blade, the straighter it will cut. the Model g0664 uses a 1 ⁄... -
Page 34: Blade Speed
Blade Speed Blade Speed the Model g0664 has a two-speed control with settings of 160 and 320 feet per minute (FpM). the speed is controlled by a rotary switch and can be switched while the motor is operating. the speed should not be switched during a cut. -
Page 35: Chip Inspection Chart
& short hard, strong & thick hard, strong & thick hard & thin straight & thin powdery Curled tight & thin g0664 heavy duty Metal-Cutting Bandsaw Chip Blade Color Speed Good silver Brown or Blue decrease decrease Brown or Blue... -
Page 36: Blade Tensioning
To properly break-in a new Grizzly blade: Choose the correct speed for the blade and material of the operation. -
Page 37: Blade Breakage
Metal-Cutting Bandsaw Workpiece Inspection some metal workpieces are not safe to cut with a metal cutting bandsaw;... -
Page 38: Operation Tips
• adjust the blade guides as close as possible to the workpiece to minimize side-to-side blade movement. • use cutting fluid when possible to increase blade life. g0664 heavy duty Metal-Cutting Bandsaw... -
Page 39: Section 5: Accessories
T20535—4-6 TpI Variable pitch Blade T20536—5-8 TpI Variable pitch Blade T20537—6-10 TpI Variable pitch Blade T20538—8-12 TpI Variable pitch Blade replacement blades for the Model g0664 heavy- duty Metal Cutting Bandsaw. 129 figure 39. Blades. H5408—Blade Tensioning Gauge the Blade tensioning gauge ensures long blade life, reduced blade breakage, and straight cutting by indicating correct tension. - Page 40 T20452 H0736 figure 45. slipit g0664 heavy duty Metal-Cutting Bandsaw dial Calipers. ® 1 Qt. Gel ® 12 oz Spray ®...
-
Page 41: Section 6: Maintenance
Metal-Cutting Bandsaw Lubrication all bearings and the gearbox on the Model g0664 are lubricated and sealed for life. no further atten- tion is needed unless damage occurs. To lubricate the bandsaw:... -
Page 42: Hydraulic System
11. replace the drain plug, then fill the tank with 15 liters of iso 15 or equivalent fluid, then reinstall the tank vent cap. tank Vent Cap tank lid figure 49. Hydraulic fluid tank. g0664 heavy duty Metal-Cutting Bandsaw tank screen drain plug... -
Page 43: Section 7: Service
2. Blade is at fault. 3. Worm gear is at fault. 4. Wrong blade for material. 5. speed is set too slow. g0664 heavy duty Metal-Cutting Bandsaw Troubleshooting 1. twist safety stop button until it pops out. 2. ensure correct size for machine load;... -
Page 44: Bandsaw Operations
3. refer to Blade Tension on page 36, and adjust as required. 4. refer to Blade Change on page 46 and replace the blade. 5. refer to Blade Speed on page 34, and adjust as required. g0664 heavy duty Metal-Cutting Bandsaw... -
Page 45: Hydraulic System Troubleshooting
3. saw bow hydraulic system is leak- ing. 4. saw bow ram is faulty. 5. Control panel wiring is faulty. g0664 heavy duty Metal-Cutting Bandsaw CORRECTIVE ACTION 1. press the standby ( << i) button. 2. Check/fill hydraulic fluid level. -
Page 46: Blade Change
52. Blade installed on wheels. 10. reinstall the wheel brush, the blade guide guards, and close the wheel access cover. 11. adjust the blade tension to 25,000 to 28,000 psi (page 36). g0664 heavy duty Metal-Cutting Bandsaw removed. Wheel shoulder... -
Page 47: Blade Guides
(figure 53). Blade guide figure 53. Blade guide extended. g0664 heavy duty Metal-Cutting Bandsaw loosen the blade guide cap screw that holds the blade guide in position (figure 54). Cap screw set screw figure 54. -
Page 48: Wheel Brush
Wheel Brush the Model g0664 is equipped with a wire wheel brush to clean metal chips from the blade, reduc- ing wear to the blade and machine. With use, the wheel will wear requiring adjustment and eventual replacement. To adjust/replace the wheel brush: raise the bow to the upmost position to allow the best access to the wheel brush. -
Page 49: Squaring Blade
57. Checking blade squareness to vise. g0664 heavy duty Metal-Cutting Bandsaw —if the blade is square, no further adjust- ments are necessary. —if the blade is not square, continue with Step 5 below. -
Page 50: Swivel Stops
-45° mark. go to Squaring Blade on page 49 to make sure the cuts will be perpendicular to the table. g0664 heavy duty Metal-Cutting Bandsaw 60° stop Bolt figure 62. 60° swivel stop. 45° stop Bolt figure 63. 45° swivel stop. -
Page 51: Feed Stop
BandsaW FroM poWer! g0664 heavy duty Metal-Cutting Bandsaw auto stop loosen the auto stop knob, adjust the posi- tion of the auto stop so it depresses the upper limit switch button, then re-tighten the auto stop knob. -
Page 52: Section 8: Wiring
Compliance Must be verified by a qualified electrician. The photos and diagrams included in this section are best viewed in color. You can view these pages in color at www.grizzly.com. -52- CIRCUIT REQUIREMENTS. you Must fol- low the CIRCUIT REQUIREMENTS section on page 11. -
Page 53: Wiring Overview
54 and images in figures 73 –76 on page 56. 220 VAC 15-15 PLUG Recommended WIRING HARNESS KEY g0664 heavy duty Metal-Cutting Bandsaw Wiring Overview READ ELECTRICAL SAFETY Laser Light see diagram on page 55 and image in figure 68. -
Page 54: Control Box Wiring Diagram
Control Box Wiring Diagram (figure 73 on page 56) (figure 76 on page 56) -54- READ ELECTRICAL SAFETY ON PAGE 52! (figure on page 56) (figure 74 on page 56) g0664 heavy duty Metal-Cutting Bandsaw... -
Page 55: Components Wiring Diagram
68. laser light. (figure 69) 220 VAC 3-Phase (figure 71) 15-15 PLUG (as recommended) figure 70. Limit switch. figure 71. Coolant pump motor. (figure 72) (figure 70) figure 72. READ ELECTRICAL SAFETY -55- g0664 heavy duty Metal-Cutting Bandsaw ON PAGE 52! -
Page 56: Control Box Electrical Components
Control Box Electrical Components figure 73. Control panel wiring. figure 75. Inner panel wiring. figure 74. Bottom panel wiring. figure 76. Side panel wiring. -56- READ ELECTRICAL SAFETY g0664 heavy duty Metal-Cutting Bandsaw ON PAGE 52! -
Page 57: Section 9: Hydraulics
(figure 79*) (figure 78*) (figure 79*) (figure 77*) (figure 78*) WARNING! POISON HAZARD! Fluid leaks may be at extremely high pressure. Hydraulic Fluid injected into the body is a medical emergency. Wiring Page (figure 77*) -57- g0664 heavy duty Metal-Cutting Bandsaw... -
Page 58: Hydraulic Components
Hydraulic Components figure 77. Hydraulic fluid tank. figure 80. Downfeed adjust knob. figure 78. Solenoids. figure 81. Vise cylinder. figure 79. Manifold overhead view. figure 82. Saw bow cylinder. -58- g0664 heavy duty Metal-Cutting Bandsaw... -
Page 59: Section 10: Parts
SECTION 10: pARTS Main parts Breakdown -59- g0664 heavy duty Metal-Cutting Bandsaw... -
Page 60: Main Parts List
P0664165 165-1 P0664165-1 P0664166 P0664167 P0664168 P0664170 PW01M PSB100M P0664200 G0664 Heavy Duty Metal-Cutting Bandsaw DESCRIPTION BRUSH SUPPORT BRUSH HEX BOLT M6-1 X 30 FLAT WASHER 6MM HEX NUT M6-1 FLAT WASHER 5MM PHLP HD SCR M5-.8 X 8 BLADE ADJUST STICK... -
Page 61: Main Parts List (Continued)
LEG ASSEMBLY G0664503 LOWER LEG G0664504 ADJUSTABLE FOOT G0664505 ROLLER SHAFT G0664506 ROLLER P6003 BALL BEARING 6003ZZ PW06M FLAT WASHER 12MM g0664 heavy duty Metal-Cutting Bandsaw PART # 248-3 P0664248-3 248-4 P0664248-4 248-5 P0664248-5 248-6 P0664248-6 248-7 P0664248-7 248-8 PSB07M... -
Page 62: Base Parts Breakdown
Base parts Breakdown -62- g0664 heavy duty Metal-Cutting Bandsaw... -
Page 63: Base Breakdown
PIVOT LOCK HANDLE P0664030 VISE TABLE P0664031 COMPRESSION SPRING P0664032 RACK SHAFT P0664033 GEAR SHAFT P0664034 SHAFT BUSHING P0664035 HANDLE g0664 heavy duty Metal-Cutting Bandsaw Base Breakdown REF PART # P0664036 P0664037 PSS06M P0664040 P0664041 PFH11M PSS25M P0664044 PW08M P0664046... -
Page 64: Labels Breakdown And List
MUST maintain the original location and readability of the labels on the machine. If any label is removed or becomes unreadable, REpLACE that label before using the machine again. Contact Grizzly at (800) 523-4777 or www.grizzly.com to order new labels. -64-... -
Page 67: Warranty And Returns
WARRANTY AND RETURNS...
Need help?
Do you have a question about the G0664 and is the answer not in the manual?
Questions and answers