Grizzly G0622 Owner's Manual
4" x 6" metal cutting bandsaw
Hide thumbs
Also See for G0622:
- Owner's manual (44 pages) ,
- Owner's manual (48 pages) ,
- Owner's manual (48 pages)
Table of Contents
Advertisement
Quick Links
Advertisement
Table of Contents

Related Manuals for Grizzly G0622


Summary of Contents for Grizzly G0622
- Page 1 4" x 6" METAL CUTTING BANDSAW OWNER'S MANUAL COPYRIGHT © AUGUST, 2006 BY GRIZZLY INDUSTRIAL, INC. WARNING: NO PORTION OF THIS MANUAL MAY BE REPRODUCED IN ANY SHAPE OR FORM WITHOUT THE WRITTEN APPROVAL OF GRIZZLY INDUSTRIAL, INC. #PC8472 PRINTED IN CHINA...
- Page 2 ���� ������ �������� �������� ������ ������������ �� ��� ������ ������ ���������� ����������� ��� ������� �� ���� ������������������ ������� �� ����� ���������� ��� ������ ��� ������������ ����� �� ���� ������ ��� ������ �� ������� �������� ������� ��������� ����������� ������������� �� ������ ���...
-
Page 3: Table Of Contents
INTRODUCTION ... 2 Foreword ... 2 Contact Info ... 2 Identification ... 5 SECTION 1: SAFETY... 6 Additional Safety Instructions for Metal Cutting Bandsaws ... 8 SECTION 2: CIRCUIT REQUIREMENTS ... 9 110V Operation ... 9 SECTION 3: SET UP ... 10 Set Up Safety ... -
Page 4: Introduction
INTRODUCTION Foreword We are proud to offer the Model G0622 4" X 6" Metal Cutting Bandsaw. This machine is part of a growing Grizzly family of fine metalworking machinery. When used according to the guide- lines set forth in this manual, you can expect years of trouble-free, enjoyable operation and proof of Grizzly’s commitment to customer satis-... -
Page 5: Machine Data Sheet
Customer Service #: (570) 546-9663 • To Order Call: (800) 523-4777 • Fax #: (800) 438-5901 MODEL G0622 4" X 6" METAL CUTTING BANDSAW Product Dimensions: Weight ...144 lbs. Length/Width/Height ... 16 x 39 x 19 in. Foot Print (Length/Width) ... 13-3/4 x 19-3/4 in. - Page 6 Other Specifications: Country Of Origin ... China Warranty ...1 Year Serial Number Location ...ID on Body Frame Assembly Time ...25 minutes Features: Horizontal and Vertical Operation Automatic Shut-Off 3/4 HP Motor Work Stop G0622 4" X 6" Metal Cutting Bandsaw...
-
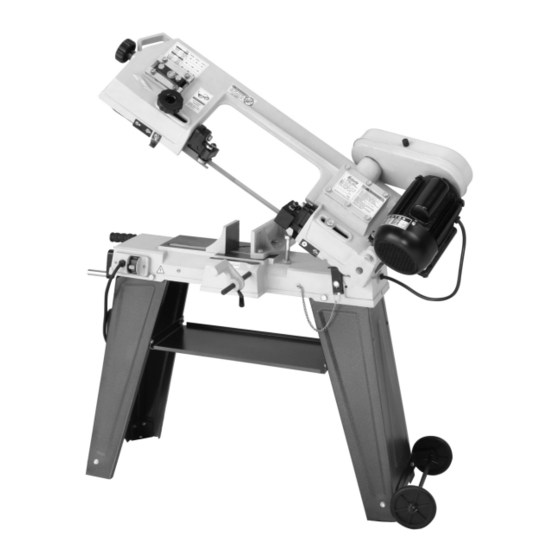
Page 7: Identification
Figure 1. Model G0622 controls and features. G0622 4" X 6" Metal Cutting Bandsaw Identification A. Motor B. Pulley Cover C. Blade D. Blade Guard Adjustment Knob E. Blade Tracking Mechanism Blade Tension Knob G. Auto Off Tab H. Blade Guide Bearing Assemblies... -
Page 8: Section 1: Safety
���������� ������ ���� ������ ���������� ���������������� �� ���� ������ ��������� ��� ���� �������� ���������������������������������������������� ������������������������������������������ �������������������������������������������� ������������������������������������������ �� ����� ������� ��������� ���� ������ �� ����� ��� ��������� �� ��������� ����� �� �������� ������������������ ������������������������������������ ��������� ����������� G0622 4" X 6" Metal Cutting Bandsaw... - Page 9 ��� �������� ��������� ���� ������ ����������������������������������������� �������������������������������������������� ������������������������������������� ��� ���� ���� ������ ��� �� ����� ��� ���� ��������� ������ ����� ���������� G0622 4" X 6" Metal Cutting Bandsaw ��� ������ ��������������������������������������� ����� ���� ���������� ��������� ������� ����� ����������������� ��� ����� ������ ����� ����������� ������...
-
Page 10: Additional Safety Instructions For Metal Cutting Bandsaws
No list of safety guidelines can be complete. Every shop environment is different. Like all machines there is danger associated with the Model G0622. Accidents are frequently caused by lack of familiarity or failure to pay attention. Use this machine with respect and caution to lessen the possibility of operator injury. -
Page 11: Section 2: Circuit Requirements
DO NOT connect the machine to the power source until instructed to do so. Amperage Draw The Model G0622 motor draws the following amps under maximum load: Motor Draw ... 5 Amps Circuit Recommendations We recommend using a dedicated circuit for this machine. -
Page 12: Section 3: Set Up
• Phillips Head Screwdriver #2 ... 1 • Straightedge, 12" Minimum ... 1 The Model G0622 was carefully packed when it left our warehouse. If you discover the machine moving is damaged after you have signed for delivery, please immediately call Customer Service at (570) 546-9663 for advice. -
Page 13: Inventory
Flat Head Screw M6-1 x 10 (Table) ... 1 • Cotter Pins (Axle & Handle) ... 4 G0622 4" X 6" Metal Cutting Bandsaw Figure 3. Model G0622 Inventory. In the event that any nonproprietary parts are missing (e.g. a nut or a washer), we would be... -
Page 14: Hardware Recognition Chart
Hardware Recognition Chart -12- G0622 4" X 6" Metal Cutting Bandsaw... -
Page 15: Clean Up
Take precautions from this hazard by only using cleaning solvents in a well ventilated area. G0622 4" X 6" Metal Cutting Bandsaw Site Considerations Floor Load Refer to the Machine Data Sheet for the weight and footprint specifications of your machine. -
Page 16: Stand Assembly
Figure 5. Figure 5. Corner braces and wheel bracket. -14- On the other leg, Insert the handle into the pre-drilled holes and secure with the cotter pins (see Figure 7). G0622 4" X 6" Metal Cutting Bandsaw... -
Page 17: Installing Pulleys
Figure 9. Tool tray. 10. Check to see if the bandsaw is relatively level then final tighten all the nuts. G0622 4" X 6" Metal Cutting Bandsaw Installing Pulleys The V-belt drive system for the bandsaw requires the installation of two pulleys. The pulleys are covered for operator safety and to keep the V-belt and pulleys clean. -
Page 18: Installing V-Belt
Install the worm gear pulley with the small diameter wheel closest to the gear box. Use a straightedge to check the alignment of the pulley wheels as shown in Figure 12. Figure 12. Checking pulley alignment. -16- G0622 4" X 6" Metal Cutting Bandsaw... -
Page 19: Installing Work Stop
Figure 14. Installing work stop shaft. Slide the work stop onto the end of the shaft and lock it into position with the locking lever shown in Figure 15. Figure 15. Work stop locking lever. G0622 4" X 6" Metal Cutting Bandsaw -17-... - Page 20 "modi- fied" with a hammer or other appropriate implement to fit securely. Safety Bracket Figure 20. Safety bracket. G0622 4" X 6" Metal Cutting Bandsaw...
-
Page 21: Test Run
—If you need any help with your bandsaw call our Tech Support at (570) 546-9663. Figure 21. ON/OFF switch. G0622 4" X 6" Metal Cutting Bandsaw Recommended Adjustments The adjustments listed below have been per- formed at the factory. However, because of... -
Page 22: Section 4: Operations
Use the scale as a guide to set your angle or use a machinist square to square the blade to the vise as shown in Figure 23. Tighten the lock nut. Figure 22. Setting vise angle. G0622 4" X 6" Metal Cutting Bandsaw... -
Page 23: Blade Speed
Note: Figure 24 shows correct methods of holding different workpiece shapes. Figure 24. Workholding options by material shape. G0622 4" X 6" Metal Cutting Bandsaw Blade Speed The bandsaw is capable of operating at 78, 108, or 180 FPM. The speed can easily be adjusted by changing the V-belt placement. -
Page 24: Blade Selection
�������� ��� � ���������� �� ��������������� �������������� ���������� ���������� �� ������ ���������� �������� �� ������������������ Figure 27. Model G0622 Blade chart. G0622 4" X 6" Metal Cutting Bandsaw ⁄ " ��� � �� ��� ���... -
Page 25: Blade Guides
Blade Guides Knob Figure 28. Blade guides. G0622 4" X 6" Metal Cutting Bandsaw Feed Rate The feed rate is controlled by the spring and handle shown in Figure 29. To adjust the feed rate: Slower: Twist the handle clockwise to add ten- sion to the spring. -
Page 26: Operation Tips
NOTICE Loosen blade tension at the end of each day to prolong blade life. -24- Figure 30. Work stop. Figure 31. Proper starting position. Figure 32. Using the vertical set-up. G0622 4" X 6" Metal Cutting Bandsaw... -
Page 27: Section 5: Accessories
G5114—64 ⁄ ⁄ x .025 14-18 Variable Pitch G5115—64 ⁄ ⁄ x .025 20-24 Variable Pitch Figure 33. Blades G0622 4" X 6" Metal Cutting Bandsaw H5405—Lenox Lube Tube ® ™ Lenox Lube Tube is a stick lubricant designed ®... - Page 28 These traditional dial calipers are accurate to 0.001" and can measure outside surfaces, inside surfaces, and heights/depths. Features stainless steel, shock resistant construction and a dust proof display. H1298 H0736 Figure 39. Grizzly G0622 4" X 6" Metal Cutting Bandsaw H1302 H4977 Dial Calipers. ®...
-
Page 29: Section 6: Maintenance
Lubricate vise screw. Annual Check: • Lubricate gear box. Cleaning Cleaning the Model G0622 is relatively easy. After using your bandsaw, remove excess chips by sweeping. Then send chips for recycling. G0622 4" X 6" Metal Cutting Bandsaw Lubrication Before applying lubricant to any area, wipe the area clean to avoid contamination. -
Page 30: Section 7: Service
SECTION 7: SERVICE This section is provided for your convenience—it is not a substitute for the Grizzly Service Department. If you need help troubleshooting, you need replacement parts, or you are unsure of how to perform the pro- cedures in this section, then feel free to call our Technical Support at (570) 546-9663. - Page 31 3. The blade tension is low. 4. The blade is dull. 5. The blade speed is wrong. G0622 4" X 6" Metal Cutting Bandsaw CORRECTIVE ACTION 1. Refer to Feed Rate on Page 23, or Blade Speed on Page 22 and adjust as required.
-
Page 32: Blade Change
—If the tracking needs to be adjusted, see Tracking in the next section. —If the tracking is fine, proceed to Blade Tension on Page 32. Figure 44. Tension knob and blade. G0622 4" X 6" Metal Cutting Bandsaw... -
Page 33: Blade Tracking
(Figure 45). Lower Hex Bolt Figure 45. Blade tracking adjustments. G0622 4" X 6" Metal Cutting Bandsaw Relax the blade tension using the blade tension knob. Adjust the tracking hex bolt with a open end wrench as shown in Figure 46, then tighten the lower hex bolt loosened in Step 4. -
Page 34: Blade Tension
Loosen the hex bolt shown in Figure 47, and rotate the seat until the blade is vertical to the bed, then tighten the hex bolt. Figure 47. Squaring the blade. G0622 4" X 6" Metal Cutting Bandsaw Hex Bolt... -
Page 35: Blade Guide Bearings
Figure 48. Backing Bearing Eccentric Bushing Figure 48. Blade guide adjustments. G0622 4" X 6" Metal Cutting Bandsaw To adjust the blade guide bearings: UNPLUG THE BANDSAW! Position the bandsaw in the vertical position. Loosen the hex nut that secures the bearing to the eccentric bushing. -
Page 36: Electrical Components
����� �� ����� �� ����� �� -34- Figure 50. G0622 Capacitor. Wiring Diagram ��������� ������������ ����������� �� �� �� �� �� ������ �� �� �� ������ �� �� ������� �� ��� G0622 4" X 6" Metal Cutting Bandsaw ��������� �������... -
Page 37: Parts Breakdown
��� ��� ��� ��� ��� ��� ��� ��� ��� ��� ��� ��� ��� ��� ��� ��� G0622 4" X 6" Metal Cutting Bandsaw Parts Breakdown ��� ��� ��� ��� ��� ��� ��� ��� ��� ��� ��� ��� ��� ��� ���... -
Page 38: Parts List
P0622192 P0622193 P0622194 P0622196 PB22M P0622199 P0622201 P0622203 PB20M G0622 4" X 6" Metal Cutting Bandsaw DESCRIPTION SET SCREW M8-1.25 X 12 FLAT WASHER 8MM HEX BOLT M8-1.25 X 20 HEX BOLT M12-1.75 X 75 PIVOT TABLE TABLE BRACKET ADJUSTABLE BRACKET (TOP) KNOB BOLT M10-1.5 X 25... -
Page 39: Parts List
MUST maintain the original location and readability of the labels on the machine. If any label is removed or becomes unreadable, REPLACE that label before using the machine again. Contact Grizzly at (800) 523-4777 or www.grizzly.com to order new labels. G0622 4" X 6" Metal Cutting Bandsaw... -
Page 40: Warranty And Returns
WARRANTY AND RETURNS Grizzly Industrial, Inc. warrants every product it sells for a period of 1 year to the original purchaser from the date of purchase. This warranty does not apply to defects due directly or indirectly to misuse, abuse, negligence, accidents, repairs or alterations or lack of maintenance. - Page 41 ���������������������������������������������������������������������������������� � ������������������������������������������������������������������������������������ ����� ����������������������� ������ � ������������������������ ���� ��������������������� ���������������������������� ������ ������������������������ ���������� � ���������������� ���������������������������� ������������������������������� ��������������������������� ��� ��������� ����������� �� ����� �� � ��������� ������ �� ���� �� ���� ��� ��������� �������� �� ���� �� ������� ������ �������� ��� ��������� �� ������� ��� ����������� �� �������� ������������� ���...
- Page 42 ���������������������� ���������������������� ����������������������������������� ����������������������������������� ������������������������������������� �������������������������������������� ������� ����������� ���� ���� ��� ���� ����������� �� ���������� �������������������������������������� ����� ����� ����...
- Page 44 ��� ������ ��� ���� ���� ������� ����� ��� ������� ����� ��� �������� ��� ������� � � � ���� ����� ��� � � �������� ������ ��� � ����� ������ � �� ��� �������� ������� � ������ �������� ������ ������� ������ �� ����� ������...
Need help?
Do you have a question about the G0622 and is the answer not in the manual?
Questions and answers