Grizzly G0623X Owner's Manual
10" sliding table saw
Hide thumbs
Also See for G0623X:
- Owner's manual (100 pages) ,
- Machine data sheet (3 pages) ,
- Parts list (16 pages)
Table of Contents
Advertisement
Quick Links
Advertisement
Chapters
Table of Contents

Related Manuals for Grizzly G0623X


Summary of Contents for Grizzly G0623X
- Page 1 10" SLIDING TABLE SAW OWNER'S MANUAL COPYRIGHT © NOVEMBER, 2007. BY GRIZZLY INDUSTRIAL, INC. REVISED MARCH, 2008 (TR) WARNING: NO PORTION OF THIS MANUAL MAY BE REPRODUCED IN ANY SHAPE OR FORM WITHOUT THE WRITTEN APPROVAL OF GRIZZLY INDUSTRIAL, INC.
- Page 2 ���� ������ �������� �������� ������ ������������ �� ��� ������ ������ ���������� ����������� ��� ������� �� ���� ������������������ ������� �� ����� ���������� ��� ������ ��� ������������ ����� �� ���� ������ ��� ������ �� ������� �������� ������� ��������� ����������� ������������� �� ������ ���...
-
Page 3: Table Of Contents
SECTION 5: ACCESSORIES ......45 Foreword ............2 SECTION 6: MAINTENANCE......47 Contact Info ........... 2 Schedule ............47 G0623X Data Sheet ........3 Cleaning ............47 G0623X3 Data Sheet ........6 Unpainted Cast Iron ........47 Identification ........... 9 Lubrication ........... -
Page 4: Introduction
Foreword Contact Info If you have any comments regarding this manual, We are proud to offer the Model G0623X/G0623X3 10" Sliding Table Saw. This machine is part of please write to us at the address below: a growing Grizzly family of fine woodworking machinery. -
Page 5: G0623X Data Sheet
����������������� � ����������������������������������������������������������������������������������������������������������������������������������������������� �������������������������������������������������������������������������������������������������������������������������������������������������������������������������� ��� �������������� � ������������������������������������������������������������������������������������������������������������������������������������������������������������������������ �� ���������������������������������������������������������������������������������������������������������������������������������������������������������������������� ����� ����� ���������������������������������������������������������������������������������������������������������������������������������������������� ������������������������������ ����������� � ���������������������������������������������������������������������������������������������������������������������������������������������������������������������������� ��������������������������������������������������������������������������������������������������������������������������������������������������������������������������������������� ���� �������������������������������������������������������������������������������������������������������������������������������������������������������������������������������������������� ����������������������������������������������������������������������������������������������������������������������������������������������������������������������������������������� ��� ������ � �������������������������������������������������������������������������������������������������������������������������������������������������������������������������������� ��������������������������������������������������������������������������������������������������������������������������������������������������������������������������������������� ����� ������������������������������������������������������������������������������������������������������������������������������������������������������������������������������������� ���������������������������������������������������������������������������������������������������������������������������������������������������������������������� ������������ �������������������������������������������������������������������������������������������������������������������������������������������������������������������������������� ����� ������ ���� � �� � G0623X/G0623X3 10" Sliding Table Saw... - Page 6 ���������� � ����������������������������������������������������������������������������������������������������������������������������������������������������������� ��������� ��������������������������������������������������������������������������������������������������������������������������������������������������������� ����� ��������������� ������������������������������������������������������������������������������������������������������������������������������������������������������������������������������ ������ ��������� � �������������������������������������������������������������������������������������������������������������������������������������������������������������������������� ������ ������������������������������������������������������������������������������������������������������������������������������������������������������������������������� ������������������������������������������������������������������������������������������������������������������������������������������������������������������������������ � � ����� � ��������� ������������������ � ����������� � � ����������������� ����������������������������� ����������������������� �������������������������� ����� ������ ���� � �� � G0623X/G0623X3 10" Sliding Table Saw...
- Page 7 ����� ������ ��� ������� ����� ��� ������� ��� ��� ������������� ��������� ������� ������� ��� ������� ������� ������������� ������������� ���������� ���������� ������� ��� ��� ��������� ��� ������� �������������������� ������������� ������� ��� ������� ��� ������� ��� ������������� ������������� ������������������������������ �������������������� G0623X/G0623X3 10" Sliding Table Saw...
-
Page 8: G0623X3 Data Sheet
������������������������������� � ������������������������������������������������������������������������������������������������������������������������������� ������ ������������������������������� � ����������������������������������� ��������������������������������������������������������������� ����� �������������������������������������������������������������������������������������������������������������������������������������������������������������������������������������� ����������� � ��������������������������������������������������������������������������������������������������������������������������������������������������������������������������� ������������������������������������������������������������������������������������������������������������������������������������������������������������������������������ ��������� �������������������������������������������������������������������������������������������������������������������������������������������������������������������������������������� ���� �������������������������������������������������������������������������������������������������������������������������������������������������������������������������������������� ����� ��������������������������������������������������������������������������������������������������������������������������������������������������� ����������������������� ������ � �������������������������������������������������������������������������������������������������������������������������������������������������������������������������������� ��������������������������������������������������������������������������������������������������������������������������������������������������������������������������������������� ����� ������������������������������������������������������������������������������������������������������������������������������������������������������������������������������������� ���������������������������������������������������������������������������������������������������������������������������������������������������������������������� ������������ �������������������������������������������������������������������������������������������������������������������������������������������������������������������������������� ����� ������� ���� � �� � G0623X/G0623X3 10" Sliding Table Saw... - Page 9 ���������� � ����������������������������������������������������������������������������������������������������������������������������������������������������������� ��������� ��������������������������������������������������������������������������������������������������������������������������������������������������������� ����� ��������������� ������������������������������������������������������������������������������������������������������������������������������������������������������������������������������ ������ ��������� � �������������������������������������������������������������������������������������������������������������������������������������������������������������������������� ������ ����������������������������������������������������������������������������������������������������������������������� ������������������������������������ ������������������������������� � ��������������������������������������������������������������������������������������������������������������������������������� � � ����� � ��������� ������������������ � ����������� � � ����������������� ����������������������������� ����������������������� �������������������������� ����� ������� ���� � �� � G0623X/G0623X3 10" Sliding Table Saw...
- Page 10 ����� ������� ��� ������� ����� ��� ������� ��� ��� ������������� ��������� ������� ������� ��� ������� ������� ������������� ������������� ���������� ���������� ������� ��� ��� ��������� ��� ������� �������������������� ������������� ������� ��� ������� ��� ������� ��� ������������� ������������� ������������������������������ �������������������� G0623X/G0623X3 10" Sliding Table Saw...
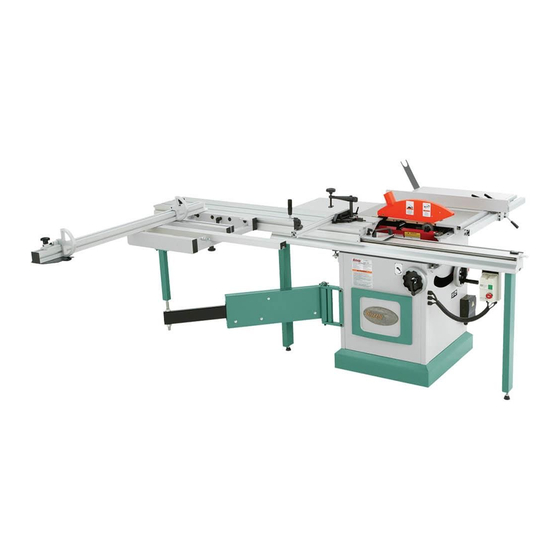
- Page 11 Figure 1. Main view of machine features and controls. G0623X/G0623X3 10" Sliding Table Saw...
-
Page 12: Section 1: Safety
����� ������� ���������� ������������ ���� ������������������������������������� ������������������� �� ����� ������� ��������� ���� �� ������ ���� � ����� �������� ����� �� ����� ��� ��������� �� ���������� ���� ��������� ����� �� �������� ������������������ ��������� ���� �������� ������ ������������������������������������ ������������������������������������������� ����������������������������������� -10- G0623X/G0623X3 10" Sliding Table Saw... - Page 13 ��� ���� ������������ �������� ��� ������� ���� ����������������������������������������� ������������������������������������������� �������������������������������������������� ���� ����� ��� ����� ���� ���� �������� ��� ���� ������������������������������������� �������������������������������������������� ��� ���� ���� ������ ��� �� ����� ������������������ ��� ���� ��������� ������ ����� ���������� -11- G0623X/G0623X3 10" Sliding Table Saw...
-
Page 14: Additional Safety For Table Saws
If normal safety precautions Failure to do so could result in serious per- are overlooked or ignored, serious personal sonal injury, damage to equipment, or poor injury may occur. work results. -12- G0623X/G0623X3 10" Sliding Table Saw... -
Page 15: Preventing Kickback
• Use featherboards or anti-kickback devices to prevent or slow down kickback. -13- G0623X/G0623X3 10" Sliding Table Saw... -
Page 16: Glossary Of Terms
The following is a list of common definitions, terms and phrases used throughout this manual as they relate to this table saw and woodworking in general. Become familiar with these terms for assembling, adjusting or operating this machine. Your safety is VERY important to us at Grizzly! Arbor: Metal shaft extending from the drive Non-Through Cut: A sawing operation that mechanism, to which saw blade is mounted. -
Page 17: Section 2: Circuit Requirements
The grounding Amperage Draw wire in the power cord must be properly connected The Model G0623X motor draws the following to the grounding prong on the plug; likewise, the amps under maximum load: outlet must be properly installed and grounded. -
Page 18: G0623X3 220/440V Operation
Minimum Circuit Size (220V) ....30 Amps Minimum Circuit Size (440V) ....15 Amps -16- G0623X/G0623X3 10" Sliding Table Saw... -
Page 19: Converting Model G0623X3 To 440V
Refer to the for 440V operation. A 440V magnetic switch can wiring diagram on Page 58 if you need help be purchased from Grizzly by calling 1-800-523- remembering where the wires are attached. 4777. Refer to the parts breakdown in the back... -
Page 20: Section 3: Setup
SECTION 3: SETUP Setup Safety Unpacking The Model G0623X/G0623X3 was carefully packed when it left our warehouse. If you discov- er the machine is damaged after you have signed This machine presents for delivery, please immediately call Customer serious injury hazards Service at (570) 546-9663 for advice. -
Page 21: Inventory
G. Crosscut Table ........... 1 H. Crosscut Table Support Leg ...... 1 Flip Stops ........... 2 Lock Lever M12-1.75 x 55 ......1 K. Flat Washer 12mm ........1 L. T-Nut M12-1.75 ........... 1 Figure 8. Miscellaneous components. -19- G0623X/G0623X3 10" Sliding Table Saw... - Page 22 —Special Washer 8 x 20mm ..... 1 —Square Nut M8-1.25 ........ 1 AN. Push Handle M12-1.75 x 14 ......1 —Flat Washer 12mm ........1 —Plastic Washer 12mm ......1 —Push Handle T-Nut M12-1.75 ....1 -20- G0623X/G0623X3 10" Sliding Table Saw...
-
Page 23: Hardware Recognition Chart
Hardware Recognition Chart -21- G0623X/G0623X3 10" Sliding Table Saw... -
Page 24: Clean Up
Refer to the Machine Data Sheet for the weight this protective coating with a solvent cleaner or and footprint specifications of your machine. citrus-based degreaser such as Grizzly’s G7895 Some floors may require additional reinforcement Citrus Degreaser. To clean thoroughly, some parts to support both the machine and operator. -
Page 25: Moving & Placing Table Saw Cabinet
Note: There are three options for leveling the saw: 1) Place it on a mobile base (Grizzly Model G7315) and use the mobile base con- trols to level it, 2) shim under the cabinet, and... -
Page 26: Assembly & Setup
Figure 18. Large extension table installed. Figure 16. T-stud inserted in mounting bracket. Thread four M8-1.25 x 25 set screws with hex nuts where shown in Figure 18, to act as leveling set screws in a later step. -24- G0623X/G0623X3 10" Sliding Table Saw... - Page 27 Spacing ����� ������� ����������� ����� �������� ����������� Figure 22. Fence base installed; spacing Figure 20. Mounting rip fence scale. between fence base and scale bar. -25- G0623X/G0623X3 10" Sliding Table Saw...
- Page 28 6mm flat washers. secure the fence in position. Attachment Rip Fence Location T-Bar Support Leg Extension Lock Levers Figure 26. Support leg installed. Figure 24. Rip fence installed on fence base. -26- G0623X/G0623X3 10" Sliding Table Saw...
- Page 29 (Figure 28), and install the fence on the table. 21. Thread the M8-1.25 knob with an 8mm flat washer onto the bottom of the T-bolt from the underside of the table. -27- G0623X/G0623X3 10" Sliding Table Saw...
- Page 30 (see Figure 34). premounted hardware. Figure 31. Sliding table shipping brace. 25. Attach the sliding table handle, as shown in Figure 33, with two button head screws and flat washers, using the premounted hard- ware. -28- G0623X/G0623X3 10" Sliding Table Saw...
- Page 31 35. Adjust the riving knife approximately ⁄ " away from the main blade, using a ⁄ " or 3mm hex wrench as a guide (Figure 40). Figure 37. Installing main blade. Figure 40. Adjusting the riving knife spacing. -29- G0623X/G0623X3 10" Sliding Table Saw...
- Page 32 38. Assemble miter gauge and push handle as shown in Figure 43. Scoring Blade Miter Gauge Push Handle Alignment Figure 41. Access holes for scoring blade adjustment controls. Figure 43. Push handle and miter gauge installed. -30- G0623X/G0623X3 10" Sliding Table Saw...
-
Page 33: Dust Hose Support
Explaining Figure 47. Dust hose support in use. how to calculate these variables is beyond the scope of this manual. Consult an expert or pur- chase a good dust collection "how-to" book. -31- G0623X/G0623X3 10" Sliding Table Saw... -
Page 34: Power Connection
Tech Support at (570) 546-9663. DO NOT place a machine into regular opera- tion if you suspect that it is malfunctioning, or serious injury could occur. G0623X3 Ground Figure 49. Main terminal boxes. -32- G0623X/G0623X3 10" Sliding Table Saw... - Page 35 —If the saw DOES start when the STOP but- ton is pushed in, then the safety feature on the STOP button is not working cor- rectly. Call Tech Support for advice before proceeding any further with the test run or machine operations. -33- G0623X/G0623X3 10" Sliding Table Saw...
-
Page 36: Section 4: Operations
Regardless of the con- the rip fence is then used to guide the workpiece tent in this section, Grizzly Industrial will through the cut. not be held liable for accidents caused by lack of training. -
Page 37: Safety Tips
On the contrary, a workpiece supported on the bowed side will rock during a cut and could cause kickback or severe injury. -35- G0623X/G0623X3 10" Sliding Table Saw... -
Page 38: Through Cuts
Safety precautions and instructions for each type of cut are located on the following pages: • Rip Cuts: Page 40 • Cross Cuts: Page 42 • Miter Cuts: Page 44 -36- G0623X/G0623X3 10" Sliding Table Saw... -
Page 39: Changing Main Blade
Figure 51, then rotate the blade by hand until the arbor lock tool seats. Move the orange blade guard back into its original position, next to the blades, and cen- ter the sliding table. -37- G0623X/G0623X3 10" Sliding Table Saw... -
Page 40: Riving Knife Adjustment
Tighten the center bolt to secure the riving in Figure 53. knife in position. Re-install the upper blade guard, close the blade guard, and move the sliding table back to center. Figure 53. Re-adjusting the riving knife. -38- G0623X/G0623X3 10" Sliding Table Saw... -
Page 41: Adjusting And Replacing Scoring Blade
There MUST be match the kerfs. an arbor flange on both sides of the blade. -39- G0623X/G0623X3 10" Sliding Table Saw... -
Page 42: Rip Cutting
Figure 58. Traditional rip cutting. Load the workpiece onto the table saw. The set up should look similar to Figure 57. Take all the necessary safety precautions, then perform the cutting operation. -40- G0623X/G0623X3 10" Sliding Table Saw... - Page 43 (see Figure 60). Note: The table will only lock in place when it is centered with the saw cabinet. Figure 62. Rip fence even with center of blade (blade guard removed for clarity). -41- G0623X/G0623X3 10" Sliding Table Saw...
-
Page 44: Crosscutting
Additionally, this machine has the capability of crosscutting workpieces while using the rip fence as a cut-off gauge (Figure 66). The Model G0623X/G0623X3 can crosscut full size panels with the fence in the forward or rear position, although it is easier to load full size pan- els with the crosscut fence mounted in the forward position (see Figure 64). - Page 45 Squaring Crosscut Fence to Blade on Page 55 if necessary. Set either flip stop to the desired width-of- cut. Note: Extend the crosscut fence slide if the workpiece is more than 74". -43- G0623X/G0623X3 10" Sliding Table Saw...
-
Page 46: Miter Cutting
Figure 70 for 0˚ to 90˚ cuts. Figure 70. Example of miter cutting operation. Once all the necessary safety precautions have been taken, perform the cutting opera- tion. Figure 69. Fence set-up for 90˚ to 135˚ cuts. -44- G0623X/G0623X3 10" Sliding Table Saw... -
Page 47: Section 5: Accessories
If you work around dust every- day, a half-mask respirator can greatly reduce your risk. Compatible with safety glasses! Figure 72. Half-mask respirator with disposable Figure 74. H4935 Scoring Blade Set. cartridge filters. -45- G0623X/G0623X3 10" Sliding Table Saw... - Page 48 Features 39 ⁄ " x ⁄ " table, 39 ⁄ " maximum table height, 8" fixed and swivel casters with brakes. Figure 76. Model H7544 Material Cart. Figure 78. Model H8003 Hydraulic Lifting Table. -46- G0623X/G0623X3 10" Sliding Table Saw...
-
Page 49: Section 6: Maintenance
SECTION 6: MAINTENANCE Cleaning Always disconnect power to the machine before Cleaning the Model G0623X/G0623X3 is relative- performing maintenance. ly easy. Vacuum excess wood chips and sawdust Failure to do this may from the table saw and inside the cabinet. Wipe result in serious person- off the remaining dust with a dry cloth. -
Page 50: Lubrication
Tilt the blade back-and-forth to distrib- Sliding Table Way Steel Rod ute the grease evenly. Figure 79. Sliding table ways. Blade Tilt Trunnions Blade Height Trunnion (Grease Behind This Plate) Leadscrews Figure 80. Lubrication locations (table removed for clarity). -48- G0623X/G0623X3 10" Sliding Table Saw... -
Page 51: Section 7: Service
5. Motor bearings are at fault. 5. Test by rotating shaft; rotational grinding/loose shaft requires bearing replacement. 6. Start delay module is at fault. 6. Adjust to correct delay; replace module. 7. Motor is at fault. 7. Test/repair/replace. -49- G0623X/G0623X3 10" Sliding Table Saw... - Page 52 1. Remove shipping braces. ments will not turn or are difficult 2. Lock knob is tight. 2. Release the lock knob. to turn. 3. Gears caked with dust. 3. Clean out dust and grease the gears. -50- G0623X/G0623X3 10" Sliding Table Saw...
-
Page 53: Belt Replacement
Replace the motor cabinet door. The belts should be tight enough that they only deflect approximately ⁄ " when pushed in the center with your thumb or index finger. Replace the motor cabinet door. -51- G0623X/G0623X3 10" Sliding Table Saw... -
Page 54: Blade Tilt Calibration
0°. —If the blade tilt pointer shows an incorrect tilt, adjust it by loosening the cap screws, rotating the pointer until it points to 0°, then tightening the cap screws. -52- G0623X/G0623X3 10" Sliding Table Saw... -
Page 55: Sliding Table Parallel Adjustment
If the sliding table will not move far enough to become parallel, the blade trunnions Rotate the blade 180° and slide the table with need to be shifted. Call Tech Support. the measuring device to position B. -53- G0623X/G0623X3 10" Sliding Table Saw... -
Page 56: Sliding Table Adjustment
Ultimately, the table must move eas- ily without any slop. Adjustment Bolt Figure 88. Adjustment bolt access location. -54- G0623X/G0623X3 10" Sliding Table Saw... -
Page 57: Squaring Crosscut Fence To Blade
Proceed to Steps 5–8. — If both measurements are within ⁄ " then no adjustments need to be made. You are finished with this procedure. Figure 89. Fence adjustment test piece. -55- G0623X/G0623X3 10" Sliding Table Saw... -
Page 58: G0623X Wiring Diagram
�� ����������� �� �� �� �� ������������ �� ����� ��������� ������ ������ ������ ��� ��������� � � � � ����� ������ ��������������������������� ��� ����� � � ������ ���������� ��� ��� � ��� ��� ��������������������������� -56- G0623X/G0623X3 10" Sliding Table Saw... - Page 59 �� ����������� �� �� �� �� ������������ �� ����� ��������� ������ ������ ������ ��� ��������� � � � � ����� ������ ��������������������������� ��� ����� � � ������ ���������� ��� ��� � ��� ��� ��������������������������� -57- G0623X/G0623X3 10" Sliding Table Saw...
-
Page 60: G0623X3 7.5 Hp 220V Wiring Diagram
������������ �� ����������� ������������ ���������������� � �� � �� � �� ������ ��� � � � � � � � ��� ��� ��� � � � � � � ������� ��� ����� ���������� ��� -58- G0623X/G0623X3 10" Sliding Table Saw... -
Page 61: G0623X3 7.5 Hp 440V Wiring Diagram
�� ������������ �� ������������ ����������������� ���������������� � � � � � � � � � � � � � ��� ��� � �� � �� � �� ��� ��� ������ ������� ����� ���������� ��� -59- G0623X/G0623X3 10" Sliding Table Saw... -
Page 62: Section 8: Parts
SET SCREW M10-1.5 X 30 PN01M HEX NUT M6-1 P0623X0015 DUST PORT 4" PSB11M CAP SCREW M8-1.25 X 16 PLW03M LOCK WASHER 6MM PW01M FLAT WASHER 8MM PS11M PHLP HD SCR M6-1 X 16 P0623X0034 WIRE CONNECTOR -60- G0623X/G0623X3 10" Sliding Table Saw... -
Page 63: Main Trunnion
PHLP HD SCR M5-.8 X 25 P0623X0108 STOP BRACKET PLN02M LOCK NUT M5-.8 P0623X0109 LIMIT SWITCH AZZ7100 PLW01M LOCK WASHER 5MM PS18M PHLP HD SCR M4-.7 X 25 P0623X0122 KEEPER PLATE PSB50M CAP SCREW M5-.8 X 10 P0623X0123 CORD -61- G0623X/G0623X3 10" Sliding Table Saw... -
Page 64: Main Motor
��� ��� ��� ��� ��� ��� ��� ��� ��� ��� ��� ��� ��� ��� ��� ��� ��� ��� ��� ��� ��� ��� ��� ��� ��� ��� ��� ��� ��� ��� ��� ��� ��� ��� -62- G0623X/G0623X3 10" Sliding Table Saw... -
Page 65: Pw06M Flat Washer 12Mm
MOTOR 5HP 220V/440V 3-PH 228A P0623X30228A MOTOR 7.5HP 220V/440V 3-PH 228-1 P0623X30228-1 MOTOR FAN COVER 228-1A P0623X30228-1A MOTOR FAN COVER 228-2 P0623X30228-2 MOTOR FAN 228-2A P0623X30228-2A MOTOR FAN 228-3 P0623X30228-3 JUNCTION BOX 228-3A P0623X30228-3A JUNCTION BOX -63- G0623X/G0623X3 10" Sliding Table Saw... -
Page 66: Sliding Table
��� ��� ��� ���� ������ ������� ������� ������� ������� � �� ����� ��� ����� ���� ������ ���� ������ ���� ������ ���� ������ ����� ������ ����� ������ ����� ������ ����� ������ ����� ������ ����� ������ -64- G0623X/G0623X3 10" Sliding Table Saw... -
Page 67: Pn09M Hex Nut M12-1.75
329-1A P0623X30329-1A SWITCH BOX 346-1A P0623X30346-1A SWITCH BOX 329-2A P0623X30329-2A CONTACTOR SDE MA-18 220V 346-2A P0623X30346-2A CONTACTOR SDE MA-18 440V 329-3A P0623X30329-3A RELAY SDE RA-30 18-26 23A 346-3A P0623X30346-3A RELAY SDE RA-20 12-18 12A -65- G0623X/G0623X3 10" Sliding Table Saw... -
Page 68: Tables
PLW06M LOCK WASHER 10MM PSB31M CAP SCREW M8-1.25 X 25 PW04M FLAT WASHER 10MM PB83M HEX BOLT M6-1 X 16 PSB64M CAP SCREW M10-1.5 X 25 PW03M FLAT WASHER 6MM PLN02M LOCK NUT M5-.8 -66- G0623X/G0623X3 10" Sliding Table Saw... -
Page 69: Rip Fence
FENCE LOCK HANDLE PSB14M CAP SCREW M8-1.25 X 20 P0623X0509 SLEEVE P0623X0520 FLAT HD SCR M6-1 X 12 P0623X0510 SPRING PRESSURE PLATE P0623X0521 WAVY WASHER 12MM P0623X0511 COVER PLATE P0623X0522 HDPE STRIP 50 X 5MM -67- G0623X/G0623X3 10" Sliding Table Saw... -
Page 70: Handwheels
SET SCREW M6-1 X 6 PW01M FLAT WASHER 8MM PN13M HEX NUT M16-2 P0623X0619 STRUT BOARD P0623X0641 DISC WASHER 10 X 20 PSB05M CAP SCREW M8-1.25 X 50 P0623X0642 BUSHING PLW04M LOCK WASHER 8MM P0623X0643 HANDLE EXTENSION -68- G0623X/G0623X3 10" Sliding Table Saw... -
Page 71: Scoring Trunnion
SCORING PULLY 60HZ P0623X0719 HEX NUT PSS02M SET SCREW M6-1 X 6 PW04M FLAT WASHER 10MM PSS02M SET SCREW M6-1 X 6 PSB02M CAP SCREW M6-1 X 20 P0623X0711 ADJUST SHAFT PN01M HEX NUT M6-1 -69- G0623X/G0623X3 10" Sliding Table Saw... -
Page 72: Crosscut Table
ADJUST HANDLE M12-1.75 X 55 P0623X0823 T-NUT M8-1.25 P0623X0811 T-NUT PSB13M CAP SCREW M8-1.25 X 30 PN03M HEX NUT M8-1.25 P0623X0825 FENDER WASHER 8MM PB126M HEX BOLT M8-1.25 X 40 PLN04M LOCK NUT M8-1.25 -70- G0623X/G0623X3 10" Sliding Table Saw... -
Page 73: Swing Arm
PN02M HEX NUT M10-1.5 P0623X0914 ROLLER P0623X0932 COVER P0623X0915 ADJUST SHAFT PB09M HEX BOLT M8-1.25 X 20 PR05M EXT RETAINING RING 15MM PW01M FLAT WASHER 8MM P6202 BALL BEARING 6202ZZ P0623X0935 MAGNET BASE ASSEMBLY -71- G0623X/G0623X3 10" Sliding Table Saw... -
Page 74: Miter Gauge
ADJUST HANDLE M6 X 30 1027 P0623X1027 SHAFT 1013 P0623X1013 LOCK SHAFT 1028 P0623X1028 SET SCREW M8-1.25 X 45 1014 P0623X1014 STOP PLATE 1029 PRP42M ROLL PIN 3 X 20 1015 PSN02M SQUARE NUT M6-1 -72- G0623X/G0623X3 10" Sliding Table Saw... -
Page 75: Crosscut Fence
TAP SCREW M4 X 10 1124 P0623X1124 KNOB SCREW M8-1.25 X 55 1112 PSBS03M BUTTON HD CAP SCR M8-1.25 X 16 1125 P0623X1125 FENDER WASHER 8MM 1113 PLW04M LOCK WASHER 8MM 1126 P0623X1126 T-BOLT M8-1.25 X 60 -73- G0623X/G0623X3 10" Sliding Table Saw... -
Page 76: Labels & Miscellaneous
MUST maintain the original location and readability of the labels on the machine. If any label is removed or becomes unreadable, REPLACE that label before using the machine again. Contact Grizzly at (800) 523-4777 or www.grizzly.com to order new labels. -74-... - Page 77 �������� ���� ���������������������������������������������������������������������������������� � ������������������������������������������������������������������������������������ ����� ����������������������� ������ � ������������������������ ���� ��������������������� ���������������������������� ������ ������������������������ ���������� � ���������������� ���������������������������� ������������������������������� ��������������������������� ��� ��������� ����������� �� ����� �� � ��������� ������ �� ���� �� ���� ��� ��������� �������� �� ���� �� ������� ������...
- Page 78 ���������������������� ����� ����� ���� ������� ����������� ���� ���� ��� ���� ����������� �� ���������� ���������������������� ����������������������������������� ����������������������������������� ������������������������������������� �������������������������������������� ��������������������������������������...
-
Page 79: Warranty And Returns
WARRANTY AND RETURNS �������� ��� ������� �������������������������������������������������������������������������� ������������������������������������ ����������������������������������������������������������������������������������������������������������� �������������������������������������������������������������������������������������������������������������� ������������������������������������������������������������������������������������������������������������� ������������������������������������������������������������������������������������������������������������� ���������������������������������������������������������������������������������������������������������� ������������������������������������������������������������������������������������������������������������� ������������������������������������������������������������������������������������������������������� ������������������������������������������������������������������������������������������������������������������ �������������������������������������������������������������� ���������������������������������������������������������������������������������������������������������� ������ ���� �� �������� ���������� ������ ����� ��� �������� ������� ��� ���� �������� ��� ����� ��� ���� ������� ��� ���� �������� ��� ����� ���� ������� ���� ����� ����� �������� ����� �������� ������ ��� ��������� ����� ���������� ���� �������������... - Page 80 ��� ������ ��� ���� ���� ������� � �������� ������ ��� � ����� ������ � ����� ��� ������� ����� ��� �������� ��� ������� �� ��� �������� ������� � � ������ �������� � ������ ������� ������ �� ����� � ������ �������� ������ ��� ���� ����...
Need help?
Do you have a question about the G0623X and is the answer not in the manual?
Questions and answers