Grizzly G1015 Instruction Manual
Knife belt sander/buffer
Hide thumbs
Also See for G1015:
- Parts list (5 pages) ,
- Owner's manual (40 pages) ,
- Owner's manual (40 pages)
Table of Contents
Advertisement
Quick Links
Download this manual
See also:
Owner's Manual
Advertisement
Table of Contents
Troubleshooting

Related Manuals for Grizzly G1015


Summary of Contents for Grizzly G1015
- Page 1 KNIFE BELT SANDER/BUFFER MODEL G1015 INSTRUCTION MANUAL COPYRIGHT © 1999 BY GRIZZLY INDUSTRIAL, INC. WARNING: NO PORTION OF THIS MANUAL MAY BE REPRODUCED IN ANY SHAPE OR FORM WITHOUT THE WRITTEN APPROVAL OF GRIZZLY INDUSTRIAL, INC. REVISED OCTOBER,1999. PRINTED IN U.S.A.
-
Page 2: Table Of Contents
BELT TRACKING ...16 OPERATIONS TEST RUN ...17 BELT SANDING ...17-18 BUFFING AND POLISHING...19 DRUM SANDING...20 ACCESSORY REMOVAL...20 MAINTENANCE GENERAL...21 LUBRICATION ...21 BELTS AND DRUMS ...21 CLOSURE ...22 TROUBLESHOOTING ...23-24 WARRANTY AND RETURNS...25 G1015 Knife Belt Sander/Buffer Table Of Contents PAGE... -
Page 3: Safety Instructions For Power Tools
DON’T FORCE TOOL. It will do the job better and safer at the rate for which it was designed. USE RIGHT TOOL. Don’t force tool or attachment to do a job for which it was not designed. G1015 Knife Belt Sander/Buffer VISITORS... - Page 4 12. SECURE WORK. Use clamps or a vise to hold work when practical. It’s safer than using your hand and frees both hands to operate tool. G1015 Knife Belt Sander/Buffer 13. DON’T OVERREACH. Keep proper foot- ing and balance at all times. 14. MAINTAIN TOOLS WITH CARE. Keep tools sharp and clean for best and safest performance.
-
Page 5: Additional Safety Instructions For Sanders
Like all power tools, there is danger associ- ated with the Model G1015 Knife Belt Sander/Buffer. Accidents are frequently caused by lack of familiarity or failure to pay attention. Use this tool with respect and caution to lessen the possibility of operator injury. -
Page 6: Circuit Requirements 110V Operation
Extension Cords If you find it necessary to use an extension cord with the Model G1015, make sure the cord is rated Hard Service (grade S) or better. Refer to the chart in Section 1: Safety Instructions to determine the minimum gauge for the extension cord at the distance you require. -
Page 7: Introduction Commentary
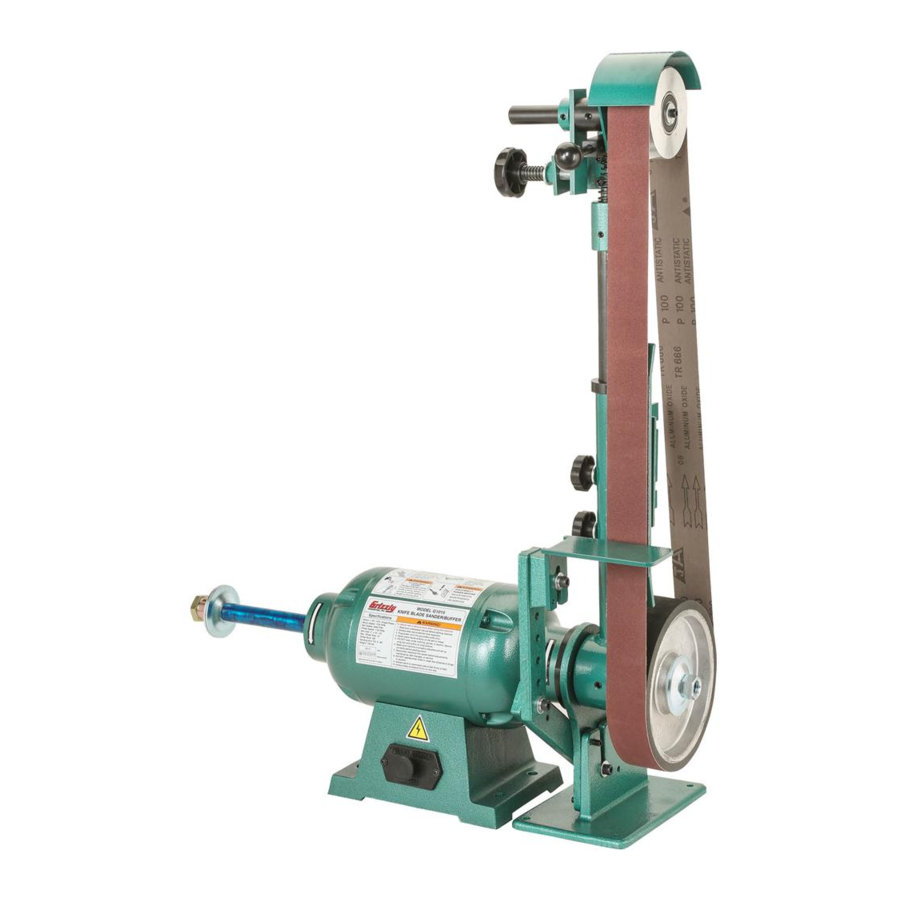
Grizzly’s com- mitment to customer satisfaction. The Model G1015 combines a 2" x 72" belt with a universal ⁄ " arbor which can accommodate a number of accessories including buffing wheels, drum sanders, or flap sanders (not included). -
Page 8: Unpacking
When you are completely satisfied with the con- dition of your shipment, you should inventory its parts. G1015 Knife Belt Sander/Buffer Parts Inventory Figure 2 displays all of the parts you should have after you unpack the boxes. You should have the following items: •... -
Page 9: Clean Up
Serious personal injury may occur. Site Consideration BENCH LOAD Your G1015 Knife Belt Sander/Buffer represents a relatively large weight load in a small footprint. Be sure that your workbench is adequately rein- forced to support the weight of the machine. -
Page 10: Assembly Mounting Base
SECTION 4: ASSEMBLY Mounting Base Before assembly can be completed, the Model G1015 motor base and belt sander base must both be mounted to a bench, or a wooden base, to provide the stability necessary for safe opera- tion. If you choose to create a wooden base for more portable operation, we recommend laminat- ing two 20"... -
Page 11: Motor
'' - 20 x arm bracket to the spacer. Mounting Bracket Figure 6. Bracket assembly attachment. Flat Edge cap screws which are already threaded ⁄ '' cap screws to attach the pivot Pivot Arm Bracket G1015 Knife Belt Sander/Buffer ⁄ " - 18... -
Page 12: Pivot Arm
Welded Bosses Figure 7. Pivot arm adjustment. G1015 Knife Belt Sander/Buffer cap screws The drive wheel propels the sanding belt. To secure the drive wheel to the motor shaft: 1. Slide a wheel flange, cupped side out, over 2. -
Page 13: Upper Arm Assembly
Do not attempt to turn on the machine until assembly and adjustments are completed. Turn off the power switch and ensure that the machine is unplugged. Failure to do so could result in serious operator injury. G1015 Knife Belt Sander/Buffer ® wrench. -
Page 14: Belt Installation
Belt Tensioning Knob Figure 11. Attaching sanding belt. G1015 Knife Belt Sander/Buffer The tool rest provides secure, angle-adjustable support for your workpiece while sanding. To install the tool rest: 1. Attach the tool rest bracket to the pivot arm 2. -
Page 15: Adjustments Belt Tension
SECTION 5: Adjustments Belt Tension The Model G1015 features a self-tensioning mechanism which automatically applies tension to the sanding belt. If you are using a different length belt than the one supplied (72'') you will need to adjust the distance between the two wheels. -
Page 16: Belt Tracking
Wheel Adjustment Belt Tension Tracking Knob Knob Figure 14. Upper arm tracking adjustments. G1015 Knife Belt Sander/Buffer Since the lower drive wheel positioning is fixed, tracking adjustment requires aligning the upper wheel: Loosen the two (2) setscrews and slide the... -
Page 17: Section 6: Operations
If the tracking is not correct, refer to the tracking adjustment guidelines in the Adjustments section. Never use the Model G1015 for applications other than those for which it was made. DO NOT overload the machine or use excess force when sanding. - Page 18 See Figure 18. Figure 18. Contour sanding, shoe removed. G1015 Knife Belt Sander/Buffer The sanding arm can also be tilted to a horizontal position if desired. See Figure 19. This can be more convenient for certain types of sanding or polishing operations.
-
Page 19: Buffing And Polishing
For buffing and polishing, Grizzly offers a broad selection of buffing wheels and polishing com- pounds that are very well suited for use with the Model G1015. Please refer to our current catalog. The auxiliary motor shaft arbor accepts buffing wheels with a '' bore. -
Page 20: Drum Sanding
Use a hand-operated pump only, and check the inflation pressure with a suitable gauge. G1015 Knife Belt Sander/Buffer Figure 23. Recommended sleeve overlap. Inflate the drum using a bicycle pump or hand pump. DO NOT over-inflate. The rec- ommended air pressure for the drum is 10 psi. -
Page 21: Section 7: Maintenance
(use a multi-purpose grease). -21- Belts and Drums The sanding belt supplied with your G1015 is a 100 grit aluminum oxide belt suitable for general purpose wood sanding. Other applications, such as metal sanding and polishing will require differ- ent types of belts, both in composition and in grit. -
Page 22: Section 8: Closure
Washington location using the address in Section 3: Introduction. The specifications, drawings, and photographs illustrated in this manual represent the Model G1015 as supplied when the manual was prepared. However, due to Grizzly’s policy of continuous improvement, changes may be made at any time with no obligation on the part of Grizzly. -
Page 23: Troubleshooting
Inspect connections on motor for loose or shorted terminals or worn insulation. Correct the low voltage conditions. Install correct fuses or circuit breakers. Reduce load on motor. Feed workpiece slower. G1015 Knife Belt Sander/Buffer... -
Page 24: Troubleshooting - Other
Belt breaking or tear- ing prematurely. Belt makes grinding noise when started. Pivot arm will not rotate to horizontal. G1015 Knife Belt Sander/Buffer CORRECTIVE ACTION Belt tension too tight. Belt rotation incorrect. Inferior quality belt. Belt rubbing against upper or lower hous- ings. -
Page 25: Warranty And Returns
WARRANTY AND RETURNS Grizzly Industrial, Inc. warrants every product it sells for a period of 1 year to the original purchaser from the date of purchase. This warranty does not apply to defects due directly or indirectly to misuse, abuse, negligence, accidents, repairs or alterations or lack of maintenance.
Need help?
Do you have a question about the G1015 and is the answer not in the manual?
Questions and answers