Table of Contents
Advertisement
Advertisement
Table of Contents

Related Manuals for Leica MojoMINI


Summary of Contents for Leica MojoMINI
-
Page 1: User Manual
Leica User Manual Version 2.0 English... - Page 2 The type and serial number of your product are indicated on the type plate. Enter the tion type and serial number in your manual and always refer to this information when you need to contact your agency or Leica Geosystems authorised service workshop. Type: _______________ Serial No.:...
- Page 3 Important paragraphs which must be adhered to in practice as they enable the product to be used in a technically correct and efficient manner. Information This product includes software licensed from Intrinsyc Software International, Inc. © 2004-2008. Leica mojoMINI, Introduction...
- Page 4 Leica mojoMINI, Introduction Trademarks • Windows is a registered trademark of Microsoft Corporation • Destinator is a registered trademark of Intrinsyc Software International, Inc. • Bluetooth is a registered trademark of Bluetooth SIG, Inc. • SD is a trademark of the SD Card Association...
-
Page 5: Table Of Contents
Connections 1.4.1 Inserting the SD Card 1.4.2 Connecting Earphones 1.4.3 Power Supply Precautions System Installation Before Installation Installing the GeoSpective Smart Antenna Installing the mojoMINI Using the Power Adaptor Connection to the GeoSpective Smart Antenna Leica mojoMINI, Table of Contents... -
Page 6: Leica Mojomini, Table Of Contents
Leica mojoMINI, Table of Contents Street Navigation Before Use First–Time Setup The Button Bar Changing the Settings Navigational Settings Travelling to an Address Travelling to a Specific Address Repeating a Journey Deleting Journey Data Route Information Favourite Journeys Searching for a Point of Interest Search by Point–of–Interest Categories... - Page 7 Setting A+ Heading Guidance Setting Fixed Contours Guidance Setting Pivot Guidance Recording Coverage Field Boundaries Continue Last Field 6.10 Nudging 6.11 Day/Night Settings 6.12 Calculator 6.13 Changing the Brightness Care and Transport Transport Storage Cleaning and Drying Leica mojoMINI, Table of Contents...
-
Page 8: Leica Mojomini, Table Of Contents
Leica mojoMINI, Table of Contents Safety Directions General Introduction Intended Use Limits of Use Responsibilities Hazards of Use Electromagnetic Compatibility EMC FCC Statement, Applicable in U.S. ICES-003 Statement, Applicable in Canada Labelling Technical Data GeoSpective Smart Antenna Performance GeoSpective Smart Antenna Specifications... -
Page 9: Getting Started
Mounting bracket and mounting b) USB cable for display cradle c) SD memory card g) GeoSpective smart antenna with d) Stylus power cable and mounting kit e) Car charger for display h) Product documentation Leica mojoMINI, Getting Started... -
Page 10: Mojomini Display
On–Off (Reset) switch e) Card slot Charge indicator g) Earphone jack h) USB–style charging port mojoMINI_002 Description Component Function LCD screen The mojoMINI is operated by touching images on the screen, either with a fingertip or with the stylus provided. - Page 11 Use this switch to reset the system. switch For storage ensure OFF position to prevent the internal battery from being drained. Ensure the switch is in ON position to operate the mojoMINI. USB–style To charge the battery, connect one end of the power adaptor charging port cable to this port, and the other end to the cigarette lighter.
-
Page 12: Geospective Smart Antenna
Leica mojoMINI, Getting Started GeoSpective Smart Antenna Components a) Power LED b) Position status LED c) Position type LED d) Power/Data port a b c mojoMINI_013 LED description Yellow Green Condition Power is not available. Power available but no satellites are tracking yet. -
Page 13: Connections
Connections Warning Before you connect the mojoMINI to any external device, switch off both the mojo- MINI and the external device. 1.4.1 Inserting the SD Card SD Card The SD card is inserted into the mojoMINI. mojoMINI_003 Leica mojoMINI, Getting Started... -
Page 14: Connecting Earphones
Leica mojoMINI, Getting Started 1.4.2 Connecting Earphones Earphones Earphones can be connected at the right side of the mojoMINI. Earphones are not deliv- ered by Leica Geosys- tems. mojoMINI_004 When an earphone jack is connected, the speaker is turned off. -
Page 15: Power Supply
The battery should be charged and used only when the temperature is in the specified range 0°C – 38°C (32°F – 100°F). • Do not block the flow of air around the mojoMINI: ventilation is important. • When the battery charge is low, a battery low symbol will appear on the screen, and the mojoMINI will eventually power off automatically. -
Page 16: Precautions
To reduce the risk of electric shock, do not open any covers. There are no user– serviceable parts inside. Refer all servicing to qualified personnel. • If the mojoMINI will not be used for a length of time, unplug any external power source. •... -
Page 17: System Installation
• Ensure that the power cables do not chafe or rub. Two major compo- • The two major components of the mojoMINI system are the mojoMINI display and nents the GeoSpective smart antenna. • The mojoMINI display by itself is sufficient for road navigation. For agricultural guidance, the GeoSpective smart antenna transmits information wirelessly to the mojoMINI display, using Bluetooth technology. -
Page 18: Installing The Geospective Smart Antenna
Leica mojoMINI, System Installation Installing the GeoSpective Smart Antenna Equipment The GeoSpective smart antenna is a high–performance GPS receiver, which is used in required conjunction with the mojoMINI. For installation and setup, you will need: • the GeoSpective smart antenna;... - Page 19 3. Use the GeoSpective cable to connect the port at the back of the smart antenna to a battery or other power supply. The connector fits one way only. 4. Turn on the power supply to the GeoSpective smart antenna. Leica mojoMINI, System Installation...
-
Page 20: Installing The Mojomini
1. Slide the mounting cradle onto the end of the mounting bracket. 2. Set the bottom edge of the mojoMINI unit onto the mounting cradle. 3. Push the top edge of the mojoMINI under the clip at the top of the mounting cradle. - Page 21 Warning Do not mount the mojoMINI where it may obscure the driver’s view of the road or field. Warning Do not mount the mojoMINI where it may be struck by a deploying airbag. Leica mojoMINI, System Installation...
-
Page 22: Using The Power Adaptor
Leica mojoMINI, System Installation Using the Power Adaptor Power adaptor The mojoMINI is supplied with a power adaptor, which supplies power and recharges the battery. 1. Connect the adaptor power plug into the USB–style power inlet on the bottom edge of the mojoMINI. -
Page 23: Connection To The Geospective Smart Antenna
Connection to the GeoSpective Smart Antenna Connection to the The GeoSpective smart antenna transmits information wirelessly to the mojoMINI, mojoMINI using Bluetooth technology. There are no wires between the two units. There is no configuration required. Leica mojoMINI, System Installation... -
Page 24: Street Navigation
GPS navigation devices use signals from satellites to determine their exact position, signal and display it on a map. Make sure that your mojoMINI has a clear view of the sky: mounting it on the windscreen will usually be sufficient. -
Page 25: First-Time Setup
Tap the Road icon, and the street navigation software will start. The mojoMINI will calculate its position. This may take a few minutes, depending on the number of satellites that are visible. - Page 26 Leica mojoMINI, Street Navigation 3. To select the language for voice prompts, tap the left or right arrows in the bottom row on the screen. The language displayed is the language that will be used in voice prompts. 4. To save the settings and return to the navigation screen, tap OK.
-
Page 27: The Button Bar
<- Button bar To reduce clutter, the button bar is usually invisible. To perform tasks, the button bar must be displayed. To display the button bar, tap the button in the bottom right–hand corner of the screen. Leica mojoMINI, Street Navigation... -
Page 28: Changing The Settings
Leica mojoMINI, Street Navigation Changing the Settings General procedure Settings may be changed at any time after initial setup. Tap the System button, and then tap one of the buttons that appear. On the settings screen, make the required changes. - Page 29 Tap the Help button to display a screen with the address of a website with answers tion to common questions: http://www.intrinsyc.com/destinator/support. Tap the About button to display a screen with information about Destinator version and copyright. Leica mojoMINI, Street Navigation...
-
Page 30: Navigational Settings
Leica mojoMINI, Navigational Settings Navigational Settings Convention An instruction in the form "Tap XX)YY" means: Tap the button labelled XX, and then tap the button labelled YY when it appears in a pop–up or new screen. Checking the signal To check the GPS signal data, tap NavSet)Signal. - Page 31 Tap NavSet)POI Icons, and then tap check boxes beside items in the list to select them for display. Quickest or You may specify that the journey calculated by the mojoMINI should be either the shortest route? quickest route or the shortest route.
- Page 32 Leica mojoMINI, Navigational Settings Roads to avoid If you wish to avoid motorways, tollways, ferries, or gated communities, carry out the following procedure: 1. Tap NavSet)Road Type, and then tap the right arrow at the top of the screen. The Road Type 2 of 2 screen appears.
-
Page 33: Travelling To An Address
Use the Up and Down buttons at the right of the list to scroll up and down. Tap on an item in the list to select it, and then tap OK. 4. Tap Go. Leica mojoMINI, Travelling to an Address... -
Page 34: Repeating A Journey
Leica mojoMINI, Travelling to an Address Repeating a Journey Have you been Details of recent journeys are retained in the mojoMINI memory, and those journeys there before? may be repeated. To repeat a previous journey, carry out the following procedure: 1. -
Page 35: Deleting Journey Data
Deleting Journey Data Deleting journey To delete journey data from the mojoMINI, carry out the following procedure: data 1. Tap Go)History. The Select Recent Location screen appears. 2. If necessary, use the Up and Down buttons at the right of the screen to scroll up and down. - Page 36 2. To avoid a turn, tap Avoid when the turn appears in the list. The mojoMINI will calculate a new route that avoids the specified turn. Lane information The Lane Information bar displays all turns, and the lanes from which they may be...
-
Page 37: Favourite Journeys
To move a Favourite into a group, carry out the following procedure: 1. Tap Go)Favourite)Edit)Edit Location. 2. Tap the left or right arrow to select a group, and then tap OK. The favourite location will now be found in the group. Leica mojoMINI, Travelling to an Address... - Page 38 Leica mojoMINI, Travelling to an Address Travelling to a To travel to a favourite address, carry out the following procedure: Favourite 1. Tap Go)Favourite, and then tap the destination in the Favourites list. 2. If the Favourite is inside a group, tap the group name and then tap the Favourite name.
-
Page 39: Searching For A Point Of Interest
Tap the Sort by ABC button for an alphabetical list. 4. To display a point of interest on a map, tap the name in the list and tap Show on Map. 5. To obtain a route to a point of interest, tap OK. Leica mojoMINI, Travelling to an Address... -
Page 40: Search By Point-Of-Interest Categories
Leica mojoMINI, Travelling to an Address Search by Point–of–Interest Categories POI categories Points of interest are classified by categories, for example Airports, Amusement Parks, ATMs, and sometimes by sub–categories where this is useful. To search for a point of interest by category, carry out the following procedure: 1. -
Page 41: Browsing For A Point Of Interest
4. Tap the bottom of the map to return to GPS mode. If you cannot find a point of interest that you know exists, it may not be included in the map supplied. Leica mojoMINI, Travelling to an Address... -
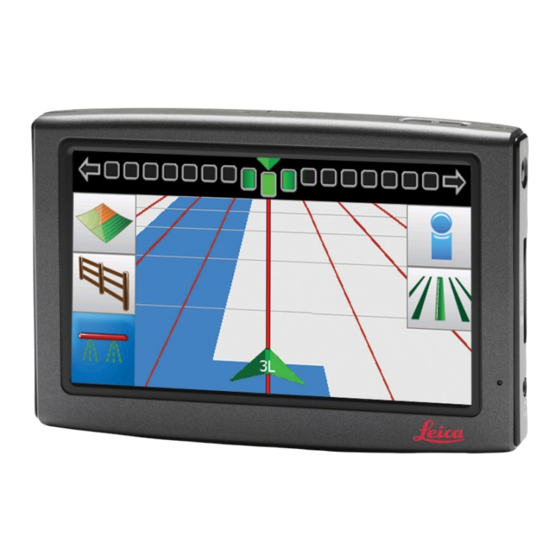
Page 42: Field Navigation
Return button, return to previous or displayed screen mojoMINI_012 Press to start a new field or to continue your last field with the previous wayline. Some features may not be available until the mojoMINI has a GPS position. -
Page 43: Starting A New Field
US units: either may be adjusted, and the other changes accord- ingly. 2. Tap on after setting each measurement. When you are finished tap on while both measurements are being displayed to continue to the next screen. Leica mojoMINI, Field Navigation... - Page 44 Leica mojoMINI, Field Navigation 3. Tap on the appropriate guidance type. a) AB Parallel guidance b) Fixed Contour guidance c) Information d) A+ Heading guidance e) Pivot guidance Navigation Screen: Go straight to the field view without setting guidance mojoMINI_014...
-
Page 45: Setting Ab Waylines
3. Drive to the position in the field where you want to set (waypoint A) and tap A on the screen. Treatment coverage can be turned on or off by tapping while setting the wayline. Leica mojoMINI, Field Navigation... - Page 46 Leica mojoMINI, Field Navigation 4. Drive to the desired endpoint (waypoint B) and tap B. The distance between points A and B must be at least 30 metres (100 feet). The greater the distance between the waypoints, the better the accuracy of the working line will be.
- Page 47 For example, if the marker is to the left of center, turn the steering wheel to the left. The row number indicator at the bottom of the screen shows the position of the tractor, and the number of rows left or right of the AB Parallel wayline. Leica mojoMINI, Field Navigation...
-
Page 48: Setting A+ Heading Guidance
Leica mojoMINI, Field Navigation Setting A+ Heading Guidance Setting an A+ wayline To set an A+ Heading wayline (starting point plus compass bearing), carry out the following proce- dure: 1. On the guidance screen, tap on the A+ Heading guidance icon 2. - Page 49 For example, if the marker is to the left of center, turn the steering wheel to the left. The row number indicator at the bottom of the screen shows the position of the tractor, and the number of rows left or right of the A+ Heading wayline. Leica mojoMINI, Field Navigation...
-
Page 50: Setting Fixed Contours Guidance
Leica mojoMINI, Field Navigation Setting Fixed Contours Guidance Setting a fixed contour To set a Fixed Contour wayline, carry out the following procedure: 1. On the guidance screen, tap on the Fixed Contour guidance icon 2. The first Fixed Contour guidance screen appears. - Page 51 If you are recording a contour that contains one or more straight–line sections joining curved sections, pause the recording at the beginning of each straight–line section and resume recording at the end of the straight line. The mojoMINI will calculate a straight line to fill the gap between the two points.
- Page 52 Leica mojoMINI, Field Navigation 5. Turn the tractor until the red line is vertical, and drive along the wayline. The navigation lightbar at the top of the screen indicates the direction to steer the vehicle. For example, if the marker is to the left of center, turn the steering wheel to the left.
-
Page 53: Setting Pivot Guidance
2. The first Pivot guidance screen appears. 3. Drive to the starting point of the circle in the field (waypoint A) and tap A on the screen. Treatment coverage can be turned on or off by tapping while setting the wayline. Leica mojoMINI, Field Navigation... - Page 54 Leica mojoMINI, Field Navigation 4. Drive part way around the circle to waypoint B, and tap B. 5. Drive further around the circle to waypoint C, and tap C. 6. Turn the tractor until the red line is vertical, and drive along the wayline.
-
Page 55: Recording Coverage
Recording Coverage Start and stop The mojoMINI can record and display the covered area (max. 300 ha / 740 ac). coverage recording Recording coverage is useful for showing where you have already been and how much ground you have covered. When used with the field boundary feature coverage recording can be used to calculate how much ground is still to be covered. - Page 56 Leica mojoMINI, Field Navigation 3. If you stop the vehicle while coverage is turned on it will again be paused. • When the vehicle is not moving coverage can be switched between off and paused by tapping • When the vehicle is moving coverage can be switched between off and on by...
-
Page 57: Field Boundaries
Left wing tip b) Center c) Right wing tip mojoMINI_015 3. Tap the button which is suits the current job you are doing. 4. Drive around the field boundary, the path will be recorded and displayed on screen. Leica mojoMINI, Field Navigation... - Page 58 Leica mojoMINI, Field Navigation 5. As you approach the start of the boundary the Close Boundary button will flash. You can choose to tap and the boundary will close by joining the current boundary recording point to the start of the boundary recording.
-
Page 59: Continue Last Field
Continuing a field If you stop work before completing a field you may want to come back and continue that field. This situation can also apply if you turned the mojoMINI off before completing the field. 1. On the initial field guidance screen tap 2. - Page 60 Leica mojoMINI, Field Navigation 3. You will then be taken to the main navigation screen where you can continue work. When continuing the last field it is possible that the wayline will not be in the same place. This can be fixed using nudge.
-
Page 61: Nudging
Misalignment can be seen when the vehicle is in the right place but waylines, coverage and boundary on the mojoMINI are not in the right place. 1. Position the vehicle on the wheel tracks of a previously completed pass. - Page 62 Leica mojoMINI, Field Navigation 4. The main navigation screen is displayed and the wayline is where the vehicle is.
-
Page 63: Day/Night Settings
2. The information screen appears. 3. Two options are available: • To change the brightness of the display, tap on the day or night icon, as required. • To use the calculator, tap on the calculator icon. Leica mojoMINI, Field Navigation... -
Page 64: Calculator
• The calculator is not available when the mojoMINI is in Street Navigation mode. • The gallon used in conversions is the US gallon, not the Imperial gallon (which is about 20% larger than the US gallon). -
Page 65: Changing The Brightness
1. On the opening screen, tap the tools icon at the bottom left of the screen. 2. Tap the right arrow to make the screen brighter, and tap the left arrow to make the screen dimmer. 3. To return to the opening screen, tap the return button. Leica mojoMINI, Field Navigation... -
Page 66: Care And Transport
Transport Shipping When transporting the product by rail, air or sea, always use the complete original Leica Geosystems packaging, transport container and cardboard box, or its equiva- lent, to protect against shock and vibration. Shipping, transport When transporting or shipping batteries, the person in charge of the product must... -
Page 67: Storage
Refer to "9 Technical Data" for information about temperature limits. For storage ensure the mojoMINI display reset switch is in the OFF position to prevent the internal battery from being drained. Li-Ion batteries •... -
Page 68: Cleaning And Drying
Leica mojoMINI, Care and Transport Cleaning and Drying Product and acces- Use only a clean, soft, lint-free cloth for cleaning. If necessary, moisten the cloth with sories water or pure alcohol. Do not use other liquids; these may attack the polymer compo- nents. -
Page 69: Safety Directions
The following directions should enable the person responsible for the product, and the person who actually uses the equipment, to anticipate and avoid opera- tional hazards. • The person responsible for the product must ensure that all users understand these directions and adhere to them. Leica mojoMINI, Safety Directions... -
Page 70: Intended Use
Leica mojoMINI, Safety Directions Intended Use Permitted use • Street navigation and field guidance. • Data communication with external appliances. • Measuring raw data and computing coordinates using satellite signals. Adverse use • Use of the product without instruction. •... -
Page 71: Limits Of Use
Danger Local safety authorities and safety experts must be contacted before working in hazardous areas, or in close proximity to electrical installations or similar situations by the person in charge of the product. Leica mojoMINI, Safety Directions... -
Page 72: Responsibilities
Manufacturers of The manufacturers of non Leica Geosystems accessories for the product are respon- sible for developing, implementing and communicating safety concepts for their Leica Geosystems... -
Page 73: Hazards Of Use
Warning If the product is used with accessories, for example masts, staffs, poles, you may increase the risk of being struck by lightning. Precautions: Do not use the product in a thunderstorm. Leica mojoMINI, Safety Directions... - Page 74 Always ensure that the working site is adequately secured. Adhere to the regulations governing safety and accident prevention and road traffic. Warning Only Leica Geosystems authorised service workshops are entitled to repair these products. Caution If the accessories used with the product are not properly secured and the product is subjected to mechanical shock, for example blows or falling, the product may be damaged or people may sustain injury.
- Page 75 The operator assures that the machine is operated, guided and monitored by a qual- ified user (e.g., a licensed driver). The user has to be able to take emergency meas- ures, for example an emergency stop. Leica mojoMINI, Safety Directions...
- Page 76 Leica mojoMINI, Safety Directions Warning Batteries not recommended by Leica Geosystems may be damaged if charged or discharged. They may burn and explode. Precautions: Only charge and discharge batteries recommended by Leica Geosystems. Warning Using a battery charger not recommended by Leica Geosystems can destroy the batteries.
- Page 77 If polymer parts are burnt, poisonous gases are produced, which may impair health. • If batteries are damaged or are heated strongly, they can explode and cause poisoning, burning, corrosion, environmental contamination, or all of these. Leica mojoMINI, Safety Directions...
- Page 78 Always prevent access to the product by unauthorised personnel. Product specific treatment and waste management information can be downloaded from the Leica Geosystems home page at http://www.leica-geosystems.com/treat- ment or obtained from your Leica Geosystems dealer.
-
Page 79: Electromagnetic Compatibility Emc
Warning Electromagnetic radiation can cause disturbances in other equipment. Although the product meets the strict regulations and standards that are in force in this respect, Leica Geosystems cannot completely exclude the possibility that other equipment may be disturbed. Caution There is a risk that disturbances may be caused in other equipment if the product is... - Page 80 Disturbances caused by electromagnetic radiation can result in erroneous measure- ments. Although the product meets the strict regulations and standards which are in force in this respect, Leica Geosystems cannot completely exclude the possibility that the product may be disturbed by very intense electromagnetic radiation produced by, for example, nearby radio transmitters, two–way radios, or diesel generators.
- Page 81 • Do not operate the product with radio or digital cellular phone devices near to medical equipment. • Do not operate the product with radio or digital cellular phone devices in aircraft. Leica mojoMINI, Safety Directions...
-
Page 82: Fcc Statement, Applicable In U
Connect the equipment into an outlet on a circuit different from that to which the receiver is connected. • Consult the dealer or an experienced radio/TV technician for help. Warning Changes or modifications not expressly approved by Leica Geosystems for compli- ance could void the user's authority to operate the equipment. -
Page 83: Ices-003 Statement, Applicable In Canada
ICES-003 Statement, Applicable in Canada Warning This Class (B) digital apparatus complies with Canadian ICES-003. Cet appareil numérique de la classe (B) est conforme à la norme NMB-003 du Canada. Leica mojoMINI, Safety Directions... -
Page 84: Labelling
Leica mojoMINI, Safety Directions Labelling Labelling mojoMINI mojoMINI_010 Labelling GeoSpec- tive smart antenna mojoMINI_009... -
Page 85: Technical Data
Maximum data rate Measurements 5 Hz Position 5 Hz Time to first fix 65 s Cold start 35 s Hot start Signal re–acquisition 0.5 s (typical) Time accuracy 20 ns RMS Velocity accuracy 0.03 m/s RMS Leica mojoMINI, Technical Data... - Page 86 Leica mojoMINI, Technical Data 1. Satellite Based Augmentation Systems (SBAS) include WAAS (North America), EG- NOS (Europe) and MSAS (Japan). 2. Typical values with Glide enabled. “Pass to pass” or time relative position error is the one dimensional horizontal (cross track) position error after 15 minutes or less after an initial convergence of at least 10 minutes.
-
Page 87: Geospective Smart Antenna Specifications
High= supply voltage -0.5 V minimum Low= 0.5 V minimum Load= 3K Ohm minimum via optional cable. 1. When tracking GPS satellites. Connector protec- Item Protection Standard tion Electrical conducted/coupled distur- ISO 7637:2002 (Survives all pulse types) bance tolerance Leica mojoMINI, Technical Data... - Page 88 Leica mojoMINI, Technical Data Size and weight Ø155.3 mm 66.8 mm Weight: 495 g maximum mojoMINI_008 Environmental Item Specification specifications Operating Temperature -40°C to +75°C Storage Temperature -55°C to +90°C Humidity Not to exceed 95% non-condensing Immersion MIL-STD-810F Method 512.4 Procedure 1 Vibration Random MIL-STD-810F Method 514.5 C17...
-
Page 89: Mojomini Specifications
1 Bluetooth module 1 x SD Card slot 1 x USB port, for power and charging only Input Voltage: Power Supply Power Consumption: < 8 W Size and weight 1 1 8 Weight: 180 g approx. mojoMINI_011 Leica mojoMINI, Technical Data... - Page 90 Leica mojoMINI, Technical Data Environmental Item Specification specifications Operating Temperature 0°C to +60°C Storage Temperature -40°C to +75°C Humidity Not to exceed 90% rarely condensing Vibration 5 Hz @ 25.4 mm 47 mins STD operating temp.
-
Page 91: Conformity To National Regulations
Conformity to national regula- • Hereby, Leica Geosystems AG, declares that the mojoMINI and the GeoSpective tions smart antenna are in compliance with the essential requirements and other rele- vant provisions of Directive 1999/5/EC. The declaration of conformity may be consulted at http://www.leica-geosystems.com/ce. -
Page 92: International Limited Warranty, Software Licence Agreement
Leica Geosystems. Such software is protected by copy- right and other laws and its use is defined and regulated by the Leica Geosystems Software Licence Agreement, which covers aspects such as, but not limited to, Scope of the Licence, Warranty, Intellectual Property Rights, Limitation of Liability, Exclusion of other Assurances, Governing Law and Place of Jurisdiction. - Page 93 You must not install or use the software unless you have read and accepted the terms and conditions of the Leica Geosystems Software Licence Agreement. Installa- tion or use of the software or any part thereof, is deemed to be an acceptance of all the terms and conditions of such licence agreement.
-
Page 94: Appendix A Troubleshooting
The mojoMINI is connected The mojoMINI has not Turn the mojoMINI on by to the power adaptor, and been used for a long time, pressing Reset. presssing the standby and the battery is button has no effect. - Page 95 Problem Possible Cause Possible Solution The mojoMINI cannot The view of the sky may be Place the mojoMINI so that receive GPS signals, or the obstructed by buildings or it has a clear view of the signals received are weak metal objects.
- Page 96 Leica mojoMINI, Troubleshooting Problem Possible Cause Possible Solution Can not get a Bluetooth There is an obstruction Mount the GeoSpective connection to the smart reducing the signal smart antenna at the front antenna. strenght. of the vehicle roof and mount the mojoMINI display high on the vehicle front glass.
- Page 97 Leica mojoMINI, Troubleshooting...
- Page 98 International Standards of Quality Management and Quality Systems (ISO standard 9001) and Environmental Management Systems (ISO standard 14001). Ask your local Leica Geosystems dealer for more information about our TQM program. Leica Geosystems AG Heinrich-Wild-Strasse...
Need help?
Do you have a question about the MojoMINI and is the answer not in the manual?
Questions and answers