Table of Contents
Advertisement
Quick Links
Download this manual
See also:
User Manual
Advertisement
Table of Contents

Related Manuals for Axis 200


Summary of Contents for Axis 200
- Page 1 AXIS 200+ and 240 User’s Guide AXIS 200+ and 240 Camera Server User’s Guide...
-
Page 2: Quick Installation Procedure
Refer to Appendix A - Hardware Inventory and check that the type of power supply is correct. 5. Acquire a valid and unused IP address for the camera server from your Network Administrator. 6. Assign the IP address using your preferred method, the AXIS IP Installer program or ARP: Easy - AXIS IP Installer Quick - ARP/ping 7.a Windows 95/98 &... -
Page 3: About This Document
For more detailed instructions, refer to the User’s Manuals for within this document, including, but not limited to, the implied the AXIS 200+ and 240 that are available in on-line format at the warranties of merchantability and fitness for a particular purpose. -
Page 4: Table Of Contents
Connecting an Auto Iris Lens to the AXIS 200+ ....... -
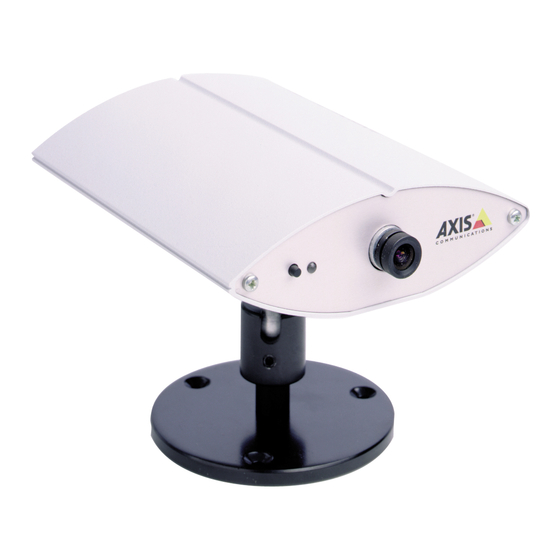
Page 5: Product Overview
AXIS 240 AXIS 200+ The AXIS 200+ is a self-contained network camera with interchangeable optics. The AXIS 240 is a small, high performance camera server that can service up to four PAL/NTSC video source and one S-video camera. Caution! The CCD (charged coupled device) within the AXIS 200+ can become permanently damaged if the camera lens is exposed to too much direct sunlight or halogen light! If this is the case use an Auto Iris Lens. -
Page 6: The Axis Online Cd
Refer to the readme.txt file for full path name details. HTML Interface You can access a Web browser interface to the contents of the AXIS Online CD by clicking the HTML button from within the main installation dialog. This interface allows Network Administrators to distribute the CD contents over the intranet by simply broadcasting a URL reference. -
Page 7: Installation Summary
S-video camera. It is possible to connect a Pan/Tilt device to the RS-232 Pan/Tilt port of the AXIS 240 for remote adjustment of the camera position. The AXIS 240 can control one Pan/Tilt device at a time, or several if they are daisy chained. -
Page 8: Connecting The Camera Server To Your Network
Network environments See ... AXIS IP Installer Windows 95/98 & Windows NT “Using the AXIS IP Installer” on page 8 Windows 95/98 & Windows NT “Using ARP in Windows 95/98 and Windows NT” on page 8 UNIX, OS/2 “Using ARP in UNIX and OS/2” on page 9... -
Page 9: Using The Axis Ip Installer
Using the AXIS IP Installer The AXIS IP Installer is a Windows 95/98 & NT program that sets the camera server IP address for you. It also allows you to access the camera server home page via a Web browser. The program is available on the AXIS Online CD and on the Axis Web Site at http://www.axis.com/... -
Page 10: Using Arp In Unix And Os/2
AXIS 200+ and 240 User’s Guide Verifying the Installation Important! Windows 95 only: When using the Windows 95 implementation of ARP , change the first line to: , where is the IP arp -s <camera IP address> <Ethernet address> <w95host IP address>... - Page 11 The AXIS Camera Control software is pre-requisite for automatic picture updating using Microsoft Internet Explorer, and must be installed on your client prior to enabling ActiveX. This software is available on the AXIS Online CD and via the Axis Website. See also, Automatic Picture Updating, on page 15.
-
Page 12: Adjusting The Focus
Adjusting the Focus AXIS 200+ Camera Server Your AXIS 200+ is delivered in approximate focus position, with focus set to infinity. The lens has rotational focus control. To fine adjust to close focus, carefully turn the smaller lens. If you cannot get a sharp picture, screw the smaller lens to its end and loosen the lock ring. Direct the camera towards a distant object and bring the camera into focus by turning the entire lens mount. -
Page 13: Configuring The Camera Server
Example http://192.16.253.80/ On the AXIS 200+ and 240 Home Pages, click on the Settings link to reach the Configuration pages. Log on as user root and use the default password pass. In the Configuration pages you can change all unit parameters, including the password. -
Page 14: Snapshots
For each snapshot taken, the camera server generates a JPEG file and stores it within its internal memory. Home Page Snapshots To produce a snapshot within the AXIS 200+ and 240 Home Pages, simply enter the name or IP address of the unit into the location/address field of your Web browser: Example http://192.16.253.80/... - Page 15 Using the Camera Server AXIS 200+ and 240 User’s Guide These image files are available within your AXIS 200+ and 240. File name Description fullsize.jpg The standard resolution. Hardware generated in about. 0.5 seconds. halfsize.jpg Excellent for thumbnails. Hardware generated in about 0.3 seconds.
-
Page 16: Automatic Picture Updating
SRC=”http://192.16.253.80/cgi-bin/fullsize.srvpushb" </BODY> </HTML> The frame rate depends on how fast the AXIS 200+ and 240 can deliver the snapshot data over the available network bandwidth. Therefore, you cannot adjust the frequency of the Server push snapshots within your Web browser. - Page 17 The Server push function is currently supported by Netscape Navigator only. However, installing the AXIS Camera Control software onto your client and using the ActiveX function provides the same functionality within Microsoft Internet Explorer on a Windows 95/98 or NT PC.
- Page 18 AXIS 200+ and 240 User’s Guide Using the Camera Server Example <HTML> <HEAD> <TITLE>Choose the right browser</TITLE> </HEAD> <BODY> <SCRIPT LANGUAGE=”JavaScript”> if (navigator.appName == “Microsoft Internet Explorer”) { document.write(“<OBJECT ID=Axis Camera CLASSID=CLSID:1773DB27-C4D2-11D1-87CE-00805FD85E14>”); document.write(“<PARAM NAME=CamAddress VALUE=192.16.253.80>”); document.write(“<PARAM NAME=AutoSize VALUE=0>”); document.write(“<BR>Download the <B> Axis ActiveX Camera Control</B><BR>from the <B>Server push page.
-
Page 19: Pan/Tilt Control
CamImg is a Java applet supplied with your Axis Camera Server. It is an easy-to-use Java applet that continuously loads live from Axis Camera Servers and enables Pan/Tilt control of connected cameras via the AXIS 240. Please refer to the User’s Manual for a full description of the available parameters. -
Page 20: External Web Sites
You can use the CRON script facility to collect snapshots periodically. CRON Scripts Embedded within your Axis camera server is a time/event based scripting language, CRON. This service allows you to program event and/or time triggered functions within the camera server. - Page 21 Using the Camera Server AXIS 200+ and 240 User’s Guide Comments It is good programming practice to start each new entry with a comment to describe its function. Comments are optional but must be proceeded by a character, as detailed below: # <comment>...
- Page 22 The sixth field is an optional Input and Boot field that defines the input and boot trigger functions. You can program the AXIS 200+ and 240 to trigger at startup or on the logical states present on the Control button and digital input ports, using the trigger variables boot, B, I1 respectively.
- Page 23 Using the Camera Server AXIS 200+ and 240 User’s Guide CRON Commands Several CRON script commands can be used within an entry. All commands must be terminated with a semi-colon “;”. This table lists the available commands: Command Description alert Sends a small message to a remote host.
- Page 24 In this example, this procedure is repeated every hour. # This is an example of an Axis extended CRON script: 0 0-23 1-31 1-12 0-6: ptz -preset 1;...
-
Page 25: Application Examples
Web browser. Just think... no more late trips to the factory to investigate problems! The only real limitation for the number of applications to which the AXIS 240 can be suited is your fantasy. -
Page 26: Appendix A - Hardware Inventory
AXIS 200+ and 240 User’s Guide Appendix A - Hardware Inventory Appendix A - Hardware Inventory Unpack and check all the items against the check list below. Contact your dealer if anything is missing or damaged. All packing material is recyclable. -
Page 27: Connectors And Indicators
The serial number is located on the underside label of the AXIS 200+. Please Serial Number - note that the serial number of your AXIS 200+ is identical to the Ethernet address of the unit. The Control button is used for multiple purposes, e.g. restoring the factory Control Button - default settings, triggering CRON scripts. - Page 28 Jack socket (PS-D) for connection of AXIS 240 power supply. Power Supply Connector - An alternative power connector is also provided. Note: The power supply supplied with your AXIS 240 is country specific. Please check that the type of power supply you are using is correct. See page 25.
- Page 29 CRON scripts. The serial number is located on the underside label of the AXIS 240. Please Serial Number - note that the serial number of your AXIS 240 is identical to the Ethernet address of the unit.
-
Page 30: Appendix B - Auto Iris
CS lens, typically used within the surveillance industry. Notes: A C-mount lens will also work with the AXIS 200+ Camera Server if used with an adaptor that effectively provides a spacer with two female 1-32 threads and moves a lens 5mm farther from the camera. -
Page 31: Level Adjustment
With the ALC screw head you adjust the photometry between peak and average. See the lens documentation for more information. Refer to the AXIS 200+ User’s Manual for further information on fitting an Auto Iris lens to the AXIS 200+. -
Page 32: Appendix C - Modem Installation
Using the Camera Server without a Network The RS-232 port of your Axis Camera Server can be used to communicate with the camera server, using an ordinary modem, an ISDN modem, a CDPD modem or a direct serial connection to a computer. - Page 33 2. Log on as root (default password is pass). 3. Click the Serial port/Modem button (AXIS 200+/AXIS 240) to go to the modem page and modify the baud rate so that it is compatible with your modem. The new port speed will take effect next time you restart your Axis Camera server.
- Page 34 Configuring the Dial-Up Adapter The following instructions describe how to set up a Microsoft Windows 95B PC for modem dial-up connection to an Axis Camera Server. Deviations from these instructions can be expected when using other operating systems. It is assumed that the TCP/IP, dial-up networking, modem and serial port configurations are correctly installed.
- Page 35 Appendix C -Modem Installation AXIS 200+ and 240 User’s Guide 6. Go to the Server Types tab and disable the NetBEUI and IPX/SPX Compatible checkbox. Click TCP/IP Settings... 7. Select Specify an IP address, and enter the IP address of your adapter.
- Page 36 AXIS 200+ and 240 User’s Guide Appendix C -Modem Installation 9. In My Connection dialog, go to the Scripting tab and disable the start terminal screen minimized checkbox. Click OK. 10. Go to the General tab. From the Connect using... dialog, click...
- Page 37 16. Press the continue button to close the terminal window. 17. Start your web browser. In the URL field enter the IP address of your Axis Camera Server (If your camera server still has the default IP address enter: http://192.36.253.80/).
-
Page 38: Setting The Ip Address Using A Null Modem Cable
AXIS 200+ and 240 User’s Guide Appendix C -Modem Installation Setting the IP Address Using a Null Modem Cable The IP address of the camera server can be changed directly via direct serial connection, using a Null Modem cable and an appropriate terminal program. The instructions provided below are relevant to Microsoft’s HyperTerminal. -
Page 39: Index
Index AXIS 200+ and 240 User’s Guide Index 10, 16 ActiveX Lens 29, 30 Application examples ALC adjustment 7, 8, 9 11, 29 C-mount 11, 29 Auto Iris CS-mount AXIS IP Installer DC-type 29, 30 AXIS Online CD LEVEL adjustment...
Need help?
Do you have a question about the 200 and is the answer not in the manual?
Questions and answers