
Subscribe to Our Youtube Channel
Related Manuals for BT IMAGE 2000


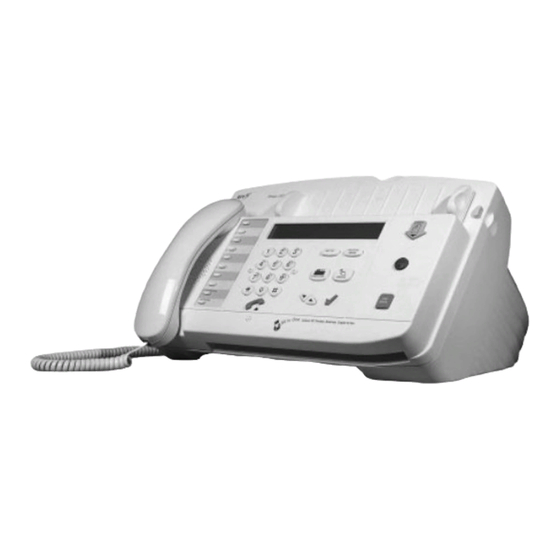
Summary of Contents for BT IMAGE 2000
- Page 1 Image 2000 multifunctional fax, copier, scanner, colour printer and telephone User guide...
- Page 2 Place of purchase: Serial number (on base of unit): Purchase price: (Proof of purchase is required for warranty purposes, so please keep your receipt) Please open this page for an ‘at a glance’ guide to your Image 2000 fax machine.
-
Page 3: At A Glance
At a glance At a glance Paper support Supports paper in the paper holder. Paper holder Document feeder Holds up to 100 sheets support of A4 (210 x 297mm) at Extend to support 75gsm. documents held in the Also takes envelopes up automatic document to A4 size. -
Page 4: Control Panels
REDIAL when entering a number. and fax numbers. button - for use with Moves the cursor through the RECALL switchboards and BT Select display. Shown as Services. throughout this guide. Activates the line monitor before Use to confirm settings. dialling phone or fax numbers. -
Page 5: Table Of Contents
One touch name and numbers Directory names and numbers Sending and receiving faxes Copying documents Additional features Connecting an answering machine to your Image 2000 Connecting to a PC for faxing, scanning and printing Connecting to a switchboard Help Technical specification... -
Page 6: Introduction
If you have a problem with the machine, do not try mains power cable with 13 amp plug attached • to repair it yourself. Call the BT Helpline on 0845 mono print cartridge (you can also use • 600 053. -
Page 7: Setting Up
Setting up Setting up follow these steps to get your Image 2000 up and running and ready to use 1 Connect the handset cord to 2 Plug the telephone line cord the handset and the base unit into the fax... -
Page 8: Sheet Feeder
7 Load paper into the automatic Power cable sheet feeder Your Image 2000 prints onto plain paper. It will hold up to 100 sheets of A4 75gsm paper Push the plug in firmly to ensure it is fully (210x297mm) inserted. -
Page 9: Installing The Print Cartridge
Release button dry than when using standard multi-purpose paper. It is recommended that only standard multi-purpose Open the front cover by pressing the two • paper is used for receiving faxes. release buttons either side of the Image 2000. - Page 10 Setting up When opened the white moulding can be Insert the print cartridge into holder. • • pulled forward to prop the front cover open. Moulding Push the print cartridge back until it clicks • into place. If it moves loosely in the carrier, Carefully remove the tape covering the print •...
- Page 11 Press the If you pause for more than one minute when • NAME. entering your ID, your Image 2000 will Use the keypad to enter the name you want automatically revert to standby and any changes • to appear on the fax heading. You can enter you have made will NOT be saved.
- Page 12 If If you pause for more than one minute when the other party does not respond, your Image entering your ID, your Image 2000 will 2000 will instruct the other fax machine to automatically revert to standby and any changes print out your call back number along with a you have made will NOT be saved.
-
Page 13: Setting The Date And Time
Press the button to confirm the change. • Your Image 2000 displays the date and time in the Display shows SET OFFICE TIME. following order: DayDay/MonthMonth/YearYear Press the button to return to standby. - Page 14 Press the button to confirm the • displayed option. Whatever mode you set for your Image 2000 during office hours, it will switch to this mode outside office hours. Press the button to return to standby. •...
-
Page 15: Setting The Receive Mode
When in TEL/FAX mode your Image TEL/FAX on your Image 2000 after 8 rings, as if it was in 2000 answers calls after one ring and checks AUTOFAX mode. You can send faxes from the for a fax signal. -
Page 16: Using The Telephone, Fax And Copier
If the handset is lifted or the button is pressed while a name or number is shown on the display, To end the call, replace the handset. your Image 2000 will dial the number after a short pause. Dialling without lifting the handset (on-hook dialling) button. -
Page 17: One Touch Name And Numbers
(See page : To edit one-touch names and number. numbers) When you set your Image 2000 to HIGH or LOW, You can enter a name of up to 20 characters. the machine gives two beeps. For example, to enter the name JOHN:... - Page 18 Using the telephone, fax and copier Sub addresses and passwords Press the button to confirm your • In addition to name, fax and phone numbers, entry. Display clears then shows ENTER you can also store a sub-address number and a FAX NO.
- Page 19 Using the telephone, fax and copier To edit one-touch names and numbers Special note Your Image 2000 can send faxes to mailboxes but it does not have its own internal mailboxes. SET UP STOP Press the button until the display •...
- Page 20 SET UP Press the buttons until the display • If you do not press any buttons for 60 seconds, your shows ONE-TOUCH SET UP Image 2000 automatically returns to standby. button. Display shows SELECT Press the • ONE-TOUCH KEY. Press the button you want.
- Page 21 • CALL DIVERSION Display shows #21# and confirms Call Diversion cancellation. You can programme your Image 2000 to divert Replace the handset. • incoming calls to another number. You can use Call Diversion to divert calls if there is no answer within 15 seconds,...
-
Page 22: Directory Names And Numbers
Using the telephone, fax and copier To use Call Return Directory names and numbers You can store up to 20 names, in alphabetical To hear who called you last, lift the handset • order, along with their associated fax and or press the button. - Page 23 If you want to go on to the next stage without entering a number, just press without entering Special note any digits. Your Image 2000 can send faxes to mailboxes but it does not have its own internal mailboxes. Enter the password number using the • keypad and press the button to confirm your entry.
- Page 24 To put a pause in the directory If a document has been inserted in the document feeder, your Image 2000 will automatically select stored fax numbers. If no document has been inserted, the telephone number will be selected.
- Page 25 • change the name. If you pause for more than one minute when entering your ID, your Image 2000 will automatically revert to standby and any changes you have made will NOT be saved. button. Display shows EDIT Press the •...
-
Page 26: Sending And Receiving Faxes
This will delete the name, fax number, faxes telephone number, subaddress number and password at the same time. Your Image 2000 lets you set its functions to suit the way you work. The most commonly STOP SET UP preferred settings are pre-selected as default. - Page 27 Using the telephone, fax and copier To load documents for faxing To send a fax Load up to 20 pages at a time, face down, into You have a choice of ways to dial a fax number. the automatic document feeder. The first page is automatically drawn a little way into the Normal dialling feeder.
- Page 28 Using the telephone, fax and copier Directory dialling To monitor a fax call Your Image 2000 can be set to allow you to START monitor the progress of a call. DIRECTORY Load the document When the line monitor is set to , you will •...
- Page 29 If the number you are calling is engaged or the This allows you to send a fax automatically at a connection not made, your Image 2000 will pre-set time. This can be useful if you want to automatically redial the number up to two send a fax abroad, so it coincides with the times.
- Page 30 Using the telephone, fax and copier To cancel a fax stored for sending later If you are not sure which file you want to All stored faxes can be deleted using the FILE delete, select FILE XXX DETAILS. TICK TO PRINT, MANAGEMENT menu.
- Page 31 ENTER PASSWORD. Enter a four digit password (or leave as • 0000 if you do not want to enter a private Your Image 2000 is pre-set to print faxes password) automatically, however this setting can be Press the button. Display shows •...
- Page 32 To stop faxes from being received into the Special note memory Your Image 2000 can send faxes to mailboxes at You need to know the current password in other machines but it does not have any mailboxes of order to switch the memory off.
- Page 33 Using the telephone, fax and copier To print a fax stored in the memory To delete a fax stored in the memory You can delete a fax without printing. SET UP SET UP STOP Press the button until the display •...
- Page 34 Display shows FAX TRANSFER ≈ ON and standby. ACCESS CODE ≈ XXXX and then changes to ENTER DESTINATION. If no code has been set the Image 2000 will go directly to standby. You can now enter the fax number you want •...
-
Page 35: Group Dialling
To store numbers under a group dial Group dialling memory If you regularly need to send a fax to a number of different destinations, your Image 2000 lets SET UP you store up to 50 destination numbers in each of three Group Dial memories. - Page 36 Using the telephone, fax and copier To add a number to a group dial memory To delete a number in the group memory SET UP SET UP STOP STOP Press the button until the display Press the button until the display •...
- Page 37 Press the button. Display shows • Using Broadcast, documents are first stored in GROUP 1. the Image 2000’s memory. You can program as Press the buttons to display the • many broadcasts as you want until all the group memory you want - 1, 2 or 3.
- Page 38 To store a document to be polled by another machine When you have added all the numbers you For this type of polling, your Image 2000 uses want in the broadcast, press the button a bulletin board. This allows you to store a again.
- Page 39 The document is scanned into the memory and the display shows BULLETIN FILE XXX before returning to standby. Your Image 2000 can hold only one document at a time on the . If a BULLETIN BOARD document has already been stored your Image 2000 asks you if you want to replace it, delete it or retain it.
- Page 40 To poll a document from another fax Turn around POLLING machine You can set your Image 2000 so that it will You can retrieve a document from another fax automatically poll any machine it sends to. machine in one of two ways. In both cases, the...
- Page 41 RECEIVE POLLING XXX (XXX is the file • Press the button to confirm. Display • number allocated by your Image 2000 for shows ENTER POLLING TIME. your reference), followed by GROUP ENTRIES. You can now enter the date and time you want...
- Page 42 Using the telephone, fax and copier To change the incoming fax size Setting the incoming fax size Your Image 2000 is pre-set to slightly reduce SET UP STOP incoming faxes to fit onto a smaller page area. Documents can also be received normal size.
- Page 43 Press the button until the display • SET UP shows PAPER SIZE SET UP. the Image 2000 clears its calls log memory and button. Display shows PAPER prepares to log the next 40 calls. Press the • SIZE A4 (or the current size).
- Page 44 Using the telephone, fax and copier To switch the automatic report on or off To manually print out an activity report This gives you a list of all the calls made and received since the calls log memory was last SET UP STOP cleared by the machine.
- Page 45 A confirmation report gives you an activity report on the last call only. SET UP STOP Your Image 2000 is pre-set to print a report Press the button until the display • SET UP automatically if a fax transmission or reception shows USER SET UP.
- Page 46 To print a list of the names and numbers report stored in your Image 2000’s one-touch If your Image 2000 is not set to print a memory and directory confirmation report after every fax transaction, you can request one as required. You can also...
-
Page 47: Copying Documents
Using the telephone, fax and copier To print a list of functions Copying documents Your Image 2000 can be used as a plain paper SET UP copier. Press the button until the display • SET UP shows PRINT OUTS + REPORTS. - Page 48 Replacement cartridges are available via the phone number displayed on your machine. Item code: 871089 To replace the print cartridge, see Help, p58. Remember to make sure there is enough paper in your Image 2000’s paper tray.
-
Page 49: Additional Features
PHOTO the resolution when you insert the document. Your For pages containing pictures, photographs or Image 2000 will ask you what resolution you want drawings which contain colours or varying during the set up procedure. shades of grey. - Page 50 Additional features To change the default resolution for faxes Contrast This changes the setting for all documents you You can choose different contrast settings to fax or copy. The pre-set resolution is NORMAL compensate for light or dark original documents which you want to fax or copy. SET UP STOP The available settings are:...
- Page 51 Additional features To change the default contrast setting Setting the print quality The pre-set setting for sending a fax is Your Image 2000 has two modes for print . This setting is suitable for most NORMAL quality: NORMAL HIGH QUALITY cases.
-
Page 52: Setting The Ring Response
This is the number of rings after which your 2000. Therefore, the number of rings set on Image 2000 will answer a call when set to the answer machine must be fewer than those AUTOFAX. The pre-set number of rings is 1. - Page 53 HANDSET to indicate that you should answer each with its own distinctive ring - on a single telephone line. the call by lifting the handset. Your Image 2000 is preset to ring for 20 seconds and after this Using this service you could have, for...
-
Page 54: Adjusting The Ringer Volume
Additional features To set the distinctive ring facility Adjusting the ringer volume You can adjust the volume of the tone ringer SET UP STOP to suit your environment. It has four settings, low, medium and high and off. The default Press the button until the display •... -
Page 55: Connecting An Answering Machine To Your Image 2000
To ensure your answering machine interworks button can also be used in RECALL with your Image 2000 you must plug it into the conjunction with BT Select Services. socket above the telephone line cord socket on the back of your Image 2000. - Page 56 Image 2000 will take over the call if it detects that it is a fax call. SET UP STOP If your Image 2000 fails to take fax calls off the answer machine there may be several reasons, Press the button until the display •...
-
Page 57: Connecting To A Pc For Faxing, Scanning And Printing
However, some fax machines do not send the appropriate tones, so your Image 2000 is Your Image 2000 acts as a full colour printer, pre-set to switch to FAX mode if it detects a fax machine and scans documents into your silent period of 3 seconds. -
Page 58: Connecting To A Switchboard
Additional features Connecting to a switchboard If you want to connect your Image 2000 to a switchboard (also known as a PBX), you can take advantage of its PBX mode. This allows you to set the line access code under one... - Page 59 To change the dial mode • options – SET ACCESS CODE or SET RECALL. Your Image 2000 is preset to dial in Tone mode, you will need to change this if your PBX If you need to set an access code choose SET ACCESS CODE, otherwise choose SET uses Pulse dialling.
-
Page 60: Help
Help Help if you have any problems using your Image 2000, this section gives you the most common solutions. Replacing the print cartridge To replace a print cartridge You can buy replacement colour and mono cartridges from all BT shops, main electrical... - Page 61 Help Remove the ink cartridge from the carrier. Push the cartridge back until it clicks into • • If it is empty discard it, if it is part used place. If it moves loosely in the carrier, it is store it in the spare ink cartridge holder, not located correctly.
-
Page 62: Clearing A Paper Jam
Clearing a paper jam Paper jam If a page of the document you are printing gets Document jam stuck in the machine, display shows PAPER JAM. If a page of the document you are faxing, copying or scanning gets stuck in the machine, display shows DOCUMENT JAM. - Page 63 Paper jammed in the paper exit area Paper jammed inside the machine Press the STOP button; this may clear the • problem. If not, unplug main power cable, remove the • Push the paper load lever away from you to •...
- Page 64 Cleaning the cartridge carrier contacts and Cleaning your Image 2000 deflector Wiping the print Nozzles and Contacts Remove the print cartridge. See ‘replacing • When the print is not clear or dots are the print cartridge” page 58. missing, the problem may be caused by dried Unplug the mains lead from the electrical •...
- Page 65 Take care not to scratch the glass. holder backward to remove the Close your Image 2000 • cartridge easily). Test that the optical scanner is clean by •...
-
Page 66: Fax Error Codes
Help Fax error codes If a fax transmission or reception fails the reason for failure is logged as an error code and will be shown on problem reports and activity reports. The code explanations are shown below. Receiving Sending Error Meaning Error Meaning... - Page 67 The terms of this guarantee do not affect your statutory rights. Telephone Preference Scheme BT is a sponsor of the Telephone Preference If your Image 2000 develops a fault outside the Service – a scheme to enable customers (TPS) guarantee period then:- to reduce unwanted sales calls.
-
Page 68: Technical Specification
Technical specification Technical specification Type Desktop Transceiver Scanning system CIS (Contact image sensor) Printing system Ink-Jet Transmission speed 5ms/line (6 sec/A4 page) Compression system MH/MR/MMR Resolution Scanning section: NORMAL mode 8 x 3.85 line/mm FINE mode 8 x 7.71 line/mm SUPERFINE mode 8 x 15.4 line/mm PHOTO mode 64 grey scales Printer section:... -
Page 69: Technical Information
Technical information Choosing a position - call progress monitor Your Image 2000 should be kept clear of dust, moisture, high - modem temperature and vibration and should not be exposed to direct - fax switch sunlight. Don’t install it close to radiators or air-conditioning - simple telephone outlets or in excessively warm, humid or dusty places. - Page 70 4.2 of EN 41003 for TNV circuits and 2.3 of EN Image 2000 has a REN of 1. Any telephone provided by BT may 60950 for SELV circuits, after making connections be assumed to have a REN of 1 unless otherwise stated on the between circuits.
-
Page 71: Index
Index Index Activity report Directory Ans/Fax - button Answering machine - storing names and numbers Approval - dialling names and numbers 22, 26 Autofax - editing Automatic document feeder - deleting 1, 6 Automatic redial Directory dialling Auto reduction Display Batch time Distinctive ring Broadcasting... - Page 72 Index One-touch - names and numbers RX/TX - editing Resolution - dialling Ring response - deleting Ring time - keys Safety warning 4, 67, 68 - fax Scanning - printing Sender ID On-hook dialling Sending faxes 24, 25 Paper Set up - holder/support Silence detector - loading...
- Page 73 Offices in Europe, North America, Japan and Asia Pacific. The Telecommunications services described in this publication are subject to availability and may be modified from time to time. CE compliant to 89/336/EEC Services and equipment are provided subject to British (EMC Directive) &...
Need help?
Do you have a question about the IMAGE 2000 and is the answer not in the manual?
Questions and answers