
Related Manuals for GE 45129


Summary of Contents for GE 45129
-
Page 1: Control Center
Wireless Alarm System Control Center User’s Manual Choice Choice ALERT ALERT ™ ™ Control all Sensors & accessories from one location 1 2 3 4 Armed Power Zone 45129... -
Page 2: Table Of Contents
Important Safeguards Designing a system Controls, Indicators, and Features Battery Backup - Control Center Low Battery Indicators ( Control Center & Sensors) The Choice Alert Operating Modes Notification Mode Dedicated Alert Mode (Zone 4) Armed/Alarm Modes Mute Function Placement of the Control Center Creating a Personal Security Code Sensors and Zones Assigning a Sensor to a Zone... -
Page 3: Important Safeguards
Before connecting or operating the Control Center, please read these instructions carefully and save this manual for future reference. Congratulations The GE Choice Alert Wireless Alarm System is one ™ of the most affordable and expandable wireless alarm systems available. You’ll discover that the system offers many features typically found in custom installed Alarm systems. -
Page 4: Designing A System
you’re concerned about the hot water tank or the dishwasher leaking? This system will help alleviate those concerns. To start, sketch a map of areas in and around your home and determine which doors and/or windows need contact Sensors, which areas that might best be served by a Motion Sensor, etc. -
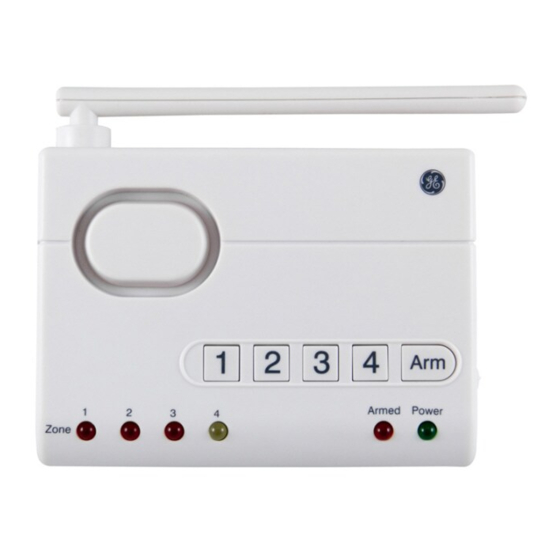
Page 5: Controls, Indicators, And Features
Front Alarm Siren Zone Zone Indicators Control, Indicators, and Features: Zone Indicators These LEDs indicate Sensor status for each of the 4 Zones in the Choice Alert system. Armed and Power Indicators These LEDs indicate status of the system. Keypad Operations: Arm button - Use this button on the keypad to select the arm setting (HOME or AWAY) you wish to use. -
Page 6: Mode Settings
of the arrow. Install batteries according to the battery polarity diagram inside the battery compartment. Replace the battery door. Note: The Control Center has an automatic internal battery tester. After batteries are installed you can check the backup battery status at any time by unplugging the AC adapter. If the batteries are acceptable, the green ‘Power’... -
Page 7: Notification Switch Settings
Notification switch settings: Off – In this mode when a Sensor is activated, the Control Center will issue a visual Alert only (flashing Zone LED indicator), no audio will be heard. The LED indicator will continue to flash as long as the Sensor is activated (door or window is open, garage door is up, etc.) Chime –... -
Page 8: Quick Reference Card
Bypass – You can bypass a Zone so that any Sensors in that Zone (1, 2, and/or 3) will not trigger the alarm regardless of HOME or AWAY setting. Quick Reference Card The Control Center comes with a quick reference card and clear storage envelope. -
Page 9: Sensors And Zones
Step 1 - A. Press and hold the Learn button (unit will beep). B. While continuing to press the Learn button, press and hold Arm button (within three seconds). C. When Control Center sounds a long beep, release buttons. The green LED power indicator will begin flashingThis indicates the unit is ready to change the Security Code. -
Page 10: Assigning A Sensor To A Zone
open, storage sheds or work shops unsecured, etc). Sensors placed in Zone 4 will not activate the Alarm or Chime. When a Sensor is triggered in Zone 4, the Control Center will sound a repeating Alert (4 beeps) and the Zone 4 LED indicator will flash continuously. These Alerts will continue until the Sensor is closed. -
Page 11: Testing Sensor
Step 2 – Press the Zone button (1, 2, 3 or 4) for the Zone you want to assign to the Sensor. The LED indicator for that Zone will begin to flash. Step 3 – Release the Zone button. Note: Zone 4 is for dedicated alerts only. Sensors in this Zone will not trigger an alarm or chime. -
Page 12: Arming The System (Home Or Away)
Arm (HOME) – No delay, instant alarm. This setting is used when you wish to secure the area but will be home and moving around within the armed area. In the Arm/HOME setting, any Motion Sensors in Zone 1, 2, and 3 will not operate. All Sensors must be closed/not activated in order to set the alarm. -
Page 13: Bypassing A Zone
Bypass a Zone (For all Zones and Modes) There may be occasions when you would like to temporarily prevent the Sensors in a Zone from triggering the alarm. In this situation you can bypass a Zone when setting the alarm. Once the alarm is disarmed the Bypass setting will be removed. -
Page 14: Alarm Siren
Test the Silent Alert Step 1 - After the Silent Alert has been successfully linked with the Control Center, press and hold the Mute button on the Control Center for three seconds. This action sends a test signal. Step 2 - When the Silent Alert receives the test signal from the Control Center, one LED indicator on the Silent Alert will begin to flash once a second. - Page 15 Step 2 - When the Control Center receives the Signal Repeater’s test signal, it will flash the green power indicator. This means a confirmation signal was sent back to the Signal Repeater. Release all buttons. Step 3 - When the Signal Repeater receives the confirmation signal, the LED indicator will flash, five times.
- Page 16 Choice Alert Control Center F.A.Q.’S Q. I am trying to program my security code and I keep waiting on the beep. But, nothing happens. Why? A. There is a short beep that you hear as soon as you press the Learn button. After you hold the Learn button for about 3 seconds you will hear a long beep;...
- Page 17 Q. If one Sensor has a low battery, will the other Sensors in the Zone (or other Zones) continue to operate? A. Yes, as long as the other Sensors have sufficient battery power, they will continue to transmit information to the Control Center and the system will operate normally.
-
Page 18: Fcc Warning
– Connect the equipment into an outlet on a circuit different from that to which the receiver is connected. – Consult the dealer or an experienced radio/TV technician for help Model # Description 45129 Control Center 45130 Garage Sensor 45131 Door/Window Sensor... -
Page 20: Limitations Of Alarm Products
• Batteries may leak harmful liquids or ignitable materials or explode causing injury and product damage • Do not mix old and new or other battery types • Replace all batteries at the same time • Replace fully discharged batteries immediately 45129-1 11/02/07...
Need help?
Do you have a question about the 45129 and is the answer not in the manual?
Questions and answers