Table of Contents
Advertisement
Quick Links
Download this manual
See also:
Operating Manual
Advertisement
Table of Contents

Related Manuals for Oce PlotWave 340


Summary of Contents for Oce PlotWave 340
- Page 1 Océ PlotWave 340/360 Touch The New Way Of Printing User manual Operating information...
- Page 2 Copyright © 2013 Océ. All rights reserved. No part of this work may be reproduced, copied, adapted, or transmitted in any form or by any means without written permission from Océ. Océ makes no representation or warranties with respect to the contents hereof and specifi- cally disclaims any implied warranties of merchantability or fitness for any particular purpose.
- Page 3 Trademarks Trademarks Océ, Océ PlotWave 340/360, Océ Express WebTools, Océ Publisher Express, Océ Publisher Mobile, and Océ Mobile WebTools are registered trademarks of Océ. ® ® ® ® Adobe , Acrobat and Reader are registered trademarks of Adobe Systems Incorporated.
-
Page 4: Table Of Contents
Contents Contents Chapter 1 Introduction.......................11 Notes for the reader.................12 Online support for your product.............14 Available documentation.................16 Chapter 2 Get to Know the Printing System..............19 Introduction....................20 The Océ PlotWave 340/360..............20 The key concepts................21 Connect your Printing System..............25 Working area [Footprint]..............25 Connect the mains supply cable and the network cable....26 Switch on the printing system............27... - Page 5 Contents Do a default print job ................69 cloud.....................71 Chapter 3 Define your Workflow with Océ Express WebTools........75 Introduction....................76 Océ Express WebTools..............76 The system requirements..............77 The 'Jobs' tab..................79 The Smart Inbox.................81 The job states..................83 The 'System' tab.................85 The system monitor................86 The 'Preferences' tab................89 The 'Configuration' tab..............90...
- Page 6 Contents Enable Access control..............129 Access control and IPsec settings..........130 Remote security................132 Remote security: generate a CA-signed certificate request..133 Remote security: import a CA-signed certificate.....135 E-Shredding..................137 Enable or disable the e-shredding function......137 Select the e-shredding algorithm..........138 Specify the number of overwrite passes........139 Configure the Presets and Stamping............140...
- Page 7 Contents Chapter 4 Use the Printing System................181 What you need to know before you start a job........182 How to feed an original.................184 How to auto-feed an original..............186 How to use the carrier sheet..............187 Print Jobs - Job submission tools............189 Use Océ Publisher Express to send a print job......189 Use the Smart Inbox to send a print job........192...
- Page 8 Contents Do a default scan job ...............250 Extended Scan Jobs - Locations and Presets........252 Scan presets on the user panel............252 Scan a photo to 'JPEG' format............253 Scan CAD colour to 'TIFF' format............254 Scan to a USB mass storage device..........255 Scan to an external location............256 Scan to a Smart Inbox and collect your file........258...
- Page 9 Contents Save the currently active licenses............324 Install a new license................325 Chapter 7 Account Management..................327 An overview of Océ Account Center ............328 ® Océ Account Console ................330 Introduction to Océ Account Console..........330 Summary of Océ Account Console ..........331 Enable account management in Océ Express WebTools ....334 Accounting workflow...............336...
- Page 10 Contents...
-
Page 11: Chapter 1 Introduction
Chapter 1 Introduction... -
Page 12: Notes For The Reader
Notes for the reader Notes for the reader Introduction This manual helps you to use your printer properly. The manual contains a description of the product and guidelines for usage. Definition Attention Getters Some parts of this manual require special attention: •... - Page 13 The use of heat-resistant gloves is mandatory when you carry out the actions concerned. Safety manual The safety manual for this product is found online with the title Safety guide. Visit http://global.oce.com/support, select your printer and find your manual in the list. Chapter 1 - Introduction...
-
Page 14: Online Support For Your Product
A Knowledge Base with answers to your questions or problems is continuously being updated. To find an answer to your question or problem, please visit: http://global.oce.com/support and select your product. In the Support section, use the search field to enter your question. You will get a list of possible answers. - Page 15 Online support for your product Addresses local Océ organisations For the addresses of local Océ organisations visit: http://global.oce.com/contact/countries Comments Send your comments by e-mail to: itc-userdoc@oce.com Chapter 1 - Introduction...
-
Page 16: Available Documentation
Available documentation Documentation Availability User Manual - Operating guide • On Océ website (http://global.oce.com), under the PlotWave's support page. Available as a PDF file in multiple lan- guages. User Manual - Installation guide •... - Page 17 Available documentation Océ Wide format Printer Driver for Microsoft Windows Documentation Availability User guide • On Océ website (http://global.oce.com), under the PlotWave's support page. Available as a PDF file in multiple lan- guages. • Online Help Embedded in the application Available in multiple languages.
- Page 18 Available documentation Chapter 1 - Introduction...
-
Page 19: Get To Know The Printing System
Chapter 2 Get to Know the Printing System... -
Page 20: Introduction
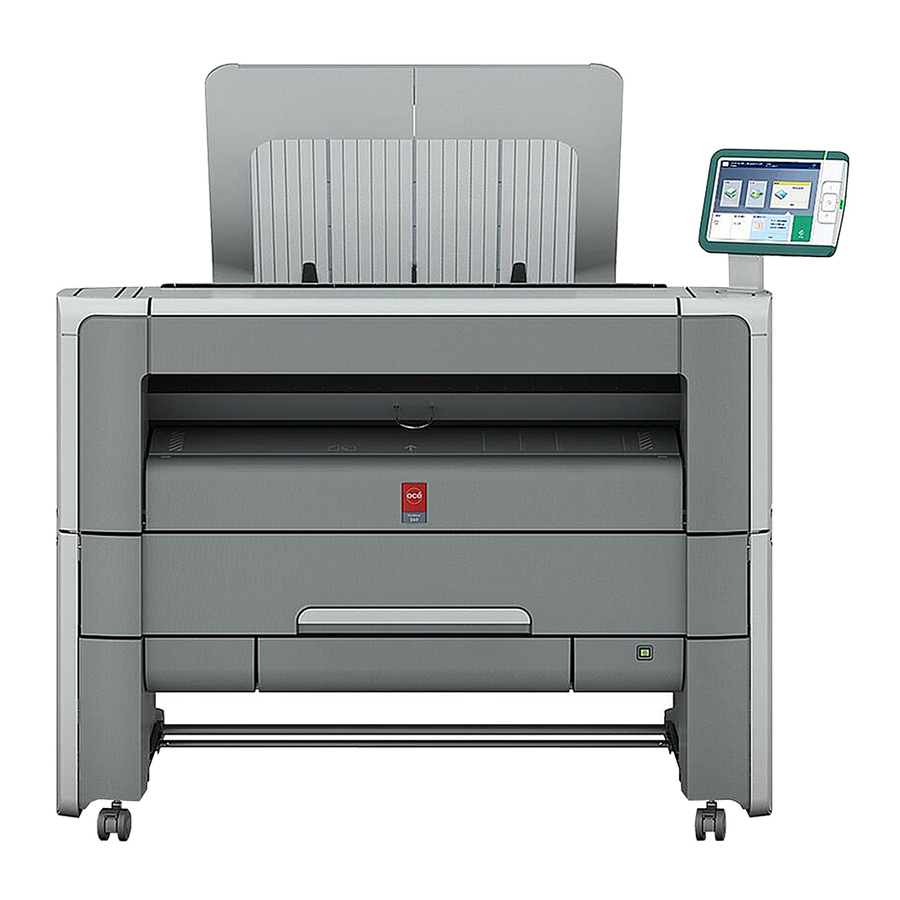
Introduction The Océ PlotWave 340/360 Introduction The Océ PlotWave 340/360 is a black and white, all-in-one wide format print, copy, and scan system with a multi-touch user panel and an optional colour scanner. Illustration Chapter 2 - Get to Know the Printing System... -
Page 21: The Key Concepts
An understanding of these main concepts is key to optimally profit from your PlotWave system. Printer configuration The Océ PlotWave 340/360 printer has 1 or 2 media rolls. The 'Océ Scanner Express', the front original tray, the Océ 2400 fanfold or Océ 4311 fullfold are optional. Automatic paper feed The Océ... - Page 22 Swipe between several jobs and pan to view the image in detail. Mobility and the cloud The Océ PlotWave 340/360 makes it possible to print from and scan to the cloud appli- cation of your choice. Together with mobile applications such as Océ Mobile WebTools, Oce Publisher Mobile the printer can be easily accessed and used from any location.
- Page 23 Océ Express WebTools. Processing sets The Océ PlotWave 340/360 supports the processing of sets. This means that a job can consist of several files or originals. You can print or scan these files or originals multiple times and sort them by page or by set.
- Page 24 The spool memory allows multiple users to send print and copy jobs to the Océ PlotWave 340/360 at the same time. The print and copy jobs are then placed in the print queue where they wait to be printed. The job that is put first into the queue is printed first.
-
Page 25: Connect Your Printing System
Working area [Footprint] Connect your Printing System Working area [Footprint] The printing system (with or without the optional 'Océ Scanner Express') requires a floor space / working area of at least 1810 mm x 1470 mm (71,3 inch x 57,9 inch). 172cm 3.5”... -
Page 26: Connect The Mains Supply Cable And The Network Cable
Connect the mains supply cable and the network cable Connect the mains supply cable and the network cable Attention: Make sure the power switch(B) is in 'off' position. Plug the mains supply cable in the power connection, at the back of the printer (A) (on the left hand side). -
Page 27: Switch On The Printing System
Switch on the printing system Switch on the printing system Attention: Make sure the mains supply cable (A) is plugged in. Attention: Make sure the network cable (C) is plugged in. Switch on the power switch at the back of the printing system (B). [12] The power switch at the back of the printer. -
Page 28: The Hardware
The components of the printer (front) The Hardware The components of the printer (front) Illustration Component - function table Component Description / Function lower left front cover Remove this cover when you want to move the printer. lower front cover Located at the front, used for error recov- ery. - Page 29 The components of the printer (front) Component Description / Function USB port USB connector to use a USB mass storage device to print from or to scan to. Océ ClearConnect: multi-touch The Océ ClearConnect user panel allows user panel the user to start copy, scan, or print jobs, and to monitor the system and the job sta- tus.
-
Page 30: The Components Of The Printer (Left Side)
The components of the printer (left side) The components of the printer (left side) Illustration Component - function table Component Description / Function residual toner compartment Gives access to the residual toner container. Chapter 2 - Get to Know the Printing System... -
Page 31: The Components Of The Printer (Back)
The components of the printer (back) The components of the printer (back) Illustration Component - function table Component Description / Function power switch Switch the main power supply on or off. You can find the serial number of the printer on the sticker above the power switch. -
Page 32: The Media Drawer
The media drawer The media drawer Illustration Component - function table Component Description / Function roll holder Carries the media roll media roll 1 Media placed on roll holder in first position. media roll 2 (optional) Media placed on roll holder in second position. Note: The scanner calibration sheet is located at the back of roll 2. -
Page 33: The User Panel: Océ Clearconnect
The user panel: Océ ClearConnect The user panel: Océ ClearConnect Illustration Components of the Océ ClearConnect Component Description / Function status light Light that gives feedback on the status of the printer. wake-up button Button that allows the operator to get the printer out of sleep mode. - Page 34 The user panel: Océ ClearConnect Note: For more information on the Océ ClearConnect, see ‘Introduction to Océ ClearConnect’ on page Chapter 2 - Get to Know the Printing System...
-
Page 35: The Output Delivery
The output delivery The output delivery Introduction The printer is equipped with a top delivery tray to collect your printed output. Illustration How to define the output delivery In Océ Express WebTools and under 'All settings' on the user panel you can define the default 'Sheet delivery' for your printed output. - Page 36 The output delivery Media name Compatible with the 'Top Delivery Tray' 'Paper 64 g' 'Paper 75 g' 'Paper 75-80 g' 'Recycled pap. 80 g' 'Paper 90-110 g' 'Transp. 75 g' 'Transp. 90 g' 'Transp. 110 g' Other media Media name Compatible with the 'Top Delivery Tray' 'Film 3.5 mil' No, delivered to the 'Back output'...
-
Page 37: The Components Of The Scanner (Optional)
The components of the scanner (optional) The components of the scanner (optional) Note: The scanner calibration sheet for the 'Océ Scanner Express' is located in the media drawer , at the back of roll 2. Illustration [19] The integrated scanner. The components of the scanner Component Description / Function... -
Page 38: The Front Original Tray (Optional)
The front original tray (optional) The front original tray (optional) Introduction The printer can be delivered with a front original tray to hold and collect your originals. When you want to scan multiple originals the tray can hold your originals. It also makes sure that your originals do not fall on the floor or get damaged when the scanner releases your originals. - Page 39 The front original tray (optional) [21] Position 2 - Access the media drawer Position of the front original tray Position Description / Function In this position the front original tray holds and receives originals. In this position you can access the media drawer. You can lower the front original tray easily when you push it down.
-
Page 40: The Folder (Optional)
The folder (optional) Introduction The printer can be delivered with an external folder. The Océ PlotWave 340 is compatible with the Océ 2400 fanfold. The Océ PlotWave 340 is compatible with the Océ 2400 fanfold and the Océ 4311 fullfold. -
Page 41: The Printing System
The folder (optional) Media name Compatible with the folder 'Paper 90-110 g' Note: For folding speed reasons, outputs longer than 1.2m must be printed one sheet at a time. Chapter 2 - Get to Know the Printing System... -
Page 42: The Printing System Consumables
The printing system consumables The printing system consumables Consumable Consumable part Description Media roll The roll consists of a core and the media. The media should be placed loose on its core. There are many different compatible me- dia types and sizes. For more information, ‘Preferred Océ... -
Page 43: Océ Clearconnect: The Multi-Touch User Panel
Introduction to Océ ClearConnect Océ ClearConnect: the multi-touch user panel Introduction to Océ ClearConnect Introduction The Océ ClearConnect is the user panel of your printer. The Océ ClearConnect is a multi-touch user panel, with dynamic tiles for print, copy, and scan jobs. The Océ... -
Page 44: The Printing System
Introduction to Océ ClearConnect Component Function 2. wake-up button The button that allows the operator to do the following: • Get the printer out of sleep mode • Wakes the printer up to full functionality 3. USB port You can insert a USB mass storage device to: •... -
Page 45: The Home Screen
The home screen The home screen Introduction The default screen of the Océ ClearConnect is the home screen. From the home screen you can manage copy, scan, and print jobs. You can enter the system menu to manage media and the printer setup, and you can see the active job and the jobs waiting in the queue in the dynamic bar . - Page 46 The home screen Component Function system menu In the dynamic bar you can access the system menu. • When you tap the system thumbnail, a new window opens with a dynamic view of the system and printer setup settings. Copy tile These dynamic tiles help you to perform copy, scan, and Scan tile print jobs.
-
Page 47: The Smart Access
The Smart Access The Smart Access Introduction The Océ ClearConnect gives easy access to your print, copy, and scan jobs and supports the green button approach via the Smart Access. The Smart Access is the dynamic lower section of the user panel. The Smart Access enables you to quickly start your job without the need to make additional settings. - Page 48 The Smart Access Component Function The Scan Smart Access Tap the Scan tile on the user panel to view the copy Smart Access. The Smart Access has the following functionalities: Component Function 1. locations Select the location you want to send your scanned file to. You can swipe through the list of various locations, from Smart Inboxes, USB, Eneo, to cloud locations.
- Page 49 The Smart Access Component Function 1. locations Select the location you want to retrieve your unprinted job from. You can swipe through the list of various locations, from Smart Inboxes, USB, Eneo, or cloud locations. 2. green button Tap the green button to start the job. Chapter 2 - Get to Know the Printing System...
-
Page 50: Presets And Advanced Settings
Presets and advanced settings Presets and advanced settings Introduction Presets give you easy access to change the most common used settings. Advanced settings help you to fine tune the settings of your job, and give access to all settings. When you tap the Copy tile or Scan tile in the home screen, a window with copy or scan presets and advanced settings opens. - Page 51 Presets and advanced settings The presets and advanced settings Component Function preset tiles The preset tiles show the default settings for your job. • The presets are divided into categories, such as 'Media', 'Layout' etc. • When you tap a preset tile, it gives quick access to a short list of other presets you can choose.
- Page 52 Presets and advanced settings Component Function 'All settings' When you tap 'All settings' a list with all the advanced set- (Advanced settings) tings opens. • The advanced settings are categorised and presented as tiles. • When you tap a tile you can fine tune the settings. Chapter 2 - Get to Know the Printing System...
-
Page 53: The Settings Concept
The settings concept The settings concept Introduction The multi-touch user panel offers the possibility to make settings for your job locally. There are two levels when you want to change settings on the user panel: • Presets: are a combination of settings that are used often. It takes only a few steps to make new settings. - Page 54 The settings concept Description Illustration • 'Media', 'Layout', 'Image', and 'Finishing' are the categories for 'Copy' and 'Print'. • 'File type', 'File size', and 'Image' are the cate- gories for 'Scan'. • Per preset category, the default setting is visible in the preset tile.
-
Page 55: The Locations
The locations The locations Introduction When you tap the Print tile on the user panel twice a window with locations opens. When you tap the Scan tile, the locations are shown in the Smart Access. Location tiles can be: • The Smart Inboxes location. - Page 56 The locations 1. the locations Component Function external loca- The external locations are presented as Smart Inboxes, USB, or as tions the remote locations you created in Océ Express WebTools. 2. preview thumbnail Component Function preview When you open a location folder, a window opens with files listed as jobs.
- Page 57 The locations 3. job settings Component Function job settings When you open a location folder, a window opens with files listed as jobs. The jobs are listed with the job settings. Tap the job settings to open the window with presets and advanced settings.
-
Page 58: Preview Your Job
Preview your job Preview your job Introduction The multi-touch user panel offers a detailed preview of your job. Touch the preview thumbnail to access the preview window. Job preview Component Function Job preview You can pan the image to see it in more detail. You can shift between the various job files that are part of one location. -
Page 59: The Jobs Queue And The System Menu
The jobs queue and the system menu The jobs queue and the system menu Introduction The dynamic bar is located in the upper part of the home screen on the user panel display. The dynamic bar consists of the active job with the jobs queue, and the system menu. The active job and the jobs queue Component Function... - Page 60 The jobs queue and the system menu Component Function jobs queue When you tap on the active job, the jobs queue window opens. • You can see all the listed jobs, and access them when you tap the job settings. •...
- Page 61 The jobs queue and the system menu Component Function setup menu The setup menu gives general information on the printer. In the list you can get access to: • 'Test prints' • 'Network settings' • 'Security' • 'Print density' • 'Clear system' •...
-
Page 62: Quick Start: Default Jobs
Use the Smart Inbox to manage and store your jobs. Define one or more Smart Inbox names that allow you to easily organise and access your jobs. With the Océ PlotWave 340/360: • The Smart Inbox cannot only be used in Océ Express WebTools, but also on the Océ... - Page 63 The Smart Inbox process for copy, scan, and print jobs Scan jobs and the Smart Inbox Function Description Location 1. Scan a job to a Scan a document on the printer, and the User panel Smart Inbox public Smart Inbox is the default location you scan to.
- Page 64 The Smart Inbox process for copy, scan, and print jobs Print a job Step Action Location 2. Print a print job When you have sent the job, go to the printer User panel on the printer and find your job in the Smart Inbox. Change the settings, and tap the green button to print your job.
-
Page 65: Do A Default Copy Job
Do a default copy job Do a default copy job Introduction When you want to copy an original and you do not make any settings the default presets are used. You only use the Smart Access to submit your job. You can see the presets that are used in the job settings section of your job. - Page 66 Do a default copy job The 'Copy' tile with the copy Smart Access is automatically selected on the user panel. Select the number of copies and tap the green button. Note: Tap on 'Release the original' under the Smart Access, to release your original from the scanner.
-
Page 67: Do A Default Scan Job
Do a default scan job Do a default scan job Introduction When you want to scan an original and you do not make any settings the default presets are used. You only use the Smart Access to submit your job. You can see the presets that are used in the job settings section of your job. - Page 68 Do a default scan job Select the 'Scan' tile on the user panel. The scan Smart Access is visible. Select the preferred location in the Smart Access and tap the green button. Note: When you do not select a location the file is sent to the public Smart Inbox. Note: Tap on 'Release the original' under the Smart Access, to release your original from the scanner.
-
Page 69: Do A Default Print Job
Do a default print job Do a default print job Introduction When you want to print a job and you do not make any settings the default presets are used. You only use the Smart Access to start your job. You can see the presets that are used in the job settings section of your job. - Page 70 Do a default print job Select the location of your job. Default, the public Smart Inbox. The jobs are listed in a new window. Select your job from the list. Tap the green button, next to the job settings. Result A print of your file is made.
-
Page 71: The Cloud
The cloud The cloud Introduction The multi-touch user panel gives the user the opportunity to print from and scan to various locations. One of these locations is the cloud. You can enter the cloud via 'WebDAV' and use it as a network drive. This way the cloud application of your choice is accessible. - Page 72 There are general cloud applications, such as SharePoint or applications via a HTTP URL, but companies can also use their own private and internal clouds. Working with the cloud on the Océ PlotWave 340/360 is very easy: Procedure Description Connection •...
- Page 73 The cloud Procedure Description For print • - Open the cloud application locally. PC or mobile jobs: device - Add and save the file you want to print, in the PC or mobile cloud. Or send your file to the printer, in the device cloud.
- Page 74 The cloud Chapter 2 - Get to Know the Printing System...
-
Page 75: Define Your Workflow With Océ Express Webtools
Chapter 3 Define your Workflow with Océ Express WebTools... -
Page 76: Introduction
Océ Express WebTools Introduction Océ Express WebTools Introduction Océ Express WebTools is an application that runs embedded on your printer. You can ® use an Internet browser (Microsoft Internet Explorer or Mozilla Firefox) to open the homepage of Océ Express WebTools on your computer or mobile device. Definition You can use Océ... -
Page 77: The System Requirements
The system requirements The system requirements Introduction You can use an internet browser to open the homepage of Océ Express WebTools. De- pending on the internet browser you use, you must set the required minimum browser security settings as indicated below. Set the minimum browser security settings for Internet Explorer Attention: You must enable cookies. - Page 78 The system requirements Step Action Value Content Block pop-up windows Disable Load images automatically Enable Enable Javascript Enable Chapter 3 - Define your Workflow with Océ Express WebTools...
-
Page 79: The 'Jobs' Tab
The 'Jobs' tab The 'Jobs' tab Illustration The 'Jobs' tab Remote control on the system's workflow. Create a new job in the Océ Publisher Express section. • When you want to submit a new job, click 'Create new job'. A new window opens, here you can define some basic job settings and browse the file you want to print. - Page 80 The 'Jobs' tab and is only visible on your local browser. When you send a print job via the Smart Inbox, the Smart Inbox is also shown on the user panel. For more information, see ‘Create and open a Smart Inbox for print jobs’ on page 117.
-
Page 81: The Smart Inbox
The Smart Inbox The Smart Inbox Definition A Smart Inbox helps you to manage customised jobs. You get an overview of the Smart Inboxes when you open the 'Jobs' tab in Océ Express WebTools. Illustration [50] The 'Jobs' tab. Jobs in a Smart Inbox You can use the Smart Inbox to manage your jobs. - Page 82 The Smart Inbox • Copy jobs The 'Preferences' - 'System defaults' - 'Job management' - 'Keep a copy of copy jobs in the Smart Inbox (Public)' - setting enables you to keep copy jobs that have been printed in the Smart Inbox for reprint. Note: For more information on the Smart Inbox, see ‘The 'Smart Inbox' and the Queue concept’...
-
Page 83: The Job States
The job states The job states Introduction When a job is placed in a Smart Inbox or in the Queue, the icon in front of the job name gives information about the status of the job. Overview of the job states in the Smart Inbox State Icon Description... - Page 84 The job states State Icon Description Attention needed General error message. Chapter 3 - Define your Workflow with Océ Express WebTools...
-
Page 85: The 'System' Tab
The 'System' tab The 'System' tab Illustration The 'System' tab Your remote view on the system. This tab can be accessed by any user. The 'System' tab is visible on all pages at the bottom of the page. When you click on the 'System' tab in the lower left corner of the screen, the system monitor pops up. -
Page 86: The System Monitor
The system monitor The system monitor Introduction You can open the system monitor to get an overview of the current status of the printing system. When you click on the 'System' tab in the lower left corner of the screen, the system monitor pops-up. - Page 87 The system monitor State Icon Description 'Processing:' <job- The system is processing the job data. name> 'Receiving:' <job- The system is receiving the job data. name> 'Optimising print quali- The system is making settings to optimise the print quality. 'Media indication' Roll media and roll width indication for roll 1 ...
- Page 88 The system monitor Icon Description Remote assistance to the system is enabled and currently accepting a connection. The E-shredding states Icon Description no icon E-shredding is disabled. E-shredding is enabled or busy. A tooltip is available with extra information. Chapter 3 - Define your Workflow with Océ Express WebTools...
-
Page 89: The 'Preferences' Tab
The 'Preferences' tab The 'Preferences' tab Illustration The 'Preferences' tab Note: Before you can edit a setting or a settings group, you must log in as a Key operator or a Power user. For more information, see ‘User roles and authorisations’ on page 124. -
Page 90: The 'Configuration' Tab
The 'Configuration' tab The 'Configuration' tab Illustration The 'Configuration' tab Note: Before you can edit a setting or a settings group, you must log in as a System administrator or a Power user. For more information, see ‘User roles and authorisations’ on page 124. -
Page 91: The 'Support' Tab
The 'Support' tab The 'Support' tab Introduction Note: Log in as System administrator or a Power user. For more information, see ‘User roles and authorisations’ on page 124. Licences The 'Support' tab consists of three sections: • 'About': find general information about the system and generate the 'Quick Response Card'. -
Page 92: Define Your Printing System Default Settings
About the default settings in Océ Express WebTools Define your Printing System Default Settings About the default settings in Océ Express WebTools Definition Before you send jobs to the printer, remember the following: The values defined in Océ Express WebTools are default values for the general system behaviour. -
Page 93: Set Another Language For Océ Express Webtools
Set another language for Océ Express WebTools Set another language for Océ Express WebTools Introduction The language setting of the internet browser you use defines the language of Océ Express WebTools. The following languages are supported: Dutch, UK English, German, French, US English, Spanish, Danish, Italian, Swedish, Norwegian, Finnish, Portuguese, Polish, Hungarian, Czech, Japanese, Simplified Chinese, Traditional Chinese, Russian, and Korean. - Page 94 Set another language for Océ Express WebTools Note: It is possible that the internet options are put under a different menu, depending on the ® Microsoft Internet Explorer version you use. Note: It is possible that the options menu is put under a different menu, depending on the ®...
-
Page 95: How To Edit A Setting
How to edit a setting How to edit a setting Introduction In Océ Express WebTools you can make settings to personalise your printing system. Browse to the settings group you want to edit, for example 'Preferences' - 'System prop- erties' - 'Regional settings'. Click directly on the value of a setting, when you want to edit a single setting click 'Edit' in the settings group bar to access a window with all settings, when you want to edit more settings in the group. -
Page 96: View And Check The Settings
View and check the settings View and check the settings Introduction In Océ Express WebTools you can view and check your settings. You can also check which settings are no longer set to the factory default value. How to view and check the settings Open the 'Configuration' tab or the 'Preferences' tab. -
Page 97: Save The Settings In A File
Save the settings in a file Save the settings in a file Introduction Save the settings and the values that you configured in the Océ Express WebTools in a file. Save the settings in a file to duplicate the settings very easily to another printer of the same type. -
Page 98: Load The Settings From A File
Load the settings from a file Load the settings from a file Introduction Load the settings and the values for Océ Express WebTools from a file. Load the settings from a file to duplicate them to another printer of the same type. Note: Not all settings are stored in the settings file. -
Page 99: Restore The Factory Defaults
Restore the factory defaults Restore the factory defaults Introduction Sometimes you want to go back to the initial settings. You can restore the factory default settings in Océ Express WebTools. How to restore the factory defaults Note: For this procedure, you need to log in as a Key operator. Open the 'Configuration' tab, or the 'Preferences' tab. -
Page 100: Set The Print Job Default Settings
Set the print job default settings Set the print job default settings Definition In Océ Express WebTools you can configure the default values for the print job settings. When you optimise the print job default settings for your document, you get the best results. - Page 101 Set the print job default settings Setting Description 'Sheet delivery' • Select 'Top Delivery Tray (TDT)' to default deliver your output in the Top delivery tray. • Select 'External output (back)' to default deliver your output at the back of the printer. Also select this option when you use the optional 'Receiving rack (basket)' or a folder.
- Page 102 Set the print job default settings Setting Description 'Cut method' • Select 'Standard' to cut the print at a standard media size (DIN, ANSI etc.). • Select 'Synchro' to cut the print at the end of the image. • Select 'Custom' (numeric) to cut the print at a specific length.
- Page 103 Set the print job default settings Setting Description 'Alignment' Select any of the options to define where to align the image on the media. For more information, see ‘Set the 'Alignment' mode ’ on page 178. 'Horizontal shift' Define how much you want the image to shift horizontally, in the chosen alignment position.
-
Page 104: Set The Copy Job Default Settings
Set the copy job default settings Set the copy job default settings Definition In Océ Express WebTools you can configure the default values for the copy job settings. When you optimise the copy job default settings for your document, you get the best results. -
Page 105: Set The Scan Job Default Settings
Set the scan job default settings Set the scan job default settings Definition In Océ Express WebTools you can configure the default values for the scan job settings. When you optimise the scan job default settings for your document, you get the best re- sults. - Page 106 Set the scan job default settings Setting Description 'Start value for ### in Fill in the number that replace the # hashes in the name. the scan file name' The number increases after each scan. 'File name for scan to Fill in the scan filename used for scans to the Smart Inbox.
-
Page 107: Manage Jobs On Your Printing System
The 'Smart Inbox' and the Queue concept Manage Jobs on your Printing System The 'Smart Inbox' and the Queue concept Definition You can use the 'Smart Inbox' for customised job management. Concept The Jobs Queue The Smart Inbox Metaphor Production belt Personal mailboxes User intention •... - Page 108 The 'Smart Inbox' and the Queue concept jobs, it is only visible on your local browser. When you send a print job to the printer, the user panel will also display the Smart Inbox. • An operator can create Smart Inboxes for scan jobs. The operator can create these Smart Inboxes in Océ...
- Page 109 The 'Smart Inbox' and the Queue concept Note: Only one user at a time can save a scan job. When more users save a scan job, the downloads will take place one after the other. When a dialogue to select the save location is open no download will start.
- Page 110 The 'Smart Inbox' and the Queue concept 'Delete' To delete a job from the queue, select the job and click 'Delete'. Retry To retry to send a job, select the job and click Retry. Send to To send a job to a new destination, select the job and click Send to. Then select the des- tination.
-
Page 111: Use Smart Inboxes In A Multiple-User Environment
Use Smart Inboxes in a multiple-user environment Use Smart Inboxes in a multiple-user environment Introduction A multiple-user environment is a working environment in which users directly send jobs to the printer and collect their own prints. In this environment it is important for a user to have easy access to personal jobs. - Page 112 Use Smart Inboxes in a multiple-user environment Setting Value 'Keep copies of local print jobs in the Smart Inbox' 'Default destination of print jobs' 'To queue and Smart Inbox' 'Expiration time-out for Smart Inbox For example: 48 hours jobs' 'Expiration time-out for Smart Inbox For example: 48 hours copy and scan jobs' 'Default Smart Inbox'...
-
Page 113: Use Smart Inboxes In A Repro Environment
Use Smart Inboxes in a repro environment Use Smart Inboxes in a repro environment Introduction A repro environment is a working environment in which a repro operator handles all the jobs. In this environment the repro operator can use the 'Smart Inbox' to organise his daily work. - Page 114 Use Smart Inboxes in a repro environment Setting Value 'Keep copies of local print jobs in the Smart Inbox' 'Default destination of print jobs' 'Only to Smart Inbox' 'Expiration time-out for Smart Inbox For example: 48 hours jobs' 'Expiration time-out for Smart Inbox For example: 8 hours copy and scan jobs' 'Default Smart Inbox'...
-
Page 115: Use Smart Inboxes In A Multiple-User And Repro Environment
Use Smart Inboxes in a multiple-user and repro environment Use Smart Inboxes in a multiple-user and repro environment Introduction A multiple-user and repro environment is a working environment in which both users directly send jobs and collect their own prints at the printer. The system is also used by a repro operator. - Page 116 Use Smart Inboxes in a multiple-user and repro environment Setting Value 'Display a view on all Smart Inbox jobs' 'Override destination of print jobs' 'Only to Smart Inbox' 'Keep completed jobs in the Smart Inbox' 'Keep copies of local print jobs in the Smart Inbox' 'Default destination of print jobs' 'To queue and Smart Inbox'...
-
Page 117: Create And Open A Smart Inbox For Print Jobs
Create and open a Smart Inbox for print jobs Create and open a Smart Inbox for print jobs Introduction There a two ways to create and open a Smart Inbox for print jobs in Océ Express WebTools: • In the Smart Inbox section under the 'Jobs' tab. •... - Page 118 Create and open a Smart Inbox for print jobs Enter the name of the new Smart Inbox and press Enter, or select the desired 'Smart Inbox' from the list. Click 'Ok' to send the print job to the Smart Inbox. The Smart Inbox is now displayed in the 'Smart Inbox' section.
-
Page 119: Create And Open A Smart Inbox For Scan Jobs
Create and open a Smart Inbox for scan jobs Create and open a Smart Inbox for scan jobs Introduction Next to the Smart Inboxes for print jobs you can also create Smart Inboxes for scan jobs. You can create a Smart Inbox for scan jobs under the 'Configuration' tab. The Smart Inbox for scan jobs is present as a scan location on the user panel. -
Page 120: Store Print, Copy, And Scan Jobs In The Smart Inbox
Store print, copy, and scan jobs in the Smart Inbox Store print, copy, and scan jobs in the Smart Inbox Introduction In Océ Express WebTools, you can store your jobs in the Smart Inbox temporarily. This way you can better manage your jobs, and reprint any job you like. Note: Storing jobs in the Smart Inbox is temporarily. - Page 121 Store print, copy, and scan jobs in the Smart Inbox Store scan jobs Open the 'Preferences' - 'System properties' tab. In the 'Job management' section, click on the 'Keep copy of scanned jobs in the Smart Inbox'. Check the box to enable the setting. Click Ok.
-
Page 122: Close Or Delete A 'Smart Inbox
Close or delete a 'Smart Inbox' Close or delete a 'Smart Inbox' Introduction In Océ Express WebTools you can also close or delete Smart Inboxes. • You can close the Smart Inbox for print jobs on your browser in the Smart Inbox section. -
Page 123: Configure Your Network And Security Settings
Configure the network settings in Océ Express WebTools Configure your Network and Security Settings Configure the network settings in Océ Express WebTools Introduction Some of the network settings are configured during the installation of your system. When you want to change the initial configuration or when you want to define more network settings, you can do so under the 'Configuration' tab. -
Page 124: Access And Passwords
User roles and authorisations Access and Passwords User roles and authorisations Introduction You can view all settings in Océ Express WebTools, but when you want to edit a setting a message appears. This message indicates that the setting is password protected. You must log in with a password to change a setting. -
Page 125: Log In As An Authorised User
Log in as an authorised user Log in as an authorised user Purpose In order to have write access for certain settings, you must log in as an authorised user. There are three user roles: the System administrator, Key operator, and Power user. They have authorisation to edit specific groups of settings. -
Page 126: Change The Password For Authorised Users
Change the password for authorised users Change the password for authorised users When to do For security reasons it is advised to periodically change the password of the three access modes (Key operator, System administrator, Power user) in Océ Express WebTools. Attention: Handle and store all passwords securely and with care. -
Page 127: Shut Down Or Restart The System
Shut down or restart the system Shut down or restart the system Note: For this procedure, you need to log in as a System administrator. To remotely shut down the printing system, you can click on 'Shut down' in the 'Support' tab of Océ... -
Page 128: Secure Protocols
Define the IP-type Secure Protocols Define the IP-type Introduction Next to IPv4 the printer also supports IPv6. You can choose to use either IPv4 or IPv6, but Océ Express WebTools also allows you to use both simultaneously. For more infor- mation on the differences between IPv4 and IPv6, please consult the Connectivity man- ual. -
Page 129: Enable Access Control
Enable Access control Enable Access control Introduction When you want to control access to your printer, you need to enable acces control in Océ Express WebTools. With access control enabled, you are able to choose up to five hosts who are allowed to communicate with the printer through your network. This amount of hosts allows for a flexible configuration. -
Page 130: Access Control And Ipsec Settings
Access control and IPsec settings Access control and IPsec settings Introduction When access control is enabled, you can edit the access control settings. Note: Make sure to set a password for changing the network settings. With this password you can reset the network settings from the user panel in case you get locked out of the system. Set the password under the 'Configuration' - 'Connectivity' tab and edit the 'Password to change network settings'. - Page 131 Access control and IPsec settings Note: For more details on these settings please consult the Security manual. Chapter 3 - Define your Workflow with Océ Express WebTools...
-
Page 132: Remote Security
Remote security Remote security Introduction By default the first certificate delivered for the use of HTTPS is an Océ self-signed certifi- cate. To ensure a fully trusted authentication, you can request and import a certificate delivered by a Certification Authority (CA-signed certificate). In Océ Express WebTools you can generate the certificates. -
Page 133: Remote Security: Generate A Ca-Signed Certificate Request
Remote security: generate a CA-signed certificate request Remote security: generate a CA-signed certificate request Introduction To ensure a fully trusted authentication via HTTPS, you can request and import a cer- tificate delivered by a Certification Authority (CA-signed certificate). In Océ Express WebTools you can generate a certificate request yourself, or you can import a pre-defined certificate via your computer or network. - Page 134 Remote security: generate a CA-signed certificate request Example (fake request): -----BEGIN NEW CERTIFICATE REQUEST----- MIIBvDCCASQAwfDELMAkGA1UEBMCRlIxDDAKBgNVBAgTA0lERjEQ- MA4GA1UEBxMHQ1JFVEVJ TDEBEGA1UEChMKT2NlIFBMVCBTQTEMMAoGA1UECxMDU05TMSowKAY- DVQQDEyF0ZHM3MDAtNzQw LnNucy5vY2VjcmV0WlsLm9jZS5uZwgZ8wDQYJKoZIhvcNAQEBBQADgY0AMIG- JAoGBAJ2NKQMd HjiDZ1khzTJTORxHqjKl3AtE3PXqRsiHouTH5JTceYtaBjCnxCJ4pGKY5iKN8KJi- JuZG8PHxY7o W/+zpvxN2VtX7TcyTAvyCThUwL+cqo75tvODo5HM- CUa2sLdl8GO9WMLpgZkxH5KzIiO+LcI4 yQbqhENynywS0C2ObX- Cq3yksF74+XIO0swhoA2yfDp4T+LuF3wxys8lUH3ZhhkOYg== -----END NEW CERTIFICATE REQUEST----- Save and send the request Click 'Save' to save the content of the request in a .csr file (named 'certificate_request.csr' by default).
-
Page 135: Remote Security: Import A Ca-Signed Certificate
Remote security: import a CA-signed certificate Remote security: import a CA-signed certificate Introduction To ensure a fully trusted authentication via HTTPS, you can request and import a cer- tificate delivered by a Certification Authority (CA-signed certificate). In Océ Express WebTools you can generate a certificate request yourself, or you can import a pre-defined certificate via your computer or network. - Page 136 Remote security: import a CA-signed certificate Import the 'CA-signed certificate' Follow steps 1 and 2 from the first procedure again, then: Select 'CA-signed certificate'. Browse to the certificate file. Select 'Yes' to validate the certificate against Java root certificates and click 'Import'. When the message 'Certificate successfully imported.' pops up, restart the controller.
-
Page 137: E-Shredding
Enable or disable the e-shredding function E-Shredding Enable or disable the e-shredding function Introduction The e-shredding function allows you to securely erase jobs from the system. This prevents unauthorised people from recovering deleted jobs. When the e-shredding function is en- abled, you can select an e-shredding algorithm. -
Page 138: Select The E-Shredding Algorithm
Select the e-shredding algorithm Select the e-shredding algorithm Introduction The e-shredding function allows you to securely erase jobs from the system. This prevents unauthorised people from accessing deleted jobs. You can select one of the following algorithms: • 'Gutmann'. All jobs on the system are erased in 35 overwrite passes. •... -
Page 139: Specify The Number Of Overwrite Passes
Specify the number of overwrite passes Specify the number of overwrite passes Introduction The E-shredding function allows you to erase jobs from the system. This prevents unau- thorised people from accessing deleted jobs. You can manually enter the required number of overwrite passes. -
Page 140: Configure The Presets And Stamping
What you need to know about presets Configure the Presets and Stamping What you need to know about presets Definition Job presets enable you to easily perform print, copy, and scan jobs that you do very often. Presets on the user panel With a preset you can pre-define the settings you need for a job. -
Page 141: Set The Copy Presets
Set the copy presets Set the copy presets Introduction With a preset you can pre-define the settings you need for a copy job. In Océ Express WebTools you can make different preset settings: • You can choose the default presets from a list of predefined presets. The default presets are used when you make no additional settings on the user panel, and press the green button. - Page 142 Set the copy presets Open the 'Preferences' - 'Copy job defaults' tab. Select the preset category you want to make a custom preset in and click on 'Edit', for example 'Custom Image preset for copy'. Fill in a name and description that will be used for the preset on the user panel. Select the settings you want to use for the custom preset, for example choose to set 'Original type' to 'Blueprint', and 'Stamp' to 'On', and choose the correct stamp from the list.
-
Page 143: Set The Scan Presets
Set the scan presets Set the scan presets Introduction With a preset you can pre-define the settings you need for a scan job. In Océ Express WebTools you can make different preset settings: • You can choose the default presets from a list of predefined presets. The default presets are used when you make no additional settings on the user panel, and press the green button. - Page 144 Set the scan presets Define the custom preset In Océ Express WebTools: Open the 'Preferences' - 'Scan job defaults' tab. Select the preset category you want to make a custom preset in and click on 'Edit', for example 'Custom Image preset for scan'. Fill in a name and description that will be used for the preset on the user panel.
-
Page 145: Set The Print Presets
Set the print presets Set the print presets Introduction With a preset you can pre-define the settings you need for a print job. In Océ Express WebTools you can make different preset settings: • You can choose the default presets from a list of predefined presets. The default presets are used when you make no additional settings on the user panel, and press the green button. - Page 146 Set the print presets Open the 'Preferences' - 'Print job defaults' tab. Select the preset category you want to make a custom preset in and click on 'Edit', for example 'Custom Image preset for print'. Fill in a name and description that will be used for the preset on the user panel. Select the settings you want to use for the custom preset, for example choose to set 'Print quality' to 'Poster'.
-
Page 147: File Type
'File type' 'File type' Depending on the colour mode and file type you select, the values for the compression mode and organisation change. For some file types and some situations, the compression and organisation settings cannot be set. The list below helps you to define the correct file type and colour mode, and shows you which compression and organisation settings are possible. - Page 148 'File type' Colour mode: Greyscale 'Colour' mode 'File type' 'Organisation' 'Compression' 'JPEG quality' 'Greyscale' 'TIFF' 'Raw' 'LZW' Not applicable 'TIFF multi- 'Striped' 'Packbits' page' 'Tiled' 'None' 'PDF' Not applicable 'Flate' Not applicable 'PDF multi- 'LZW' page' 'None' 'JPEG' 'Maximum' 'High' 'Medium' 'Low' 'PDF/A'...
- Page 149 'File type' Colour mode: Black and White 'Colour' mode 'File type' 'Organisation' 'Compression' 'JPEG quality' 'Black&white' 'TIFF' 'Raw' 'Group 4' Not applicable 'TIFF multi- 'Striped' 'Group 3' page' 'Tiled' 'Packbits' 'None' 'PDF' Not applicable 'Group 4' Not applicable 'PDF multi- 'Flate' page' 'LZW'...
-
Page 150: Create A Stamp
Create a stamp Create a stamp Introduction In the custom preset section of the 'Copy job defaults', and the 'Scan job defaults' in Océ Express WebTools you can enable the stamp functionality. Under the 'Stamping' tab you can create your own predefined stamp. Note: For more information, on how to enable a stamp see ‘Set the copy presets’... -
Page 151: Configure External Locations
Configure your locations Configure External Locations Configure your locations Introduction On the user panel you can find a list of locations you can scan to and print from. To this location you send your scanned files for storage, or you save files on this location and you send them to the printer. -
Page 152: Enable Or Disable Usb
Enable or disable USB Enable or disable USB Introduction When you want to use USB as a location you have to make settings for USB first. You can make the settings in Océ Express WebTools. Make settings for USB Open the 'Configuration' - 'External locations' tab. USB is present in the list of external locations. -
Page 153: Create An External Location
Create an external location Create an external location Introduction You can create an external location with Océ Express WebTools. Before you begin Note: Make sure you enable 'SMB' protocol. Note: Make sure you enable 'FTP' under the 'Configuration' - 'Connectivity' tab. Note: Make sure the URL for 'WebDAV' and 'Eneo' is not blocked. - Page 154 Create an external location Enter the 'User name': the user name gives access to the external location. The user must at least have read and write permissions for the external location. For SMB destinations the format must be as follows: Local user name: 'IPaddress\user- name' or 'hostname\username'.
-
Page 155: Error Messages When Validation Fails
Error messages when validation fails Error messages when validation fails Test button When you create your external location, the system validates the location. The system checks the following aspects: • Check the remote folder syntax. • Check the validity of the hostname. •... - Page 156 Error messages when validation fails Error code Possible Causes • Check if the hostname or IP address is correctly typed. • Check that remote host is up and running and connected to the network. 5, 6, 7 • Check that SMB or FTP protocol is enabled on remote host •...
-
Page 157: Configure The Printer Settings
Configure the regional settings Configure the Printer Settings Configure the regional settings Purpose The regional settings are configured during the installation of your printer. When you want to change the initial configuration, you can do so in the 'Regional settings'. Define the regional settings for the printer in the following order: •... -
Page 158: Configure The 'User Panel Time-Out
Configure the 'User panel time-out' Configure the 'User panel time-out' Introduction The printer user panel can automatically return to the Home screen. When you disable this setting, the user panel display does not return to the Home screen automatically. When to do Enable the setting and define a suitable time-out period that does not interfere with the print productivity. -
Page 159: Configure The Automatic Wake-Up
Configure the Automatic wake-up Configure the Automatic wake-up Introduction You can use Automatic wake-up to start up the printer automatically on each working day. The wake-up time and working days are configurable. How to configure the Automatic wake-up Open the 'Preferences' - 'System properties' tab. Click on 'Edit' in the 'Printer properties' section, or click on the 'Automatic on' setting. -
Page 160: Configure The Sleep Mode Time-Out
Configure the Sleep mode time-out Configure the Sleep mode time-out Introduction The printer offers an energy save mode that you can use when the printer is idle for a defined period. The configuration of the timer prevents unnecessary power consumption. The printer uses minimal energy, because the power supply of the printer is turned off. -
Page 161: Configure The 'Media Request Time-Out
Configure the 'Media request time-out' Configure the 'Media request time-out' Introduction The operator panel displays a message with a media request when the requested media is not available on the printer. • When the 'Media request time-out' setting is disabled, the media request will be dis- played on the operator panel until it is resolved. -
Page 162: Configure The Media Sizes
Configure the media sizes Configure the media sizes Introduction You can load various media sizes on the printer. In Océ Express WebTools you can indicate the various media sizes to make them recognisable for the printer. Note: For this procedure you need to log in as a System Administrator. How to define the media sizes In Océ... -
Page 163: Configure The Pen Settings
Configure the pen settings Configure the pen settings Introduction Normally, you define the pen settings in the application that you use to create a drawing with. When the pen settings are not defined in the application, the default pen settings in Océ... -
Page 164: Configure Mobile Printing And Scanning
Océ Mobile WebTools Configure Mobile Printing and Scanning Océ Mobile WebTools Introduction Océ Mobile WebTools provides you with the following functionalities: • Submit a print-ready file to the printer from a mobile device. • Save a scanned file from the printer on a mobile device. •... - Page 165 Océ Mobile WebTools • You need a compatible mobile operating system. • You need a mobile web browser. Optionally: • You need a mobile file explorer application to print a stored file. • You need a mobile application to scan the QR Code. How to use the functionality When you want to use Océ...
-
Page 166: Configure Océ Express Webtools Settings For A Mobile Connec- Tion
Configure Océ Express WebTools settings for a mobile connection Configure Océ Express WebTools settings for a mobile con- nection Introduction When you want users to easily access Océ Mobile WebTools, it is necessary to configure the settings first. With the information you can develop a 'Quick Response Card' to create easy access. - Page 167 Configure Océ Express WebTools settings for a mobile connection Note: When the printer is in a Windows domain network, enter the domain name in Océ Express WebTools: - Open the 'Configuration' - 'Connectivity' tab - Go to the 'Network adapter' section. Enter the domain name in the field 'Primary DNS suffix'.
-
Page 168: Generate The 'Quick Response Card
Generate the 'Quick Response Card' Generate the 'Quick Response Card' Introduction When you want users to easily access the printer from their mobile devices, you can generate the 'Quick Response Card'. The 'Quick Response Card' contains all the infor- mation to establish a connection between the mobile device and the printer. The card contains all your settings and a uniquely generated QR code. - Page 169 Generate the 'Quick Response Card' Illustration [117] Example of a QR Card Generate the 'Quick Response Card' In Océ Express WebTools on your computer: Open the 'Support' - 'About' tab. Click on 'Quick Response Card' in the 'Downloads' section. A new window opens. The 'Quick Response Card' is automatically generated and displayed in the window.
-
Page 170: Connect Your Mobile Device To Océ Mobile Webtools
Connect your mobile device to Océ Mobile WebTools Connect your mobile device to Océ Mobile WebTools Introduction When you scan the QR Code or enter the printer's URL in the mobile web browser, you can connect to Océ Mobile WebTools. Before you begin •... - Page 171 Connect your mobile device to Océ Mobile WebTools Enter the printer's URL, displayed on the 'Quick Response Card'. For example: 'http://hostname(.com)/MobileWebTools. When requested, enter the password on the 'Quick Response Card' in order to connect. Connect to Océ Express WebTools with the IP address When allowed by the System administrator, you can also access the extended Océ...
-
Page 172: Optimise Your Print Quality And Print Productivity
Set the 'PDF transparency flattening' Optimise your Print Quality and Print Productivity Set the 'PDF transparency flattening' Introduction In Océ Express WebTools you can select a setting to flatten transparency information in a PDF document before printing. The setting is used for PDF documents containing transparency information only. -
Page 173: Set The 'Pdf Wipeout Correction
Set the 'PDF wipeout correction' Set the 'PDF wipeout correction' Introduction The 'PDF wipeout correction' setting allows you to print PDF documents, that contain solid black areas that block parts of the image. When you enable this setting, PDF docu- ments are printed correctly but the processing of the PDF files is slower. -
Page 174: Set The 'Long Plot Mode
Set the 'Long plot mode' Set the 'Long plot mode' Introduction When the 'Long plot mode' setting is enabled, it allows you to print plots up to eight times longer than when the setting is disabled. For the printer to be able to print long prints, the print quality can be reduced. Note: For this procedure you need to log in as a Key operator. -
Page 175: Set The 'Automatic Roll Switch
Set the 'Automatic roll switch' Set the 'Automatic roll switch' Introduction In Océ Express WebTools you can choose to enable or disable the 'Automatic roll switch' for the following purposes: • 'Enabled' Select this value when you have two media rolls that contain identical media: the same media type and size. -
Page 176: Set The 'Spool Threshold
Set the 'Spool threshold' Set the 'Spool threshold' Introduction When the job memory is full the printer cannot receive new jobs, therefore it is necessary to spool the memory. Set the 'Spool threshold' setting to define the spool capacity for your jobs. -
Page 177: Set The 'Rotation' Mode
Set the 'Rotation' mode Set the 'Rotation' mode Introduction When you want to turn an image you can use the rotation settings. The setting allows you to turn the image according to predefined rotation values, or you can let the printer perform the rotation automatically. -
Page 178: Set The 'Alignment' Mode
Set the 'Alignment' mode Set the 'Alignment' mode Introduction When you want shift the image on the sheet, you can change the alignment mode. With the alignment mode you can also optimise the print productivity, as you reduce the dis- tance the print carriage has to travel. -
Page 179: Set The Link Speed And Duplex Mode
Set the Link speed and duplex mode Set the Link speed and duplex mode Introduction Use Océ Express WebTools to set the transmission speed and duplex mode for your network adapter. Before you begin Note: For this procedure you need to log in as a Key operator. Note: The list of values you can select depends on the network card type. - Page 180 Set the Link speed and duplex mode Chapter 3 - Define your Workflow with Océ Express WebTools...
-
Page 181: Use The Printing System
Chapter 4 Use the Printing System... -
Page 182: What You Need To Know Before You Start A Job
What you need to know before you start a job What you need to know before you start a job Definition You can make a copy, scan, or print job you as intricate as you like. There are three gen- eral levels on which you can make changes to the job settings, before you start a job: •... - Page 183 What you need to know before you start a job • Make sure that you define the correct job settings: for example, orientation, rotation, and media type. Chapter 4 - Use the Printing System...
-
Page 184: How To Feed An Original
How to feed an original How to feed an original Introduction When you want to copy or scan, it is important to correctly feed the original in the printer. Attention: The scanner can not scan an original that is thicker than 0.8 mm or rigid originals. When you use the carrier sheet that is available as an option, ensure that the combined thickness of both the document and carrier sheet does not exceed 0.8 mm. - Page 185 How to feed an original The scanner takes the original. The width of the original is automatically detected and displayed in the Smart Access. The live scan view displays the scanning process. Result Depending on the selected 'Original release mode' in Océ Express WebTools, the scanner holds or releases the original after the scan procedure.
-
Page 186: How To Auto-Feed An Original
How to auto-feed an original How to auto-feed an original Introduction When you activate the auto-feed functionality, you do not need to use the green button every time you scan a document. This way you improve your productivity. The scanner is activated automatically, and after the scan procedure the scanner releases the original. -
Page 187: How To Use The Carrier Sheet
How to use the carrier sheet How to use the carrier sheet Introduction The carrier sheet can help you to scan an original. The use of the carrier sheet depends on the condition of your original. When to do You can use the carrier sheet, when you want to copy or scan: •... - Page 188 How to use the carrier sheet Note: The scanner will detect the width of the carrier sheet as the original width. The scanner takes the carrier sheet with the original. A copy or scan is made of your original. Chapter 4 - Use the Printing System...
-
Page 189: Print Jobs - Job Submission Tools
Use Océ Publisher Express to send a print job Print Jobs - Job submission tools Use Océ Publisher Express to send a print job Introduction Océ Publisher Express is a job submitter that is integrated in Océ Express WebTools. Note: When you use Océ... - Page 190 Use Océ Publisher Express to send a print job Illustration How to use Océ Publisher Express to send a print job Step Action Remarks Open the 'Jobs' - tab. This tab displays the following. • The Océ Publisher Express section. •...
- Page 191 Use Océ Publisher Express to send a print job Step Action Remarks Click on 'Add file' and use the You can print documents with the follow- Browse... button to select the ing data formats file you want to print. • - HP-GL - .hp, .hpg, .hpgl Repeat this action to add more •...
-
Page 192: Use The Smart Inbox To Send A Print Job
Use the Smart Inbox to send a print job Use the Smart Inbox to send a print job Introduction When you have already added a job to the Smart Inbox in Océ Express WebTools you can print this job via theSmart Inbox. Note: For more information on how to create a Smart Inbox, see ‘Create and open a Smart Inbox... -
Page 193: Use Océ Publisher Select To Send A Print Job
Use Océ Publisher Select to send a print job Use Océ Publisher Select to send a print job Definition Océ Publisher Select is a client application that allows you to create, preview, print, and manage jobs in an intuitive way. Océ... - Page 194 Use Océ Publisher Select to send a print job Step Action Remarks Add the print files to the job The system immediately starts to interpret the file. It automatically selects the most appropriate media and orients the image on the media. Edit and adjust the document In the 'Edit Document Print Settings' print settings when needed...
-
Page 195: Use The Océ Wide Format Printer Driver For Microsoft Windows To Send A Print Job
® ® Use the Océ Wide format Printer Driver for Microsoft Windows to send a print job ® Use the Océ Wide format Printer Driver for Microsoft Win- ® dows to send a print job Introduction ® ® Océ provides the Océ Wide format Printer Driver for Microsoft Windows that allows you to send print jobs to your printer. - Page 196 - the Océ Wide format Printer Driver for Microsoft Windows Online Help ® ® - the Océ Wide format Printer Driver for Microsoft Windows User manual Note: Visit http://global.oce.com/support, select your driver and find manuals and downloads in the list. Chapter 4 - Use the Printing System...
-
Page 197: Use The Océ Postscript
® Use the Océ PostScript 3 Driver to send a print job ® Use the Océ PostScript 3 Driver to send a print job Introduction ® Océ provides the Océ PostScript 3 Driver that allows you to send print jobs to your printer. - Page 198 Features settings if necessary. Click 'OK' to send the print job to the Smart Inbox or the print queue. Note: For more information visit http://global.oce.com/support, select your driver and find manuals and downloads in the list Chapter 4 - Use the Printing System...
-
Page 199: Use Océ Publisher Mobile To Send A Print Job
All Océ TCS, TDS, ColorWave and PlotWave systems are supported. A user can plot all PDF*, PLT (HPGL1/2), TIFF, JPEG and DWF* files. Before you begin Download Océ Publisher Mobile from http://global.oce.com/support. Go to the software page under large format and select the product. Illustration Add a printer to Océ... - Page 200 Use Océ Publisher Mobile to send a print job Step Action Remarks The detected printer, indicated with a When your printer is not detect- 'Connection' icon, is added to your ed, you can add it manually. printer list. Tap the 'Add' printer button. From the printer list, select your printer.
- Page 201 Use Océ Publisher Mobile to send a print job Step Action Remarks Indicate the number of copies. Tap the green button Your job is sent to the printer. Chapter 4 - Use the Printing System...
-
Page 202: Print From Your Mobile Device
Print from your mobile device Print from your mobile device Introduction When you have access to Océ Mobile WebTools you can print a file from your mobile device on the printer . Note: You can navigate in a file repository on your mobile device. If needed, install a file ex- plorer application. - Page 203 Print from your mobile device Go to the 'Print' section, and select 'New job'. The 'Print job' window opens. Click on 'Select a file'. Browse to the file you want to print and click Open. Define the settings for your print job and click Ok. After you have defined your settings, click on the printer icon in the upper right hand corner.
-
Page 204: Use Ftp To Send A Print Job
Use FTP to send a print job Use FTP to send a print job Introduction The printer supports printing through FTP. When you send your print job through FTP the default Océ Express WebTools settings are leading. Note: You must enable printing through FTP in Océ Express WebTools. Note: For more information on how to create an external location via FTP on the user panel, ‘Create an external location’... - Page 205 Use FTP to send a print job Web browsers that support job submission through FTP Level of functionality Web browser Operation Supports drag and drop of ® Drag the jobs into the Microsoft Internet Ex- files 'Jobs' folder on the FTP plorer 6.0 (or higher) site of your printer.
-
Page 206: Use Lpr To Send A Print Job
Use LPR to send a print job Use LPR to send a print job Introduction The printer supports printing through LPR. When you send your print job through LPR the default Océ Express WebTools settings are leading. Note: You must enable printing through LPR in Océ Express WebTools. How to send a print job via LPR Type the following line command after the Command prompt: lpr -S <hostname or IP address>... -
Page 207: Use The Cloud To Send A Print Job
Use the cloud to send a print job Use the cloud to send a print job Introduction The cloud can be seen as a virtual network drive you use to send files to, but also to save and share files on. There are general cloud applications, such as SharePoint or applications via a HTTP URL, but companies can also use their own private and internal clouds. -
Page 208: Basic Print Jobs - Default
Do a default print job Basic Print Jobs - Default Do a default print job Introduction When you want to print a job and you do not make any settings the default presets are used. You only use the Smart Access to start your job. You can see the presets that are used in the job settings section of your job. - Page 209 Do a default print job Select the location of your job. Default, the public Smart Inbox. The jobs are listed in a new window. Select your job from the list. Tap the green button, next to the job settings. Result A print of your file is made.
-
Page 210: Direct Print
Direct print Direct print Introduction When you want to do a default print job: • You can print with direct print. When you print with direct print, the print job is sent to the queue immediately. • You can print without direct print. When you print without direct print you have to start the job locally at the printer. - Page 211 Direct print Go to the printer and open your Smart Inbox, via the Smart Access on the user panel. Select your job in the Smart Inbox. Tap the green button to print your job. Result Collect your output at the printer. Chapter 4 - Use the Printing System...
-
Page 212: Print From A Usb Mass Storage Device
Print from a USB mass storage device Print from a USB mass storage device Introduction With the help of a USB mass storage device, you can perform print and scan jobs on the printer. When you want to print from a USB device: Insert a USB device into the USB port on the multi-touch user panel. -
Page 213: Extended Print Jobs - Presets
Print presets on the user panel Extended Print Jobs - Presets Print presets on the user panel Introduction When you do not make different settings in Océ Express WebTools, the printer uses the default presets for print, copy, and scan jobs. Below the presets you can use to change the settings for print jobs on the multi-touch user panel are listed. -
Page 214: Extended Print Jobs - Advanced Settings
Advanced settings for print jobs Extended Print Jobs - Advanced Settings Advanced settings for print jobs Introduction When you tap the 'Print' tile on the multi-touch user panel, you can make your own settings. Apart from the preset tiles, you can select the advanced settings under 'All settings'. These settings are used for extended print jobs. - Page 215 Advanced settings for print jobs Preset category: 'Layout' Setting Settings values Function 'Cut size' 'Cut method': When set to 'Synchro', the print is cut • 'Synchro' depended of the image. • 'Standard' When set to 'Standard', the print is cut •...
- Page 216 Advanced settings for print jobs Setting Settings values Function 'Positioning' 'Alignment': 'Aligns the image on the media.' • 'Top left' • 'Top' • 'Top right' • 'Left' • 'Centre' • 'Right' • 'Bottom left' • 'Bottom' • 'Bottom right' 'Horizontal shift' 'Shifts the image in the horizontal direc- tion (after alignment to one of the posi- tions given in 'Alignment').'...
- Page 217 Advanced settings for print jobs Setting Settings values Function 'Scale' '1:1' Scales the image to the original size. 'Standard half size' Scales the image to half the media size present. 'Fit to media width' Scales the image to fit the media size you select from a list.
- Page 218 Advanced settings for print jobs Preset category: 'Finishing' Setting Settings values Function 'Delivery' 'Top Delivery Tray' Location on top of the printer, that de- posits the sheet face-down. Note: Not all media types can be deliv- ered to the 'Top Delivery Tray'. 'Back output' Location at the back of the printer, that deposits the sheet face-up.
-
Page 219: Basic Copy Jobs - Default
Advised settings for copy jobs Basic Copy Jobs - Default Advised settings for copy jobs Introduction A default copy job takes two steps: feed the original face up and tap the green button. When you change the presets or the advanced settings, it is an extended copy job. Advised settings for copy jobs It is best to predefine the advised settings for copy jobs you do most often. - Page 220 Advised settings for copy jobs Original document Original type Remarks Blueprints with white lines 'Blueprint' The image is inverted, that on a blue background is white is converted to black. Note: For highlighting colour on an otherwise monochrome original, select the listed original type and enable 'Colour highlighting'.
-
Page 221: Do A Default Copy Job
Do a default copy job Do a default copy job Introduction When you want to copy an original and you do not make any settings the default presets are used. You only use the Smart Access to submit your job. You can see the presets that are used in the job settings section of your job. - Page 222 Do a default copy job The 'Copy' tile with the copy Smart Access is automatically selected on the user panel. Select the number of copies and tap the green button. Note: Tap on 'Release the original' under the Smart Access, to release your original from the scanner.
-
Page 223: Extended Copy Jobs - Presets
Copy presets on the user panel Extended Copy Jobs - Presets Copy presets on the user panel Introduction When you do not make different settings in Océ Express WebTools, the printer uses the default presets for print, copy, and scan jobs. Below the presets you can use to change the settings for copy jobs on the multi-touch user panel are listed. -
Page 224: Make A Half Size Copy
Make a half size copy Make a half size copy Introduction When you want to scale your original to a 50% copy, you can select a preset on the user panel. Make a half size copy Feed the original face up and centred on the original feeding table. Note: You do not need to centre the original precisely. -
Page 225: Copy By Set
Copy by set Copy by set Introduction You can use the 'Create set' option to make multiple sets of copies. How to copy by set Feed the original face up and centred on the original feeding table. Note: You do not need to centre the original precisely. The exact position of the original is au- tomatically detected by the scanner. -
Page 226: Extended Copy Jobs - Advanced Settings
Advanced settings for copy jobs Extended Copy Jobs - Advanced Settings Advanced settings for copy jobs Introduction When you tap the 'Copy' tile on the multi-touch user panel, you can make your own settings. Apart from the preset tiles, you can select the advanced settings under 'All settings'. These settings are used for extended copy jobs. - Page 227 Advanced settings for copy jobs Preset category:'Layout' Preset Settings values Function 'Cut size' 'Cut method': When set to 'Synchro', the print is cut • 'Synchro' depended of the image. • 'Standard' When set to 'Standard', the print is cut • 'Custom' to a standard media size.
- Page 228 Advanced settings for copy jobs Preset Settings values Function 'Remove strip' 'Top' 'Erase a strip from the beginning of the original.' From 0 to 400 mm, or 0 to 16". 'Bottom' 'Erase a strip from the bottom of the original.' From 0 to 400 mm, or 0 to 16".
- Page 229 Advanced settings for copy jobs Preset Settings values Function 'Positioning' 'Alignment': 'Aligns the image on the media.' • 'Top left' • 'Top' • 'Top right' • 'Left' • 'Centre' • 'Right' • 'Bottom left' • 'Bottom' • 'Bottom right' 'Horizontal shift' 'Shifts the image in the horizontal direc- tion (after alignment to one of the posi- tions given in 'Alignment').'...
- Page 230 Advanced settings for copy jobs Preset Settings values Function 'Scale' '1:1' Scales the image to the original size. 'To media size' Scales to the selected media width. 'To standard size' Scales the image to fit the media size you select from a list. 'Custom' Scales the image to a custom percentage.
- Page 231 Advanced settings for copy jobs Preset category: 'Image' Preset Settings val- Settings values Function 'Original' 'Original type' 'Lines/text stan- Define the type of original you dard' use. For more information on 'Lines/text draft' choosing the correct original 'Coloured original' type, see ‘Advised settings for copy 'Folded lines/text' jobs’...
- Page 232 Advanced settings for copy jobs Preset Settings val- Settings values Function The width of the original is a standard size. Note: Depends on the media series you define in Océ Express WebTools 'Custom' The width of the original is a You can enter a size custom size.
- Page 233 Advanced settings for copy jobs Preset Settings val- Settings values Function 'Image' 'Colour high- 'On' When enabled all coloured infor- lighting' 'Off' mation is printed darker on the original than black/grey informa- tion. For instance, marked or highlighted text becomes more visible.
- Page 234 Advanced settings for copy jobs Preset Settings val- Settings values Function 'Area to 'Area to erase: From 0 to 914 'The horizontal offset where the erase' X origin' mm, or 0 to 36" erase area starts.' 'Area to erase: From 0 to 6000 'The vertical offset where the Y origin' mm, or 0 to 250".
- Page 235 Advanced settings for copy jobs Preset category: 'Finishing' Preset Settings values Function 'Delivery' 'Top Delivery Tray' Location on top of the printer, that de- posits the sheet face-down. Note: Not all media types can be deliv- ered to the 'Top Delivery Tray'. 'Back output' Location at the back of the printer, that deposits the sheet face-up.
-
Page 236: Make A Copy And Add A Strip
Make a copy and add a strip Make a copy and add a strip Introduction When you make a copy, you can add a strip to a document. Use 'Sheet size' to copy an original without a strip, and add a strip to the copy. You can add a strip at the top or bottom of a copy. - Page 237 Make a copy and add a strip Tap 'Cut size' under the 'Layout' preset. 'Add a leading strip' 'Add a trailing strip' Tap 'Add a leading strip' or 'Add a trailing strip', and define the values. Make your settings and tap 'OK'. Define the number of copies and tap the green button.
-
Page 238: Make A Copy And Remove A Strip
Make a copy and remove a strip Make a copy and remove a strip Introduction When you have an original with a strip, you can remove the strip from your copy. Use the option on the user panel to copy an original with a strip, and remove the strip from the copy. - Page 239 Make a copy and remove a strip Result The printer copies the original without the defined strip. You can also use this setting to copy a specific area of the original. For more information, see ‘Make a copy of a specific area of an original’ on page 240.
-
Page 240: Make A Copy Of A Specific Area Of An Original
Make a copy of a specific area of an original Make a copy of a specific area of an original Introduction You can make a copy of a specific area of an original. Use the option 'Remove strip' to copy a specific area. Before you begin When you remove a strip, make sure that you copy all the required information. - Page 241 Make a copy of a specific area of an original Result The printer copies a specific area of the original. Chapter 4 - Use the Printing System...
-
Page 242: Make A Copy And Remove A Specific Area Of An Original
Make a copy and remove a specific area of an original Make a copy and remove a specific area of an original Introduction You can make a copy and delete a specific area of an original. You can use two settings: 'Area to erase: width' and 'Area to erase: length', to define the dimensions of the delete area. -
Page 243: Make A Copy And Scale To Another Size
Make a copy and scale to another size Make a copy and scale to another size Introduction When you want to scale your copy to another size, you can make changes under the ad- vanced settings. With the custom setting you can choose any scale percentage you want, between the range of 10 - 1000%. - Page 244 Make a copy and scale to another size Result A copy of the original, scaled with your percentage, is made. Chapter 4 - Use the Printing System...
-
Page 245: Make A Copy On A Cut Sheet
Make a copy on a cut sheet Make a copy on a cut sheet Introduction You can copy on cut sheet media when the required media type or size is not available on the media rolls of the printer. How to copy on a cut sheet Feed the original face up and centred on the original feeding table. - Page 246 Make a copy on a cut sheet Place the cut sheet media on the media bypass of the printer. Note: Use the media size indication on the media bypass to align the cut sheet media correctly. When you use a B1 media size (707 mm) you must align the cut sheet media with the A1 indent.
-
Page 247: Make A Copy With A Stamp
Make a copy with a stamp Make a copy with a stamp Introduction A stamp is a mark you can put on every copy. Before you begin To enable the stamp functionality, you must first create a stamp in Océ Express WebTools. For more information on how to do this, see ‘Create a stamp’... -
Page 248: Basic Scan Jobs - Default
Advised settings for scan jobs Basic Scan Jobs - Default Advised settings for scan jobs Introduction A default scan job takes three steps: feed the original face up, select the location in the scan Smart Access, and tap the green button. When you change the presets or the advanced settings it is called an extended scan job. - Page 249 Advised settings for scan jobs Original document Original type Remarks Dark originals and dark 'Dark original' The renewed 'Dark origi- transparent originals nal' setting is best for all CAD originals with vary- ing background. Diazo copies / "Chinese 'Dark original' blueprints"...
-
Page 250: Do A Default Scan Job
Do a default scan job Do a default scan job Introduction When you want to scan an original and you do not make any settings the default presets are used. You only use the Smart Access to submit your job. You can see the presets that are used in the job settings section of your job. - Page 251 Do a default scan job Select the 'Scan' tile on the user panel. The scan Smart Access is visible. Select the preferred location in the Smart Access and tap the green button. Note: When you do not select a location the file is sent to the public Smart Inbox. Note: Tap on 'Release the original' under the Smart Access, to release your original from the scanner.
-
Page 252: Extended Scan Jobs - Locations And Presets
Scan presets on the user panel Extended Scan Jobs - Locations and Presets Scan presets on the user panel Introduction When you do not make different settings in Océ Express WebTools, the printer uses the default presets for print, copy, and scan jobs. Below the presets you can use to change the settings for scan jobs on the multi-touch user panel are listed. -
Page 253: Scan A Photo To 'Jpeg' Format
Scan a photo to 'JPEG' format Scan a photo to 'JPEG' format Introduction When you want to scan a photo to 'JPEG' format, you can select the presets on the user panel. Feed the original face up and centred on the original feeding table. Note: You do not need to centre the original precisely. -
Page 254: Scan Cad Colour To 'Tiff' Format
Scan CAD colour to 'TIFF' format Scan CAD colour to 'TIFF' format Introduction When you want to scan a 'CAD colour' to 'TIFF' format, you can select the presets on the user panel. Feed the original face up and centred on the original feeding table. Note: You do not need to centre the original precisely. -
Page 255: Scan To A Usb Mass Storage Device
Scan to a USB mass storage device Scan to a USB mass storage device Introduction When you insert a USB device in the user panel, you can scan to USB. Before you begin Before you scan to USB, make sure the right functionalities are enabled. For more infor- mation see, ‘Enable or disable USB’... -
Page 256: Scan To An External Location
You only use the Smart Access to submit your job. In the Smart Access you can select the location you want to sent your scan to. With the Océ PlotWave 340/360 printer you can use the following external location types: •... - Page 257 Scan to an external location Select the 'Scan' tile on the user panel. The scan Smart Access is visible. Select the preferred location in the Smart Access. Tap the 'Scan' tile once more, when you want to change the settings. Tap the green button.
-
Page 258: Scan To A Smart Inbox And Collect Your File
Scan to a Smart Inbox and collect your file Scan to a Smart Inbox and collect your file Introduction When you scan a document on the printer, the public Smart Inbox is the default location you scan to. You can also choose another Smart Inbox as your location in the Smart Access of the user panel. - Page 259 Scan to a Smart Inbox and collect your file Select the 'Scan' tile on the user panel. The scan Smart Access is visible. Select the preferred Smart Inbox in the Smart Access. Tap the 'Scan' tile once more, when you want to change the settings. Tap the green button.
- Page 260 Scan to a Smart Inbox and collect your file In the Smart Inbox, select your job. In the bar above select 'Send to...', to send your job to the destination you want to save it in. Or select 'Save' to save your job locally. Result Your scanned file is saved at the preferred destination.
-
Page 261: Save A Scanned Document On Your Mobile Device
Save a scanned document on your mobile device Save a scanned document on your mobile device Introduction When you have access to Océ Mobile WebTools you can scan a document from the printer and save it on your mobile device. Before you begin Make sure you have a working connection, for more information see ‘Connect your mobile... -
Page 262: Extended Scan Jobs - Advanced Settings
Available settings for scan jobs Extended Scan Jobs - Advanced Settings Available settings for scan jobs Introduction When you tap the 'Scan' tile on the multi-touch user panel, you can make your own settings. Apart from the preset tiles, you can select the advanced settings under 'All settings'. These settings are used for extended copy jobs. - Page 263 Available settings for scan jobs Preset: 'File type' Setting Settings val- Settings values Function 'File type' Type 'TIFF' 'The file type of the scanned im- 'TIFF multipage' age. The list of file types depends 'PDF' on scan to colour, greyscale, or 'PDF multipage' black-and-white: CALS is only 'PDF/A'...
- Page 264 Available settings for scan jobs Preset: 'File size' Setting Settings values Function 'Resolution' '100' 'The resolution of the scanned image in '200' dpi.' '300' '400' '600' Chapter 4 - Use the Printing System...
- Page 265 Available settings for scan jobs Setting Settings values Function 'Remove strip' 'Top' 'Erase a strip from the beginning of the original.' From 0 to 400 mm, or 0 to 16". 'Bottom' 'Erase a strip from the bottom of the original.' From 0 to 400 mm, or 0 to 16".
- Page 266 Available settings for scan jobs Preset: 'Image' Setting Settings val- Settings values Function 'Original' 'Original type' 'Lines/text stan- Define the type of original you dard' use. For more information on 'Folded lines/text' choosing the correct original 'Coloured original' type, see ‘Advised settings for scan 'Artwork' jobs’...
- Page 267 Available settings for scan jobs Setting Settings val- Settings values Function The width of the original is a standard size. Note: Depends on the media series you define in Océ Express WebTools 'Custom' The width of the original is a You can enter a size custom size.
- Page 268 Available settings for scan jobs Setting Settings val- Settings values Function 'Image' 'Colour high- 'On' When enabled all coloured infor- lighting' 'Off' mation is printed darker on the original than black/grey informa- tion. For instance, marked or highlighted text becomes more visible.
-
Page 269: File Type
'File type' 'File type' Depending on the colour mode and file type you select, the values for the compression mode and organisation change. For some file types and some situations, the compression and organisation settings cannot be set. The list below helps you to define the correct file type and colour mode, and shows you which compression and organisation settings are possible. - Page 270 'File type' Colour mode: Greyscale 'Colour' mode 'File type' 'Organisation' 'Compression' 'JPEG quality' 'Greyscale' 'TIFF' 'Raw' 'LZW' Not applicable 'TIFF multi- 'Striped' 'Packbits' page' 'Tiled' 'None' 'PDF' Not applicable 'Flate' Not applicable 'PDF multi- 'LZW' page' 'None' 'JPEG' 'Maximum' 'High' 'Medium' 'Low' 'PDF/A'...
- Page 271 'File type' Colour mode: Black and White 'Colour' mode 'File type' 'Organisation' 'Compression' 'JPEG quality' 'Black&white' 'TIFF' 'Raw' 'Group 4' Not applicable 'TIFF multi- 'Striped' 'Group 3' page' 'Tiled' 'Packbits' 'None' 'PDF' Not applicable 'Group 4' Not applicable 'PDF multi- 'Flate' page' 'LZW'...
-
Page 272: Make A Scan And Remove A Strip
Make a scan and remove a strip Make a scan and remove a strip Introduction When you have an original with a strip, you can remove the strip from your scanned file. Use the option 'Remove strip' on the user panel to scan an original with a strip and remove the strip from the file. - Page 273 Make a scan and remove a strip Select'Top', 'Bottom', 'Left', or 'Right' and define the values. Make your settings and tap 'OK'. Tap the green button. Result The printer scans the original to file without the defined strip. The file is sent to your preferred location.
-
Page 274: Pause, Stop, Or Clear The System
Pause, resume, or stop an active job Pause, Stop, or Clear the System Pause, resume, or stop an active job Introduction When you want to pause, resume, or stop an active job there are several things you can How to 'Pause' or 'Resume' an active print job Steps Illustration tion... - Page 275 Pause, resume, or stop an active job How to stop an active print job in Océ Express WebTools Step Action Result Open the 'Jobs' tab. In the 'Jobs - Queue' section tick the box The system aborts and deletes in front of the job you want to delete and the job.
-
Page 276: Clear The System
Clear the system Clear the system When to do On the printer user panel, you can remove all print and copy jobs from the system. How to clear the system On the multi-touch user panel: Tap the 'System' thumbnail in the dynamic bar . A new window opens. In the 'Setup' list in the bottom right corner of the screen, select 'Clear system'. -
Page 277: Maintain The Printing System
Chapter 5 Maintain the Printing Sys-... -
Page 278: Update Your System
Update the system software Update your System Update the system software Introduction Océ Express WebTools offers an option to update the system software. You can find these settings under the 'Support' - 'Update' tab. The update option has the following functionalities: •... - Page 279 Update the system software You must wait approximately 15 minutes for the files to upload. The progress bar, at the bottom of the page, indicates the progress. When the upload is finished, click 'Ok'. A dialogue window appears. To start the installation click on'Ok'. When you do this, a warning message is displayed. The user panel now displays the message 'Do not switch off the system.', 'The system is installing the software.', 'This may take a while.'.
-
Page 280: Move The Printing System
Switch off the printing system Move the Printing System Switch off the printing system Introduction When you want to switch off the printing system completely, you have to take a few steps. Use the on / off button at the front of the printer to switch the printing system off. The lighted button starts to blink. - Page 281 Switch off the printing system Switch off the power switch at the back of the printing system (A). Chapter 5 - Maintain the Printing System...
-
Page 282: Disconnect The Network Cable And The Mains Supply Cable
Disconnect the network cable and the mains supply cable Disconnect the network cable and the mains supply cable Attention: Make sure the main power switch (A) is in 'off' position. Disconnect the network cable from the network connection at the back of the printer (C). -
Page 283: Move And Re-Adjust The Printing System
Move and re-adjust the printing system Move and re-adjust the printing system Introduction When you move the printing system to a new location, you must check if it needs re- adjustment to ensure the best output quality. You need two tools for the adjustment procedure. You can find these tools behind the lower right front cover. - Page 284 Move and re-adjust the printing system Pull firmly to open the media drawer. Slide the lower left front cover (1) to remove it. Check if the level indicator arrow is exactly on the middle of the marker. If no, continue with step 5. Chapter 5 - Maintain the Printing System...
- Page 285 Move and re-adjust the printing system If yes, continue with step 9. Slide the lower right front cover (11) to remove it, and get access to the tools you need for the adjustment procedure. Chapter 5 - Maintain the Printing System...
- Page 286 Move and re-adjust the printing system Loosen the nut with the key wrench. Use the Allen key to adjust the level, until the level indicator arrow is exactly on the middle of the marker. Chapter 5 - Maintain the Printing System...
- Page 287 Move and re-adjust the printing system Lock the nut with the key wrench. Place the lower left front cover back. Chapter 5 - Maintain the Printing System...
- Page 288 Move and re-adjust the printing system Place the tools and the lower right front cover back. Close the media drawer. Chapter 5 - Maintain the Printing System...
-
Page 289: Connect The Mains Supply Cable And The Network Cable
Connect the mains supply cable and the network cable Connect the mains supply cable and the network cable Attention: Make sure the power switch(B) is in 'off' position. Plug the mains supply cable in the power connection, at the back of the printer (A) (on the left hand side). -
Page 290: Switch On The Printing System
Switch on the printing system Switch on the printing system Attention: Make sure the mains supply cable (A) is plugged in. Attention: Make sure the network cable (C) is plugged in. Switch on the power switch at the back of the printing system (B). [230] The power switch at the back of the printer. -
Page 291: Replace The Media
The media drawer Replace the Media The media drawer Illustration Component - function table Component Description / Function roll holder Carries the media roll media roll 1 Media placed on roll holder in first position. media roll 2 (optional) Media placed on roll holder in second position. Note: The scanner calibration sheet is located at the back of roll 2. - Page 292 The media drawer Component Description / Function clean cut button Button used to trim a strip of a new or damaged media roll. Chapter 5 - Maintain the Printing System...
-
Page 293: Remove A Media Roll
Remove a media roll Remove a media roll Attention: Handle the media roll with care. A dented media roll can damage the printer. Attention: Do not open the media drawer during the printing process. Caution: Watch your fingers when you handle the media roll. Caution: When you want to remove an A0 media roll from position 2 make sure to bend your knees, as indicated below, to spare your back. - Page 294 Remove a media roll Illustration How to remove a media roll Pull firmly on the media drawer to open it. Chapter 5 - Maintain the Printing System...
- Page 295 Remove a media roll Roll the media back manually, to remove the media from the metal paper guide. Use both hands (as indicated) to lift the roll holder with the media roll, and put it on the roll loading station. Pull the handle of the roll holder locking mechanism towards you, and remove the roll holder from the core of the media roll.
- Page 296 Remove a media roll Put the empty roll holder back into the drawer (as shown in the illustrations) Remove the media roll from the roll loading station. Store it in a safe place, so that it cannot fall over or roll away. Chapter 5 - Maintain the Printing System...
-
Page 297: Unpack The Media Roll
Unpack the media roll Unpack the media roll Attention: Handle the media roll with care. A dented media roll can damage the printer. Attention: Please refer to the list of ‘Preferred Océ media types and sizes’ on page 365 to find the corre- sponding media name that you must select. - Page 298 Unpack the media roll Remove the plug from the media roll. Carefully remove the media roll from the box. Remove the other plug and plastic around the media roll. Chapter 5 - Maintain the Printing System...
-
Page 299: Load A Media Roll (Position 1)
Load a media roll (position 1) Load a media roll (position 1) Note: When your printing system is equipped with an additional media roll, it is advised to load an A0 or E-size media roll on position 1 and an A2 or C-size media roll on position Caution: Watch your fingers when you handle the media roll. - Page 300 Load a media roll (position 1) Slide (2) the roll holder into the right side of the core of the new media roll. Align the roll with the centre of the correct size indicator on the roll holder and release the handle of the locking mechanism.
- Page 301 Load a media roll (position 1) Note: When you use a B1 media size (707 mm), you must align the media roll with the A1 in- dent. Remove the tapes from the new media roll. Use both hands (as indicated) to place the media roll in the media drawer. Chapter 5 - Maintain the Printing System...
- Page 302 Load a media roll (position 1) Use both hands to turn the media roll backwards (1) until the media flap has passed the metal paper guide. Use both hands to slide the media under the metal paper guide (2) until the media is transported automatically.
- Page 303 Load a media roll (position 1) If necessary, press the clean cut button to trim a strip of the new media roll. Press once for a strip of approximately 20 cm, or hold the button and release it when the strip has the desired length.
-
Page 304: Load A Media Roll (Position 2)
Load a media roll (position 2) Load a media roll (position 2) Note: When your printing system is equipped with an additional second media roll, it is advised to load an A0 or E-size media roll on position 1 and an A2 or C-size media roll on posi- tion 2. - Page 305 Load a media roll (position 2) Slide (2) the roll holder into the right side of the core of the new media roll. Align the roll with the centre of the correct size indicator on the roll holder and release the handle of the locking mechanism.
- Page 306 Load a media roll (position 2) Remove the tapes from the new media roll. Use both hands (as indicated) to place the media roll in the media drawer. Use both hands to turn the media roll backwards (1) until the media flap has passed the metal paper guide.
- Page 307 Load a media roll (position 2) Use both hands to slide the media under the metal paper guide (2) until the media is transported automatically. If necessary, press the clean cut button to trim a strip of the new media roll. Press once for a strip of approximately 20 cm, or hold the button and release it when the strip has the desired length.
- Page 308 Load a media roll (position 2) Note: Do not open the media drawer during loading. The user panel displays the message that new media is detected. Follow the steps in the wizard to define the correct media type and size, when not detected automatically. Chapter 5 - Maintain the Printing System...
-
Page 309: Change The Media Type And Media Size
Change the media type and media size Change the media type and media size Introduction When you load a new type of media, the system automatically detects the new media and can ask you to enter the correct media type and size. When the media type or size defined on the system, are not correct you can change these settings. -
Page 310: Refill The Toner
When a ‘Refill toner’ message appears on the user panel, you need to refill the toner. Note: Make sure you use toner suitable for the PlotWave 340/360. Note: You must use only one bottle of toner at a time. When you use more than one bottle, the compartment will flood and toner will spill. - Page 311 Refill the toner How to refill the toner Open the toner compartment. Shake the toner bottle well. Leave the bottle closed. Place the bottle on the refill opening of the toner unit. Chapter 5 - Maintain the Printing System...
- Page 312 Refill the toner Pull the slider towards you to open both the bottle and the refill opening of the toner unit. Tap the toner bottle gently (sideways), to let the toner flow from the bottle. When the toner bottle is empty, return the slider of the toner unit to the original position to close the refill opening and the toner bottle.
-
Page 313: Replace The Residual Toner Container
Replace the residual toner container Replace the residual toner container Introduction When you refill the toner, you also need to replace the residual toner container. Attention: Do not replace the container during the printing process. You can replace the container when the printer is on. - Page 314 Replace the residual toner container Remove the full residual toner container. Note: The residual toner container can be disposed normally. Place the empty residual toner container. Close the residual toner compartment. Chapter 5 - Maintain the Printing System...
-
Page 315: Maintain The Scanner
Clean the scanner Maintain the Scanner Clean the scanner Introduction Component Description / Function originals exit Exits originals for reception into the front original tray. original size ruler Use this ruler to measure the original. original feed rollers A set of rollers used to transport the origi- nal. - Page 316 Clean the scanner Component Description / Function original feeding table Use this table to feed the original into the scanner. When to do The copy and scan quality can decrease if: • the transparent contact plates are dirty or static, •...
- Page 317 Clean the scanner A locking mechanism prevents the scanner top cover from closing. Attention: To clean the scanner use the soft lint-free muslin towels from the scanner cleaning kit. Use a muslin towel that has been moistened with water and firmly wrung out to clean the following parts of the scanner: Chapter 5 - Maintain the Printing System...
- Page 318 Clean the scanner • The original support rollers (6) Rotate the rollers to clean them. • The transparent contact plates (9) Wipe off any soiled areas. Wipe all the cleaned parts once again using a dry Muslin towel. Caution: Watch out, not to get your fingers caught in the scanner top cover. Press the scanner top cover down gently with both hands, to close it.
-
Page 319: Calibrate The Scanner
Calibrate the scanner Calibrate the scanner Introduction You can calibrate the scanner when you are not satisfied with the copy or scan quality. Use the calibration wizard to calibrate the scanner. Before you begin Clean the scanner before you start the calibration procedure. Dirty parts of the scanner cause a decreased copy and scan quality. - Page 320 Calibrate the scanner Tap the 'Scanner calibration' tile. A wizard opens up. Follow the instructions in the wizard. Insert the scanner calibration sheet when instructed in the wizard. Tap the green button to start the scanner calibration. Note: 'Calibrating the scanner takes between 5 to 10 minutes.' Chapter 5 - Maintain the Printing System...
-
Page 321: License Management
Chapter 6 License Management... -
Page 322: Introduction To License Management
Introduction to license management Introduction to license management Introduction For certain applications your printer uses, you need to activate a license. You can activate them in Océ Express WebTools. The following workflow describes how you can do this. The workflow View the current active licenses. -
Page 323: Check Your Licenses
Description 'Option' This field displays the name of the option. The following licenses are available for your printer: • The Océ PlotWave 340 or the Océ PlotWave 360 Product license • 'License for Adobe PostScript 3 / PDF' • ®... -
Page 324: Save The Currently Active Licenses
Save the currently active licenses Save the currently active licenses Introduction You can save all active licenses into one single file. When to do Save the currently active licenses before you start a license activation job, or when you want to save the current license situation. How to save the license information Note: For this procedure, you need to log in as a System administrator or Power user. -
Page 325: Install A New License
Install a new license Install a new license Introduction The Océ applications and optional functions are protected against unauthorised use. You need to activate a license to enable an application. Under the 'Licenses' tab in Océ Express WebTools you can upload new license files. Note: After the license is uploaded you must restart your system to activate the license file. - Page 326 Install a new license Note: When you do not check the box for agreement, your license will not be installed. Click 'Next'. Click 'Ok' to start the activation of the license file. A message appears when the process is completed. Restart the system to activate the changes.
-
Page 327: Chapter 7 Account Management
Chapter 7 Account Management... -
Page 328: An Overview Of Océ Account Center
Use Océ Account Center to manage the account information of print jobs, copy jobs, and scan jobs for your Océ devices. Note: For this application a separate user manual is available. Visit http://global.oce.com/sup- port, select your printer and find your manual in the list. Definition Océ... - Page 329 An overview of Océ Account Center Illustration User roles and tasks in Océ Account Center Users Tasks 1) Administrator • Create, manage, and delete the account dialogue. • Publish the account dialogue to Océ Express WebTools and the user panel. 2) Users •...
-
Page 330: Océ Account Console
Introduction to Océ Account Console ® Océ Account Console Introduction to Océ Account Console Definition Océ Account Console is installed on the administrator's workstation. Access to Océ Ac- count Console is password protected and limited to the administrator. Purpose Océ Account Console has the following functionalities: •... -
Page 331: Summary Of Océ Account Console
Summary of Océ Account Console Summary of Océ Account Console Main parts of Océ Account Console An administrator uses Océ Account Console to perform a number of maintenance and configuration tasks. The main functional areas of Océ Account Console are described in the table below. Main parts of Océ... - Page 332 Summary of Océ Account Console Part Description The 'Devices' tab 'Devices' section. • 'Create...'. Use this option to create a new device. • 'Delete'. Use this option to remove the device. The log data for the device is removed as well. Please note that this action cannot be reversed.
- Page 333 Summary of Océ Account Console Part Description The 'Administra- The administrator screen enables you to perform the following tion' screen. actions. • Change the password. • Publish the data that are retrieved from other applications. • Define the remaining settings for Océ Account Console. •...
-
Page 334: Enable Account Management In Océ Express Webtools
Enable account management in Océ Express WebTools Enable account management in Océ Express WebTools Introduction To enable account management you can define the values in Océ Express WebTools Definition The account information requirements are defined and managed by the administrator. How to define the 'Logging and accounting' settings Open the 'Preferences' - 'System defaults' tab, and under 'Job management' enable the 'Force entry of accounting data'. - Page 335 Enable account management in Océ Express WebTools Setting Value Description 'Number of days to Enter a value between 1 and 99 days. keep log files' meric value Accounting data missing In case the required accounting data is missing, the icon is displayed in front of the job in the 'Smart Inbox'.
-
Page 336: Accounting Workflow
After the administrator configures the settings, accounting can be integrated in the workflow. Workflow Define an accounting dialogue and publish it. Add the Océ PlotWave 340/360 to the devices in Océ Account Console and configure the tasks. Note: Try to retrieve log data every day, when the printer is On. -
Page 337: Chapter 8 Support
Chapter 8 Support... -
Page 338: Counter History
'Counter history' 'Counter history' Introduction Navigate to the 'Support' - 'Counter history' tab to get an overview of the consumables used per printed job. The table below gives an overview of the various functionalities you can access in the 'Counter history' to sort, group, save, or print the information you need. Note: To access the 'Counter history' functionality you must log on as a Key operator or as a System administrator. - Page 339 'Counter history' Functionali- Description 'View total Select 'View total info' in the upper right hand corner of the counter info' history list, when you want to have a complete overview with job counter information. Click on a group name to display counter information for all the jobs in the group.
-
Page 340: View Events
View events View events Introduction Feedback on errors related to print jobs is displayed in the event list. You can open the event list when you click on 'View events' in the 'Jobs' tab in Océ Express WebTools. Next to this, you can make additional settings to receive more feedback. Additional settings to view events The settings you can make to get additional feedback from the system are listed below: Open the 'Preferences' - 'System defaults' tab. -
Page 341: Event Messages
Event messages Event messages Introduction You can open the event list when you click 'View events' in the 'Jobs' tab. Overview event messages Event message Troubleshoot • 'Partially printed job aborted due Check the structure and keywords of the Océ to reception problem (protocol Job Ticket. - Page 342 Event messages Event message Troubleshoot 'PS/PDF limitation, one or more The Postscript or PDF file causes an internal pages not correctly printed' printer error. • Try to print it from an application using the ® Océ Windows Printer Driver. • If the error persists, contact Océ...
- Page 343 Event messages Event message Troubleshoot 'Job was deleted from the queue The job has been deleted from the print queue after a media request timeout' because the time-out of the media request expired and the 'Action after media request time-out' is set to 'Delete the job' •...
- Page 344 Event messages Event message Troubleshoot 'Print settings conflict: the docu- The print job contains a non-supported structure ment is identified and printed of embedded Océ Job Tickets. The settings you with the settings embedded in have selected in the submission application are not the file' used.
-
Page 345: Remote Service
Remote Service Remote Service Introduction Océ Express WebTools offers remote services from the printer to Océ, or from Océ to the printer. You can edit these settings in the 'Support' - 'Remote Service' tab in the Océ Express WebTools. 'Remote Service' has the following options: •... - Page 346 Remote Service A message diplays the answer, within 30 seconds. When configured correctly, the message: 'The system is connected to Océ Remote Service' is displayed. Now the system is able to send data to Océ. For example, Océ Meter Manager, or Océ 'Remote Service' information.
- Page 347 Remote Service The system creates a zip file that contains the technical and audit log files in a textual format. You can save the zip file locally. Chapter 8 - Support...
-
Page 348: Solve Problems
How to solve problems with jobs Solve Problems How to solve problems with jobs When there is a problem with a job, the colour of the green 'Jobs - Queue' bar in Océ Express WebTools turns red. The System Monitor section of Océ Express WebTools displays the message: 'User inter- vention required'. -
Page 349: Clear An Original Jam In The Scanner
Clear an original jam in the scanner Clear an original jam in the scanner Introduction When an original jam occurs in the scanner, the message 'Scanner original jam' appears on the user panel. You must remove the original from the scanner. When an original jam often occurs: •... -
Page 350: Clear A Media Jam In The Heater Section
Clear a media jam in the heater section Clear a media jam in the heater section Attention: During normal use the fuser has to remain closed. Only open it to remove the media after a media jam. When a media jam occurs in the heater section, take the following steps: Wait a few moments to let the heater cool down. - Page 351 Clear a media jam in the heater section Use the media jam clearance handle to open the upper back cover. Remove any jammed printing material from the fuser section. Press the green knob on the media jam clearance handle and close the upper back cover. Note: Make sure you close the upper back cover properly: make sure you hear a click.
-
Page 352: Clear A Media Jam In The Media Bypass Section
Clear a media jam in the media bypass section Clear a media jam in the media bypass section When a media jam in the media bypass section occurs, take the following steps: Open the lower front cover. Chapter 8 - Support... - Page 353 Clear a media jam in the media bypass section Lower the media bypass, by pressing the handles on the left and the right. Remove any jammed media. Chapter 8 - Support...
- Page 354 Clear a media jam in the media bypass section Note: When the material cannot be removed easily, open the upper back cover with the media jam clearance handle to access to the jammed material. For more information, see ‘Clear a media jam in the heater section’ on page 350).
-
Page 355: Clear A Media Jam In The Roll Feed Section
Clear a media jam in the roll feed section Clear a media jam in the roll feed section When a media jam in the roll feed section occurs, take the following steps: Firmly pull the media drawer to open it. Remove any jammed printing material from the paper path and, if necessary, pull back the media and rewind it. -
Page 356: Print A Demo Print
Print a demo print Print a demo print When to do You can print a demo print to check if the printer works correctly. How to print a demo print On the multi-touch user panel: Tap the 'System' thumbnail. A window opens. In the 'Setup' list in the bottom right corner of the display, select 'Test prints'. -
Page 357: Print A Test Print
Print a test print Print a test print When to do Print a test print from roll 1 or 2 at the request of the Océ Helpdesk. The test print pro- vides information that can help to solve quality problems. How to print a test print On the multi-touch user panel: Tap the 'System' thumbnail. -
Page 358: Print The Print Density Chart
Print the print density chart Print the print density chart When to do To influence the toner usage of your printer you can print the print density chart and adjust the print density offset. A negative value reduces the toner usage, a positive value increases the toner usage. -
Page 359: Chapter 9 Specifications Of The Printer
Chapter 9 Specifications of the printer... -
Page 360: Specifications
Océ Radiant Fusing technology Toner/Ink type Océ black toner: 0.4 kg per bottle Speed Black and white: Océ PlotWave 340: 240 (A1/D-size)/hr, 138 ppm (A0/E- size)/hr Océ PlotWave 360: 335 (A1/D-size)/hr, 186 (A0/E-size)/hr Resolution 600 x 1200 dpi... - Page 361 Specifications Component Specifications Roll width 297 - 914 mm; 11 - 36" Output delivery Top delivery tray Media type Paper, Recycled Paper, Transparent, Translucent, Paper, Vel- lum, Film. User panel Component Specifications Description Océ ClearConnect multi-touch user panel Size (WxDxH) 300 x 220 x 40 mm;...
- Page 362 Specifications Scanner Component Specifications Description Contact Image Sensor (CIS) with Océ Colour Image Logic technology Scan resolution 600 x 600 dpi Scan speed Copying: 7 m/min; 23 ft/min Black & white scanning: 14.6 m/min; 47.9 ft/min Colour scanning: 5.1 m/min; 16.7 ft/min Scan format TIFF, PDF, PDF/A, JPEG, CALS, NIFF, multi-page PDF, multi-page PDF/A and multi-page TIFF...
- Page 363 Specifications Component Specifications Power consump- Sleep mode: 41 W (115 V / 60 Hz: 39 W) tion Standby mode: 88 W (115 V / 60 Hz: 92 W) Print mode: 1.4 kW (115 V / 60 Hz: 1.5 kW) Per print: 45 Wh/A0 (EPA ENERGY STAR TEC method Recycle Hardware: made of steel or highly recyclable plastics: up to 95% of the engine can either be upcycled or recycled.
- Page 364 Specifications Component Specifications Software ® Océ View Station, Océ Repro Desk Studio, Océ Repro Desk Web Client, Océ Repro Desk Select, Océ Repro Desk Profes- sional, Océ Client Tools Chapter 9 - Specifications of the printer...
-
Page 365: Preferred Océ Media Types And Sizes
Preferred Océ media types and sizes Preferred Océ media types and sizes Introduction Océ machines and media are matched for the best quality and performance. Océ recom- mends the use of approved Océ media. You can receive a list of media (that includes plain or recycled paper, transparent paper, coloured papers, and different polyester films) from your Océ... - Page 366 Preferred Océ media types and sizes Name Europe Weight Name US Weight Translucent 68 gr Translucent 18lb Vellum 75 gr Vellum 20lb Note: Visit the company website for the latest information. Media sizes Maximum Minimum Roll width 914 millimetres 279 millimetres 36 inch 11 inch Roll length...
-
Page 367: Chapter 10 Contact
Chapter 10 Contact... -
Page 368: Online Support For Your Product
A Knowledge Base (OKB) with answers to your questions or problems is continuously being updated. To find an answer to your question or problem, please visit: http://global.oce.com/support and select your product. In the Support section, use the search field to enter your question. You will get a list of possible answers. - Page 369 Online support for your product Addresses local Océ organisations For the addresses of local Océ organisations visit: http://global.oce.com/contact/countries Comments Send your comments by e-mail to: itc-userdoc@oce.com Chapter 10 - Contact...
-
Page 370: Reader's Comment Sheet
Reader's comment sheet Reader's comment sheet Questions Have you found this manual to be accurate? O Yes O No Were you able to operate the product, after reading this manual? O Yes O No Does this manual provide sufficient background information? O Yes O No Is the format of this manual convenient in size, readability and arrangement (page layout,... - Page 371 Please return this sheet to: Océ-Technologies B.V. For the attention of ITC User Documentation. P.O. Box 101, 5900 MA Venlo The Netherlands Send your comments by E-mail to: itc-userdoc@oce.com For the addresses of local Océ organisations see: http://www.oce.com Chapter 10 - Contact...
- Page 372 Index Auto-feed the original Index description ............186 Automatic roll switch Automatic roll switch ........175 Automatic wake-up Automatic wake-up ........159 Back output Access control description ............35 Enable ..........129–130 Basic settings Account management Basic settings ..........100 Océ Express WebTools .........334 Browser security settings Action after media request time-out Browser security settings .........77...
- Page 373 Index description ............266 with a stamp ..........247 Colour mode Copy job defaults black and white ........149, 271 description ............104 ..........147, 269 colour Océ Express WebTools .........104 Copy job presets description ............266 ..........148, 270 Copy job presets ...........140 greyscale Components media drawer Copy jobs clear an original jam ........349...
- Page 374 Index External location Basic settings ..........100 Demo print generate CA-signed certificate request ...133 print .............356 import a CA-signed certificate ......135 Direct print scan to ............256 print with or without ........210 External locations Disconnect description ............55 mains supply cable ........282 error messages ..........155 network cable ..........282...
- Page 375 Index Green button Job preview description ..........33, 45 description ............58 Job settings Smart Access ...........47 Green button approach description ............55 Job states default job ............182 Queue ............83 Smart Inbox ............83 Job submission description ............182 Horizontal shift ..............204 Layout settings ..........102 ..............206 Océ...
- Page 376 Media selection policy general copy job settings .......104 Sheet settings ..........101 Media size description ...........214, 226 Main components Media sizes Océ PlotWave 340/360 ........20 Media sizes ...........162 Main concepts specifications ..........366 the Smart Inbox ..........62 Media source Mains supply cable description ...........214, 226...
- Page 377 Index Move the printing system Océ media types description ............283 preferred media ..........365 Océ Mobile WebTools Configure settings ........166 Connection ..........170 Introduction ..........164 Network cable Password ............170 connect ..........26, 289 Print job ............202 disconnect ............282 QR Code ............170 Network duplex mode Quick Response Card ........168 Network duplex mode...
- Page 378 Index E-shredding states ...........88 for copy jobs ..........223 print job settings user panel ......214 for print jobs ..........213 remote service states ........87 for scan jobs ..........252 scanner states ..........87 main concept ..........53 Preshared key system states ...........86 toner states .............87 Preshared key ..........130 Preview...
- Page 379 Index Printer top cover Media roll (position 1) .........299 description ............28 Media roll (position 2) .........304 Printing system the residual toner container ......313 footprint ............25 Residual toner compartment move ............283 description ............30 re-adjust ............283 Residual toner container switch off ............280 replace ............313 Resolution...
- Page 380 Index Settings overview Scan job presets ..........140 Scan jobs copy jobs ............226 and the cloud ..........71 print jobs ............214 CAD colour scan to TIFF ......254 scan jobs ............262 Setup menu clear an original jam ........349 description ............59 description ............248 Sheet delivery photo scan to JPEG ........253 Sheet delivery...
- Page 381 ..........71 General scan job settings ......105 The home screen Status light description ............45 description ............33 The main concepts Stop of the PlotWave 340/360 ........21 active job ............274 TIFF Stop button scan job ............254 description ............33 Time format Strip Time format ..........157...
- Page 382 Index print .............212 USB port description ..........28, 33 User intervention required message ............348 User panel components ............33 description ............28 introduction to ..........43 time-out ............158 User panel display description ............33 User roles Océ Express WebTools .........124 Validation fails external locations ..........155 Vertical shift Layout settings ..........102...
- Page 384 2013Océ. Illustrations and specifications do not necessarily apply to products and services offered in each local market. Technical specifications are subject to change without prior notice. Trademarks mentioned in this document are the property of their respective owners. For more information visit us at: www.oce.com 2013-05...
Need help?
Do you have a question about the PlotWave 340 and is the answer not in the manual?
Questions and answers