Bowflex Xtreme Assembly And Owner's Manual
Assembly and owners manual
Hide thumbs
Also See for Xtreme:
- Assembly instructions manual (12 pages) ,
- Assembly instructions & owner's manual (72 pages)
Table of Contents
Advertisement
Special Edition Includes:
Dr. Ellington Darden's
Six Week Fast Fat Loss –
Body Leanness Program
The Bowflex Xtreme
®
Home Gym
Assembly Instructions
& Owner's Manual
Written By: Tom Purvis RPT, RTS
Registered Physical Therapist
and founder of the
Resistance Training
Specialist Program
���������������
PN 11471 Rev E (7/2006)
Advertisement
Table of Contents

Related Manuals for Bowflex Xtreme


Summary of Contents for Bowflex Xtreme
- Page 1 Special Edition Includes: Dr. Ellington Darden’s Six Week Fast Fat Loss – Body Leanness Program The Bowflex Xtreme ® Home Gym Assembly Instructions & Owner’s Manual Written By: Tom Purvis RPT, RTS Registered Physical Therapist and founder of the Resistance Training Specialist Program ���������������...
- Page 2 Introduction Congratulations! Congratulations on your commitment to improving 8'4" x 6'6" (2.6 m x 2.0 m) of free space for your health and fitness! With the Bowflex Xtreme safe operation of the Bowflex Xtreme home gym. ® ® home gym, you have everything you need to exceed...
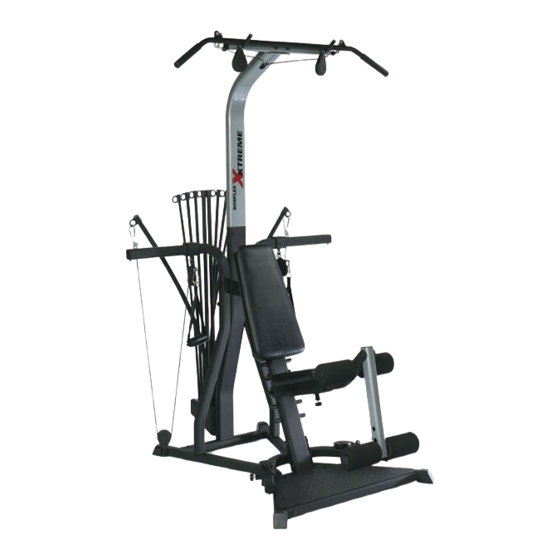
- Page 3 Parts Reference Guide ��� ���� ��� ��� ����� ������ ��� ���� ������ ����� ��� ���� �������� ����� ���� ����� ������ ���� ����� ���� ����� ������ ����� ���� ����� ������� �������� ������ ������ ����� ����� ���� ���� ����� Optional Leg Extension Attachment ������...
- Page 4 � �������� ���������� ���� ����� ���� ����� ���� ����� ����� ���� ���� ����� ������ ����� ����� ������ ��� ����� ��� �������� ���� ����� ���� ������� ����� ����� ������ ��� ����� ��� �������� ���� ����� ���� ������� ����� ��� ����� ��� ��� �� ���� ����...
- Page 5 Assembly Hardware: (1:1 Scale) Button Head Screws: " " " " 4 (5/16 x 3/4 " " 2 (3/8 20 (3/8 x 3/4 Button Head Screw (in separate bag Top View with washers) " " " " 2 (5/16 x 2 1/2 2 (3/8 "...
-
Page 6: Assembly Guide
Assembly Guide Step 1 Base Frame Assembly Parts: • Base Frame • Right Frame Rail • Left Frame Rail • Rear Cross Member Hardware: • 6 Button Head Screws ( 3/8" X 3/4") • 6 Flat Washers (3/8") Tool: 7/32" Allen Wrench (or Hex Wrench) Lay all parts on floor as shown. - Page 7 Assembly Guide Step 3 Install Lower Lat Tower Assembly Parts: • Lower Lat Tower Assembly • Base Frame Assembly Hardware: • 2 Button Head Screws (3/8" X 3/4") • 2 Flat Washers (3/8") Tool: 7/32” Hex Wrench Align the Lower Lat Tower Assembly over the Base Frame.
- Page 8 Assembly Guide Flat Step 5 Install Squat Pulley Frame Washers Parts: • Squat Pulley Frame Assembly Squat Pulley Frame • Main Assembly Hardware: • 1 Button Head Screw (3/8" X 5") • 1 Nylock Nut (3/8") • 2 Button Head Screws (3/8" X 1") •...
- Page 9 Assembly Guide Step 7 Install Slider Pulleys Parts: • 2 Slider Pulleys with Cable Assembly Slider Pulley w/ Screw • Main Assembly Cable Assembly Hardware: • 2 Cap Screws (1/4" X 1/2") Screw Tools: Phillips Screw Driver Install a Slider Pulley onto each Pulley Arm as shown.
- Page 10 Assembly Guide Step 9 Seat Assembly Button Head Screws Parts: Flat Washers • Seat Backbone • Seat Bottom Hardware: • 4 Button Head Screws (5/16" X 3/4") • 4 Washers (5/16") Seat Backbone Tool: 3/16" Hex Wrench Seat Bottom Install the Seat Backbone to the underside of the Seat Pad using screws and washers as shown.
- Page 11 Assembly Guide Step 11 Install Optional Leg Extension Assembly Lock Knob Parts: • Leg Extension Assembly Seat Backbone • Lock Knob Extension 11-1 Backbone Insert Leg Extension Backbone into open end of Seat Backbone as shown. 11-2 Align one hole of the Leg Extension with the hole in the Seat Backbone to fit your height and secure with the...
- Page 12 Step 13 Install Seat Back Pad Seat Back Pad Note: The back of the Seat Back Pad has two pairs of holes. Select the appropriate set based on your height. Parts: • Seat Back Pad • Main Assembly Hardware: • 2 Button Head Screws (5/16" X 2 1/2") •...
- Page 13 Upper Lat Tower Rods not shown Flat for clarity Washers Button Head Screws Flat Washers Button Head Screws TIGHTEN HARDWARE Lower Lat Tower Carefully go over the entire Bowflex Xtreme home gym and tighten all ™ hardware before using.
- Page 14 Page 18 of the owner’s manual shows pulley routing for individual exercises. CONGRATULATIONS! You have successfully completed assembly of your Bowflex Xtreme ® home gym! Please inspect your machine to ensure that all fasteners are tight and everything is properly assembled. Review all warnings affixed to...
- Page 15 Special Edition Includes: Dr. Ellington Darden’s Six Week Fast Fat Loss – Body Leanness Program The Bowflex Xtreme ® Home Gym Owner’s Manual Written By: Tom Purvis RPT, RTS Registered Physical Therapist and founder of the Resistance Training Specialist Program ���������������...
-
Page 16: Important Safety Precautions
300 pounds (136 kg). For your safety, ® Do not remove these labels. If you need replacement do not use or allow others to use the Bowflex labels, please call a Bowflex Representative at Xtreme home gym if they weigh in excess of 300 ®... -
Page 17: Table Of Contents
Muscle Chart ........83 Crossover Bent Over Row ......41 Bowflex Xtreme Home Gym 6-Week ®... -
Page 18: Get To Know Machine
Get to Know Your Bowflex Xtreme Home Gym ® Upper Lat Caps Tower Power Rod ® Unit Seat Back Hook Seat Cable Hand Grip Base Frame Platform... -
Page 19: How To Use Your Machine
Disconnect the cables from the Power Rod unit ® protective black rubber coating. Each rod is marked when your are not using with its weight rating on the Rod Cap. your Bowflex Xtreme ® home gym. Use the rod Adjusting and binding strap included Understanding... - Page 20 How to Use Your Machine Maintenance and Care of Your Bowflex The Bowflex Xtreme Home Gym ® Xtreme Home Gym Pulley Positions ® Inspect your machine for any worn or loose With the versatility to perform over 65 different components prior to use. Tighten or replace any...
- Page 21 Most of the • Make sure that the Lat Tower’s cables are exercises you perform utilize securely fastened to the regular Bowflex this grip. The Standard Grip home gym cables. Xtreme ®...
-
Page 22: Define Your Goals
Define Your Goals Your body will do what you train it to do. That’s why it’s important to define your goals and focus them. Here are some fitness components that will help you define your goals and choose your fitness program. Muscle Strength is the maximum force that you Body Composition is the ratio of fat weight (fat) can exert against resistance at one time. - Page 23 Define Your Goals Design Your Own Program Training variables. When designing your own Understand fitness and its components. program there are several variables that, when Improperly designed programs can be dangerous. mixed properly, will equal the right fitness Take some time to review this manual as well as formula for you.
-
Page 24: Working Out
We recommend that you warm up by doing The most important part of breathing during light stretching and performing light exercises exercise is, quite simply, that you do it. Breathing on the Bowflex Xtreme home gym. in or out during the actual performance is not ®... -
Page 25: The Workouts
The Workouts 20 Minute Better Body Workout Frequency: 3 Days Per Week (M-W-F) Time: About 20 Minutes Start by performing one set of each exercise. Warm up with a light resistance that you can perform easily for 5 -10 reps without fatiguing. -
Page 26: 20 Minute Upper/Lower Body
The Workouts 20 Minute Upper/Lower Body Frequency: 4 Days Per Week (M-T-TH-F) Time: About 20 Minutes This program provides you with a quick and effective workout that combines muscle conditioning with some cardiovascular benefits. Do this routine when you are limited in time or just want a variation to your normal routine. Perform this program training 2 days, resting 1 to 2. -
Page 27: Body Building
The Workouts Body Building Frequency: 3 Days On, 1 Day Off Time: About 45-60 Minutes Body building requires focused concentration and dedication to training, as well as proper eating habits. Train each muscle group to failure before moving on to the next exercise. Do not neglect any muscle group. If needed, include an aerobic activity to increase your caloric expenditure and help to reduce your body fat levels to achieve a defined muscular look. -
Page 28: Circuit Training Anaerobic / Cardiovascular
The Workouts Circuit Training – Anaerobic/Cardiovascular Frequency: 2-3 Times Per Week Time: About 20-45 Minutes Circuit training is a great way to achieve the benefits of strength training and cardiovascular training in one quick, challenging routine. The idea is to move quickly from exercise to exercise, taking only as much rest between sets as it takes to set up the next exercise (less than 20 seconds). -
Page 29: True Aerobic Circuit Training
The Workouts True Aerobic Circuit Training Frequency: 2-3 Times Per Week Time: About 20-60 Minutes Circuit training is a great way to achieve the benefits of strength training and cardiovascular training in one quick, challenging routine. By returning to an aerobic exercise between each set you are increasing your aerobic capacity, endurance and burning fat as energy. -
Page 30: Strength Training
The Workouts Strength Training Frequency: 3 Days Per Week (M-W-F) Time: About 45-60 Minutes This program is designed to emphasize overall strength development. This is an advanced routine to be used only after you have progressed from the advanced general conditioning routine and only after you have perfected your exercise techniques. -
Page 31: Chest Exercises
Chest Exercises Bench Press – Shoulder Horizontal Adduction (and Elbow Extension) Muscles worked: START FINISH Chest muscles (pectoralis major). Also involves front shoulder muscles (anterior deltoid and triceps, located on the back of the upper arm Position: Seated – facing outward Accessory: Hand Grips Pulleys:... -
Page 32: Decline Bench Press
Chest Exercises Decline Bench Press – Shoulder Horizontal Adduction (and Elbow Extension) Muscles worked: START FINISH Chest muscles (pectoralis major). Also involves front shoulder muscles (anterior deltoid) and triceps. Position: Seated (seat in lowest position) facing outward Accessory: Hand Grips Pulleys: Center Cross Bar –... -
Page 33: Shoulder Exercises
Shoulder Exercises Reverse Fly – Shoulder Horizontal Abduction (Elbows Stabilized) Muscles worked: START FINISH Back portion of shoulder muscles (rear deltoids, rear portion of middle deltoids). Position: Standing – facing Power Rod unit ® Seat: Removed Accessory: Hand Grips Pulleys: Center Cross Bar –... -
Page 34: Crossover Rear Deltoid Rows
Shoulder Exercises Crossover Rear Deltoid Rows – Elbow Flexion Muscles worked: START FINISH Back portion of shoulder muscles (rear deltoids, rear portion of middle deltoids). Position: Standing – facing Power Rod unit ® Accessory: Hand Grips Pulleys: Center Cross Bar – narrow position Before You Begin: START ACTION... -
Page 35: Lateral Shoulder Raise
Shoulder Exercises Lateral Shoulder Raise – Shoulder Abduction (Elbows Stabilized) Muscles worked: START FINISH Side shoulder muscles (middle deltoids), top muscle of rotator cuff (supraspinatus) and upper trapezius muscles. Position: Standing – facing outward Accessory: Hand Grips Pulleys: Squat Pulley Frame – use START ACTION squat straps... -
Page 36: Front Shoulder Raise
Shoulder Exercises Front Shoulder Raise – Shoulder Flexion (Elbow Stabilized) Muscles worked: START FINISH Front part of shoulder muscles (front deltoids) and front part of middle deltoids. Position: Standing – facing outward Accessory: Hand Grips Pulleys: Squat Pulley Frame Before You Begin: START ACTION Remove Leg Extension and seat. -
Page 37: Shoulder Rotator Cuff (Internal)
Shoulder Exercises Shoulder Rotator Cuff – Internal Rotation Muscles worked: START FINISH Front rotator cuff muscle (subscapularis). Position: Standing – facing left or right Accessory: Hand Grips Pulleys: Center Cross Bar -wide position Before You Begin: Remove Seat and Leg Extension START ACTION •... -
Page 38: Shoulder Extension
Shoulder Exercises Shoulder Extension – Elbows Stabilized Muscles worked: START FINISH Upper back (latissimus dorsi, teres major, rear deltoid muscles), muscles between shoulder blades (middle trapezius, rhomboid muscles) and triceps. Position: Standing – facing Power Rod unit ® Accessory: Hand Grips Pulleys: Center Cross Bar –... -
Page 39: Scapular Protraction
Shoulder Exercises Scapular Protraction – Elbows Stabilized Muscles worked: START FINISH Serratus anterior muscles, the muscles on the side of the rib cage. Position: Seated – facing outward Accessory: Hand Grips Pulleys: Center Cross Bar – narrow position Before You Begin: START ACTION Remove Leg Extension and adjust seat... -
Page 40: Scapular Retraction
Shoulder Exercises Scapular Retraction Muscles worked: START FINISH Develops muscles between shoulder blades (trapezius and rhomboids). Position: Seated on floor, facing machine Accessory: Hand Grips Pulleys: Squat Pulley Frame Before You Begin: Remove Leg Extension START ACTION • Keeping arms straight, •... -
Page 41: Back Exercises
Back Exercises Standing Shoulder Pullover – with Bent Lat Bar (Elbows Stabilized) Muscles worked: START FINISH Upper back (latissimus dorsi, teres major, rear deltoid muscles). Also involves chest (pectoralis major muscles) and triceps. Position: Standing – facing Power Rod unit ®... -
Page 42: Narrow Pulldowns W/ Bent Lat Bar
Back Exercises Narrow Pulldowns with Bent Lat Bar – Shoulder Extension (with Elbow Flexion) Muscles worked: START FINISH Latissimus dorsi, teres major and rear deltoid, which make up the large pulling muscles of upper back. Also involves biceps group. Position: Seated –... -
Page 43: Bent Over Row
Back Exercises Bent Over Row Muscles worked: START FINISH Latissimus dorsi, teres major and rear deltoid, which make up the large pulling muscles of upper back. Also involves biceps group. Position: Standing – facing Power Rod unit ® Accessory: Hand Grips Pulleys: Squat Pulley Frame START... -
Page 44: Seated Lat Rows
Back Exercises Seated Lat Rows – Shoulder Extension (and Elbow Flexion) Muscles worked: START FINISH Latissimus dorsi, teres major and rear deltoid muscles, which make up the large pulling muscles of upper back. Also involves biceps. Position: Seated on ground, facing Power Rod ®... -
Page 45: Standing Low Back Extension
Back Exercises Standing Low Back Extension – with Hip Extension Muscles worked: START FINISH Muscles in lower back (erector spinae, deep spinal muscles), lower back muscles, gluteus maximus and hamstrings. Position: Standing – facing outward Accessory: Hand Grips Pulleys: Squat Pulley Frame – standard position Before You Begin: START ACTION... -
Page 46: Crossover Wide Pulldowns W/ Hand Grips
Back Exercises Crossover Wide Pulldowns – Shoulder Extension (with Elbow Flexion) Muscles worked: START FINISH Latissimus dorsi, teres major and rear deltoid. Also involves chest (pectoralis major) muscles and triceps muscles. Position: Seated – facing Power Rod unit ® Accessory: Hand Grips Pulleys: Lat Tower... -
Page 47: Seated Lat Pulldowns
Back Exercises Seated Lat Pulldowns – Shoulder Adduction (with Elbow Flexion) Muscles worked: START FINISH Latissimus dorsi, teres major and rear deltoid. Also involves biceps group. Position: Seated – facing Power Rod unit ® Accessory: Hand Grips Pulleys: Lat Tower Before You Begin: Remove Leg Extension START... -
Page 48: Arm Exercises
Arm Exercises Triceps Pushdown – Elbow Extension Muscles worked: START FINISH Triceps muscles. Position: Standing – facing Power Rod unit ® Accessory: Hand Grips Pulleys: Lat Tower Before You Begin: Remove Seat and Leg Extension START ACTION Key Points: • Stand on platform. •... -
Page 49: Triceps Pushdown W/ Bent Lat Bar
Arm Exercises Triceps Pushdown – with Bent Lat Bar (Elbow Extension) Muscles worked: START FINISH Triceps muscles. Position: Standing – facing Power Rod unit ® Accessory: 50” Bent Lat Bar Pulleys: Lat Tower Before You Begin: Remove Leg Extension START ACTION Key Points: •... -
Page 50: Hammer Triceps Extension
Arm Exercises Hammer Triceps Extension – Elbow Extension Muscles worked: START FINISH Triceps muscles. Position: Seated – facing outward Accessory: Hand Grips in “Hammer Grip” Pulleys: Center Cross Bar – narrow position Before You Begin: Remove Leg Extension and adjust seat START ACTION height. -
Page 51: Triceps Kickback
Arm Exercises Triceps Kickback Muscles worked: START FINISH Triceps muscles. Position: Standing – facing Power Rod unit ® Accessory: Hand Grips Pulleys: Center Cross Bar – narrow position Before You Begin: Remove Seat and Leg Extension START ACTION Key Points: •... -
Page 52: Resisted Dip
Arm Exercises Resisted Dip – Elbow Extension Muscles worked: START FINISH Triceps muscles. Position: Standing – facing outward Accessory: Hand Grips Pulleys: Lat Tower Before You Begin: Remove Seat and Leg Extension START ACTION Key Points: • Stand on the platform facing •... -
Page 53: Concentration Biceps Curl
Arm Exercises Concentration Biceps Curl – Elbow Flexion (in Supination) Muscles worked: START FINISH Biceps muscles. Position: Standing – right or left side facing Power Rod unit ® Accessory: Hand Grips Pulleys: Squat Pulley Frame Before You Begin: Remove Seat and Leg Extension START ACTION •... -
Page 54: Barbell Biceps Curl
Arm Exercises Barbell Biceps Curl – Elbow Extension Muscles worked: START FINISH Biceps muscles. Position: Standing – facing Power Rod unit ® Accessory: Squat Bar – with squat straps Pulleys: Squat Pulley Frame Before You Begin: Remove Seat and Leg Extension START ACTION Key Points:... -
Page 55: Seated Biceps Curl
Arm Exercises Seated Biceps Curl – Elbow Flexion (in Supination) Muscles worked: START FINISH Biceps muscles. Position: Seated – facing outward Accessory: Hand Grips Pulleys: Squat Pulley Frame Before You Begin: Remove Leg Extension START ACTION Key Points: • Grasp hand grips, arms at sides •... -
Page 56: Wrist Extension
Arm Exercises Wrist Extension Muscles worked: START FINISH Back and top parts of forearms. Position: Standing – facing Power Rod unit ® Accessory: Hand Grips Pulleys: Squat Pulley Frame Before You Begin: Remove Seat and Leg Extension START ACTION Key Points: •... -
Page 57: Trunk Rotation
Arm Exercises Trunk Rotation Muscles worked: START FINISH Most of trunk muscles. Note: rotation is limited in the spine and should be performed with minimal resistance, in proper alignment. Position: Seated, facing outward left or right Accessory: Hand Grips Pulleys: Center Cross Bar –... -
Page 58: Seated (Resisted) Abdominal Crunch
Abdominal Exercises Seated (Resisted) Abdominal Crunch – Spinal Flexion Muscles worked: START FINISH Abdominal area including upper and lower front abs (rectus abdominus) and side abs (obliques). Position: Seated – facing outward Accessory: Hand Grips Pulleys: Center Cross Bar – narrow position Before You Begin: START ACTION... -
Page 59: Leg Exercises
Leg Exercises Leg Extension Muscles worked: START FINISH All muscles on front of upper thigh (quadriceps muscle group). Position: Seated – facing outward Accessory: Leg Extension Pulleys: Squat Pulley Frame Before You Begin: Adjust seat height START ACTION • Sit on seat facing away from •... -
Page 60: Standing Hip Extension (Knee Bent)
Leg Exercises Standing Hip Extension – Knee Bent Muscles worked: START FINISH Buttocks area (gluteus maximus). Position: Standing – facing Power Rod unit ® Accessory: Hand Grip on arch Pulleys: Squat Pulley Frame Before You Begin: Remove Seat and Leg Extension START ACTION Key Points:... -
Page 61: Leg Kickback
Leg Exercises Leg Kickback – Hip and Knee Extension Muscles worked: START FINISH Buttocks area (gluteus maximus). Position: Standing – facing Power Rod unit ® Accessory: Hand Grip on arch Pulleys: Squat Pulley Frame Before You Begin: Remove Seat and Leg Extension START ACTION Key Points:... -
Page 62: Dead Lift
Leg Exercises Dead Lift Muscles worked: START FINISH Buttocks area (gluteus maximus). Position: Standing – facing outward Accessory: Squat Bar Pulleys: Squat Pulley Frame Before You Begin: Remove Seat and Leg Extension START ACTION Key Points: • Facing away from machine, grip •... -
Page 63: Standing Hip Adduction
Leg Exercises Standing Hip Adduction Muscles worked: START START FINISH FINISH Insides of thighs (adductor muscle groups). Also, the outside of hip (gluteus medius) on support leg. Position: Stand to left or right of machine – facing outward Accessory: Hand Grip over ankle Pulleys: Squat Pulley Frame START... -
Page 64: Calf Raise
Leg Exercises Calf Raise – Ankle Plantarflexion (Knee Stabilized) Muscles worked: START START FINISH FINISH Lower leg or calf (gastrocnemius, soleus). Position: Standing – facing Power Rod ® unit Accessory: Hand Grips Pulleys: Squat Pulley Frame Before You Begin: START ACTION Remove Seat and Leg Extension •... -
Page 65: By Ellington Darden, Ph.d
The Bowflex ® Body Leanness Program By Ellington Darden, Ph.D. The following program was created by Dr. Ellington Darden. It contains a rigorous fitness and dietary program. Please consult your physician before beginning any fitness or dietary program. Some of the names of the exercises... - Page 66 – 18 workouts (3 per week) ® – allowed the participants to build muscle, which accelerated their metabolisms, and produced faster and greater fat losses. The plan worked so well that it became know as The Bowflex Body ®...
- Page 67 WARNING! Before beginning this program consult your physician or healthcare professional. Show this plan and your Bowflex ® Owner’s Manual to your physician or healthcare professional. Only he or she can determine if this course is appropriate for your particular age and condition.
- Page 69 Measurements Skinfold Measurements To accurately track your progress through this six-week program, it is necessary to take skinfold measurements. By measuring yourself in this way, you will be able to determine your lean-body mass and your body-fat percentage. The goal of this program is to increase your lean-body mass and decrease your body-fat percentage. Please read this section carefully.
- Page 70 Measurements Using Calipers When Measuring Skinfolds The procedure for measuring skinfold thickness is to grasp firmly with the thumb and forefinger a fold of skin and surface fat and pull it away from the underlying muscle. Take the caliper in your other hand and open the jaws.
- Page 71 Determining Your Body Fat To Use The Nomogram: 1) Locate the sum of your three skinfolds in the right column and mark it. 2) Locate your age in years on the far left column and mark it. 3) Connect the two marks with a straightedge. Where the straightedge intersects the line in the middle column appropriate to you, you will find your body-fat percentage.
- Page 72 Calculating Lean Body Mass Now that you know your body-fat percentage, you can calculate your lean-body percentage. This will eventually show you how many pounds of muscle were added to your body, after completing the program. For Example: Before the program, Joe weighs 200 pounds (90.7 kg) and measures 30% fat, which amounts to 60 pounds (27.2 kg).
- Page 73 Right Thigh Left Thigh Total Percent Body Fat If you wish to send in your results to Nautilus, Inc., please send to: Bowflex Results, Nautilus, Inc. ® World Headquarters, 16400 S.E. Nautilus Drive, Vancouver, WA 98683. Or you may fax this sheet to Bowflex Results at 1-360-694-7755.
- Page 74 The Workouts GUIDELINES Week 1&2 All exercises should be practiced with one set of 8 to 12 repetitions. The style of performance is very important. The movement for each repetition should be 4 seconds in the positive phase and 4 seconds in the negative.
- Page 75 Eating Guidelines You will be following a reduced-calorie nutrition program, which is divided into three two-week segments. The program is a proven method for achieving maximal fat loss over a six-week period. It consists of a carbohydrate- rich, descending-calorie eating plan and a superhydration routine. Follow a Carbohydrate-Rich, Descending-Calorie Eating Plan: Approximately 60 percent of the daily calories should be from carbohydrates.
- Page 76 Superhydrate Your System Drinking plenty of water is essential to the success of Don’t be surprised if you have to make more than this program. Drinking the recommended amount a dozen trips to the restroom, especially during the of water can seem like a challenge at first. Stick with first week of the program.
- Page 77 The Eating Plan The menus in the Bowflex eating plan are designed You’ll always have a 300 calorie breakfast, a 300 ® calorie lunch, and a 300 calorie dinner (women), for maximum fat-loss effectiveness and nutritional value. For best results, follow them exactly.
- Page 78 The Eating Plan - US Measurements Soup (choice of one soup) Steak Dinner Breakfast = 300 calories • Healthy Choice Hearty Chicken, 15-oz. can 3 oz. lean sirloin, broiled (176) ® Choice of bagel, cereal or shake. (260), or 1/2 C. sweet peas, canned, no salt added (60) •...
- Page 79 The Eating Plan - Metric Measurements Soup (choice of one soup) Steak Dinner Breakfast = 300 calories • Healthy Choice Hearty Chicken, 420 g can 85 g lean sirloin, broiled (176) ® Choice of bagel, cereal or shake. (260), or 120 ml sweet peas, canned, no salt •...
- Page 80 Shopping List Meat, Poultry, Fish and Entrees Quantities needed for listed items will depend on your specific selections. Review your choices Chicken (thin sliced), turkey (thin sliced), tuna and adjust the shopping list accordingly. It may be (canned in water), sirloin steak (lean). helpful for you to photocopy this list each week before doing your shopping.
- Page 81 ® drinking of the cold water. You may have been consuming it too quickly. Q. I’m afraid that I might get large, unfeminine muscles from some of the Bowflex exercises ® Q. Is it possible to drink too much water? you recommend in this course.
- Page 82 Q & A Q. Why is it so important I perform the Bowflex normal interpersonal problems to interfere with the ® exercises with a 4-second count on the lifting and training. lowering? Q. Why won’t you allow me to do aerobic dancing on my off-days to speed up the loss of body fat? A.
- Page 83 Q. I’m pleased that I lost the fat I wanted to lose. twice a week. What do I do to maintain my new body weight? Add variety to your Bowflex routines. ® A. Once you’ve lost your excessive fat, your next task is to maintain that status.
-
Page 84: Exercise Log
Exercise Log Please feel free to make copies of this chart to continue your exercise log. DATE DATE DATE DATE DATE DATE EXERCISE Sets 10, 9 Bench Press Reps 120, 130 Resistance Sets Reps Resistance Sets Reps Resistance Sets Reps Resistance Sets Reps... -
Page 85: Muscle Chart
Muscle Chart Sternocleidomastoid Trapezius Pectoralis Major Anterior Deltoid Posterior Deltoid Serratus Anterior Medial Deltoid Infraspinatus Biceps Rectus Abdominus Teres Major Brachialis Flexor Digitorum Triceps Superficialis External Obliques Latissimus Dorsi Brachioradialis Pronator Teres Flexor Carpi Gluteus Radialis Medius Tensor Gluteus Fasciae Maximus Latae Adductor... -
Page 86: Satisfaction Guarantee
© 2006 Nautilus, Inc. All Rights Reserved. Nautilus, Inc. World Headquarters, 16400 S.E. Nautilus Drive, Vancouver, Washington, USA 98683 1-800-NAUTILUS Bowflex, Bowflex Xtreme, Power Rod and the Bowflex and Nautilus logos are either registered trademarks or trademarks of Nautilus, Inc. -
Page 87: Bowflex Xtreme ® Home Gym Warranty Card
© 2006 Nautilus, Inc. All Rights Reserved. Nautilus, Inc. World Headquarters, 16400 S.E. Nautilus Drive, Vancouver, Washington, USA 98683 1-800-NAUTILUS Bowflex, Bowflex Xtreme, Power Rod and the Bowflex and Nautilus logos are either registered trademarks or trademarks of Nautilus, Inc. - Page 88 • Damage due to use by persons who weigh more than 300 pounds (136 kg). Return the defective part, at your expense, Nautilus, Inc. warrants to the original to the address given to you by a Bowflex purchaser of the Bowflex Xtreme home ®...
-
Page 89: Warranty Information
Warranty Information (Keep For Your Records) We want you to know that the Bowflex Refunds may be denied or delayed if • Damage due to use by persons who Xtreme home gym is a superior product. these instructions are not completely weigh more than 300 pounds (136 kg). - Page 90 © 2006 Nautilus, Inc. All Rights Reserved. Nautilus, Inc. World Headquarters, 16400 S.E. Nautilus Drive, Vancouver, Washington, USA 98683 1-800-NAUTILUS Bowflex Xtreme, Nautilus, Power Rod and the Bowflex and Nautilus logos are registered trademarks of Nautilus, Inc. Printed in China...
Need help?
Do you have a question about the Xtreme and is the answer not in the manual?
Questions and answers