Table of Contents
Advertisement
Quick Links
Advertisement
Table of Contents

Related Manuals for Comdial Scout II


Summary of Contents for Comdial Scout II
- Page 1 Scout II User’s Guide (for FX, DXP , DXP Plus Systems)
- Page 2 Comdial reserves the right to make any changes and improvements in the product described in this document at any time and without prior notice. Scout II is a trademark of Comdial Corporation. All other product names are trademarks of their respected owners. First Edition June, 2002 Printed in the USA GCA70-380 Jun ‘02...
- Page 3 This Scout II User’s Guide is applicable for the following system models. Product Required Software Version FX II Supported in all software versions FXS/FXT Supported in all software versions DXP/DXP Plus 8A or later For an optional headset or other accessories available for use with your Scout II Digital Wireless Telephone, please contact your local dealer.
- Page 4 Document Revision History Date Affected Pages Change June 2002 i-108 Original Release GCA70-380 Jun ‘02...
-
Page 5: Table Of Contents
Scout II User’s Guide TABLE OF CONTENTS USING THIS GUIDE .............1 1. INTRODUCING THE SCOUT II DIGITAL WIRELESS TELEPHONE 1.1 Knowing your Digital Wireless Telephone......3 1.1.1 Reviewing Important Safety Instructions ....5 1.1.2 Reviewing The Technical Specifications....11 1.2 Knowing your Telephone’s Functions ......12 1.2.1 Knowing The Handset ..........12... - Page 6 3.8 Camping on at a Busy Station and Waiting for an Answer (Call Waiting)..............50 3.9 Overriding a Call or a Do Not Disturb Condition at Another Telephone (Executive Override) ......51 3.10 Making a Subdued Off-Hook Voice Announcement (SOHVA)................52 Comdial Jun ‘02...
- Page 7 Scout II User’s Guide 4. ANSWERING CALLS 4.1 Answering Outside and Intercom Calls......54 4.2 Answering Calls at Monitored Stations ......54 4.3 Answering Night Transferred Calls........55 4.4 Making a Call Pick-Up .............56 4.5 Responding to a Subdued Off-Hook Voice Announcement ..............57 5.
- Page 8 9.1 Lighting the Message-Waiting Light ........89 9.2 Sending LCD Messages............90 9.3 Sending Response Messages ..........93 10. PROGRAMMING YOUR TELEPHONE 10.1 Programming for Speed Dialing ........95 10.2 Programming Outside Numbers as Speed Dials....97 10.3 Programming DSS Numbers ...........98 viii Comdial Jun ‘02...
- Page 9 Scout II User’s Guide 10.4 Programming the Feature Codes........99 10.5 Programming the Response Message Button ....100 11. TROUBLESHOOTING YOUR TELEPHONE 11.1 Interpreting the Trouble Symptoms.......101 11.2 Performing a Power Reset ..........103 INDEX ..................105 Jun ‘02 Comdial...
- Page 10 Contents This Page Intentionally Left Blank Comdial Jun ‘02...
-
Page 11: Using This Guide
To assist you in installing the digital wireless telephone and its acces- sories, refer to the information in the following chapter. Chapter 2, Installing Scout II The operation chapters define often-used features and provide instructions for their use:... - Page 12 Using This Guide This Page Intentionally Left Blank Comdial Jun ‘02...
-
Page 13: Knowing Your Digital Wireless Telephone
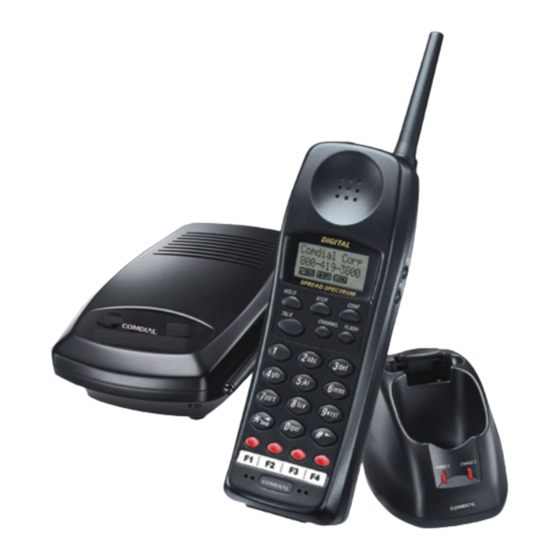
The sections are titled as follows. Section 1.1, Knowing your Digital Wireless Telephone Section 1.2, Knowing your Telephone’s Functions Section 1.3, Using your Scout II Handset 1.1 Knowing your Digital Wireless Telephone Your digital wireless telephone consists of the following items: •... - Page 14 Introducing The SCOUT II Digital Wireless Telephone Because the handset is wireless, you are not confined to your desk or wherever you have located the base unit. This freedom allows you to carry on a telephone conversation and still be free to do other things.
-
Page 15: Reviewing Important Safety Instructions
Scout II User’s Guide 1.1.1 REVIEWING IMPORTANT SAFETY INSTRUCTIONS Since your digital wireless telephone has both an AC power supply and batteries, you should read and understand the following important safety instructions. Before you read anything else, please observe the following. - Page 16 Introducing The SCOUT II Digital Wireless Telephone 6. Slots and openings in this product’s cabinet back or bottom are provided for ventilation to protect this product from overheat- ing. Do not block these openings by placing this product on a bed, sofa, rug, or other similar surface.
- Page 17 Scout II User’s Guide 11. Never push objects of any kind through this product’s cabinet slots as the objects may touch dangerous voltage points or short out parts that could result in a risk of fire or electric shock. Never spill liquid of any kind on this product or submerge it in liquid.
- Page 18 Introducing The SCOUT II Digital Wireless Telephone 15. Do not use a telephone to report a gas leak in the vicinity of the leak. WARNING To reduce the risk of fire or injury to persons by the battery, read and follow these instructions.
- Page 19 Scout II User’s Guide SAVE THESE INSTRUCTIONS WARNING The Scout II digital wireless telephone contains a rechargeable Nickel-Cadmium Battery. • Cadmium is a chemical known to the state of California to cause cancer. • The rechargeable nickel-cadmium battery contained in this digital wireless telephone may explode if disposed in a fire.
- Page 20 Introducing The SCOUT II Digital Wireless Telephone WARNING RECHARGEABLE NICKEL-CADMIUM BATTERIES MUST BE RECYCLED OR DISPOSED OF PROPERLY. • Residents of Minnesota should contact 1-800-225- PRBA for information concerning reclamation and disposal of rechargeable Nickel-Cadmium batteries. • Residents outside of Minnesota should contact their...
-
Page 21: Reviewing The Technical Specifications
Scout II User’s Guide 1.1.2 REVIEWING THE TECHNICAL SPECIFICATIONS The specifications shown are typical and subject to change without notice. General The Scout II complies with FCC and IC parts 15 and 68. Frequency Control: Phase Lock Loop Modulation: Spread Spectrum Operating Temperature: 0°... -
Page 22: Knowing Your Telephone's Functions
Introducing The SCOUT II Digital Wireless Telephone 1.2 Knowing your Telephone’s Functions Your digital wireless telephone provides many versatile features for your use. The discussions that follow explain these features in terms of what they allow you to do. 1.2.1 KNOWING THE HANDSET •... - Page 23 Scout II User’s Guide • Volume Button –sets the loudness of the calling party’s voice to low, medium, high or maximum –sets ringer volume to low, high, or off (vibrate mode) –sets the ring type to A, B, or C (ring frequency or tone) •...
- Page 24 Introducing The SCOUT II Digital Wireless Telephone 1. Ringer ON/OFF switch 9. Head Set Jack 2. Message Display 10. Volume (R/VOL) Button 3. Transfer/Conference (T/C) Button 11. MUTE Button 4. Talk Button 12. Hold Button 5. Numeric Keypad 13. Tap Button 6.
-
Page 25: Knowing The Base Unit
Scout II User’s Guide 1.2.2 KNOWING THE BASE UNIT • Antenna –allows the base unit to communicate with the handset • Power On LED –indicates that base unit has AC power supplied 18. DC Power Jack 19. Phone Jack 1.2.3 KNOWING THE CHARGING STAND •... -
Page 26: Using Your Scout Ii Handset
Introducing The SCOUT II Digital Wireless Telephone 1.3 Using your Scout II Handset Note: Operation of the Scout II is performed using the handset out of the charging unit. Figure 1-1 Scout II Handset Controls 1.3.1 MAKING A CALL When you pick up the handset and press Talk, you will see: Comdial Jun ‘02... - Page 27 Scout II User’s Guide After the connection has been made between the handset and base, you will see: Or, you may see one of the following: Condition Indicator LCD Screen No Connection Error Tone to Base Unit Line in Use Error Tone Jun ‘02...
-
Page 28: Answering A Call
Introducing The SCOUT II Digital Wireless Telephone If the handset is at the range limit of the Scout II, or no power is going to the base unit, you may see: When you hear a dial tone, enter the number you are calling. (You can also use a speed dial number. -
Page 29: Interpreting The Low Battery Indication
Scout II User’s Guide 1.3.3 INTERPRETING THE LOW BATTERY INDICATION When the battery pack in the handset is low and needs to be charged, you will see a message on the display. On a Call In Standby Mode All keys and functions are None of the buttons operate. - Page 30 Introducing The SCOUT II Digital Wireless Telephone This Page Intentionally Left Blank Comdial Jun ‘02...
-
Page 31: Installing Scout
Scout II User Guide 2. INSTALLING SCOUT II The digital wireless telephone is a proprietary multiline telephone that connects directly to a digital station port. Use the information in this chapter to learn how to install the digital wireless telephone and its accessories. -
Page 32: Selecting The Installation Location
Installing Scout II 2.1 Selecting the Installation Location CAUTION Your digital wireless telephone contains special purpose circuitry that allows it to operate only when it is connected to a proprietary digital tele- phone system. Because of this special design, do not connect your digital wireless telephone to a telephone company central office jack that is designed for industry-standard telephones. -
Page 33: Connecting To The Station Jack
Scout II User Guide 2.2 Connecting to the Station Jack Connect one end of the supplied four-conductor line cord to the phone jack on the digital wireless telephone base unit. Connect the other end of this line cord to a digital station port jack. -
Page 34: Applying Power To The Base Unit And Charging Station
2.3 Applying Power to the Base Unit and Charging Station 1. Using only the base unit AC adapter supplied with the Scout II, plug the AC adapter cord into the AC adapter input jack on the base unit. Route the cord through the strain relief channel. - Page 35 Scout II User Guide Charging Unit The unique design of your Scout II allows you to place the handset in the charging unit with or without the belt clip attached. Note: Use only the supplied charging unit AC adapter: AD-970 The charging unit also has the ability to charge a second battery with or without the handset being charged.
-
Page 36: Wall Mounting The Base And Charger Units
Charger Units 2.4.1 MOUNTING BASE UNIT USING STANDARD WALL PLATE The Scout II is designed to be mounted on a standard AT&T or GTE wall plate. To attach the wall mount stand to the base unit, perform the following steps. -
Page 37: Mounting Base Unit Directly On Wall
Scout II User Guide 5. Plug the other end of the short telephone cord into the modular wall jack. 6. Place the base unit on the posts of the wall plate and push down until it is firmly seated. 7. Plug the AC Adapter into a standard 120V AC wall outlet. - Page 38 Installing Scout II To mount your Scout II base unit directly to a wall, perform the fol- lowing steps. 1. Insert two mounting screws into the wall 3-15/16 inches apart. Allow about 3/16 of an inch between the wall and screw heads for mounting the phone.
- Page 39 Scout II User Guide 4. Plug one end of the telephone line cord into the line jack on the base unit. Then place the telephone cord inside the molded channel on the bottom of the wall mount stand. 5. Place the base unit on the posts of the wall screws and push down until it is firmly seated.
-
Page 40: Mounting Charging Unit On Wall
Installing Scout II 6. Plug the other end of the short telephone cord into a telephone wall jack. 7. Plug the AC Adapter into a standard 120V AC wall outlet. 2.4.3 MOUNTING CHARGING UNIT ON WALL The charging unit is also designed to be wall mounted. Before mounting your charging unit, consider the following: •... - Page 41 Scout II User Guide To mount your Scout II charging unit directly to a wall, perform the following steps. 1. Insert two mounting screws into the wall 1-9/10 inches apart. Allow about 3/16 of an inch between the wall and screw heads for mounting the phone.
- Page 42 Installing Scout II 3. Wrap the AC Adapter cord around the strain relief. 4. Place the charging unit on the posts of the wall screws and push down until it is firmly seated. Comdial Jun ‘02...
-
Page 43: Installing The Battery Pack
Scout II User Guide 5. Plug the AC Adapter into a standard 120V AC wall outlet. 2.5 Installing the Battery Pack If you see a low battery notice in the display while you are on a call, you can quickly change the battery pack without losing the call. Your telephone holds the call for approximately 20 seconds after you remove the battery pack from the handset. - Page 44 Installing Scout II 1. Remove the battery cover by pressing the latch and sliding the cover down until it comes off the handset. 2. Slide the battery pack down into the handset. Note: You may have to remove the old battery at this time.
-
Page 45: Charging The Handset's Battery Pack
Pack The rechargeable Nickel-Cadmium battery pack must be fully charged before using your Scout II for the first time. Note: Charge the battery pack without interruption for 5 hours. 1. Place the handset in the front slot of the charging unit. - Page 46 Installing Scout II 2. Make sure the CHARGE indicator lights. If the CHARGE light doesn’t light, check to see that the AC Adapter is plugged in, and that the handset is making good contact with the charg- ing unit charging contacts.
-
Page 47: Charging Spare Battery Packs
Scout II User Guide 2.7 Charging Spare Battery Packs The charger unit of your Scout II is equipped to charge the spare battery pack with or without the handset in the front slot. 1. Slide the spare battery pack into the second slot in the charging unit until the retaining clip snaps over the top of the pack. -
Page 48: Cleaning The Battery And Charging Unit Contacts
Installing Scout II 2.8 Cleaning the Battery and Charging Unit Contacts To maintain a good charge, it is important to clean all charging con- tacts on the handset, spare battery pack and charging unit about once a month. Use a pencil eraser or a soft dry cloth. Do not use any liquids or solvents. -
Page 49: Attaching The Belt Clip To The Handset
Scout II User Guide 2.9 Attaching the Belt Clip to the Handset You can use the belt clip to attach the handset to your belt or pocket for convenient portability. 1. Slide the clip into the tab slot. CAUTION The belt clip is designed to fit snugly onto the handset. - Page 50 Installing Scout II 2. Press firmly until it snaps into place. 3. To remove, simply press the retain clip in toward the belt clip blade and slide the clip up at the same time. Comdial Jun ‘02...
-
Page 51: Testing The Coverage Range
Scout II User Guide 2.10 Testing the Coverage Range Your digital wireless telephone will continue to operate effectively as you move some distance away from the base unit. Many circum- stances affect the maximum distance that you can travel away from the base unit’s location. - Page 52 Installing Scout II Note: If you should wander out of range while on a call, you will lose voice contact with your party but your handset will keep its display and status lights active for approximately 20 seconds. During this 20 second time period, you can step back in range and resume your con- versation.
-
Page 53: Making Calls
Scout II User’s Guide 3. MAKING CALLS When you wish to make a call, you must press the Talk button to make the handset active and then select a line or the intercom. After you press Talk, the display provides you with several pieces of infor- mation. -
Page 54: Dialing Automatically
To automatically dial a speed dial number stored at one of the pro- grammable function buttons, 1. lift handset, 2. press pre-programmed speed dial button F1–F4 (line selection is usually a part of the stored speed dial number), Comdial Jun ‘02... -
Page 55: Dialing Manually
Scout II User’s Guide With your station at idle, you can use the following procedure to auto- matically dial a personal or system speed dial number that is stored at a dial pad location: 1. lift handset and press Talk (if necessary), 2. -
Page 56: Redialing A Previously Dialed Number
When line groups are available for your use, you may access them for outside calling instead of pressing a line button to select a individual line for use. Comdial Jun ‘02... -
Page 57: Waiting For A Line (Queuing)
Scout II User’s Guide If your system has line groups, access them as follows: 1. lift handset and press Talk (if necessary), 2. press button to select intercom (if necessary), 3. dial desired line group access code: 9 = line group 1... -
Page 58: Making Intercom Calls
DSS button again. To manually cause the other telephone to ring (tone calling), 1. lift handset and press Talk (if necessary), 2. press button to select intercom (if necessary), 3. dial extension number (called telephone will ring). Comdial Jun ‘02... -
Page 59: Camping On At A Busy Station And Waiting For An Automatic Callback
Scout II User’s Guide To tone call automatically, 1. lift handset and press Talk (if necessary), 2. press DSS button (called telephone will ring). Note: The following instructions assume a voice-first default setting. Any user can change a call to a tone signaling for that call simply by pressing the Intercom button again after dialing the extension number or by pressing the DSS button again. -
Page 60: Camping On At A Busy Station And Waiting For An Answer (Call Waiting)
To activate call waiting when you hear a busy signal, 1. lift handset and press Talk (if necessary), 2. press button to select intercom, 3. dial extension number, 4. dial * 6 (called party hears tone), 5. wait on line for reply. Comdial Jun ‘02... -
Page 61: Overriding A Call Or A Do Not Disturb Condition At Another Telephone (Executive Override)
Scout II User’s Guide The called party can place the current call on hold or disconnect from the call to answer your call-waiting tone, or choose to ignore your call-waiting tone and continue current conversation. To cancel call waiting, 1. lift handset and press Talk (if necessary), 2. -
Page 62: Making A Subdued Off-Hook Voice Announcement (Sohva)
SOHVA), • wait on line for reply (either verbal or LCD reply). Note: The caller cannot control how the announcement is received. This depends upon the equipment used and station programming. Comdial Jun ‘02... -
Page 63: Answering Calls
Scout II User’s Guide 4. ANSWERING CALLS Answer a call by pressing the function button for the ringing line. As a convenience, your system installer may assign ringing line pref- erence to your station. If he or she does so, you will have access to... -
Page 64: Answering Outside And Intercom Calls
The associated light is known as the busy lamp field, or BLF light, and the button is known as the direct station select, or DSS button. Comdial Jun ‘02... -
Page 65: Answering Night Transferred Calls
Scout II User’s Guide If the installer also arranges for your station to have the station moni- toring feature, the BLF light shows activity status at the monitored telephone. Also, the installer may arrange for your telephone to include a DSS STATUS button at a function button location (F1–F4). -
Page 66: Making A Call Pick-Up
To answer a call that is ringing at any telephone in the system, 1. lift handset and press Talk (if necessary), 2. press intercom button (if necessary), 3. dial * 4, 4. dial extension number of ringing telephone, 5. answer call. Comdial Jun ‘02... -
Page 67: Responding To A Subdued Off-Hook Voice Announcement
Scout II User’s Guide 4.5 Responding to a Subdued Off-Hook Voice Announcement Your installer can arrange your telephone to receive a subdued off- hook voice announcement (SOHVA) call. This calling method allows an intercom caller to break into your current call and make an announcement to you that only you can hear through your handset receiver. - Page 68 Message button to scroll through the system-supplied mes- sages, 3. press # when your display shows the message you wish to send (the message will then be displayed at the calling LCD speaker- phone and the SOHVA call will be terminated). Comdial Jun ‘02...
-
Page 69: Transferring Calls
Scout II User’s Guide 5. TRANSFERRING CALLS You can transfer calls from your digital wireless telephone to another system telephone in several ways. The information in this chapter describes those ways. Section 5.1, Transferring Screened and Unscreened Calls Section 5.2, Making a Hot Transfer 5.1 Transferring Screened and... -
Page 70: Making A Hot Transfer
If you make a hot transfer to a monitor telephone, you can voice announce the call over the telephone’s speaker, but the person receiving the outside line transfer will need to lift the handset to answer the call (the telephone will not ring after you have made the announcement). Comdial Jun ‘02... - Page 71 Scout II User’s Guide Please note that you cannot make a hot transfer to a telephone if its user has enabled the Voice Announce Block feature. This telephone will automatically ring with the transfer requiring the intercom party to answer it as either a screened or an unscreened transfer.
- Page 72 Transferring Calls This Page Intentionally Left Blank Comdial Jun ‘02...
-
Page 73: Placing Calls On Hold
Scout II User’s Guide 6. PLACING CALLS ON HOLD You can place calls on hold and pick them up a short time later in several different ways. This chapter explains the various methods you can use to hold a call. - Page 74 1. lift handset (if your station does not have prime line or idle line preference), 2. press Hold once for each call in the hold queue until you reach the call you wish to service, 3. press Tap to retrieve call. Comdial Jun ‘02...
-
Page 75: Handling Hold Recalls
Scout II User’s Guide For example, if five calls are holding and you wish to retrieve the second call you placed on hold, you would press Hold three times to scroll from held call #5 through call #4, call #3, and then to call #2. -
Page 76: Parking Calls
(you will hear four short tone bursts at 12-second intervals). Your display will indicate that the call is a park recall and will identify the orbit from which the recall origi- nated. Comdial Jun ‘02... - Page 77 Scout II User’s Guide To answer a park recall, • press button for recalling line. The call will then connect to your station. To place a park recall on hold at your station, • press Hold. If the call remains on hold for a period of time, it will ring back to your telephone as a hold recall.
- Page 78 Placing Calls On Hold This Page Intentionally Left Blank Comdial Jun ‘02...
-
Page 79: Conferencing Calls
Scout II User’s Guide 7. CONFERENCING CALLS When you join your digital wireless telephone together on a call with one or more system telephones, the arrangement is known as confer- encing. You can make conference calls that involve up to five parties, including yourself as the originating party, in any combination of outside lines and intercom parties. - Page 80 To rejoin an unsupervised conference between two outside lines, • press Tap. Note: Conference volume levels are dependent upon the quality of the external lines. Comdial Jun ‘02...
-
Page 81: Using The Other Telephone Features
Scout II User’s Guide 8. USING THE OTHER TELEPHONE FEATURES This chapter details features that enhance the basic operation of your digital wireless telephone. Remember, your station may be arranged to give you access to an assigned line or intercom as soon as you lift the handset from the base unit, or as soon as you press the Talk button if you are using the handset in a portable manner. -
Page 82: Blocking Voice Announced Calls
1. lift handset and press Talk (if necessary), 2. press intercom button (if necessary), 3. dial * 2. To un-block SOHVA calls, 1. lift handset and press Talk (if necessary), 2. press intercom button (if necessary), 3. dial # 2. Comdial Jun ‘02... -
Page 83: Displaying Status Of Busy Lines And Stations
Scout II User’s Guide 8.2 Displaying Status of Busy Lines and Stations The system installer can provide your digital wireless telephone with the ability to display the identify the station that is busy on a line and the line on which a station is busy (this latter feature usually requires an optional DSS/BLF console). -
Page 84: Entering Account Codes
4. dial * 0 4 (call is automatically placed on hold), 5. dial account code, 6. listen for dial tone and dial number you are calling. Note: If you hear an error tone after you have dialed your account code, check the number for validity. Comdial Jun ‘02... -
Page 85: Entering Authorization Codes
Scout II User’s Guide 8.5 Entering Authorization Codes Authorization codes give you a walking class of service option. Walking class of service provides you with the mobility to use your class of service (COS) features, prime line assignments, and exception numbers on any other telephone in the system. This... -
Page 86: Forwarding Calls
This feature is valuable if you are frequently too busy to answer a call yet find it inconvenient to have your calls permanently forwarded. The system installer sets the number of rings that sound at your telephone before the system forwards the calls. Comdial Jun ‘02... -
Page 87: Making A Call Non-Private (Privacy Release)
Scout II User’s Guide To forward your calls, 1. lift handset and press Talk (if necessary), 2. press intercom button (if necessary), 3. dial one of the following codes, Forward Forward After Ring Immediately No-Answer Or Busy All calls * 5 2... -
Page 88: Monitoring A Conversation Between Two Telephones (Service Observing)
By using the MUTE button, you can block transmission of your voice to the calling party. For example, if someone comes into your office to talk to you and you do not want this conversation to interrupt the distant party, press the MUTE button. Comdial Jun ‘02... -
Page 89: Sending A Paging Announcement
Scout II User’s Guide To mute your telephone, • press and hold MUTE (you can still hear the distant party’s voice). To speak to the calling party, • release MUTE. 8.10 Sending a Paging Announcement There are several ways to make a public announcement to all or a portion of your location. -
Page 90: Setting A Do Not Disturb Condition At Your Telephone
DND condition set at another telephone. To enable or disable the DND condition at your telephone, 1. lift handset and press Talk (if necessary), 2. press intercom button (if necessary), 3. dial # 0 1, 4. press Talk to end. Comdial Jun ‘02... -
Page 91: Setting The Volume Controls
Scout II User’s Guide To override a DND condition at another telephone, 1. make intercom call and hear DND tone, 2. dial * 0 3 (called party will hear several short tone bursts), 3. wait for a reply. CAUTION Remember, your telephone has a power saving feature that turns off the display after a short period of time. -
Page 92: Adjusting The Handset Volume Duringa Call
Press R/VOL on the side of the handset during a call to change the ear- piece volume. (Be sure you are on a call when you set handset receiver volume; otherwise, you may inadvertently adjust your ringer level instead.) Press R/VOL once for each level change that you desire. Comdial Jun ‘02... -
Page 93: Adjusting The Handset Ringer Tone And Volume In Standby Mode
Scout II User’s Guide 8.12.2 ADJUSTING THE HANDSET RINGER TONE AND VOLUME IN STANDBY MODE To adjust the volume of the ringer or to change the tone type, press R/VOL on the side of the handset while in standby mode. -
Page 94: Vibrate Mode
When the switch on the side of the handset is turned off, you will see the ring off icon. When you turn the switch on the side of the handset on, the ring off icon disappears. Comdial Jun ‘02... -
Page 95: Switching The Dialing Mode Between Pulse And Tone
Scout II User’s Guide 8.13 Switching the Dialing Mode between Pulse and Tone If your local telephone service is pulse (rotary dialing), your tele- phone is arranged to dial in this manner (when programmed to do so by the installer). If you need to send tones during a dialing sequence (e.g., to send bank-by-phone tones), you can convert to tone while... - Page 96 To retrieve a call that you parked using the Tracker option, 1. press Hold button to scroll your held calls (display shows Page and extension number of each parked call), 2. press Tap to retrieve the displayed parked call. Comdial Jun ‘02...
-
Page 97: Using Your Digital Wireless Telephone With A Dss/Blf Console
Scout II User’s Guide If you receive a parked call message on your Tracker pager, 1. lift handset and press Talk (if necessary), 2. press intercom button (if necessary), 3. dial Tracker pager displayed orbit code (#800–#899). 4. retrieve call. - Page 98 To use the console with your digital wireless telephone, 1. lift handset and press Talk (if necessary), 2. press intercom button (if necessary), 3. press console button for desired feature, 4. complete your call in the normal manner. 5. press Talk to hang up. Comdial Jun ‘02...
-
Page 99: Sending And Receiving Non-Verbal Messages
Scout II User’s Guide 9. SENDING AND RECEIVING NON-VERBAL MESSAGES This chapter details the several different methods that you can use to send and receive messages with your digital wireless telephone without using verbal communications. Section 9.1, Lighting the Message-Waiting Light Section 9.2, Sending LCD Messages... -
Page 100: Sending Lcd Messages
To turn on a message from your telephone: 1. lift the handset and press Talk (if necessary), 2. press the intercom button (if necessary), 3. dial * 0 2, 4. press # to clear the current message if one is stored, and Comdial Jun ‘02... - Page 101 Scout II User’s Guide 5. dial the desired code number from your LCD message list (01-30). LCD Message List (Write the attendant supplied message here) Dial Code Message Back at (default message 1) Call (default message 2) Ask them to hold...
- Page 102 (for example, dial # 12 09 07 08 15 02 02 00 00 for a space and the number 978-2200). Dialing Code Table Character Dialing Code Character Dialing Code space 6. press #, then press Talk to end the message. Comdial Jun ‘02...
-
Page 103: Sending Response Messages
Scout II User’s Guide To turn off the message, 1. lift the handset and press Talk (if necessary), 2. press the intercom button (if necessary), and 3. dial 0 2. 9.3 Sending Response Messages By programming one or more Response Message buttons at unused function buttons F1–F4 on your digital wireless telephone, you can... - Page 104 Response Message button to scroll through the system-sup- plied messages, 3. press # when your display shows the message you wish to send (the message will then be displayed at the calling telephone and the SOHVA call will be terminated). Comdial Jun ‘02...
-
Page 105: Programming Your Telephone
Scout II User’s Guide 10. PROGRAMMING YOUR TELEPHONE Use this chapter’s information to understand the various pro- gramming steps that you can take with your LCD speakerphone. Section 10.1, Programming for Speed Dialing Section 10.2, Programming Outside Numbers as Speed Dials Section 10.3, Programming DSS Numbers... - Page 106 • perform such activities in the off-peak hours,such as early morning or late evening, • remain on the line and briefly explain to the dispatcher the reason for the call. Comdial Jun ‘02...
-
Page 107: Programming Outside Numbers As Speed Dials
Scout II User’s Guide Enter your stored numbers on these charts for future reference. Speed Dial Numbers Key Pad Buttons Function Buttons 10.2 Programming Outside Numbers as Speed Dials To store an outside number as a speed dial number, follow the display prompts and proceed as follows: 1. -
Page 108: Programming Dss Numbers
4. press function button or dial pad button to choose storage loca- tion, 5. dial extension number, 6. press next location button and store next DSS number, 7. repeat the previous step until all DSS numbers are stored, press Talk to end. Comdial Jun ‘02... -
Page 109: Programming The Feature Codes
Scout II User’s Guide Note: Storing a new DSS number at a button location overwrites an existing DSS number already stored there. 10.4 Programming the Feature Codes If you find that you are using certain features often, you can program a feature’s dialing code (such as * 5 2 to forward your calls) at an... -
Page 110: Programming The Response Message Button
5. dial 00 to make a scrolling button, or,– dial message number (01–30) from list of messages to make a fixed button, 6. press # to save programming, 7. press Talk to end, 8. label button location. Comdial Jun ‘02... -
Page 111: Troubleshooting Your Telephone
Scout II User’s Guide 11. TROUBLESHOOTING YOUR TELEPHONE If your digital wireless telephone is not operating properly, use this chapter’s information to help identify the cause of improper oper- ation. Section 11.1, Interpreting the Trouble Symptoms Section 11.2, Performing a Power Reset 11.1 Interpreting the Trouble... - Page 112 For example, if a button has a line assigned to it, it is not available as a programmable button and an error tone sounds if it is pressed during programming. Comdial Jun ‘02...
-
Page 113: Performing A Power Reset
Scout II User’s Guide Scrambled Display • Reset power. No link Feature Access Problems Display Shows NO COMM • Base unit cannot make contact with telephone system. Check line cord. * If you isolate improper operation to a defective battery pack, verify that the battery chargers are operating properly. - Page 114 Troubleshooting Your Telephone This Page Intentionally Left Blank Comdial Jun ‘02...
-
Page 115: Index
Scout II User’s Guide Index camping on at a busy station and waiting for an answer (call waiting) 50 camping on at a busy station and waiting account codes 74 for an automatic callback 49 adjusting the handset ringer tone and... - Page 116 Index entering authorization codes 75 introducing the SCOUT II digital wireless telephone 3 executive override 51 knowing the base unit 15 Feature Codes 99 knowing the charger stand 15 features 12, 71 knowing the handset 12 forwarding calls 76 knowing your digital wireless...
- Page 117 Scout II User’s Guide public announcement 79 pulse 85 night transferred calls 55 non-verbal messages 89 numeric keypad 13 queuing 47 operating temperature 11 r/vol 83 optional accessories 3 range limit 18 orbits 66 recalls out of range 18 hold 65...
- Page 118 Using This Guide 1 spare battery charging bay 15 using your digital wireless telephone with a DSS/BLF console 87 spare battery packs 37 using your Scout II handset 16 specifications 11 base unit 11 general 11 handset 11 speed dial 95...
Need help?
Do you have a question about the Scout II and is the answer not in the manual?
Questions and answers