Dell 1815dn Multifunction Mono Laser Printer User Manual
Multi-function printer
Hide thumbs
Also See for 1815dn Multifunction Mono Laser Printer:
- Owner's manual (150 pages) ,
- Service manual (153 pages)
Table of Contents
Advertisement
Quick Links
Unpacking Your Multi-Function Printer
1. Select a location for your printer.
CAUTION:
The printer requires at least two people to lift it safely.
Leave enough room to open the printer tray, covers, doors, and options. It is also important to allow enough space around the printer for proper
l
ventilation.
Provide a proper environment:
l
A firm, level surface
l
Away from the direct airflow of air conditioners, heaters, or ventilators
l
Away from sunlight, extreme humidity, or high fluctuations in temperature
l
A clean, dry, and dust free location
l
NOTE:
Leave the printer in the box until you are ready to install it.
2. In addition to the Dell™ Laser Multi-Function Printer 1815dn, ensure that you have the following items in the box. If there is a missing item, contact
Dell:
toner cartridge
owner's manual
Drivers and Utilities CD
setup diagram
a. The appearance of the power cord and the telephone line cord may differ according to your country's specifications.
b. The Drivers and Utilities CD contains Dell printer drivers, Scan drivers, Printer Settings Utility, Set IP, Macintosh driver, Linux driver, Dell Toner
Management System™, Dell ScanCenter™, PaperPort
c. This item is only provided in some countries.
NOTE:
Use the telephone line cord supplied with your printer. If you choose to use a different cord, use an AWG #26 or lower gauge cord that is a
maximum 250 cm in length.
NOTE:
The power cord must be plugged into a grounded power socket.
3. Save the carton and packing material in case the printer needs to be repacked.
4. Remove the packing tape from the front, back and sides of the printer.
b
®
and an HTML User's Guide.
a
power cord
telephone line cord
c
terminator
quick reference guide (optional)
Advertisement
Table of Contents

Related Manuals for Dell 1815dn Multifunction Mono Laser Printer


Summary of Contents for Dell 1815dn Multifunction Mono Laser Printer
- Page 1 Leave the printer in the box until you are ready to install it. 2. In addition to the Dell™ Laser Multi-Function Printer 1815dn, ensure that you have the following items in the box. If there is a missing item, contact...
-
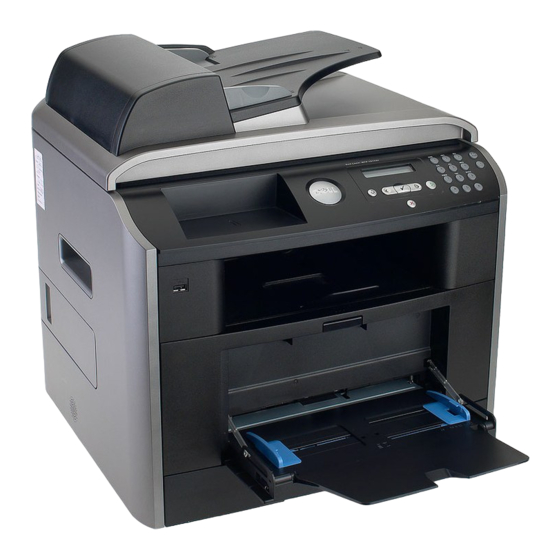
Page 2: Front View
7. Attach the quick reference guide (optional) to the space on the operator panel. About Your Multi-Function Printer These are the main components of your printer. The following illustrations show the standard Dell Laser MFP 1815dn and an optional tray 2 attached: Front View ... -
Page 3: Rear View
Rear View a. If the phone communication is serial in your country (such as Germany, Sweden, Denmark, Austria, Belgium, Italy, France and Switzerland), you must remove the plug from the Phone connector and insert the supplied terminator. b. You can buy and install a locking unit to prevent the installed memory card from being removed. ... -
Page 4: Installing The Toner Cartridge
It also enables you to print a Phonebook list. Insert a pause into a fax number in edit mode. Fonts The Dell Laser printer supports the following fonts: Installing the Toner Cartridge 1. Open the front cover. CAUTION: To prevent damage, do not expose the toner cartridge to light for more than a few minutes. -
Page 5: Loading Paper
NOTE: If toner comes into contact with your clothing, wipe the toner off with a dry cloth and wash your clothing in cold water. Hot water sets toner into fabric. CAUTION: Do not touch the green underside of the toner cartridge. Use the handle on the cartridge to avoid touching this area. 3. - Page 6 2. If you load paper that is longer than a standard (Letter or A4) size, such as Legal paper, press and unlatch the guide lock, and then slide the paper length guide out completely to extend the paper tray to its full length. 3.
-
Page 7: Making Connections
7. Pinch the paper width guide, as shown, and move it towards the stack of paper until it lightly touches the side of the stack. NOTE: Improper adjustment of paper guides can result in paper jams. 8. Insert and slide the paper tray back into the printer. 9. -
Page 8: Connecting The Printer Cable
Network". NOTE: USB cables are sold separately. Contact Dell to purchase a USB cable. NOTE: Connecting the printer to the USB port of the computer requires a certified USB cable. You will need to buy a USB 2.0 compliant cable that is about 3 m in length. -
Page 9: Dell Laser Mfp 1815Dn Menu Functions
2. Press the power switch to power on the printer. Warming Up appears on the display indicating that the printer is now on. To view your display text in another language, see "Changing the Display Language". Dell Laser MFP 1815dn Menu Functions 1. Paper Setup 2. Copy Defaults 3. Fax Defaults Paper Size # of copies... -
Page 10: Changing The Display Language
Sent Report Junk Fax List User Setup Clear Settings RCV Report Scan Journal Send to Self Print Sys. Data System Data Email Report Default From Scheduled Jobs Default Subj Email Forward Control Access Set Passcode 10. Sound/ 11. Machine setup 12. -
Page 11: Toner Save Mode
Toner Save Mode The Toner Save mode enables your printer to use less toner on each page. Activating this mode extends the life of the toner cartridge longer than the normal mode, but it reduces the print quality. NOTE: For PC-printing, you can also turn on or off the Toner Save mode in the printer properties. -
Page 12: Setting The Time Out Option
Setting the Time Out Option You can set the time the printer waits before it restores the default copy or fax settings, if you do not start copying or faxing after changing them on the operator panel. 1. Press Scroll ( ) to highlight Menu and press Select ( 2. -
Page 13: Loading Paper For Copying
Copying Loading Paper for Copying Setting Copy Options Selecting a Paper Tray Using Special Copy Features Preparing a Document Printing Copies on Both Sides of Paper Loading an Original Document Changing the Default Settings Making Copies Loading Paper for Copying ... -
Page 14: Loading An Original Document
Remove all staples and paper clips before loading documents. Make sure any glue, ink or correction fluid on the paper is completely dry before loading documents. Do not load documents containing different sizes or weights of paper. Do not load booklets, pamphlets, transparencies or documents having other unusual characteristics. -
Page 15: Making Copies
2. Place the document face down on the document glass and align it with the registration guide on the top left corner of the glass. For detailed guidelines for preparing an original document, see "Preparing a Document". 3. Close the document cover. NOTE: If you are copying a page from a book or magazine, lift the cover until its hinges are caught by the stopper and then close the cover. -
Page 16: Setting Copy Options
Setting Copy Options The Copy menus on the operator panel let you customize all the basic copy options; number of copies, copy size, contrast and image quality. Set the following options for the current copy job before pressing Start ( ) to make copies. -
Page 17: Using Special Copy Features
3. Press Scroll ( ) to select the image quality mode and press Select ( Text: Use for documents with fine details, such as fine text. Text&Photo: Use for documents with both text and photo/gray tones. Photo: Use for documents with photo or gray tones. ... -
Page 18: Poster Copying
Auto Fit does not work. NOTE: You cannot adjust the copy size using the Zoom menu while the Auto Fit copying is enabled. To make the Auto Fit copying: 1. Load the document to be copied on the document glass, and close the document cover. 2. -
Page 19: Printing Copies On Both Sides Of Paper
Printing Copies on Both Sides of Paper You can set the printer to print copies on both sides of paper automatically. 1. Load the documents to be copied in the ADF. 2. Press Scroll ( ) to highlight Copy and press Select ( 3. -
Page 20: Setting The Printer Id
Faxing Setting the Printer ID Sending a Fax Using the Number Keypad to Enter Characters Receiving a Fax Setting the Time and Date Automatic Dialing Changing the Clock Mode Other Ways to Fax Setting Sounds Additional Features Toll Save Mode Sending a Fax from a PC Setting up the Fax System ... -
Page 21: Setting The Time And Date
Keypad Letters and Numbers Assigned numbers, letters or characters 1 @ . _ space , / * # & $ + - ` A B C 2 D E F 3 G H I 4 J K L 5 M N O 6 P Q R S 7 T U V 8 W X Y Z 9 Changing Numbers or Names If you make a mistake while entering a number or name, press the left Scroll ( ) button to delete the last digit or character. -
Page 22: Changing The Clock Mode
NOTE: The printer beeps and does not allow you to proceed to the next step if a wrong number is entered. Changing the Clock Mode You can set your printer to display the current time using either the 12-hour or the 24-hour format. 1. -
Page 23: Setting Up The Fax System
2. Press Scroll ( ) to highlight Advanced Fax and press Select ( 3. Press Scroll ( ) to highlight Toll Save and press Select ( 4. Press Scroll ( ) to display On and press Select ( 5. After 1 second, enter the time and date when your printer starts sending toll save faxes, using the number keypad. To select AM or PM for 12-hour format, press the or the button. -
Page 24: Sending A Fax
• DRPD Mode: Before using the Distinctive Ring Pattern Detection (DRPD) option, distinctive ring service must be installed on your telephone line by the telephone company. After the telephone company has provided a separate number for faxing with a distinctive ring pattern, configure the fax setup to monitor for that specific ring pattern. -
Page 25: Sending A Fax Automatically
Mode Recommended for: Standard Documents with normal sized characters. Fine Documents containing small characters or thin lines or documents printed using a dot-matrix printer. Super Fine Documents containing extremely fine detail. The super fine mode is enabled only if the remote printer also supports the Super Fine resolution. -
Page 26: Receiving A Fax
Options". Receiving a Fax NOTE: The Dell Laser MFP 1815dn cannot receive color faxes. About Receiving Modes NOTE: To use the Ans/Fax mode, attach an answering machine to the extension telephone socket ( ) on the back of your printer. -
Page 27: Receiving Automatically In The Ans/Fax Mode
You can receive a fax by picking up the handset of the extension phone and then pressing the remote receive code (see "Receive Code"), or by accessing Fax On Hook Dial Yes when the bell is ringing (you can hear voice or fax tones from the remote printer) and then pressing Start ( ) on the operator panel. -
Page 28: Receiving Faxes In The Memory
4. Press Scroll ( ) to highlight Set and press Select ( The LCD displays Waiting Ring. 5. Call your fax number from another telephone. It is not necessary to place the call from a fax machine. 6. When your printer begins to ring, do not answer the call. The printer requires several rings to learn the pattern. 7. -
Page 29: Group Dialing
Editing Speed Dial Numbers You can edit a specific speed dial number. 1. Press Directory ( ) on the operator panel. Press Scroll ( ) to highlight Fax and press Select ( Press Scroll ( ) to highlight Menu and press Select ( Press Scroll ( ) to highlight Directory and press Select ( 2. -
Page 30: Editing Group Dial Numbers
Press Scroll ( ) to highlight Fax and press Select ( Press Scroll ( ) to highlight Menu and press Select ( Press Scroll ( ) to highlight Directory and press Select ( 2. Press Scroll ( ) to highlight PhoneBook and press Select ( 3. -
Page 31: Searching For A Number In The Memory
Follow the procedure of the desired operation (Broadcasting transmission; see "Sending Broadcasting Faxes", Delayed transmission; see "Sending a Delayed Fax"). When you come to a step in which the display asks you to enter the remote fax number: For a one-digit group number, press and hold the appropriate digit button. -
Page 32: Printing A Phonebook List
Press Scroll ( ) to highlight Directory and press Select ( 3. Press Scroll ( ) to highlight PhoneBook and press Select ( 4. Press Select ( ) to access Search. 5. Press the button labeled with the letter you want to search for. A name beginning with the letter displays. For example, if you want to find the name "MOBILE", press the 6 button, which is labeled with "MNO". -
Page 33: Sending A Delayed Fax
Place a single document face down on the document glass. For details about loading a document, see "Loading an Original Document". 2. Press Scroll ( ) to highlight Fax and press Select ( 3. Adjust the document contrast and resolution to suit your fax needs. For details, see "Adjusting the Document Contrast"... -
Page 34: Sending A Priority Fax
If you set a time earlier than the current time, the document may be sent at that time the following day. 12. Press Select ( ) when the start time displays correctly. 13. The document is scanned into the memory before transmission. The display shows the memory capacity and the number of pages being stored in memory. -
Page 35: Canceling A Scheduled Fax
4. Press Scroll ( ) to highlight Fax Features and press Select ( 5. Press Select ( ) to access Add Page. The display shows the jobs reserved in memory. 6. Press Scroll ( ) until you see the fax job to which you want to add documents to and press Select ( The printer automatically stores the documents in the memory, and the display shows the memory capacity and the number of pages. -
Page 36: Printing Reports
1. Access the Secure Receive menu by following steps 1 thorough 3 in "To turn the secure receiving mode on:". 2. Press Scroll ( ) to display Off and press Select ( 3. Enter the four-digit passcode and press Select ( The mode is deactivated and the printer prints faxes stored in memory. -
Page 37: Using Advanced Fax Settings
This report shows information about the emails you recently sent. Multi-communication Report This report is printed automatically after sending documents to more than one location. Power Failure Report This report is printed out automatically when power is restored after a power failure if there is any data loss due to power failure. Printing a Report 1. -
Page 38: Using An Answering Machine
about sending toll save faxes, see "Toll Save Mode". Select Off to turn this feature off. Select On to turn this feature on. You can set the start time and date; and the end time and date for toll save mode. Junk Fax Setup Using the Junk Fax Setup feature, the system may not accept faxes sent from remote stations. -
Page 39: Installing Pc-Fax Software
To fax via the computer modem, follow the instructions provided with your computer modem and fax application. You can capture images using your printer and Dell ScanDirect and send them using your fax application with the computer modem. ... - Page 40 2. Select Print from the File menu. The Print window displays. It may look slightly different depending on your application. 3. Select Dell PC Fax from the Print window. 4. Click OK. 5. Compose the cover page and click Continue.
- Page 41 Your PC begins to send the fax data and printer sends the fax. ...
-
Page 42: Finding Information
• Customer Care- Contact information, order status, warranty, and repair information • Downloads- Drivers • Reference- Printer documentation and product specifications You can access Dell Support at support.dell.com. Select your region on the WELCOME TO DELL SUPPORT page, and fill in the requested details to access help tools and information. -
Page 43: Getting Started
The supplied Drivers and Utilities CD provides you with Dell's MFP driver package for using your printer with a Linux computer. Dell's MFP driver package contains printer and scanner drivers, providing the ability to print documents and scan images. The package also delivers powerful applications for configuring your printer and further processing of the scanned documents. - Page 44 Glibc 2.2 or higher CUPS SANE Installing the MFP Driver 1. Make sure that you connect your printer to your computer. Turn both the computer and the printer on. 2. When the Administrator Login window appears, type in root in the Login field and enter the system password. NOTE: You must log in as a super user (root) to install the printer software.
- Page 45 If you connect your printer using the network cable, the following window appears. Check the Network printer, and select your printer from the drop-down list. Click Next. 6. If you connect your printer using the USB cable, choose a port you will use with your printer. After choosing the port, click Next. If you connect your printer using the network cable, skip to the next step.
-
Page 46: Uninstalling The Mfp Driver
10. When the following window appears, click Finish. The installation program has added the MFP Configurator desktop icon and Dell MFP group to the system menu for your convenience. If you have any difficulties, consult the onscreen help that is available through your system menu or in the driver package windows applications, such as MFP Configurator or Image Editor. -
Page 47: Using The Mfp Configurator
Opening the MFP Configurator 1. Double-click MFP Configurator on the desktop. You can also click the Startup Menu icon and select Dell MFP and then MFP Configurator. 2. Press each button on the Modules pane to switch to the corresponding configuration window. -
Page 48: Scanners Configuration
Add Class...: Enables you to add a new printer class. Remove Class: Removes the selected printer class. Scanners Configuration In this window, you can monitor the activity of scanner devices, view a list of installed Dell MFP devices, change device properties, and scan images. -
Page 49: Mfp Ports Configuration
The Dell MFP driver package provides an appropriate port sharing mechanism that is used by Dell printer and scanner drivers. The drivers address their devices via so-called MFP ports. The current status of any MFP port can be viewed via the MFP Ports Configuration. The port sharing prevents you from accessing one functional block of the MFP device, while another block is in use. -
Page 50: Printing A Document
1. From the application you are using, select Print from the File menu. 2. Select Print directly using lpr. 3. In the Dell LPR window, select the model name of your machine from the Printer list and click Properties. 4. Change the printer and print job properties. -
Page 51: Printing Files
You can print many different types of files on the Dell MFP device using the standard CUPS way - directly from the command line interface. The CUPS lpr utility enables you do that. But the drivers package replaces the standard lpr tool by a much more user-friendly Dell LPR program. - Page 52 When you have only one MFP device and it is connected to the computer and turned on, your scanner appears on the list and is automatically selected. If you have two or more scanners attached to your computer, you can select any scanner to work at any time. For example, while acquisition is in progress on the first scanner, you may select the second scanner, set the device options and start the image acquisition simultaneously.
-
Page 53: Adding Job Type Settings
If you want to edit the scanned image, use the toolbar. For further details about editing an image, see "Using the Image Editor". 10. When you are finished, click Save on the toolbar. 11. Select the file directory where you want to save the image and enter the file name. 12. - Page 54 You can use the following tools to edit the image: Tools Function Saves the image. Cancels your last action. Restores the action you canceled. Zooms the image out. Zooms the image in. Enables you to scroll through the image. Crops the selected image area.
-
Page 55: Installing Software For Macintosh
6. Enter the queue name in the Queue Name field. If you cannot determine the queue name for your printer server, try using the default queue first. 7. Select Dell in Printer Model and your printer in Model Name. 8. Click Add. -
Page 56: For A Usb-Connected Macintosh
3. Click Add on the Printer List. 4. Select the USB tab. 5. Select Dell in Printer Model and your printer in Model Name. 6. Click Add. Your printer appears on the Printer List, and is set as the default printer. -
Page 57: Duplex Printing
Printing Multiple Pages on One Sheet of Paper You can print more than one page on a single sheet of paper. This feature provides a cost-effective way to print draft pages. 1. From your Macintosh application, select Print from the File menu. 2. -
Page 58: Image Mode
3. Select a binding orientation from Two Sided Printing option. 4. Click Print and the printer prints on both sides of the paper. Printer Features Setting The Printer Features tab provides options for selecting the paper type and adjusting print quality. ... - Page 59 Scanning If you want to scan documents using other software, you will need to use TWAIN-compliant software, such as Adobe PhotoDeluxe or Adobe Photoshop. The first time you scan with your printer, select it as your TWAIN source in your application. ...
-
Page 60: Maintenance
Maintenance Clearing the Memory Backing up Data Cleaning Your Multi-function Printer Maintaining the Toner Cartridge Replacement parts Ordering Supplies Clearing the Memory You can selectively clear information stored in your printer's memory. 1. Press Scroll ( ) to highlight Menu and press Select ( 2. -
Page 61: Cleaning Your Multi-Function Printer
5. Press Cancel ( ) to return to Standby mode. Restoring Data 1. Insert the USB memory key into the USB memory port on your printer. 2. Press Scroll ( ) to highlight Menu and press Select ( 3. Press Scroll ( ) to highlight Machine Setup and press Select ( 4. -
Page 62: Cleaning The Scanner
Cleaning the Scanner Keeping the scanner and ADF glass clean ensure the highest quality copies, scans, and sent faxes. Dell recommends cleaning the scanner at the start of each day and during the day, as needed. NOTE: If there are lines present on copied or faxed documents, check your scanner and ADF glass for any particles. -
Page 63: Maintaining The Toner Cartridge
Maintaining the Toner Cartridge Storing the Toner Cartridge Store the toner cartridge in the original packaging until you are ready to install it. Do not store the toner cartridge in: Temperatures greater than 40° C (104° F) An environment with extreme changes in humidity or temperature ... -
Page 64: Replacing The Toner Cartridge
"Ordering Supplies" to order toner cartridges. CAUTION: For best results, use Dell toner cartridge. Print quality and printer reliability are not guaranteed if you do not use Dell supplies. To replace the toner cartridge: 1. Open the front cover. -
Page 65: Replacement Parts
Pickup roller Approx. 150,000 pages To purchase replacement parts, contact your Dell dealer or the retailer where you bought your printer. We strongly recommend that these items be installed by a trained service professional. Replacing the ADF rubber pad ... -
Page 66: Ordering Supplies
Ordering Supplies You can order supplies using the DellTM Toner Management System or the Dell Printer Configuration Web Tool. If your printer is connected to a network, type your printer's IP address in your Web browser or open the Network Status Monitor Center (see "Network Status... - Page 67 If ordering by phone, call the number that appears under the By Telephone heading. 3. If your printer is connected to a network, type the printer's IP address in your Web browser to launch the Dell Printer Configuration Web Tool, and click the supplies link.
- Page 68 ...
-
Page 69: About Sharing The Printer On A Network
Printing Across a Network Whether the printer is locally connected or network-connected, you need to install the Dell Laser MFP 1815dn software on each computer that prints documents using the printer. Setting Up the Locally Shared Printer ... -
Page 70: Setting Up The Host Computer
6. Double-click your printer icon. 7. Click the Printer menu and point to Properties. 8. Click the Details tab and point to the printer port and then click OK. In Windows NT 4.0/2000/XP/Server 2003/Vista Setting Up the Host Computer 1. -
Page 71: Via The Operator Panel
SetIP: A utility program that allows you to select a network interface card and manually configure the addresses for use with the TCP/IP protocol. 2 Via the Operator Panel You can configure the basic network parameters through the printer's operator panel. Use the printer operator panel to do the following: ... -
Page 72: Restoring The Network Configuration
Static Addressing To enter the TCP/IP address from your printer's operator panel, take the following steps: 1. Press Scroll ( ) to highlight Menu and press Select ( 2. Press Scroll ( ) to highlight Network CFG and press Select ( 3. -
Page 73: Precautions When Installing Printer Accessories
Your printer has 92 MB of memory. It can be expanded to 192 MB. Remove the preinstalled memory DIMM before upgrading the memory. NOTE: Your printer supports only Dell DIMMs. Order Dell DIMMs online at www.dell.com. 1. Power the printer off and unplug all cables from the printer. -
Page 74: Activating The Added Memory In The Ps Printer Properties
For Windows Vista, click Control Panel Hardware and Sound Printers. 4. Select the Dell Laser MFP 1815 PS printer. 5. Right-click the printer icon and: In Windows 98/Me, click Properties. In Windows 2000/XP/Server 2003/Vista, click Print Setup or click Properties and then point to Printing Preferences. -
Page 75: Installing An Optional Tray
Installing an Optional Tray 2 You can increase the paper handling capacity of your printer by installing an optional tray 2. This tray holds 250 sheets of paper. 1. Power the printer off and unplug all cables from the printer. 2. - Page 76 For Windows Vista, click Control Panel Hardware and Sound Printers. 3. Click the Dell Laser MFP 1815 printer. 4. Right-click the printer icon and: In Windows 98/Me, click Properties. In Windows 2000/XP/Server 2003/Vista, click Print Setup or click Properties and then point to Printing Preferences.
- Page 77 6. Click OK.
-
Page 78: Paper Handling
Paper Handling Print Media Guidelines Loading Print Media in the Paper Tray Storing Print Media Using the Bypass Tray Identifying Print Media Sources and Specifications Setting the Paper Size Selecting an Output Location Setting the Paper Type Print Media Guidelines ... -
Page 79: Recommended Paper
Grain refers to the alignment of the paper fibers in a sheet of paper. Grain is either long grain, running the length of the paper, or short grain, running the width of the paper. For 60 to 90 g/m (16 to 24 lb bond) paper, grain long fibers are recommended. -
Page 80: Selecting Preprinted Forms And Letterhead
Do not use paper that you have cut or trimmed yourself. Do not mix print media sizes, weights, or types in the same source; mixing results in jams. Do not use coated papers. Remember to change the paper size setting when you use a source that does not support auto size sensing. ... -
Page 81: Selecting Prepunched Paper
Selecting Prepunched Paper Prepunched paper brands can differ in the number and placement of holes and in manufacturing techniques. Use the following guidelines to select and use prepunched paper: Test paper from several manufacturers before ordering and using large quantities of pre-punched paper. ... -
Page 82: Card Stock
- Contain windows, holes, perforations, cutouts or embossing - Use metal clasps, string ties, or metal folding bars - Have an interlocking design - Have postage stamps attached - Have any exposed adhesive when the flap is in the sealed or closed position - Have nicked edges or bent corners - Have rough, cockle, or laid finishes ... -
Page 83: Storing Print Media
Card stock is single ply, and has a large array of properties, such as the moisture content, thickness, and texture, that can significantly affect print quality. See "Identifying Print Media Sources and Specifications" for information on the preferred weight for the grain direction of print media. ... - Page 84 Oficio 8.5 x 13.5 in. (216 x 343 mm) Folio 8.5 x 13 in. (216 x 330 mm) Envelope 7-3/4 (Monarch) 3.875 x 7.5 in. (98.4 x 190.5 mm) Envelope COM-10 4.12 x 9.5 in. (105 x 241 mm) Envelope DL 4.33 x 8.66 in.
-
Page 85: Selecting An Output Location
Selecting an Output Location The printer has two output locations; the output tray (face down) and the rear cover (face up). To use the output tray, make sure that the rear cover is closed. To use the rear cover, open it. NOTE: If paper coming out of the output tray has problems, such as excessive curl, try printing to the rear cover. -
Page 86: Loading Print Media In The Paper Tray
CAUTION: The fuser area inside of the rear cover of your printer becomes very hot when in use. Take care when you access this area. Loading Print Media in the Paper Tray You can load approximately 250 sheets of plain paper in the tray 1 or the optional tray 2. If you purchased the optional tray 2, see "Installing an Optional Tray 2"... - Page 87 NOTE: Always load only the print materials specified in the Specifications on "Paper Specifications" to avoid paper jams and print quality problems. NOTE: Flatten any curl on postcards, envelopes and labels before loading them into the bypass tray. To use the bypass tray: 1.
-
Page 88: Setting The Paper Size
CAUTION: Make sure to open the rear cover when you print on transparencies. If not, they may tear while exiting the machine. 6. After printing, fold away the paper support extension and close the bypass tray. Tips on using the bypass tray ... - Page 89 ...
-
Page 90: Printing A Document
Your printer prints documents using the Graphic Device Interface (GDI), Printer Control Language (PCL) or Postscript (PS) printer driver. When you install the Dell software, your printer automatically installs the GDI and PCL printer drivers. Installing the PS printer driver is optional. See "Installing Dell Software for... -
Page 91: Canceling A Print Job
For Windows XP/Server 2003, click Printers and Faxes. For Windows Vista, click Control Panel Hardware and Sound Printers. 3. Double-click the Dell Laser MFP 1815 icon. 4. From the Document menu, click Cancel (Windows NT 4.0/2000/XP/Server 2003/Vista) or Cancel Printing (Windows 98/Me). Printer Settings ... -
Page 92: Layout Tab
For Windows Vista, click Control Panel Hardware and Sound Printers. c. Point to the Dell Laser MFP 1815 printer. d. Right-click on the printer icon and: For Window 98/Me, click Properties. For Windows 2000/XP/Server 2003/Vista, click Print Setup or click Properties and point to Printing Preferences. -
Page 93: Graphics Tab
Property Description Copies enables you to choose the number of copies to be printed. You can enter up to 999. Copies The Size option enables you to choose the size of paper loaded in the paper tray. Size If the required size is not listed in the Size box, click Custom. When the Custom Paper Setting window appears, set the paper size and click OK. -
Page 94: Other Options Tab
Some printed characters appear to have jagged or uneven edges. Set this Image Mode option to improve the print quality of Image Mode your text and make the characters appear smoother. • Normal: This setting prints text in the normal mode. •... -
Page 95: About Tab
Property Description You can create a background image of text to print on each page of your document. See "Using Watermarks". This feature is not Watermark available when using the Postscript (PS) driver. Overlays are often used to take the place of preprinted forms and letterhead paper. See "Using Overlays". -
Page 96: Printing Multiple Pages On One Sheet Of Paper
Printing Multiple Pages on One Sheet of Paper You can select the number of pages to print on a single sheet of paper. To print more than one page per sheet, the pages will appear decreased in size and arranged on the sheet. You can print up to 16 pages on one sheet. 1. -
Page 97: Fitting Your Document To A Selected Paper Size
4. Select the paper source, size and type. 5. Click OK to print the document. Fitting Your Document to a Selected Paper Size You can scale your print job to any selected paper size regardless of the digital document size. This can be useful when you want to check fine details on a small document. -
Page 98: Printing On Both Sides Of Paper
3. Configure the poster option: You can select the page layout from Poster<2x2>, Poster<3x3>, or Poster<4x4>. If you select Poster<2x2>, the output will be automatically stretched to cover 4 physical pages. Specify an overlap in millimeters or inches to make it easier to reconstruct the resulting poster. 4. -
Page 99: Using An Existing Watermark
4. Click the Paper tab and select the paper source, size and type. 5. Click OK and print the document. Your printer prints on both sides of paper automatically. Using Watermarks The Watermark option enables you to print text over an existing document. For example, you may want to have large gray letters reading "DRAFT"... -
Page 100: Using Overlays
3. Enter the text message you want to print in the Watermark Message box. The message displays in the preview image window. The preview image is provided so that you can see how the watermark will appear on the printed page. -
Page 101: Using A Page Overlay
To use a page overlay, you must create a new page overlay containing your logo or image. NOTE: The overlay document size must be the same as documents you will print with the overlay. Do not create an overlay with a watermark. -
Page 102: Deleting A Page Overlay
If you have stored the overlay file you want to use on an external source, such as a CD or floppy disk, you can also load the file when you access this Load Overlay window. After you select the file, click Open. The file is now shown in the Overlay List box and is available for printing. Select the overlay from the Overlay List box. -
Page 103: Scanning Overview
Icons on the Dell ScanCenter bar represent the programs that are limited to PaperPort and to Dell ScanCenter. To scan and send an item to a program, click the program icon and then scan the item. Dell ScanCenter automatically starts the selected program when the scan is complete. -
Page 104: Scanning Using Network Scan
Adding a User To register yourself as an authorized Network Scan user, follow the instructions in the Dell Network Scan Manager screens. 1. Click the Add Device button. 2. Click Next. 3. Specify the network scanner you want to use by browsing or by providing an IP address to connect directly to a scanner. For more information on using an IP address, see "Adding a... -
Page 105: Adding A Scanner
To register your scanner as an authorized network scanner, use the Dell Network Scan Manager window. 1. In the Dell Network Scan Manager window, click the Add Device button, or double-click the Add Device icon. 2. Click Next. 3. Select Browse for a scanner. (Recommended), or Connect to this scanner. If you select Connect to this scanner, enter an IP address and then click Next. -
Page 106: Setting The Properties
5. When you have added your printer to the network, Click Finish. Your printer appears on the Dell Network Scan Manager window and you can now scan through the network. Setting the properties 1. In the Dell Network Scan Manager window, double-click the scanner icon, or click the Properties button. -
Page 107: Advanced Page
Advanced Page Preferences Page Scanning using Network Scan 1. Confirm your scanner is available for use by checking the scanner status icon. 2. Configure the network scanner settings. See "Setting the properties". 3. Load the document you want to scan. 4. -
Page 108: Scanning Using The Windows Image Acquisition (Wia) Driver
Scanning Using the Windows Image Acquisition (WIA) Driver Your printer also supports the WIA driver for scanning images. WIA is one of the standard components provided by Microsoft Windows XP/Server 2003/Vista and works with digital cameras and scanners. Unlike the TWAIN driver, the WIA driver enables you to scan an image and easily manipulate those images without using additional software. -
Page 109: Scanning Using The Default Settings
The USB memory port on the front of your printer is designed for USB V1.1 and USB V2.0 memory. You must use only an authorized USB memory key whose connector style is A Plug Type. Insert a USB memory key into the USB memory port on the front of your printer. CAUTION: Do not remove the USB memory key while the printer is in operation. -
Page 110: Deleting An Image File
Place a single document face down on the document glass. For details about loading a document, see "Loading an Original Document". 3. Press Scroll ( ) to highlight Scan and press Select ( 4. Press Select ( ) to access USB key. 5. -
Page 111: Printing From The Usb Memory Key
If you see "\" in the front of a folder name, there are one or more folders in the selected folder. 7. If you selected a file in step 6, the display shows the size of the file for about 2 seconds. Go to the next step. If you selected a folder, press Scroll ( ) to select the file you want to delete and press Select ( 8. -
Page 112: Email Setup
Email Setup To use e-mail features such as Scanning to E-mail and Fax Forward to E-mail addresses, you first need to configure the network settings and set up your e- mail account. See "Setting Up the Network-connected Printer" for network parameters. Setting up the Email Account 1. -
Page 113: Setting Up Address Book
NOTE: You can enter a name you have stored in the Address Book. See "Setting up Address Book". The display asks if you want to enter another address. 9. To enter additional address, press Scroll ( ) to select Add and repeat step 8. To continue to the next step, press Select ( ) when Done appears. -
Page 114: Editing Or Deleting An E-Mail Address
7. The e-mail address you have assigned for the name appears. Press Select ( 8. Enter the recipient's name and press Select ( For information about entering characters, see "Using the Number Keypad to Enter Characters". 9. The e-mail address you have assigned for the name appears. Press Select ( 10. -
Page 115: Deleting A Group Number
Press Scroll ( ) to highlight Menu and press Select ( Press Scroll ( ) to highlight Directory and press Select ( 2. Press Scroll ( ) to highlight Email and press Select ( 3. Press Select ( ) to select Group Mail. 4. -
Page 116: Printing Address Book
Place a single document face down on the document glass. For details about loading a document, see "Loading an Original Document". 2. Press Directory ( ) in the operator panel. Press Scroll ( ) to highlight Menu and press Select ( Press Scroll ( ) to highlight Directory and press Select ( 3. -
Page 117: Fax Forward To E-Mail Addresses
2. Press Scroll ( ) to highlight Scan Defaults and press Select ( 3. Press Select ( ) to access Image Size. 4. Press Scroll ( ) to highlight the image size you want and press Select ( 5. Press Scroll ( ) to highlight Version and press Select ( 6. -
Page 118: Software Overview
The Dell Printer Configuration Web Tool, also known as the Printer Embedded Web Server, lets you monitor the status of your network printer at your desk. View and/or change the printer configuration settings, monitor toner level, and when it is time to order replacement toner cartridges, just click the Dell supplies link right from your Web browser. -
Page 119: Printer Status
4. Press Select ( ) to print a network configuration page. If an IP address has not been assigned, assign one for your printer. See "Configuring TCP/IP". Select an appropriate link such as "Setting Up the Network-connected Printer" to view the status of your network printer and/or change the printer configuration settings. -
Page 120: Installing Software In Windows
If you attach a USB printer cable while your printer and computer are powered on, the Windows hardware wizard launches immediately. Cancel the screen and use the Drivers and Utilities CD to install the Dell software. 1. Make sure that the printer is connected to your computer and powered on. Close all unnecessary programs. -
Page 121: Assigning An Ip Address
2. Insert the Drivers and Utilities CD. NOTE: For Windows Vista, click Continue when the User Account Control screen appears. 3. If required, press the Language button to select a language. 4. Select Personal Installation and click Next. 5. Select Typical Installation and click Next to install the User's Guide, the printer drivers, scanner driver and PaperPort as the default settings. To install selected software including the printer Postscript driver, select Custom Installation and click Next. -
Page 122: Installing Dell Software For Network Printing
Installing Dell Software for Network Printing When you connect your printer to the network, configure the TCP/IP settings for the printer before you install the Dell software on each network printer. You can install the Dell software on the network computers locally or remotely. -
Page 123: Uninstalling Software
If you do not see your printer in the list, click Update to refresh the list or click Add Printer to add your printer to the network. To add the printer to the network, enter the port name and an existing IP address for the printer. If you want to install the printer on a server, select the I am setting up this printer on a server check box. -
Page 124: Using The Dell Toner Management System
If your printer is connected to a network, you can use the Network Status Monitor Center. Using the Network Status Monitor Center, you can launch the Dell Printer Configuration Web Tool and manage the status of multiple printers on the network. -
Page 125: Printer Settings Utility
Using the Printer Settings Utility window, you can set up the fax system data options, and create and edit Phonebook entries from your computer. You can also configure the destination launches when you access Scan and then PC. When you install the Dell software, the Printer Settings Utility is automatically installed. For information about installing the software, see "Installing Software in... -
Page 126: The Fax Setting Section
The Fax Setting Section Click the Fax Setting section to create a fax cover page. For details, see "Advanced Fax Setting Options". The fax cover page contains the date, the sender's fax number and printer ID, the recipient's fax number and printer ID stored in the sender's Phonebook and the total number of pages you sent. ... -
Page 127: General Specifications
Temperature: 50o F-89o F (10o C-32o C) Humidity: 20%-80% RH 16 characters x 2 lines Toner cartridge life Dell Standard Capacity Toner Cartridge life: 3,000 pages Dell High Capacity Toner Cartridge life: 5,000 pages Multi-function printer dimension 17.7 x 18 x 16.7 in. -
Page 128: Facsimile Specifications
Color bit depth 24 bit Mono bit depth 1 bit for Lineart 8 bit for Gray scale Scan speed (Text mode) document glass: 15 (Lineart), 20 (Gray), 30 seconds (Color) ADF: 26 (Lineart), 26 (Gray), 64 seconds (Color) Copy speed SDMC (Single Document Multiple Copy): 27 cpm (copies per minute for letter), 25 cpm for A4 MDMC (Multi-document Multiple Copy) at Text and Mixed: 7 cpm MDSC (Multi-document Single Copy): 7 cpm... -
Page 129: Paper Specifications
Before purchasing large quantities of paper, ensure the paper meets the requirements specified in this User's Guide. CAUTION: Using paper that does not meet these specifications may cause problems, requiring repairs. These repairs are not covered by the Dell warranty or service agreements. -
Page 130: Paper Output Capacity
If you are unsure of what type of paper you are loading, such as bond or recycled paper, check the label on the package. The following problems may cause print quality deviations, jamming or even damage to the printer: Symptom Problem with paper Solution... - Page 131 The paper storage environment should be properly maintained to ensure optimum performance. The required condition is 20° C to 24° C (68° F to 75° F), with a relative humidity of 4 percent to 55 percent. The following guidelines should be considered when evaluating the paper's storage environment: Paper should be stored at or near room temperature. The air should not be too dry or too humid. ...
-
Page 132: Notes, Notices, And Cautions
Adobe and PhotoShop are registered trademarks of Adobe Systems Incorporated. Other trademarks and trade names may be used in this document to refer to either the entities claiming the marks and names of their products. Dell Inc. disclaims any proprietary interest in trademarks and trade names other than its own. -
Page 133: Troubleshooting
Troubleshooting Clearing Jams in the ADF Clearing Jams in the Paper Paths Clearing LCD Error Messages Solving Problems Clearing Jams in the ADF When a document jams while it passes through the ADF, Document Jam appears on the display. NOTE: To prevent document jams, use the document glass for thick, thin or mixed documents. -
Page 134: Clearing Jams In The Paper Paths
b. Close the document cover. Then load the documents back into the ADF. 2. If you cannot see the paper or the paper does not move when you pulled, open the document cover. 3. Turn the release knob so that you can easily seize the misfed document, and remove the document from the roller or the feed area by carefully pulling it gently to the right. -
Page 135: Paper Feed Jam (Optional Tray 2)
If you cannot see the paper or the paper does not move when pulled, check the fuser area. For more information, see "Fuser Area Jam". 4. Insert the paper tray into the printer until it snaps into place. Printing automatically resumes. ... -
Page 136: Fuser Area Jam
2. Open and close the front cover to resume printing. Fuser Area Jam NOTICE: The fuser area is hot. Take care when removing paper from the printer. 1. Open the front cover and lightly pull the toner cartridge straight out. 2. - Page 137 3. If you cannot see the paper in the output tray or the paper does not move when pulled, open the rear cover. 4. If you see the jammed paper, push the two blue pressure levers up and remove the paper. Skip to step 9. If you do not see the paper, go to the next step.
-
Page 138: Duplex Jam
9. Return the levers, fuser door, rear cover stopper, and duplex guide to their original position. 10. Close the rear cover. 11. Open and close the front cover. Printing automatically resumes. Duplex Jam Duplex Jam 0 1. Pull the duplex unit out of the printer. 2. -
Page 139: Tips For Avoiding Paper Jams
1. Open the rear cover. 2. Unfold the duplex guide fully. 3. Pull the jammed paper out. 4. Return the duplex guide and close the rear cover. 5. Open and close the front cover. Printing automatically resumes. Tips for Avoiding Paper Jams ... - Page 140 Press Start Invalid Cartridge The toner cartridge you have installed is not for your Install a Dell-genuine toner cartridge, designed for your printer. printer. Connection Error Connection with the SMTP server failed.
-
Page 141: Solving Problems
Please wait a few minutes. automatically redial. Solving Problems The following chart lists some conditions that may occur and the recommended solutions. Follow the suggested solutions until the problem is corrected. If the problem persists, contact Dell. Paper Feeding Problems... -
Page 142: Printing Problems
Windows. Click the Start button Settings Printers. Right-click the Dell Laser MFP 1815 printer icon and select Set as Default Printer. Check the printer for the following: • The front or rear cover is not closed. • Paper is jammed. -
Page 143: Printing Quality Problems
try a print job that you know works. Finally, try a new printer cable. The wrong printer driver was selected. Check the application's printer selection menu to ensure that your printer is selected. The software application is malfunctioning. Try printing a job from another application. The operating system is malfunctioning. - Page 144 Toner smear • Clean the inside of the printer. See "Cleaning the Interior". • Check the paper type and quality. See "Paper Specifications". • Remove the toner cartridge and install a new one. See "Replacing the Toner Cartridge". If marks repeatedly appear on the printed side of the page at even intervals: Vertical repetitive defects •...
-
Page 145: Fax Problems
Black pages • The toner cartridge may not be installed properly. Remove the cartridge and reinsert. • The toner cartridge may be defective and need replacing. Install a new toner cartridge. See "Replacing the Toner Cartridge". • The printer may require repair. Contact a service representative. Loose toner •... -
Page 146: Copying Problems
The printer dials a number, but the The other fax machine may be turned off, out of paper, or cannot answer incoming calls. Speak with the connection with another fax machine fails. other machine operator and ask her/him to sort out the problem. Documents are not stored in the memory. -
Page 147: Common Windows Problems
I can't view the Help file. To view the Help file, you need to have Microsoft Internet Explorer 4 service pack 2 or above. I can't use Network Scan Manager. Check your operating system. Supporting operating systems are Microsoft Windows 98/Me/NT4.0/2000/XP/Server 2003/Vista. ... -
Page 148: Common Macintosh Problems
I can't print when I installed both Linux Print • Since both Linux Printer Package and MFP driver make a symbolic link to "lpr" printing Package (LPP) and MFP driver on the same command, which is commonly used on Unix clones, it is not recommended to use both machine simultaneously.
Need help?
Do you have a question about the 1815dn Multifunction Mono Laser Printer and is the answer not in the manual?
Questions and answers