SIIG CyberSerial Dual PCIe Quick Installation Manual
Hide thumbs
Also See for CyberSerial Dual PCIe:
- Quick installation manual (9 pages) ,
- Quick installation manual (12 pages)
Table of Contents
Advertisement
Quick Links
Introducing the CyberSerial Dual PCIe
The CyberSerial Dual PCIe-Dual Bracket high-speed serial
I/O card provides two additional 9-pin serial ports.
Features and Benefits
•
Compliant with PCI Express Base Specification 1.0a
•
PCI Express 1-lane (x1) serial I/O card works with
PCI Express slots with different lane width
•
Installs into any available PCI Express slot and
provides two 9-pin RS232 serial ports
•
128-byte FIFO buffers dramatically increase data
transmit/receive speed and supports data rates up
to 920 Kbps
•
Works as standard RS232 port or with 5V or 12V
power output for devices that require power
System Requirements
•
PCI Express-enabled system with an available PCI
Express slot
•
Windows
2008 (32-/64-bit) / Vista (32-/64-bit)
Package Contents
•
CyberSerial Dual PCIe-Dual Bracket adapter
•
Connector bracket with 9-pin serial port (for the 2nd
serial port)
•
"Y" split power cable
•
Driver CD & quick installation guide
04-0570A
CyberSerial Dual PCIe
Quick Installation Guide
2000 / XP (32-/64-bit) / Server 2003 &
®
1
Advertisement
Table of Contents

Related Manuals for SIIG CyberSerial Dual PCIe


Summary of Contents for SIIG CyberSerial Dual PCIe
-
Page 1: Quick Installation Guide
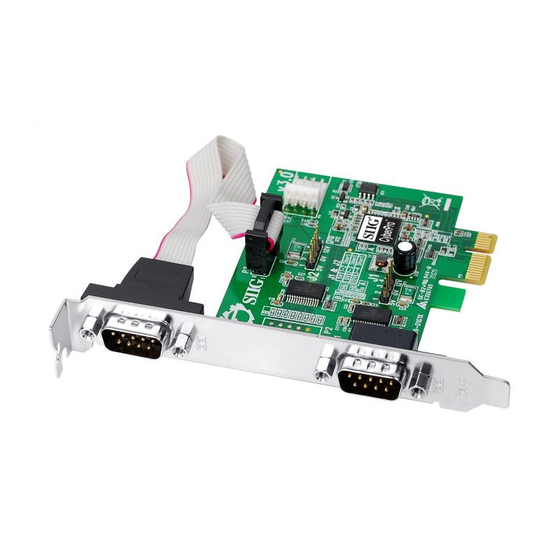
CyberSerial Dual PCIe Quick Installation Guide Introducing the CyberSerial Dual PCIe The CyberSerial Dual PCIe-Dual Bracket high-speed serial I/O card provides two additional 9-pin serial ports. Features and Benefits • Compliant with PCI Express Base Specification 1.0a • PCI Express 1-lane (x1) serial I/O card works with PCI Express slots with different lane width •... - Page 2 Layout Power connector* Connector bracket with 9-pin serial port Pin 1 for 2nd serial port Serial port 1 Figure 1: Layout * Note: If the serial port requires power output, connect the system power source to board's power connector. However, most serial devices do not require additional power through the serial port.
-
Page 3: Hardware Installation
Hardware Installation General instructions for installing the card are provided below. Since the design of computer cases and motherboards vary, refer to your computer’s reference manual for further information, if needed. Static Electricity Discharge may permanently damage your system. Discharge any static electricity build up in your body by touching your computer’s case for a few seconds. -
Page 4: Driver Installation
Replace the computer cover and reconnect the power cord. Driver Installation This section provides information on how to install the CyberSerial Dual PCIe-Dual Bracket drivers. Windows 2000 At the Found New Hardware Wizard, click Next. Select Search for a suitable driver for my device (recommended), and click Next. - Page 5 Repeat steps 1-3 one or two times to complete the installation. ™ Windows Vista (32-/64-bit) At the Found New Hardware window, click Locate and install driver software (recommended), then click Continue. Click I don't have the disc. Show me other options. Insert the driver CD, click Browse my computer for driver software (advanced).
-
Page 6: Changing Com Port Number
To Verify Windows Installation Check in Device Manager to verify successful driver installation. For Windows 2000 / XP / Server 2003: Right click My Computer, click Manage, click Device Manager. For Windows Vista: Right click Computer, click Manage, click Continue, click Device Manager. For Windows Server 2008: Right click Computer, click Manage, double click Diagnostics, click Device Manager. - Page 7 Step 1: Submit your RMA request. Go to www.siig.com, click Support, then RMA to submit a request to SIIG RMA. If the product is determined to be defective, an RMA number will be issued. Step 2: After obtaining an RMA number, ship the product.
- Page 8 Fremont, CA 94538-3152, USA Phone: 510-657-8688 CyberSerial Dual PCIe-Dual Bracket is a trademark of SIIG, Inc. SIIG and the SIIG logo are registered trademarks of SIIG, Inc. Microsoft, Windows and Windows Vista are either registered trademarks or trademarks of Microsoft Corporation in the United States and/or other countries. Other names used in this publication are for identification only and may be trademarks of their respective companies.
Need help?
Do you have a question about the CyberSerial Dual PCIe and is the answer not in the manual?
Questions and answers