
Subscribe to Our Youtube Channel
Related Manuals for GE 29582


Summary of Contents for GE 29582
- Page 1 Model 29582 Digital Answerer with Call Waiting Caller ID and Speakerphone Telephone User's Guide...
-
Page 2: Equipment Approval Information
Equipment Approval Information Yourtelephone equipment is approved for connection to the Public SwitchedTelephoneNetwork and is in compliance with ports 15 and 68, FCCRulesand Regulationsand the TechnicalRequirementsfor TelephoneTerminal Equipment publishedby ACTA. 1 Notification to the Local Telephone Company Onthe bottom of this equipment is a label indicating,among other information, the USnumber and RingerEquivalenceNumber (REN} f or the equipment. -
Page 3: Interference Information
Interference Information Thisequipment has beentested and found to comply with the limits for a ClassB digital device, pursuant to Part 15 of the FCCRules.Theselimits are designedto provide reasonableprotection against harmful interference ina residential installation. Thisequipment generates, uses,and can radiate radio frequency energy and, if not installedand used in accordance with the instructions,may cause harmful interference to radio communications. -
Page 4: Table Of Contents
Table of Contents HANDSET VOLUME ........EQUIPMENT APPROVAL INFORMATION ..INTERFERENCE INFORMATION ...... SPEAKERPHONE VOLUME ......HEARING AID COMPATIBILITY ..... 3 TELEPHONE OPERATION ......LICENSING ..........USING THE SPEAKERPHONE....... FCC RF RADIATION E XPOSURE SPEAKERPHONE LOCATION....STATEMENT ........SPEAKERPHONE USE ......INTRODUCTION ........ - Page 5 Table of Contents MEMORY ..........MEMORY.... STORING A NUMBER STORING CALLER RECORDS ....INSERTING A PAUSE IN THE DIALING SEOUENCE ..........CHANGING A STORED NUMBER ....DIALING A STORED NUMBER ..... DIALING A QUICK DIAL NUMBER ....REVIEWING STORED NUMBERS ....
-
Page 6: Introduction
Introduction CAUTION: When using telephone equipment, there are basic safety instructions that should always be followed. Refer to the IMPORTANT SAFETY INSTRUCTIONS provided with this product and save them for future reference. Before You Beqin Parts Checklist Make sure your package includes the following items: fi o Base AC power adaptor... -
Page 7: Important Installation Information
Important Installation Information • Never installtelephone wiring during a lightning storm. • Nevertouch non-insulated telephonewires or terminals, unlessthe telephoneline has been disconnectedat the network interface. • Usecaution when installing or modifyingtelephone lines. • Never installtelephonejacks in wet locations unlessthe jack isspecifically designedfor wet locations. -
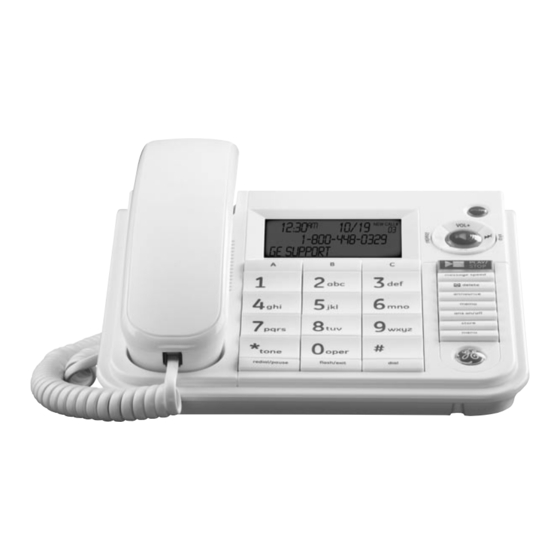
Page 8: Base Layout
Base Layout Quick dial/emergency SPEAKERPHONE(button) memory (buttons) display , mute (button) +/-buttons) (button) PLAY/STOP (button) speed (button) (button) (button) memo (button) ans on/off * tone (button) menu (button) flash/exit (button) dial ( button) redial/pause Hicrophone (button) -
Page 9: Installing The Phone
Installing the Phone Desktop Installation CAUTION: To reduce risk of personal injury, fire, or damage i, only the 5-2806 (white) or 5-2807 (black) power adaptor listed in the user's guide. This power adaptor is intended to be correctly orientated in a vertical or floor mount position. -
Page 10: Wall Mounting The Phone
Wall Mounting the Phone 1. To preparefor wall mounting,wrap excess telephonecord, if any, around the hooks providedon the wall mount bracket. Be sureto leaveenough cord for connectingto the baseat the top and the walljack through the center cut out of the wall bracket. 2. -
Page 11: Answerer
Important Instructions for Moving the Answerer: Tomove the answerer to a different location in the house,follow these instructions: 1. Disconnectthe phone line. 2. Goto the electricaloutlet and unplug the power adaptor. 3. Movethe unit and phone lineto the desiredlocation. /4.Plug in the power adaptor into an electricaloutlet. 5. -
Page 12: Telephone Set Up
Telephone Set Up Youcan customizethe following settings to suit your needs. Local Area Code Setsyour local area code for Dial Back. Display Contrast Selectsthe display contrast. Default Settings Time/Date Setsthe time and date. Local Area Code - - - Display Contrast MessageLength Setsthe length of time allowedfor... -
Page 13: Setting The Display Contrast
Setting the Disploy Controst Thissetting allows you to adjust the displaycontrast for easierreadability. 1. If you recentlyadjusted the LocalAreaCodemenu, skip to Step2. If you haven't adjusted any other setting, pressand releasethe MENUbutton until the screen displaysSETCONTRAST. 2. Usethe SKIPor REPEAT b utton to selectthe desiredsetting (1-5). 3. - Page 14 AM/PM 1. Press"* "on the keypadfor AMand press "# "for PMto set the time of day. 2. Whenfinished,the cursor movesto the Month field. Now you're readyto enter the month. Month 1. Usethe keypadto enter two digit numbers to set the month. 2.
-
Page 15: Length
Setting the Incoming Messoge Length Thissetting allows you to set the maximum length of time allowedfor a single incoming message.Youcan choosefrom 1-8 minutes. 1. If you just adjusted the LocalAreaCodemenu, skip to Step2. If you haven't adjusted any other setting, pressand releasethe MENUbutton until the screen displaysMESSAGE L ENGTH. -
Page 16: Toll Saver
3. Whenfinished,pressthe MENU button to confirm.The unit beeps. NOTE:To skip to the next setting, press the MENUbutton. To exit setup, press the FLASH/E×ITbutton. Toll Saver Toll Saver can save you the cost of a call when you access your messages from another phone: •... -
Page 17: Setting The Dialing Mode
Setting the Dialing Mode This adjustment allows you to select tone (touch-tone) or pulse (rotary) mode dialing. The phone is automatically set for touch-tone use. 1. If you just adjusted the Remote Access menu, skip to Step 2. If you haven't adjusted any other setting, press and release the MENU button until the screen displays TONEPULSE"... -
Page 18: Telephone Operation
Telephone Operation Using the Speakerphone IMPORTANT: In the event of a power outage, the speakerphone and answerer will not be operational. Speakerphone Location Forbest speakerphoneperformance,avoid the following: • Areaswith high backgroundnoise.(Themicrophone might pick up these sounds and preventthe speakerphonefrom going into the receiving modewhen you finish talking.) •... -
Page 19: Placing A Phone Call
Placing a Phone Call 1. Lift the handset or pressthe SPEAKERPHONE button and wait for a dial tone. 2. Dialthe telephone number you wish to call. B.Youcan also dial the number on the keypadfirst, then pressthe SPEAKERPHONE button to dial out. The screendisplaysPREDIAL. In case of a mistake in entering the number,pressthe DELETE button to erasethe last digit. -
Page 20: Redial
Redial Redialthe last number you called by pressingthe REDIAL button after you get a dial tone. NOTE: The Redial feature holds in memory the last phone number you dialed (as many as 28 digits). If you pressed any numbers after dialing the phone number, (for example,... -
Page 21: Auto Disconnect
Auto Disconnect Auto Disconnectstopsthe unit from playingthe greeting or recordingwhen you pick up the phone and answer the call. If the greetingor recordingdoescontinue to play after answering,pressthe PLAY/STOP b utton. If you would liketo screenthe call, allow the systemto answer beforepicking up the phone. -
Page 22: Erase Messages
Erase Messages SingleMessoges Youcan erasea messageitself,leavingthe CallerID information. • Whilethe messageis playing, pressand releasethe DELETE button. Theunit erases the current messageand announces,"Messageerased." All Messoges Youcan also eraseall the old messagesonly, leavingthe new messagesand CallerID information. Whilethe unit is in ready-to-answer mode, pressand hold the DELETE button until the unit announces,"Messogeserosed."... -
Page 23: Remote Access Commands
Toaccess your answerer: 1. Callyour telephonenumber. 2. After you hear the beep that followsthe greeting,enter your B-digitsecurity code. Theunit confirms your codewith a double beep and playsthe remote menu. IFthe wrong security code is enteredthe unit beepsthree times and allowsfor correct codeto be entered. -
Page 24: Caller Id Features
Message number l-BOu-qqB-u3E_-t-_ Call IDphone number (if any) GE SLIPF',nRT CallID name(if any) Caller ID with Call Waiting Providedyou subscribeto CallWaiting CullerIDservicefrom your phone company;if you receivean incoming call and you are already on the phone,a beep indicatesthe presenceof a CallWaiting call on the line.Onlythe handsetthat isin use at the time of the call will display and store the CallWaiting CullerID information. -
Page 25: Receiving And Storing Calls
Receiving and Storing Calls Theunit receivesand displaysinformation transmitted byyour local phone company. Thisinformation can includethe phone number,date, and time; or the name,phone number,date, and time. Whenthe CallerID memory isfull, a new call automatically replacesthe oldest call in memory.NEW appearsin the display for calls receivedthat have not been reviewed. -
Page 26: Dialing Back
Dialing Back Whenreviewing CallerID records,you may dial backthe phone numbers shown on the display by pressingthe DIALbutton. If you programmed your local area code in the setup menu 1. Usethe SKIPor REPEAT b utton to scroll to the numberyou want to dial. •... - Page 27 If you did not program your local area code in the setup menu 1. Usethe SKIPor REPEAT b utton to scroll to the numberyou want to dial Youwill only see 10-digitnumbers (i.e.234-555-1234). 2. Seesteps 2 through 4 in the above sectionto completethe dial back sequence. NOTE:To cancel Dial Beck, press the PLAY/STOPbutton or wait for the unit to return to the reedy-to-answer mode.
- Page 28 5. Whenfinished,pressthe STORE button. ThescreendisplaysMEMORY LOCATION. 6. Pressthe memory location number (0-9 or A,B,C)to store the number. Example: Tostore 1 123 555 1211 AISmith,you would do the following: 1. Press1;pressthe SKIPbutton; press 1;press 2;etc. 2. Whenfinished,pressthe STORE button. B.Toenterthe name,press2; pressthe SKIPbutton; press5 (threetimes);pressthe SKIPbutton {twotimes);press7 (fourtimes);etc.
- Page 29 Changing a Stored Number Use the same procedure to change a stored number as you do to store a number- you're just replacing the phone number with a different one. Dialing a Stored Number 1. Pick up the handset or press the SPEAKERPHONEbutton. 2.
- Page 30 Reviewing Stored Numbers 1. Press the DIAL button. The screen displays MEMORY DIAL=?. 2. Use the SKIPor REPEATbutton to scroll through the memory locations. • To dial the displayed number, press the DIAL button. The speakerphone comes on and dials the number automatically. (Tocancel, press the SPEAKERPHONEbutton). •...
- Page 31 Message Indicators Thefollowing special messagesindicate the status of a messageor the unit: O0CALLS The call record log is empty. UNKNOWNCALLER The incoming call does not have CallerIDserviceor their servicearea is not linkedto yours.If UNKNOWNNAME appearsalong with a calling number,the name information for that numberwas not available.
- Page 32 Troubleshootinq Guide TelephoneSolutions No dial tone • Verifythe telephone line cord is connectedto the baseand walljack. • Checkthe hookswitch to make sure it popsup. Won't dial out • Makesurethe tone/pulse setting is programmed correctly. Phonedoesn't ring • Checkthe ringer volume. •...
- Page 33 • Memoryis full. Won't respondto remote commands • Youmust use a touch-tone phone. • Youmust enter the correct security code. • Did unit hang up? If you take no action for a period of time, it automatically hangs Answererdoesn'twork • Unplugthe power cordfrom the electrical outlet and plug it back in to reset the answerer.
- Page 34 General Product Care Tokeepyour product working and looking good,follow these guidelines: • Avoidputting it near heating appliancesand devicesthat generateelectrical noise (forexample,motors or fluorescent lamps). • DONOTexposeto direct sunlight or moisture. • Avoiddropping product and/or other rough treatment. • Cleanwith a soft cloth. •...
- Page 35 Warranty Assistance If trouble is experiencedwith this equipment, for warranty information, please contact customer serviceat 1-800-448-0329. If the equipment iscausing harm to the telephonenetwork, the telephone company may requirethat you disconnectthe equipment until the problem is resolved. Anyunauthorized repairs,changesor modificationsnot expresslyapprovedby ThomsonInc.could void the user'sauthority to operatethis product.
- Page 36 Limited Warranty What your warranty covers: • Defectsin materialsor workmanship. For how long after your purchase: • Oneyear,from date of purchase. (Thewarranty periodfor rental units beginswith the first rental or 45 days from date of shipment to the rental firm, whichever comesfirst.) What we will do: •...
- Page 37 Product Registration: • Please visit www.ge.com/phones to register your unit. It wilt make it easier to contact you, should it ever be necessary. Registration is not required for warranty coverage. Limitation of Warranty: • THE WARRANTY STATEDABOVE IS THE ONLY WARRANTY APPLICABLE TO THIS PRODUCT.
-
Page 38: Important Instructions For Moving The Answerer
Index Answerer Operation General Product Care Answering System Set Up Auto Disconnect Handset Volume Hearing Aid Compatibility Base Layout Before You Begin Important Installation Information Important Instructions for Moving the Answerer Call Answering Caller ID Features 2/4 Inserting a Pause in the Dialing Sequence Caller IDwith Call Waiting Installing the Phone... -
Page 39: Setting The Incoming Message Length
Index Summary Screen Switching between Speaker Parts Checklist and Handset Placing a Phone Call Playing Messages 21 Telephone Jack Requirements Telephone Operation Receiving a Phone Call Telephone Set Up Receiving and Storing Calls 25 Temporary Tone Dialing Recording the Greeting Toll Saver Redial Troubleshooting Guide... - Page 40 Visit the GE website at: www.GE.com/phones Thomson Inc. i01 West 103rd Street Model 29582 Indianapolis,IN 46290-1102 © 2008ThomsonInc, 00023598 (Rev 1 Dom E/S) 08-27 Trademark(s) ® Registered Printed in Chin(] Marca(s)Registrada(s)
- Page 41 Modelo 29582 Contestador Digital con Identificador de Llamada en Espera y Tel_fono con Altavoz Guia del Usuario...
- Page 42 Informaci6n sobre la Aprobaci6n de Equipo Elequipode sutel_fonoesta aprobadopara la conexi6ncon lared Telef6nicaPOblica (PublicSwitchedTelephone Network) y cumplecon los requisitosestablecidos en las secciones15y 68de las Reglas y Regulaciones d e la FCC y con losRequerimientos T _cnicospara EquiposdeTerminales Telef6nicas (Technical Requirements for Telephone Terminal E quipment), publicadopor ACTA 1 Notificaci6n a laCompa_iaTelef6nicaLocal AIfondodeeste equipoUd hallar6un r6tulo indicando,entreotra informaci6n,el nOmerodela Registraci6n...
- Page 43 Informaci6n de Interferencias Este artefacto cumple con la Parte 15 de las Reglas de la FCC.Su funcionamiento es sujeto alas dos condiciones siguientes: (I) Este artefacto no puede causar interferencia dahosa, y (2) Este artefacto debe aceptar cualquier interferencia recibida, incluyendo interferencia que puede causar un funcionamiento no deseado.
- Page 44 Tabla de Contenido VOLUHEN DE LOS MENSAJES ....... INFORMACION SOBRE LA APROBACION DE EOuIPo VOLUHEN DEE TIHBRE ........INFORMACION DE INTERFERENCIAS ..... VOLUHEN DEE AURICULAR ......COMPATIBILIDAD CON AUDIFONOS ..... VOLUHEN DEE ALTAVOZ ........LICENSING ............ FUNCIONES BASICAS DEL TELEFONO ....
- Page 45 Tabla de Contenido ............ INDICADORES DE MENSAJES ......MEMORIA SOLUCION DE PROBLEMAS ......COMO ALMACENAR UN NOMERO EN LA MEMORIA27 SOLUCIONES PARR EL TELEFONO ......COMO ALMACENAR ARCHIVOS DEL IDENTIFICADOR DE LLAMADAS ....SOLUCIONES PARR EL CONTESTADOR ....COMO INTRODUCIR UNA PAUSA CUIDADO GENERAL DEL PRODUCTO...
- Page 46 Introducci6n CUIDADO: Cuando utilice equipo telef6nico, hay instrucciones b6sicas _ikde seguridad que siempre deben seguirse. Refi_rase a la guia de INSTRUCCIONESDE SEGURIDAD IMPORTANTESprovista con este producto y gu6rdela para referencia futura. Antes de Comenzar Lista de Partes AsegOrese de que suempaque contenga losarticulos itustrados a continuaci6n: Base Adaptador de corriente CA...
- Page 47 Informaci6n Importante para la Instalaci6n • Nunca instale cableadotetef6nico durante unatormenta de ret6mpagos. • Nunca toque cables o terminales no aislados,a menos que la lineatetef6nica haya sido desconectadaen la interfaz de la red. • Utilice precauci6n cuando instateo modifiquelineas tetef6nicas. •...
- Page 48 Formato de la Base SPEAKERPHONE Marcaci6n R6pida/Memoria (b6ton altavoz) EmergencJa (botones) mute (bot6n mudo) pantalla (boton e!Okol+/men +/-) * tone (bot6n tono) _ menu "_ (bot6n para men_) redial/pause HJcr6fono flash/exit dial (bot6n para volver a (bot6nservicJos/salir) (bot6n marcar) marcar/pausa)
- Page 49 Para Instalar el Tel fono Instalaci6n sabre Superficie Plana CUIDADO: Para reducir el riesgo de lesi6n personal, fuego, o dafio use solamente el adaptador de corriente S-2806 (blanco)0 o S-2807 (negro) listado en la guia del usuario. Este adaptador de corriente es disefiado para estar orientado correctamente en una posici6n de montaje vertical o en el piso.
- Page 50 Instalaci6n del Tel6fono sobre Pared 1. Para preparar etmontaje en la pared,envuelva et excesode cable tetef6nico,si Iohay, atrededor de los ganchosque son suministradosen el soporte para montaje de pared.AsegOrese de dejar suficiente cable para conectar con la base en la parte superioryen et recept6culode pared a trav6s det orificio central det soporte.
- Page 51 Instrucciones Importantes para Mover el Contestador Para moverel contestador a una Iocalizact6ndiferente dentro de la casa, sigalos siguientes instrucciones: 1, Desconectela linea tetef6nica. 2. Vayaal contacto et6ctricoy desconecteel cable de corriente. 3. Nueva et aparato y la lineatetef6nica a la Iocalizaci6ndeseada. /4.Conecteet cable de corriente en un enchufe et6ctrico.
- Page 52 sostengoet bot6n DELETE cuando et soludo seest6 reproduciendo, Programaci6n del Tel@fono Ustedpuedecambiar lassiguientesprogramacionesa su gusto para satisfacersus necesidades: Clavede Area Local Programa su clave de 6rea local para la funci6n de Regresaret Llamado (DialBack). Contraste de la Pantalla Seteccionaet nivetde Programaci6n por Omisi6n contraste de la pantalta.
- Page 53 c6digo de 6rea e ira la siguienteopci6n. NOTA: Si usted comete un error, puede usor SKIPo REPEATporo moverse entre el lo. y el 3er. dJgito e ingresor el n_mero nuevomente desde el teclodo. NOTA: Para saltar a la siguiente programaci6n, presione el bot6n MENU.
- Page 54 programor los minutos. Minutos 1. UselosnOmerosdet teclodo poro ingresor un nOmerode dos digitos poro estoblecer los minutos. 2. Cuandohoya terminodo, el cursor se mueve al campo AM o PM.Ahorausted est6 listo pora programor Io hora det dio,AM o PM. AMIPM 1.
- Page 55 Programaci6n de la Duraci6n de Mensajes Entrantes Esta programaci6n le permite programar et mG×imotiempo permitido para un solo mensaje entrante. Usted puedeescogerde 1 a 4 minutos. 1. Si usted acaba de ajustar et menOde Clavede Area Local,satteat paso 2.Si usted no ha ajustado ningunaotra programaci6n, presioney suelte elbot6n MENUhasta que la indicaci6n MESSAGE L ENGTH (duraci6nde mensaje)aparezca en la pantalta.
- Page 56 Ahorrador de Cargos El Ahorrador de Cargos le puedeahorrar el costa deunallamada cuandousted t iene a cceso a susmensajes d esde otto tel6fono: • Si usted tiene mensajes n uevos, el aparato c ontesta despu6s del segundo timbre. • Si usted notiene m ensajes nuevos, el aparato contesta despu6s del quinto timbre. Usted puedecolgar despu6s del tercer timbre y ahorrarse pagarel costa dela llamada o el cargo delargo distancia.
- Page 57 Programaci6n de la Modalidad para Marcar Esteajuste le permite seteccionarla modatidadpara marcar de tono (touch-tone)o de pulso (rotatorio}.Ettetdono est6 autom6ticamente programado en modatidadde tono. l. Si usted acaba de ajustar et menOde AccesoRemoto,salte al Paso2. Siusted no ha ajustado ninguna otra programaci6n, presioney suetteet bot6n MENUhasta que la indicaci6n _ TONEPULSE aparezcaen la pantalta, i, indica en cu61configuraci6n est6 actualmente la unidad.
- Page 58 Funciones B6sicas del Tel fono C6mo Usar el Altavoz IMPORTANTE:en el caso de una falla en el suministro de corriente, el tel_fono con altavoz y la contestadora no funcionar6n. Localizaci6n del Altavoz Paraet mejor funcionamiento det altavoz,evite lo siguiente: • Areascon mucho ruido de fondo. (ElmicrOfonopuederecoger estos sonidosy evitar queel altavoz puedacambiarse a la modalidad para recibir cuando ustedtermina de hablar).
- Page 59 C6mo Hacer una Llamada 1. Levanteet auricular u presioneet bot6n SPEAKERPHONE y espereal tono de marcar. 2. Marque et nOmeroal que usted deseaItamar. 5. Etusuario puedetambi6n marcar primero el nOmeroen etteclado, tuego presionaret bot6n SPEAKERPHONE para marcar.El LCDmostrar6 PREDIAL (Premarcaci6n). E ncaso de un error al ingresar el nOmero,presioneDELETE para borrar et01timodigito.
- Page 60 Volver a Marcar (REDIAL) Vuetvaa marcar et OltimonOmeroal queusted Itam6,oprimiendoet bot6n REDIALunavez que obtienetono de marcar. NOTA: La funci6n de Volver a Marcar (REDIAL)retiene en la memoria el 6ltimo n6mero que usted marc6 (hasta 28 digitos). Si usted oprimi6 cualquier tecla despu6s de marcar el n6mero telef6nico (por ejemplo0 para tener acceso a un sistema de men6 de voz), esos n6meros tambi6n ser6n marcados).
- Page 61 C6mo Auto-Desconectar La auto desconexiGn detienela reproducciGndet saludo o grabaciGnen la unidad cuando usted levanta ettelGfonoy respondela Ilamada.Siet saludo o grabaciGncontin0a en reproducciGndespuGsde responder,presioneet botGnPLAY/STOP. Si usted quisiera monitorear la Itamada,permita que et sistema respondaantes de levantar et tetdono. CGmo Reproducir los Mensajes Utilice et botGnPLAY/STOP pora reproducir mensajes.Etaparato reproduce primero los mensajesnuevosen etarden recibido.Sino hay mensajes,etaparato le indica quausted...
- Page 62 C6mo Borrar Mensajes MensajesIndividuales Usted puedeborrar et mensajemismo, dejando0nicamente la informaci6n det Identificador de Llamadas. • Hientras etmensajese est6 reproduciendo,presioney suette et bot6n DELETE. Etaparato borra etmensajeactual y asi Io indica "Messageerased," (mensaje borrado). Todoslos Mensajes Usted puedetambi6n borrar Onicamentelos mensajesviejos,dejando los mensajesnuevosy la informaci6n det Identificador de Llamadas.
- Page 63 Acceso Remoto Usted puedetener occesoo su contestodor desde cuolquiertet6fono con modolidod poro marcor pot tono en otro tocolizoci6n,simplementeinscribiendosu c6digo de seguridad de ] digitos (el c6digo progromodo de fdbrico es 123,pero usted puede combiorlo).Observeque los funcionesremotos no sirvencon tet6fonos de pulso o rototorios. C6motener acceso a sucontestador: 1, Llome o su nOmero tetef6nico, 2.
- Page 64 Funciones del Identificador de Llamadas (Caller ID) IMPORTANTE:Para utilizar las caracteristicas de la identificaci6n de Ilamador de esta unidad, usted debe suscribirse a cualquiera de los servicios de Identificador de Llamadas, ya sea el servicio est6ndar de Identificador de Nombre/NLimero o el servicio de Identificador de Llamada en Espera.
- Page 65 C6mo Recibir y Almacenar Llamadas Esteaparato recibey muestra informaci6n transmitida por su compafliatetef6nica local.Esta informaci6n puedeincluir et nOmerotetef6nico,fecha,y hora;o et nombre,nOmerotetef6nico, fecha y hora.Cuando la memoria est6 tlena,una ltamada nueva autom6ticamente reemplaza a la Ilamada m6s antigua en ta memoria.La indicaci6nNEWlneuva)aparecer6 en la pantalta para Itamadasque han sido recibidas pero no ban sido a0n revisadas.
- Page 66 • Presioneet bot6n SKIPcuando est6 revisandoet 01timoarchivo del Identificador de Llamadas;et aparato indica ENDOFMSTque eset final de lalista de archivos. Despu6s presioneet bot6n DELETE, y etaparato ERASE ALLCALLS? le pregunta si borra todos los archivos. Presionenuevamente et bot6n para borrar DELETE para borrartodos losarchivos. Para Volver a Marcar Cuando est6 revisandolosarchivos det Identificador de Llamadas(CallerID),usted puede volvera marcar et n0mero que semuestra en la pantalta, oprimiendoet bot6n DIAL.
- Page 67 Si usted No Program6 su Clavede Area en el Men6 de Programaci6n i,Utilice los botones SKIP o REPEATpararecorrer los nOmeros hasta llegar al nOmeroque usted quiera m arcar, U sted Onicamente ver6nOmeros dei0 digitos (porejemplo,234-555-1234). 2, Vealos pasosdel 2 al 4 en lasecci6n anterior para completar el procesode volvera llamar, NOTA: Para cancelar la funci6n de Regresar el Llamado (Dial Back), presione el bot6n PLAY/STOP o espere a que el aparato regrese a la modalidad de listo para contestar.
- Page 68 5. Cuondohoyo terminodo, presioneet bot6n STORE. L oindicoci6n MEMORYLOCATION (tocolizoci6nde memorio)oporece en Io pontollo. 6. Presioneet nOmerode Io Iocolizoci6nde Io memorio (0-9o A, B,C)poro olmocenor et nOmero. Porejemplo: Poro olmocenor 1 123 5551211 At Smith,usted horio Io siguiente: 1. Presione1; presioneSKIP; p resione1; presione2; etc. 2.
- Page 69 C6mo Cambiar un N6mero Almacenado Utilice et mismoprocedimiento para cambiar un nOmeroque et que usa para almacenarlo, usted est6 simplemente reemplazandoet nOmero tetef6nico con otro diferente. CBmo Marcar un N_mero Almacenado 1. Levanteet auricular u presioneet bot6n SPEAKERPHONE. 2. Presioneet botOnDIAL.La indicaci6n MEMORY DIAL=?aparece en la pantalta. 3.
- Page 70 C6mo Revisar N6meros Almacenados 1. Presioneet bot6n DIAL.Lo indicaci6n MEMORY DIAL=?oporece en Io pontolto. 2. Utilice losbotones SKIPo REPEAT poro recorrer losIocolizacionesde memorio. • Poro marcar etn0mero mostrado,presioneet bot6n DIAL.El oltavozse octivo y marcoet nOmerooutom6ticomente.(Poroconcetor,presione etbot6n SPEAKERPHONE). • Para solir de la modolidod de revisor nOmerosalmacenodos,presioneet bot6n FLASH/EXIT. •...
- Page 71 Indicadores de Mensajes Lossiguientes mensajesespecialesindican etestado actual de un mensajeo det aparato: O0CALLS Etregistrode Itamadasest6 vacio. La Ilamada entrante no tiene serviciode Identificador de Llamadaso UNKNOWN CALLER su 6rea de servicio no estd conectada con la suya.Si la indicaci6n UNKNOWNNAME(nombre desconocido)aparecejunto con et nOmeroquellama, significa que la informaci6n det nombre para ese nOmerono estaba disponible.
- Page 72 Soluci6n de Problemas Soluciones Para el Tel_fono No hay tono de marcar. • Verifiqueque etcable de lalinea tetef6nica est6 conectado a la basey al recept6culode la pared • Verifiqueque legancho para colgar rebote hacia arriba. No da linea. • Aseg0resede que etselector de tono/pulso est6 programado correctamente. Ettetdono no timbra.
- Page 73 • Lo memorio est6 Iteno. No respondea loscomondos de occesoremoto. • Tieneque usor un tetdono con modolidod pora morcor de Touch-Tone. • Usted debe inscribiret c6digo de seguridod correcto. • _EIaparato cotg6? Siusted no act0o pot un periodode tiempo, et aporato cuetgo autom6ticomente.
- Page 74 Cuidado General del Producto Para mantener sutetOfonofuncionando bien y con buenaapariencia, observelos siguientes pautas: • Eviteponer ettetdono cerca de calentadores(calefactores)de ambiente y dispositivosque genereninterferencia elOctricaejemplo,motores o 16mparas fluorescentes). • No Io expongaa la luzsolar directa o a la humedad. • No deje caer la extensionmOvily no maltrate ettetdono. •...
- Page 75 Ayuda de la Garantia Si ustedexperimenta problemascon este equipo,para informaci6n de garantia, comuniquesecon el departamento de servicioal cliente al 1-800-448-0329.Siel equipo est6 causando da_osa la red telef6nica,la compa_ia telef6nica puede requerir que desconectesu equipo hasta que el problema hayasido resuelto. Cualquierreparacioneso cambio o modificaci6n no aprobadosexpresamentepot ThomsonInc.
- Page 76 Garantia Limitada Lo que cubre su garantia: • Defectosde materiales o de trabajo, Porcuanto tiempo despu_sde la compra: • Un aho,a partir de la fecha de compra. (Elperiodo de garantia para unidadesarrendadasse inicia con la primera renta o/45 dias de lafecha det embarque a la firma de arrendamiento,Io que ocurra primero). Lo que haremos: •Proporcionarle unaunidad nueva.
- Page 77 Registro del Producto: • Par favor visite www, ge.com/phones pora registrar su unidad. Esto focilitor6 contactarlo en caso necesario. Etregistro no es requerido para cobertura en garantia. Limituciones sabre lu Guruntiu: • LA GARANTiA ESPECIFICADAANTERIORMENTES ESLA UNICA GARANTiA APLICABLE A ESTE PRODUCTO.
- Page 78 Indice Acceso Remoto Enmudecedor Ahorrador de Cargos Estatuto sobre la Exposici6n Antes de Comenzar a la Radiaci6n de la FCCRF Ayuda de la Garant[a Formato de la Base Comandos Para Acceso Remoto Funciones B@sicasdel Tel6fono C6mo Almacenar Archivos Funciones del Identificador del Identificador de Llamadas de Llamadas (Caller ID) C6mo Almacenar un N0mero...
- Page 79 Indice Memoria Selecci6n de la Calidad de Grabaci6n Memoria Llena Servicios Especiales ("FLASH") Soluci6n de Problemas Soluciones para el Contestador Operaci6n del Contestador Soluciones Para el Tel6fono Pantalla Sumario Tono Temporal para Marcar Para grabar el Saludo Para Instalar el Tel6fono Para intercambiar Uso del Altavoz entre Altavoz y Auricular...
- Page 80 Visiteel sitio de GEen: www.GE.com/phones Thomson Inc. i01 West103rd Street Hodeto 29582 indianapolis,IN46290-1102 © 2008 ThomsonInc, 00023598 (Rev 1 Dom E/S) 08-27 Trademarkls)@Registered Impreso en China Marco(s) Registrado(s)
Need help?
Do you have a question about the 29582 and is the answer not in the manual?
Questions and answers