Table of Contents
Advertisement
Advertisement
Table of Contents

Related Manuals for Pfaff creative 4874


Summary of Contents for Pfaff creative 4874
- Page 1 4874 creative™ c o v e r l o c k Instruction manual...
-
Page 3: Safety Instructions
This houshold sewing machine is designed to comply with IEC/EN 60335-2-28 and UL1594 IMPORTANT SAFETY INSTRUCTIONS When using an electrical appliance, basic safety precautions should always be followed, including the following: Read all instructions before using this household sewing machine. DANGER - To reduce the risk of electric shock: •... -
Page 4: Table Of Contents
Table of contents Disengage the upper looper 2-30 Remove knife guard 2-31 Set seam width 2-32 Technical part Setting the stitch length 2-33 Differential feed 2-34 Safety Instructions How to use this instruction manual Parts of creative 4874 1-10 Electronic functions Summary of stitch programs for the creative 4874 1-13 Set language... - Page 5 Technnical Part Threading the needle(s) Top cover thread tension, blue 5-10 Care of the machine Threading the top cover thread 5-10 Removing the needle plate Summary of threading paths and their threading Placing the needle plate sequences 5-11 Oiling the machine Starting to sew 5-12 Cleaning of the machine...
-
Page 6: How To Use This Instruction Manual
fi nd out just what your machine can do, and make full use of all its features. If you have any further questions, just ask your PFAFF dealer. He is happy to be of service with any help or advice. - Page 7 Technnical Part Technical Part This chapter contains pages that describe the individual parts of the machine and a program summary. Note: Some fabrics have a lot of excess dye which can cause discoloration on other fabric but also on your sewing machine. This discoloring may be very diffi cult or impossible to remove.
-
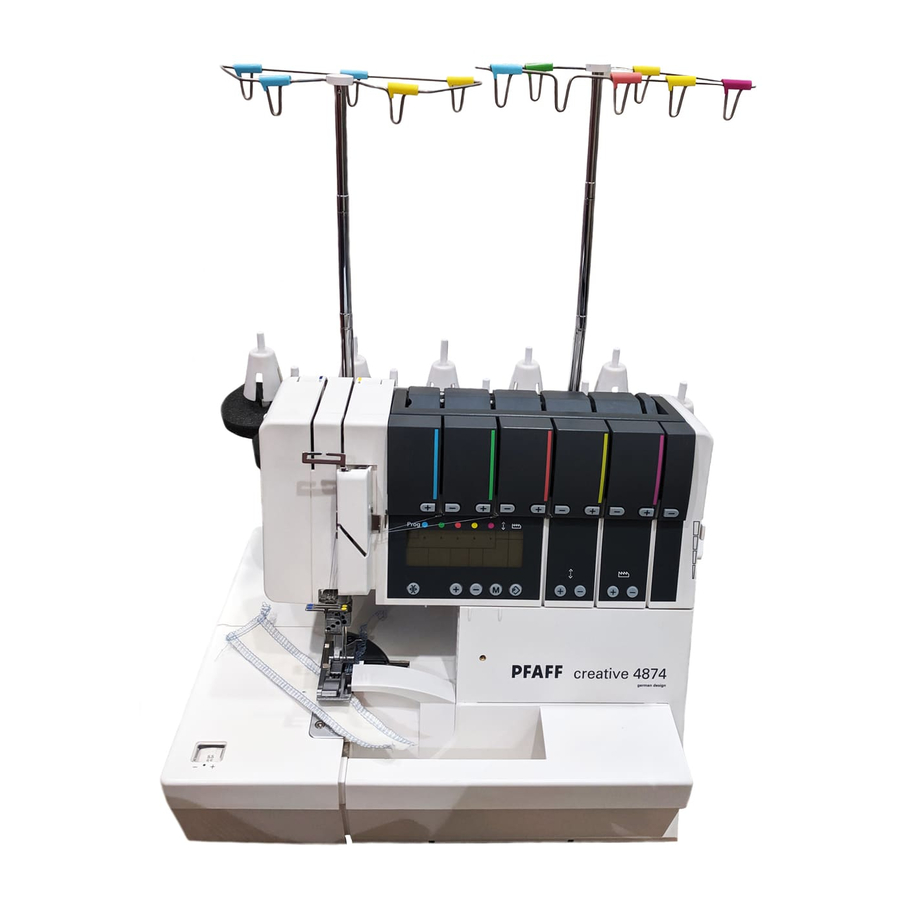
Page 8: Parts Of Creative 4874
Parts of creative 4874 1 Needle thread tension 2 Needle thread tension 3 Carrying handle 4 Thread tension / upper looper 5 Thread tension / lower looper 6 Thread tension/ double chain-stitch and cover- stitch looper 7 Tension buttons + / – 8 Speed control 9 LCD Display 10 Tension release button... - Page 9 Technnical Part 30 Upper looper 31 Lower looper 32 Stitch fi nger 33 Double chainstitch and cover-stitch looper 34 Threading aid for double chainstitch and cover-stitch looper 35 Movable upper knife 36 Fixed lower knife 37 Check spring for edging the thread chain 38 Needle plate disconnection lever...
- Page 10 43 Color coded telescoping thread guides 44 Telescoping thread guide slide 45 Thread tensions top/ deco cover 46 Rear thread guides top/ deco cover 47 Thread cutter 48 Slots for detachable thread stand 49 Thread stand 50 Spool pin 51 Cone thread holder 52 Foam pads 53 Power cable socket 54 Foot control socket...
-
Page 11: Summary Of Stitch Programs For The Creative 4874
Technnical Part Summary of stitch programs for the creative 4874 Program 04 Program 01 Program 02 Program 03 Program 05 Program 09 Program 10 Program 06 Program 07 Program 08 Program No. Description 2-needle cover hem, narrow For hemming stretch fabrics and piping, for decorative effects. - Page 12 Program 15 Program 11 Program 13 Program 12 Program 14 Program 16 Program 18 Program 19 Program 20 Program 17 Program No. Description 3-thread overedge seam, wide For overedging medium to heavy, easily fraying fabrics. 3-thread serging, wide For overedging heavy fabrics not prone to fraying 3-thread fl...
- Page 13 Technnical Part Program 23 Program 24 Program 25 Program 21 Program 22 Program 27 Program 30 Program 28 Program 29 Program 26 Program No. Description 2-needle Top-cover, narrow For hemming stretch fabric and for decorative effects. 2-needle Top-cover, wide For hemming stretch fabric and for decorative effects. 3-needle Top-cover For hemming highly stretch fabric and for decorative effects.
- Page 14 1-14...
-
Page 15: Technical Section, General
Technical section, general Technical section, general This chapter contains information on all the basic mechanical functions of your creative 4874. You will also fi nd additional information in chapters 5 and 7. -
Page 16: Machine Cover
Machine cover The machine cover protects your machine from dust and dirt. When you have fi nished sewing, push the thread guides (28 and 44) down. The thread stand (49) must be pushed as far as it will go towards close to the machine; you can take the thread cones off fi... -
Page 17: Swivel Table
Technical section, general Swivel table Note: As soon as either the swivel table (21) or the front Push the swivel table (21) to the left. The cover (16) is opened, the converter, the tweezers and the allen key power supply to the machine are located behind the swivel table. -
Page 18: Detachable Thread Stand
Detachable thread stand Note: The detachable thread stand is required for stitch Insert the top catches of the detachable programs 21 – 30. thread stand (27) into the top slots on the rear cover and press the bottom portion of the stand against the cover. -
Page 19: Foam Pads/Cone Holders
Technical section, general Foam pads/Cone holders If you are using large cones (5,000 – 10,000 mm), the foam pads (52) and the cone holders (51) will be helpful to you. With synthetic threads, the foam pads catch threads that have slipped down and help to advance the thread fl... -
Page 20: Hand Wheel
Hand wheel When turning the hand wheel (56) by hand, e.g. to raise the needle(s) to their highest position, always turn toward you. Presser foot lift Use the presser foot lifter (57) to raise or lower the presser foot. If you push the lifter one step up, you will be able to raise the presser foot to its maximum height of 6.5 mm for particularly thick fabrics. -
Page 21: Presser Foot
Technical section, general Note: The position of the Presser foot presser foot, “A” or “B”, The standard presser foot has two appears in the LCD display (9) different positions: (see page 3-2). Position “A” - for sewing cover stitch (progs. 1, 2, 3), double chainstitch (prog. 4), the 4-thread safety seam (prog. -
Page 22: Needle Position
Needle position The 4874 offers a choice of 5 needle positions. You can sew with as many as 3 needles simultaneously. The needle positions are L0, L1, L2, R1 and R2. A retaining screw is provided above each needle. Note: If the needles are In this operator’s manual and in the LCD inserted at R2 and R1, the left display (9) (see page 3-2), the different... -
Page 23: Changing A Needle
Technical section, general Changing a needle Turn off at the power switch To remove: Lower the presser foot and raise the needle(s) to its/their highest position. Take the needle changing tool out of the accessory box and push it up over the needle as far as it will go. -
Page 24: Threading (Stitch Programs 01-20) 2-10
Threading (stitch programs 01-20) Thread guides Slide the thread stand (49) backwards and pull the thread guide (44) up as far as it will go. Place the spools on the spool pins (50). For notes on the spool net, the thread run-off disc, the foam pads and the cone holders, please see page 2-5. - Page 25 Technical section, general Threading Upper looper (red) Turn the hand wheel towards you until the upper looper (30) reaches its highest position. Thread the threads in order from 1 to 9. Some of the thread guides are marked with a red dot. Thread the thread in thread guides 1 to 7.
- Page 26 Threading Lower Looper (yellow) Turn the hand wheel towards you until the lower looper (31) is as far to the right as possible. Thread the thread in order from 1 to 10. Some of the thread guides are marked with a yellow dot. Thread the thread in thread guides 1 to 6.
- Page 27 Technical section, general Pass the thread forwards through eye C (= Threading point 10) of the lower looper. Pull about 10 cm (5”) of thread through the hook and place it to the left under the presser foot. 2-13...
- Page 28 Threading Double chainstitch and cover stitch looper for progs. 04, 19 and 20 (purple) Turn the hand wheel towards you until the double chainstitch and cover stitch looper (33) is as far to the right as possible. Thread the thread in order from 1 to 12. Some of the thread guides are marked with a purple square.
- Page 29 Technical section, general From the front, pass the thread through eye C (- threading point 12) of the double chain stitch and cover stitch looper. Pull about 10 cm (5”) of thread through the looper and place it to the left under the presser foot.
- Page 30 Exception: Threading double chain stitch and coverstitch looper for coverstitch (progs. 01, 02, 03) top/deco stitches (progs. 21-30) (purple) Turn the hand wheel towards you until the double chainstitch or coverstitch looper (33) is as far to the right as possible. Thread the threads in order from 1 to 10.
- Page 31 Technical section, general From the front, pass the thread through eye C (- threading point 10) of the double chain stitch and cover stitch looper. Pull about 10 cm (5”) of thread through the hook and place it to the left under the presser foot.
-
Page 32: Threading The Needle(S) 2-18
Threading the needle(s) Thread the thread in order from 1 to 8. The thread must pass through the lower slot in thread guide 5. To thread needles more easily, use the needle threader in the accessories box (see page 2-21). Pull the thread about 10 cm (5”) through the eye of the needle and place it facing to the left under the presser foot (if... - Page 33 Technical section, general Exception: Note: To thread the double chainstitch (prog. 04) you have Threading needle L2 when sewing the to thread the green tension 5-thread safety seam (prog. 20), the 4- (see page 2-22). thread safety seam (prog. 19) and double chainstitch (prog.
-
Page 34: Important Note On Threading
Note: Even when the looper Important note on threading threads break, you must Always thread the needles last, so the remove the threads from the needle thread pass over the looper thread eye of the needle, rethread the looper threads, and then as shown in Fig. -
Page 35: Needle Threader
Technical section, general Needle threader Turn off at the power switch Raise the needle(s) to its/their highest position and lower the presser foot. Place the thread running from right to left in notch A of the needle threader (the needle threader is included in the accessory box). -
Page 36: Summary Of Threading Paths And Threading Sequences
Summary of threading paths and threading sequences Stitch program 01: 2-needle cover hem, narrow Stitch program 02: 2-needle cover hem, wide Stitch program 03: 3-needle cover hem Stitch program 04: Chainstitch 2-22... - Page 37 Technical section, general Stitch program 05: 2-thread fl atlock, narrow Stitch program 07: 2-thread serging, narrow Stitch program 08: 2-thread fl at hem Stitch program 09: 2-thread fold. rolled hem Stitch program 06: 2-thread fl atlock, wide Stitch program 10: 3-thread overedge seam, narrow Stitch program 13: 3-thread fl...
- Page 38 Stitch program 15: 2-needle, 3-thread overedge seam Stitch program 18: 4-thread overedge seam Stitch program 19: 4-thread safety stitch, wide Stitch program 20: 5-thread safety stitch, wide 2-24...
-
Page 39: Speed Control
Technical section, general Speed control With the speedcontrol slider (8), you can set the maximum speed to any value from 700 rpm to 1500 rpm. If you select programs 21 – 30, the maximum speed is reduced to 400 rpm. Note: Lower the presser foot Presser foot pressure before turning the presser foot... -
Page 40: Thread Cutter
Thread cutter At the end of a seam, sew a thread chain of 15 to 20 cm (7”-10”) and pull the thread chain from back to front over the thread cutter (47). This will cut off the thread chain. Check spring for edging the thread chain Use the check spring for edging the thread chain (37) to edge the thread chain at the start of the seam. -
Page 41: Disengage The Upper Knife
Technical section, general Disengage the upper knife Turn off the power switch Remove the trim catcher and open the front cover and the swivel table. Raise the upper knife (35) to its highest position by turning the hand wheel. Now push the knob for lowering the upper knife (39) as far as it will go to the right. -
Page 42: Stitch Fi Nger
Stitch fi nger For Standard Overlock Seams: For sewing all standard overlock seams (ex. progs. 01-04 and 21-30) the stitch fi nger (32) remains in its engaged position. For rolled hems Remove the trim catcher and open the front cover. Pull knob A of the stitch fi nger (32) to the right and swing it down into its disengaged position. -
Page 43: Attach Converter
Technical section, general Attach converter Turn off the power switch The converter (41) must be attached for all 2-thread seams (except program 04) and the 2-needle, 3-thread overedge seam. Open the swivel table and take out the converter. Move the upper looper (30) beside and to the right of the needle by turning the hand wheel. -
Page 44: Disengage The Upper Looper
Disengage the upper looper You can disengage the upper looper (30) with the upper looper disconnection lever (18). Remove the trim catcher and open the front cover. Turn the hand wheel to bring the looper to its lowest position. Note: The LCD display (9) Press the upper looper disconnection lever will show whether the upper (18) down and push it to the left. -
Page 45: Remove Knife Guard
Technical section, general Remove knife guard Remove the trim catcher and open the front cover. Pull the knife guard (17) up and off. To insert, place the knife guard under latch A and push down into the front cover guides. Note: The sewing table (accessory) is attached in the same way. -
Page 46: Set Seam Width
Set seam width Turn the seam width adjustment knob (22) to select any seam width value from 3.5 to 6.0 mm; it will also be displayed in the viewing window (23). (Double chain stitch is sewn with a gap of 6.5 to 9 mm.) Figure A: If loops are protruding from the edge of your seam, turn the seam width selection knob upwards to shift the upper... -
Page 47: Setting The Stitch Length
Technical section, general Setting the stitch length The stitch length is selected automatically by the creative 4874. However, it can be changed and stored at any time using stitch length adjustment buttons (14) (see page 3-4). 2-33... -
Page 48: Differential Feed
Note: The effect of the Differential feed differential feed also depends The differential feed consists of two feed on the stitch length selected dogs arranged one behind the other. and the type of fabric being used. Both feed dogs (A + B) move the fabric. The movement of the front feed dog (A) can be regulated using the differential feed adjustment buttons (15). - Page 49 Technical section, general If you set the differential feed to 2.0 the front feed dog moves at twice the speed of the rear feed dog. This means that the front feed dog moves twice as much fabric as the rear feed dog. This gathers the fabric.
- Page 50 2-36...
-
Page 51: Electronic Functions
Electronic functions Electronic functions This chapter contains information about all the electronic functions of the machine. -
Page 52: Set Language
Set language You can select any of the following languages: Czech, Danish, German, English, Spanish, French, Italian, Dutch, Polish, and Portuguese. Hold down the program selection buttons +/– (11) simultaneously as you switch the machine on. Use program selection button + (11) to select the language you want. - Page 53 Electronic functions If you have selected stitch programs 21-30, R appears in the display. Use clearview foot If you have selected stitch programs 24 –30 and you press the program selection button + beside the R, one of these two symbols will appear: <>...
-
Page 54: Button Functions
Button functions 7 Tension buttons +/–: To increase or 14 Stitch length setting buttons +/-: If you press one of these buttons, the decrease the tension settings. program memory opens. Use the +/- to 10 Tension release button: If you press adjust the stitch length. -
Page 55: Save
Electronic functions Save Recalling the memory Use the program selection buttons +/– to recall the program you want. If you press the memory selection button P once, the program memory will open. The settings for the thread tensions, stitch length and differential feed are displayed next to the program number. -
Page 56: Notes On The Saving To Memory
Save The settings for automatic thread tensions, stitch length, and differential feed can be changed and stored. To do this, use the appropriate buttons +/– to change the previous setting. In our example we have changed the stitch length setting from 2.5 to 3.0. -
Page 57: Changing Settings For Tension, Stitch Length And Differential Feed Directly Without Saving
Electronic functions Changing settings for tension, stitch length and differential feed directly without saving If you want to change tension settings in the middle of a sewing project, but don’t want to save these values, press one of the tension buttons + /-. To change the stitch length or the differential feed value, press the corresponding +/- buttons. -
Page 59: Cover Stitch
Cover stitch Cover stitch In this chapter, we explain the basic functioning of your creative 4874, using the coverstitch as an example. -
Page 60: Switching The Machine To Cover Stitch (Progs. 01, 02, 03)
Cover stitch Switching the machine to cover stitch Note: Always set up your (progs. 01, 02, 03) creative 4874 as shown in the display fi rst. Then open the program memory (see page 3-5) before threading the machine. Use the program selection buttons +/- (11) to select one of the cover-stitches. - Page 61 Cover stitch Turn the hand wheel to bring the upper looper to its lowest position. Press the lever to disengage the upper looper (18) down and push it to the left. Turn the hand wheel to ensure that the looper is disengaged.
-
Page 62: Threading The Cover-Stitch Looper
Set the standard presser foot heel to A or insert the clearview foot F from the accessory box. When you press the memory selection button P once, the program memory opens. The thread tension settings appear beside the program number in the display. First thread the purple thread tension for the cover-stitch looper, followed by the blue, green and red thread tensions for the... - Page 63 Cover stitch Note: In the case of thread Thread the thread in the guides from 1 to guides 6 and 7, the thread is 8. (Make sure: The thread does not pass simply placed on top of them, under the latch) not threaded through.
-
Page 64: Threading The Needle(S)
Threading the needle(s) Thread the threads in order from 1 to 9. The thread must pass through the lower slot in thread guide 5. To thread needles more easily, use the needle threader in the accessory box. Pull the thread about 10 cm (5”) through the eye of the needle and place it to the left under the presser foot (if necessary, press the tension release button (10), see... -
Page 65: Summary Of Threading Paths And Their Threading Sequences
Cover stitch Summary of threading paths and their threading sequences Stitch program 01: 2-needle cover hem, narrow Stitch program 02: 2-needle cover hem, wide Stitch program 03: 3-needle cover hem Important notes on sewing with the cover stitch Sewing table The sewing table is marked with various measurements. -
Page 66: Starting To Sew
Note: The hem guide H2 Preparing the project may be ordered as an extra When hemming, it is helpful to iron the accessory. It makes hemming hem beforehand. Depending on the child’s play without the need to iron the hem before you hemdepth, add 0.5 cm (1/4”) to the hem. -
Page 67: Ruler
Cover stitch Now turn the hand wheel back until the needles are in their highest position. At the same time, loosen the needle threads slightly with one fi nger. Raise the presser foot. Grasp the threads at the end of the seam and press the tension release button to pull the project out. -
Page 68: Stitch Formation
Stitch formation 3-needle cover hem, program 03 If all the thread tensions are set correctly, the needle threads (blue, green and red) are almost invisible on the underside of the fabric. The looper thread (purple) lies slack between them. The needle threads (blue, green and red) are too loose and form small loops on the underside of the fabric. - Page 69 Cover stitch 2-needle cover hem, narrow and wide, programs 01, 02 If all the thread tensions are set correctly, the needle threads (blue and green) are almost invisible on the underside of the fabric. The looper thread (purple) lies slack between them.
- Page 70 4-12...
-
Page 71: Top Cover Stitch
Top Cover Stitch Top Cover Stitch In this chapter, we describe the basic functioning of your creative 4874 with reference to top cover stitching. -
Page 72: Sewing Program Sticker
Top Cover Stitch Switching the machine to top cover operation (progs. 21, 22, 23). Detachable thread stand For top cover sewing you need to use the detachable thread stand. Insert the top catches of the thread stand (27) into the top slots on the rear cover and press the bottom portion of the stand against the cover. -
Page 73: Stitch Program Selection
Top Cover Stitch Top/deco switch lever Note: If the top/deco switch lever is not in the correct Choose a stitch program and move the top/ position, the machine will not deco switch lever A to the correct position: run in programs 21 – 30 and an alarm will sound. - Page 74 Pull knob A of the stitch fi nger (32) to the right and swing it down into its disengaged position. Turn the hand wheel to bring the upper looper to its lowest position. Press the upper looper disconnection lever (18) down and push it to the left.
-
Page 75: Accessories
Top Cover Stitch Turn the seam width adjustment knob (22) to set the seam width to 3.5 mm. Use clearview foot R from the accessory box. Accessories The following accessories are provided for the top cover: 1. Top cover hook 2. -
Page 76: Top Cover Round Thread Guide
Insert the top cover hook and tighten the screw. To remove the top cover hook, loosen the screw with the allen key. Place the screwdriver between the top cover hook and the holder. Press the tip of the screwdriver gently forwards. The top cover hook will pop out of the holder. -
Page 77: Threading The Cover-Stitch Looper
Top Cover Stitch When attaching the thread guide, make sure that the holder for the top/deco switch lever is fully seated in slot A. Now push the thread guide device back as far as it will go until you hear it click into place. To remove it, press handle B down against C (the part where the triangle thread guide is attached). - Page 78 Thread the threads in order from 1 to 10. Thread guide 8 is marked with a purple square Note: In the case of thread Thread the thread in the guides from 1 to guides 6 and 7, the thread is 8.
-
Page 79: Threading The Needle(S)
Top Cover Stitch Pull about 10 cm (5”) of thread through the looper and place it to the left under the presser foot. Threading the needle(s) Thread the thread in order from 1 to 9. The thread must pass through the lower slot in thread guide 5. -
Page 80: Top Cover Thread Tension, Blue
Top cover thread tension, blue Set the top cover thread tension, blue (45) as indicated on the stitch program sticker. To do this, turn the thread tension dial by hand until the corresponding setting appears directly above line A. Threading the top cover thread Place the spool on the front left spool pin of the detachable thread stand. -
Page 81: Summary Of Threading Paths And Their Threading Sequences
Top Cover Stitch Thread the thread in order 1 to 4 and place the thread to the left over the presser foot. Some thread guides are marked in blue. Summary of threading paths and their threading sequences Stitch program 21 2-needle Top cover, narrow Stitch program 22 2-needle Top cover, wide... -
Page 82: Starting To Sew
Important notes on sewing with the top cover stitch Sewing table The sewing table is marked with various measurement units. The fi gures at the top are centimeters, those at the bottom represent inches. Preparing your project If you are going to use top cover stitches for decorative effects, you can mark the outlines on the right side of the fabric with textile pen or chalk, and sew along these... -
Page 83: Stopping Sewing
Top Cover Stitch Stopping sewing 1. If you are sewing to the edge of the project: Grasp the threads at the end of the seam and sew slowly off the project. As you do so, pull the threads gently backwards. 2. -
Page 84: Stitch Formation
Stitch formation Since the top cover-stitch consists of a combination of the cover-stitch with top cover thread, we offer suggestions about adjustment options that predominantly refer to the cover-stitch. 3-needle Top cover, stitch program 23 If all the thread tensions are set correctly, the needle threads (blue, green and red) are almost invisible on the underside of the fabric. - Page 85 Top Cover Stitch 2-needle top cover, narrow and wide, stitch programs 21, 22 If all the thread tensions are set correctly, the needle threads (blue and green) are almost invisible on the underside of the fabric. The hook thread (purple) lies slack between them.
- Page 86 5-16...
-
Page 87: Deco Cover
Deco Cover Deco Cover In this chapter, we are going to describe the basic functioning of your creative 4874 using the example of the deco cover stitch. -
Page 88: Detachable Thread Stand
Deco Cover Switching the machine to deco cover operation (progs. 24 - 30) Detachable thread stand For deco cover sewing you need to use the detachable thread stand. Insert the top catches of the thread stand (27) into the top slots on the rear cover and press the bottom portion of the stand against the cover. -
Page 89: Top/Deco Switch Lever
Deco Cover Top/deco switch lever Note: If the top/deco switch lever is not in the correct Choose a stitch program and move the top/ position, the machine will not deco switch lever A to the correct position: run in programs 21 – 30 and an alarm will sound. - Page 90 With the needle changing tool, insert needles L 0, 1 and 2 as far as they will go into the needle holder (make sure the needles are inserted all the way with your fi ngers). Tighten the associated retaining screw and remove the needle changing tool.
- Page 91 Deco Cover Raise the upper knife (32) to its highest position by turning the hand wheel. Now push the knob for lowering the upper knife (36) as far as it will go to the right. Turn the knob towards you until the upper knife is in its lowest position.
-
Page 92: Accessories
Accessories The following accessories are provided for deco cover: 1. Blue decorative thread guide 2. Yellow decorative thread guide Both decorative thread guides have three holes for threading the decorative threads. This is indicated on the stitch program sticker by the following symbol: This symbol indicates which of the holes to insert the thread, and which of the two thread tensions (blue/yellow) you must use. -
Page 93: Threading The Cover-Stitch Looper
Deco Cover To remove the decorative thread guides, loosen the screws with the allen key. Place the screwdriver between the decorative thread guide and the holder and press the tip of the screwdriver gently forwards. The thread guide will pop out of the holder. Remove the blue one fi... - Page 94 Thread the threads in order from 1 to 10. Thread guide 8 is marked with a purple square. Note: In the case of thread Thread the thread in the guides from 1 guides 6 and 7, the thread is to 8. (Make sure the thread does not pass simply placed on top of them, under the latch.) not threaded through.
-
Page 95: Threading The Needle(S)
Deco Cover Pull about 10 cm (5”) of thread through the looper and place it to the left under the presser foot. Threading the needle(s) Thread the threads in order from 1 to 9. The thread must pass through the lower slot in thread guide 5. -
Page 96: Deco-Cover Thread Tension Dials, Blue And Yellow
Deco-cover thread tension dials, blue and yellow Set the deco cover thread tensions, blue and yellow (45) as indicated on the stitch program sticker. To do this, turn the thread tension dials until the corresponding settings appear directly above line A and line B. -
Page 97: Summary Of Threading Paths And Their Threading Sequences
Deco Cover Now guide the thread into the color coded thread guide in the detachable thread stand. Thread the deco cover threads in order through 1 to 4 and bring them behind the needles. With tweezers, turn them to the front towards you. - Page 98 Stitch program 26 6-thread deco cover Stitch program 27 6-thread deco cover Stitch program 28 6-thread deco cover Stitch program 29 8-thread deco cover 6-12...
-
Page 99: Important Notes On Sewing With The Deco Cover Stitch
Deco Cover Stitch program 30 10-thread deco cover Important notes on sewing with the Deco Cover Stitch Sewing table The sewing table is marked with various measurement units. The fi gures at the top are centimeters, those at the bottom represent inches. -
Page 100: Starting To Sew
Note: Test sew the cover stitch Starting to sew fi rst, without adding the deco Lift up the presser foot and position the cover thread. When the stitch fabric under the presser foot so that the is tested, continue sewing also with the deco cover thread. - Page 101 Deco Cover Raise the presser foot. Grasp the threads at the end of the seam and press the tension release button to pull the project out. Cut the threads off. Pull the deco cover threads through to the wrong side of the fabric and tie off. 6-15...
-
Page 102: Stitch Formation
Stitch formation Since deco cover consists of a combination of cover stitch with deco cover threads, we will present suggestions for adjustment with reference to cover-stitch. 5-thread deco-cover, program 24 If all the thread tensions are set correctly, the needle threads (blue and green) are almost invisible on the underside of the fabric. - Page 103 Deco Cover If the needle threads (blue and green) are too loose and form small loops on the underside of the fabric. Adjust the blue and green needle thread tensions to a higher setting. If the needle threads (blue and green) are too tight and the fabric is puckering.
- Page 104 If the deco cover threads (blue and yellow) are barely visible. Adjust the yellow and blue thread tensions (45) of the deco cover threads to a lower setting. If the needle threads (blue, green and red) are too loose. Adjust the blue, green and red needle thread tensions to a higher setting.
- Page 105 Deco Cover 6-thread deco cover, stitch program 28 If all the thread tensions are set correctly, the needle threads (blue, green and red) are almost invisible on the underside of the fabric. The looper thread (purple) lies slack between them. The deco cover threads (blue and yellow) are lying slack around the middle needle thread on the top side of the fabric.
- Page 106 6-20...
-
Page 107: Thread Tension
Thread Tension Thread Tension This chapter includes information on correct thread tensions for all the stitches you can create with your creative 4874. We also provide you with a number of hints on selecting the correct thread. -
Page 108: Correct Thread Tension
Correct thread tension Your 4874 automatically sets the thread tension, stitch length and differential feed for each stitch type. However, the type of fabric, the quality of the thread and the needle size all affect seam formation to some degree, so it may be necessary to adjust the thread tension settings. -
Page 109: Correcting Stitch Formation
Thread Tension Correcting stitch formation Hint: If you use all the threads in the respective thread In order to be able to check the thread tension color, you will fi nd tension better, you should sew a test seam it easier to adjust the thread fi... - Page 110 2-needle cover-stitch, narrow and wide Stitch programs 01, 02 If all the thread tensions are set correctly, the needle threads (blue and green) are barely visible on the underside of the fabric. The looper thread (purple) lies slack between them. The right needle thread (green) is too loose.
- Page 111 Thread Tension 3-needle cover-stitch Stitch program 03 If all the thread tensions are set correctly, the needle threads (blue, green and red) are barely visible on the underside of the fabric. The looper thread (purple) lies slack between them. The needle threads (blue, green and red) are too loose.
- Page 112 5-thread safety seam Stitch program 20 Since the 5-thread safety seam consists of a combination of a double chain-stitch and a 3-thread overlock stitch, see below and on page 7-8 for suggestions on how to adjust these stitches. 4-thread safety seam Stitch program 19 Since the 4-thread safety seam consists of a combination of a double chain-stitch and a...
- Page 113 Thread Tension 4-thread overlock seam Stitch program 18 If all the thread tensions are set correctly, the looping of the two looper threads (red and yellow) meet right at the edge of the fabric. The upper looper thread (red) appears on the underside of the fabric.
- Page 114 3-thread overlock, narrow and wide Stitch programs 10 and 11 If all the thread tensions are set correctly, the two looper threads (red and yellow) meet right at the edge of the fabric. The needle thread is too loose. Adjust the corresponding needle thread tension to a higher setting.
- Page 115 Thread Tension 3-thread fl atlock, narrow and wide Stitch programs 13 and 14 If all thread tensions are set correctly, thread looping is right at the edge of the fabric. The upper looper (red) and the needle (blue) meet at the edge of the material.
- Page 116 2-thread fl atlock, narrow and wide Stitch programs 05 and 06 If all the thread tensions are set correctly, the looper and needle threads will meet on the edge of the fabric. Note: To sew the 2-thread fl atlock attach the converter as described on page 2-29.
- Page 117 Thread Tension 3-thread fl at hem Stitch program 16 If all thread tensions are set correctly, the upper and lower looper threads meet right at the edge of the fabric. The needle thread (green) is too loose. Adjust the green needle thread tension to a higher setting.
- Page 118 3-thread fold, rolled hem Program 17 If all the thread tensions are set correctly, the upper looper thread (red) loops completely around the edge of the fabric. The needle thread (green) is too loose. Adjust the green thread tension to a higher setting.
- Page 119 Thread Tension 2-thread fl at hem Stitch program 08 If all thread tensions are set correctly, the needle thread (green) and lower looper threads meet at the edge of the fabric. Note: To sew the 2-thread fl at hem attach the converter as described on page 2-29.
- Page 120 2-thread fold, rolled hem Stitch program 09 If all the thread tensions are set correctly, the lower looper thread (yellow) completely covers the edge of the fabric. Note: To sew the 2-thread fold, rolled hem attach the converter as described on page 2-29.
- Page 121 Thread Tension 2-needle, 3-thread overedge seam Stitch program 15 If all the thread tensions are set correctly, the yellow lower looper thread loops completely round the edge of the fabric. Note: To sew the 2-needle , 3-thread overedge seam attach the converter as described on page 2-29.
- Page 122 Stitch formation We show adjustment options that predominantly refer to the cover-stitch, since the top cover-stitch consists of a combination of cover-stitch with top cover thread. 3-needle top cover Stitch program 23 If all the thread tensions are set correctly, the needle threads (blue, green and red) are barely visible on the underside of the fabric.
- Page 123 Thread Tension 2-needle top cover-stitch, narrow and wide Stitch programs 21, 22 If all the thread tensions are set correctly, the needle threads (blue and green) are barely visible on the underside of the fabric. The looper thread (purple) lies slack between them.
- Page 124 Stitch formation Since deco cover consists of a combination of cover stitch with deco cover threads, we offer suggestions for adjustments with reference to cover-stitch. 5-thread deco-cover Stitch program 24 If all the thread tensions are set correctly, the needle threads (blue and green) are barely visible on the underside of the fabric.
- Page 125 Thread Tension If the deco cover threads (blue and yellow) are barely visible, adjust the yellow and blue thread tensions (45) of the deco cover threads to a lower setting. If the needle threads (blue and green) are too loose and form small loops on the underside of the fabric, adjust the blue and green needle thread tensions to a higher setting.
- Page 126 6-thread deco cover Stitch program 25 If all the thread tensions are set correctly, the needle threads (blue, green and red) are barely visible on the underside of the fabric. The looper thread (purple) lies slack between them. The deco cover threads (blue and yellow) are lying slack between the needle threads on the top side of the fabric.
- Page 127 Thread Tension If the needle threads (blue, green and red) are too loose, adjust the blue, green and red thread tensions to a higher setting. If the needle threads (blue, green and red) are too tight and the fabric is puckering, adjust the blue, green and red needle thread tensions to a lower setting.
- Page 128 6-thread deco cover Stitch program 28 If all the thread tensions are set correctly, the needle threads (blue, green and red) are barely visible on the underside of the fabric. The looper thread (purple) lies slack between them. The deco cover threads (blue and yellow) are lying slack around the middle needle thread on the top side of the fabric.
-
Page 129: Thread Table For 2-, 3-, And 4-Thread Overlock Seams
Thread Tension When buying sewing threads, you should bear in mind that your creative 4874 uses considerably more than a conventional sewing machine, so you will need to buy correspondingly larger units of thread. Overlock thread is available in cones (2,000-5,000 m) or mini-kingspools (1,000 m) in a wide range of colors. - Page 130 7-24...
-
Page 131: Accessories
Accessories Accessories This chapter includes a list of all standard and special presser feet available for use with your creative 4874. -
Page 132: Standard Accessories
Standard accessories The following accessories are included in the accessory box: Standard presser foot (on Clearview foot F the machine) Part No.: 29 924 993-81/744 Part No.: 29 924 993-81/783 1. Overlock needle system EL X 705, Cat. No. 2002 Part No.: 48 086 004 31 000 2. - Page 133 Accessories The following accessories are included behind the swivelling table (21) in the machine: 1. Converter Part No.: 29 924 993-81/491 2. Tweezers Part No: 29 924 993 71 012 3. Allen keys Part No.: 29 924 993-81/450 The following accessories are shipped with the machine: 1.
- Page 134 The following accessories are stored in the trim catcher: 1. Clearview foot R (may be included in the accessories box) Part No.: 29-924993-83/073 2. Top/deco cover detachable thread guide (may be included in the accessories box) Part No.: 29-924993-83/120 3. Top cover hook Part.
-
Page 135: Special Accessories
Accessories Special accessories A wide range of accessories is available for use with the creative 4874. Ask your Pfaff dealer for full information. Accessory Part No. Sewing work Multi-purpose foot M 29 924 993 82-002 Foot to which guides H1, H2 and H3 can be attached. - Page 136 Accessory Part No. Sewing work Elastic tape insert 29 924 993 82-034 For sewing on elastic tape with a width up to 7.5 mm. 7.5 mm Elastic tape insert 29 924 993 82-035 For sewing on elastic tape with a width up to 10 mm. 10 mm Elastic tape insert 29 924 993 82-036...
-
Page 137: Care Of The Machine
Care of the machine Care of the machine This chapter includes all the information you need for care and maintenance of your creative 4874 and suggestions for solving certain problems. WARNING! For your safety when taking care of your machine, always turn off the power switch and unplug the sewing machine from the electrical outlet. -
Page 138: Removing The Needle Plate
After every cleaning of the machine, oil the points shown with the oil included in the accessories. One or two drops of PFAFF sewing machine oil are suffi cient. All other parts are made from special materials and... -
Page 139: Cleaning Rubber Feet
0.5 to 1.0 mm below the cutting edge of the lower fi xed knife. When you have adjusted the upper knife precisely, you can tighten retaining screw A fully. Loosen the screw to the upper knife. Visit you local Pfaff dealer for precise adjustment. -
Page 140: Changing The Light Bulb
Note: If the upper knife is Tighten the upper knife tightened, the seam width cannot be altered. Turn off the power switch Before sewing particularly heavy fabrics, it is advisable to tighten the upper knife (35). Raise the needle(s) to its/their highest position and open the swivelling table. -
Page 141: What Happens If
Care of the machine What happens if...? This chapter includes some suggested solutions if certain problems arise with your creative 4874. Of course your Pfaff dealer will always be available to provide more information and assistance Problem Cause Remedy Needle breaks The needle is bent Replace the needle (see page 2-9). - Page 142 Problem Cause Remedy Seam puckers Thread tension is too tight Reduce thread tension. The differential feed is set Adjust differential feed (see page 2-34). incorrectly The thread has jammed because Thread correctly. of incorrect threading Fabric is not being The stitch length is too short Increase stitch length (see page 3-4).
-
Page 143: Intellectual Property
1 machine cover 1 accessory box 1 sewing table Intellectual Property PFAFF, CREATIVE and COVERLOCK are registered trademarks or tra- demarks of VSM Group AB. Please note that on disposal, this product must be safely recycled in accordance with relevant National legislation relating to electrical/ electronic products.