Table of Contents
Advertisement
Quick Links
Advertisement
Table of Contents

Related Manuals for Baumatic BT2385SS


Summary of Contents for Baumatic BT2385SS
- Page 1 BT2385SS Cooker...
- Page 2 Notice d'utilisation...
-
Page 3: Table Of Contents
Freestanding electric cooker The first thing to do is to check if your Dear Customer! appliance has arrived undamaged. In case you find any transport damages, please Congratulations on your purchase. See for report it immediately to your local dealer, or yourself: our products read reliability. -
Page 4: Safety Precautions
Safety precautions • To avoid any possible hazard, the utensils (flat baking pan, oil collector, oil filter, etc.). appliance may be installed by qualified • If you discover any visible cracks upon the personnel only. • Any repairs by unqualified persons may glass ceramic surface, you may not use the hob anymore, because there is an result in electric shock or short circuit. -
Page 5: Intended Use
Intended use Cooker cover This appliance is intended for use in your (certain models only) household. Never use the appliance for any The cooker cover may be coated, or made other purpose! of stainless steel or glass, and may be These instructions describe in detail all the closed only after all the hotplates are particulars and possibilities of its use. -
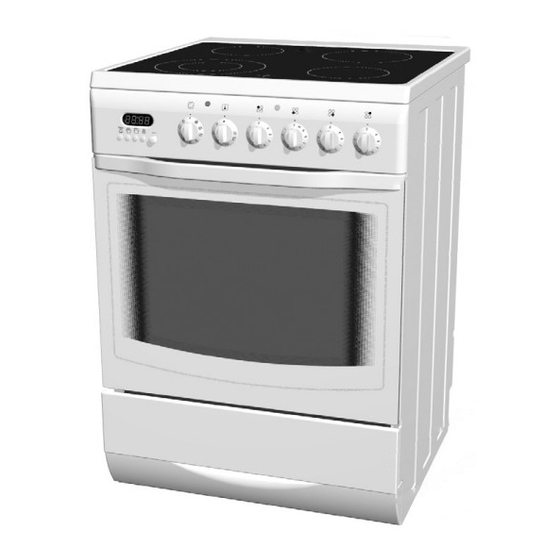
Page 6: Description Of The Appliance
Description of the appliance Steam exit Glass ceramic hob Control panel Oven door handle Oven glass door Drawer Additional support (certain models) Adjustable legs - certain models (accessible after removing the drawer) 1 Program timer (certain models). 6 Signal lamp, operation. Indicates the operation of oven or a hotplate. -
Page 7: Prior First Use
Prior first use Glass ceramic hob Energy saving tips (certain models only) The bottom of the dish is too thin and Wipe the glass ceramic surface with moist becomes crooked in cloth and some dishwashing detergent for the process of heating manual wash. -
Page 8: Tips For Purchasing Crockery
Lack of water may cause damage to the Tips for purchasing crockery dish and to the hotplate. • Temperature resistant glass cookware is • Good quality dishes feature thick flat suitable for use with the hotplate if the bottom. Uneven bottom of the dish causes bottom diameter of such dish is adequate increased consumption of energy and to the diameter of the hotplate. -
Page 9: Hotplates
Hotplates Important warnings! Special warning for hotplates • Never switch on empty hotplates, without (certain models only) • Never place wet dishes or steaming lids dishes, and never use hotplates for heating the ambience! upon the hotplate. Humidity may damage •... -
Page 10: Operation Of Hotplates
Operation of hotplates Hotplates are controlled by knobs, located at the control panel. Symbols adjacent to the knobs indicate their location. Heating power is regulated in steps. It is recommended to switch the hotplate off 3-5 minutes before the completion of cooking, and use the remaining accumulated heat. -
Page 11: Hotplates
Hotplates Controlling the operation of a three ring hotplate Three ring hotplate offers the possibility to adapt the heating surface to the size and the shape of the cooking dish. Hotplate with Hotplate with The hotplate is switched on/off by the extended rings extended ring button relevant control knob. -
Page 12: Oven
Oven Some models have installed two lamps for Important warnings! oven lighting; one at the top of rear wall and the second one at the middle of right- • Never put aluminum foil to the bottom of handed side wall . the oven, and do not place any crockery upon it. -
Page 13: Operation
Grill with ventilator Defrosting Infrared heater and ventilator operate This is the mode with air, circulating without simultaneously. This mode is appropriate for any of the heaters being turned on. It is used roasting and grill of larger chunks of meat or for slow defrosting of food. -
Page 14: Oven Guide Levels
Oven guide levels Telescopic slide guides Baking pans and accessories (oven grid, (certain models only) grease receptacle, baking tray, etc.) may be Note! Telescopic slide guides and other inserted into the oven in 5 guiding levels. oven accessories might get very hot! Use Appropriate levels are indicated in the tables kitchen gloves or other suitable protection! that follow. -
Page 15: Baking Pastry
• Different cakes may be baked together if Baking pastry the necessary temperature is approximately the same. Most appropriate position for baking is the • Baking time may be different for different application of both upper and lower heater, pastry, so you may have to take one pan or the hot air. - Page 16 Pastry Baking Table Type of pastry Guide level Temp. Guide level Temp. Baking (from down (°C) (from down (°C) time upwards) upwards) (in min.) Sweet pastry Raisin cake 150-160 55-70 160-170 Ring cake 150-160 60-70 160-170 Tree cake (tart form) 160-170 45-60 150-160...
-
Page 17: Roasting
• When roasting on the grill grid, place the Roasting grid in the deep roasting pan and insert both into the sliding guide. The bottom Best results are obtained with the pan will intercept dripping fat. engagement of both upper and lower, or •... - Page 18 Roasting Table Type of meat Weight Guide level Temp. Roasting Temp. Roasting (from bottom (°C) (°C) time time grams) (in min.) (in min.) Beef Beef loin 1000 180-190 100-120 200 -220 Beef loin 1500 170-180 120-150 200-220 Roastbeef, rare 1000 180-200 30-40 220-230...
-
Page 19: Grilling And Browning (Barbecue)
Grilling and browning (barbecue) • Take extra precautions when grilling. Intensive heat from infrared heater makes the oven and the accessories extremely hot. Use protective gloves and barbecue accessories! • Perforated roast may produce spurting of hot grease (sausages). Use long grill tongs to prevent skin burns and protect your eyes. - Page 20 Grill table Type of meat for grill Weight Guide level Temp. Temp. Grill time (from bottom (°C) (°C) (in min.) grams) Meat and sausages 2 beefsteaks, rare 14-16 2 beefsteaks, medium 16-20 2 beefsteaks, well done 20-23 2 pork scrag fillets 19-23 2 pork chops 20-23...
-
Page 21: Preserving Of Fruit And Vegetables
• Insert the pan with jars into the second Preserving of fruit and vegetables guide from bottom up. Set the temperature regulation knob to 180°C. Use the bottom heater mode together with Pre-heating of oven is not necessary. the fan •... -
Page 22: Cleaning And Maintenance
Cleaning and maintenance Never clean the appliance with pressurized Weekly care hot steam cleaner! 2 Once a week clean the complete hob with Before cleaning switch the cooker off and let the special cleaning agents for glass it cool down completely. ceramic hobs. -
Page 23: Oven
cleaning agents, so you may repeat the Catalytic coating of the oven cleaning procedure several times. Use of • Catalytic enamel is soft and sensitive to aggressive cleaners and rough dish bottoms rubbing and therefore we warn against the produces abrasion and black smudges upon use of abrasive cleaning agents and the surface. - Page 24 Removing wire and telescopic Removing oven door (certain models only) guide grids Open the door to the horizontal position. Pull Telescopic guide grids or wire guides may the bottom hinge supports upwards to the be removed to facilitate the cleaning of the vertical position and lock them to the latch of oven.
-
Page 25: Oven Drawer
Removing oven door with a Accessories Accessories, like biscuit tray, oven grid, etc. single axe hinge are cleaned with hot water and the usual (certain models only) detergent. Open the door completely and turn the removable locks backwards (see fig). Then Special enamel close the door slowly and let the locks fit to Oven, interior door lining, baking tray and... -
Page 26: Troubleshooting Guide
Troubleshooting guide Any unskilled attempt to repair the appliance • is the mains power fuse burned? is extremely dangerous as it might cause • is the temperature regulator properly set? electric shock and short circuit. To avoid such injuries any repairs may be performed Fuses often burn out... -
Page 27: Replacement Of Parts
Replacement of parts The oven light bulb casing is under Oven light bulb tension. Danger of electric shock! Before replacing the oven bulb switch off the The bulb for cooker and cut it from mains by removing replacement the mains power fuse or disconnect the should meet the protective device. -
Page 28: Instructions For Installation And Connection28
Instructions for installation and connection Safety precautions for the Anti Tilt Bracket technician • Installation may be carried out only by qualified personnel. • The electric installation shall be equipped with a safety device, able to disconnect the appliance from mains in all wires, with the distance between contacts of not less than 3 mm in open position. -
Page 29: Leveling The Appliance And Extra Support
Leveling the appliance and extra support (certain models only) The height of the cooker with the support is 90 cm, and without support it is 85 cm. Left and right side of the support is equipped with two wheels to facilitate relocation. In the front part, on both sides there are two adjustable screws, used to level the cooker and adjust its upper edge in line with the... -
Page 30: Electric Connection
Electric connection Electric connection may be carried Connection out by qualified service personnel • Using the screwdriver open the connector only! cover at the rear of the appliance. Wrong connection may permanently Release two locks located at either side of damage parts of the appliance and the connector bottom. -
Page 31: Technical Information
Technical information Type-model BT2385SS Dimensions 85/60/60 oder 90/85-60/60 (heigh/width/depth) cm Hotplate (Ø cm/kW) HL = HI-Light heater B = fast hotplate N = normal hotplate Rear left 145/1,2/HL Front left 210/120/2,2/HL Front right 145/1,2/HL Rear right 180/1,8/HL Oven Tenperature regulator/ function mode switch Guide levels (telescopic guides in 3 levels-only... -
Page 32: After Sale Service
After sale service Repairs If you find your cooker malfunctioning and requiring repair, contact our nearest service center and quote the code and the type or model of the appliance. Attached is the list of service centers with addresses and phone numbers. Important! Before contacting the service center, check if you can repair the malfunction, using the... - Page 33 Baumatic appliance. * In addition, your appliance is covered by a 5 year parts warranty. Baumatic Ltd will provide free of charge the parts required to repair the appliance, only if they are fitted by a Baumatic engineer, for any defect that arises due to faulty materials or workmanship within a period of 5 years from the original purchase date.
- Page 34 143003/en (08-06) Instructions for use, installation and connection...
- Page 35 Notice d'utilisation...
Need help?
Do you have a question about the BT2385SS and is the answer not in the manual?
Questions and answers