
Related Manuals for CHIEF LTM1U-G


Summary of Contents for CHIEF LTM1U-G
- Page 1 I N S T A L L A T I O N I N S T R U C T I O N S MTM1U MSM1U LSM1U LTM1U FUSION HEIGHT ADJUST FLAT PANEL MOUNTS MSM1U/MTM1U/LSM1U/LTM1U...
-
Page 2: Important Safety Instructions
AN ACCESSORY is the secondary Chief NOTE: The MSM1U/MTM1U/LSM1U/LTM1U Fusion height- product which is attached to a primary Chief product, and may have a component attached or setting on it. adjust mounts may be used with the UL Listed FCAV1U Fusion pull-out accessory. - Page 3 Installation Instructions MSM1U/MTM1U/LSM1U/LTM1U DIMENSIONS MSM1U 6.00 152.4 RAILS CAN BE SLID LEFT OR RIGHT DIMENSIONS: [MILLIMETERS] FOR OFFSET MAXIMUM MOUNTING PATTERN IS 22.7" (576 mm) WITHOUT REVERSING UPRIGHTS INCHES MAXIMUM MOUNTING PATTERN IS 25.3" (642 mm) WITH REVERSING UPRIGHTS FOR RECESSED APPLICATIONS, MINIMUM VERTICAL LIFT FOR HOOK ENGAGEMENT IS .75"...
- Page 4 MSM1U/MTM1U/LSM1U/LTM1U Installation Instructions DIMENSIONS--continued LSM1U 16.00 406.4 MINIMUM WALL UPRIGHT SPACING 6.00 152.4 RAILS CAN BE SLID LEFT OR RIGHT FOR OFFSET MAXIMUM MOUNTING PATTERN IS 31.7" (805 mm) WITHOUT REVERSING UPRIGHTS MAXIMUM MOUNTING PATTERN IS 34.3" (871 mm) WITH REVERSING UPRIGHTS...
- Page 5 Installation Instructions MSM1U/MTM1U/LSM1U/LTM1U LEGEND Tighten Fastener Pencil Mark Apretar elemento de fijación Marcar con lápiz Befestigungsteil festziehen Stiftmarkierung Apertar fixador Marcar com lápis Serrare il fissaggio Segno a matita Bevestiging vastdraaien Potloodmerkteken Serrez les fixations Marquage au crayon Loosen Fastener Drill Hole Aflojar elemento de fijación...
-
Page 6: Tools Required For Installation
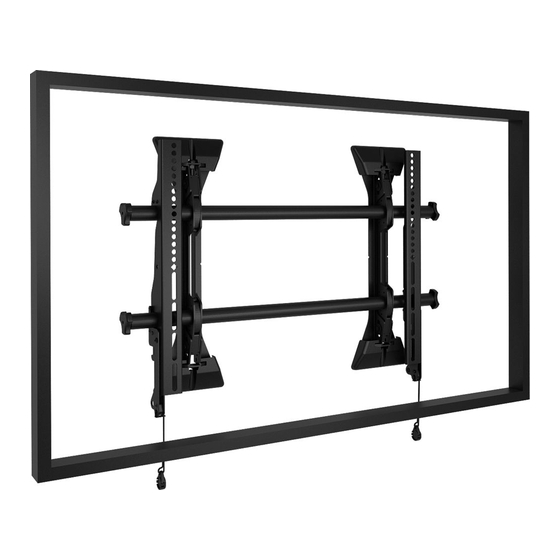
X (4) [Included in hardware box] [Included in hardware box] [Wall cover] CC (1) [LSM1U/LTM1U CC (1) BB (1) AA (1) mount] [MSM1U/MTM1U [right] [left] Y (1) mount] Z (1) [left] [right] [Interface brackets] [Interface brackets] (MTM1U/LTM1U Only) (MSM1U/LSM1U Only) -
Page 7: Installation
Drill one 7/32" (5.5mm) pilot hole in each stud. be mounted to a bare 8" concrete, 8"x8"x16" concrete block; or 2" x 4" wood studs (16" on center for MSM1U/MTM1U, and 16" Partially install two 5/16 x 2-1/2" flanged lag bolts (N) into or 24"... - Page 8 7 10 (N) x 2 (T) x 4 (Q) x 2 (Q) x 2 (N) x 2 (MSM1U shown) Figure 3 Figure 4 CAUTION: MINIMUM HORIZONTAL DISTANCE BETWEEN WALL BRACKETS IS 16" (406.4mm). Do not place mounting brackets closer together than 16" (406.4mm).
- Page 9 Installation Instructions MSM1U/MTM1U/LSM1U/LTM1U Attaching Interface Brackets to Screen NOTE: The nesting spacers (MA) may be used separately, or put two together in different configurations to create Align the center of the bracket (Y and Z or AA and BB) with different size spacers.
- Page 10 MSM1U/MTM1U/LSM1U/LTM1U Installation Instructions If necessary, the tilt interface bracket knobs may be NOTE: NEVER place both interface brackets (Y and Z or AA switched to allow the interface brackets (AA and BB) to be and BB) to one side of the wall mount center line! (See reversed.
- Page 11 Installation Instructions MSM1U/MTM1U/LSM1U/LTM1U Hang screen onto the top rail of the mount (CC). (See Figure 11) • MSM1U / LSM1U: Hang top hook of interface brackets (Y and Z) onto the top rail of the mount (CC). (See Figure 11) •...
-
Page 12: Horizontal Adjustment
MSM1U/MTM1U/LSM1U/LTM1U Installation Instructions Adjustments Tilt (MTM1U / LTM1U Only) The interface brackets (AA and BB) allow from -2° to 12° tilt, Horizontal Adjustment and can be locked at 0°, 6° and 12°. The mount wall brackets may be adjusted side to side at the Loosen the interface bracket knob. - Page 13 (See Figure 16) Figure 15) NOTE: The padlock maximum shackle diameter is 5/16" (7.9 mm). (U) x 2 (MTM1U / LTM1U) (MSM1U / LSM1U) Padlock shackle maximum diameter: - 5/16" (7.9mm) (U) x 2 (MSM1U / LSM1U) (MTM1U / LTM1U)
- Page 14 MSM1U/MTM1U/LSM1U/LTM1U Installation Instructions...
- Page 15 Installation Instructions MSM1U/MTM1U/LSM1U/LTM1U...
- Page 16 F 877.894.6918 / 952.894.6918 Europe A Franklinstraat 14, 6003 DK Weert, Netherlands P +31 (0) 495 580 852 Chief, a products division of F +31 (0) 495 580 845 Milestone AV Technologies Asia Pacific A Office No. 918 on 9/F, Shatin Galleria...
Need help?
Do you have a question about the LTM1U-G and is the answer not in the manual?
Questions and answers