Advertisement
Quick Links
I N S T A L L A T I O N I N S T R U C T I O N S
FUSION PORTRAIT MICROADJUSTABLE LARGE TILT MOUNT
Spanish Product Description
German Product Description
Portuguese Product Description
Italian Product Description
Dutch Product Description
French Product Description
LTMPU
Advertisement

Related Manuals for CHIEF LTMPU


Summary of Contents for CHIEF LTMPU
- Page 1 I N S T A L L A T I O N I N S T R U C T I O N S FUSION PORTRAIT MICROADJUSTABLE LARGE TILT MOUNT Spanish Product Description German Product Description Portuguese Product Description Italian Product Description Dutch Product Description French Product Description LTMPU...
-
Page 2: Installation Instructions
Exceeding the weight capacity can result in serious personal injury or damage to equipment! It is the installer’s responsibility to make sure the combined weight of all components located between the LTMPU up to (and including) the display does not exceed 200 lbs (90.7 kg). WARNING: Use this mounting system only for its intended use as described in these instructions. - Page 3 Installation Instructions LTMPU DIMENSIONS NOTES: NOT RECOMMENDED FOR SINGLE STUD MOUNTING MAX SCREEN MOUNTING PATTERN 20.7" (525.8 mm) WIDE X 31.5" (800.1 mm) HIGH MIN SCREEN MOUNTING PATTERN WIDTH 7.874" (200 mm) MAX SCREEN SCREW SIZE 8 mm MAX MOUNTING PATTERN IS 21.6" (548.6 mm) WITHOUT REVERSING UPRIGHTS MAX MOUNTING PATTERN IS 26.2"...
-
Page 4: Tools Required For Installation
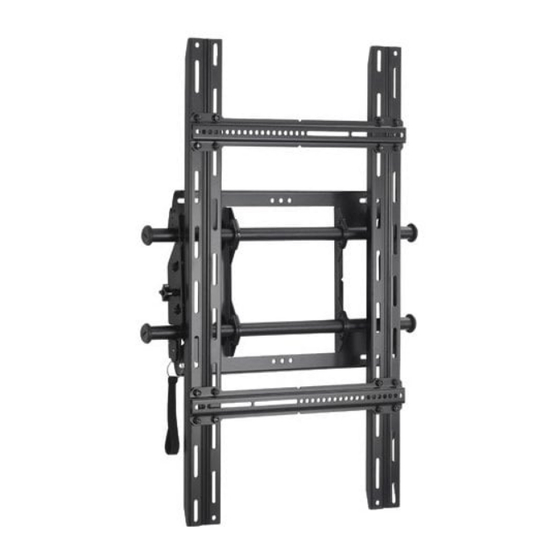
LTMPU Installation Instructions TOOLS REQUIRED FOR INSTALLATION 3/16” (included) M5 (included) 7/32” (5.5mm) Wood Stud 3/8” (9.5mm) Concrete PARTS C (1) [Right Upright] A (1) B (1) [Wall Mount] [Left Upright] D (2) [Display Bracket] E (1) G (1) G1 (8) - Page 5 (See Figure 2) The LTMPU mounts are designed to be mounted to an 8" concrete, 8"x8"x16" concrete block or 2" x 4" wood studs (16" on center) wall. The LTMPU has brackets which allow the TV to be tilted. Locate Mounting Site...
- Page 6 LTMPU Installation Instructions WARNING: EXPLOSION AND FIRE HAZARD! CUTTING OR DRILLING INTO GAS PLUMBING CAN CAUSE DEATH OR SERIOUS PERSONAL INJURY! ALWAYS make certain area behind mounting surface is free of gas, water, waste, or any other plumbing before cutting, drilling, or installing fasteners.
- Page 7 Installation Instructions LTMPU Attaching Display Brackets to Display Attaching Uprights to Display Brackets Horizontally align the center of the display brackets (D) with Vertically align the center of the uprights (B and C) with center of screen. (See Figure 5) center of screen.
- Page 8 LTMPU Installation Instructions Attaching Display to Wall Mount (Screen not shown for clarity) Push upright brackets tabs all the way down so that the lower mounting slot is blocked. (See Figure 8) Hang the top hook of upright brackets onto the top bar of the mount.
- Page 9 Installation Instructions LTMPU Locking Mount (Optional) Add padlock (not included) to upright bracket tab to lock the LTMPU mount. (See Figure 11) Add padlock (Optional) Figure 11...
- Page 10 LTMPU Installation Instructions...
- Page 11 Installation Instructions LTMPU...
- Page 12 Europe A Franklinstraat 14, 6003 DK Weert, Netherlands P +31 (0) 495 580 852 F +31 (0) 495 580 845 Chief Manufacturing, a products division Asia Pacific A Office No. 1 on 12/F, Shatin Galleria of Milestone AV Technologies 18-24 Shan Mei Street...
Need help?
Do you have a question about the LTMPU and is the answer not in the manual?
Questions and answers