Advertisement

Introduction
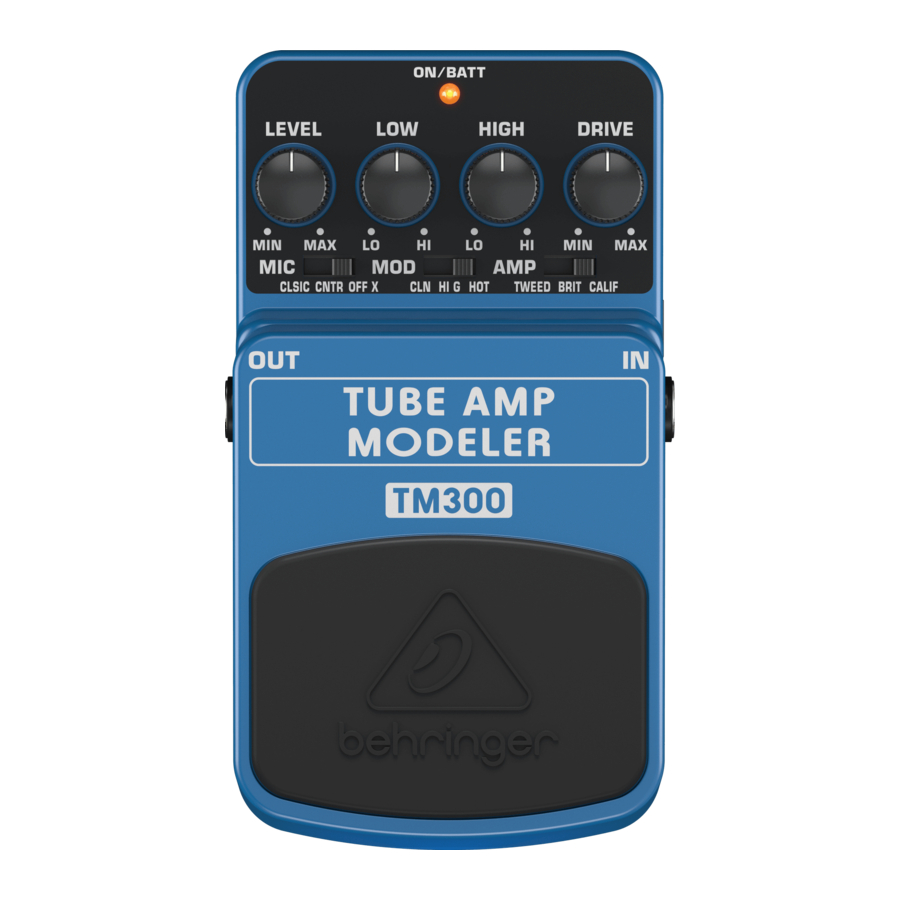
This high-quality effects pedal provides 3 classic guitar amps, 3 gain modes and 3 mic placements for a total of 27 configurations that let you easily achieve the most sought-after tube amp sounds from clean, crunch to super-fat distortion. Thanks to its high-performance features you can achieve the typical hard rock or heavy metal distortion sounds.
Controls

- The LEVEL control adjusts the output level.
- The LOW control allows you to boost/cut the low-frequency range.
- The HIGH control allows you to boost/cut the high-frequency range.
- The DRIVE control adjusts the amount of overdrive effect.
- The MIC switch simulates the microphone placement (orientation and distance) in relation to the cabinet. Select CLSIC (Classic: distant mic placement without ambience) to achieve high midrange content and a greater definition of notes like with classic early tube amps. In CNTR (Center: close miking at the center of a cone) you get greater high mid-range content and increased low-end for mega crunchy results. OFF X (Off Axis: close miking at the edge of a cone) is very similar to CNTR, but produces a smoother, softer sound with less upper mid-range content; perfect in combination with MODE position HOT.
- Use the MODE switch to dial up one of 3 gain settings (HOT, HI G, CLN) that you want to combine with the amp setting.
- Use the AMP switch to select one of 3 great classic tube amps. You will recognize these classic amp tones as soon as you hear them. For crystal-clear, transparent sounds with dynamic bass select TWEED. For aggressive mids and incredible sustain select BRIT(ISH). Rounder and more evened-out (yet still sophisticated) sounds can be dialed up if you select CALIF(ORNIAN); it's perfect for leads.
- The ON/BATT LED illuminates when the effect is activated. It also serves as a battery level indicator.
- Use the footswitch to activate/deactivate the effect.
- Use this ¼" TS IN connector to plug in the instrument cable.
- The ¼" TS OUT connector sends the signal to your amp.
Use the DC IN connection to plug in a 9 V power supply (not included).
The BATTERY COMPARTMENT is located underneath the pedal cover. To install or replace the 9 V battery (not included), press the hinges with a ballpoint pen and remove the pedal cover. Be careful not to scratch the unit.
- The TM300 has no on/off switch. As soon as you insert the plug into the in connector, the TM300 is on. When not in use, remove the plug from the in connector. This extends the life of the battery.
The SERIAL NUMBER is located on the bottom.
Safety Instructions
Do not use near water, or install near heat sources. Use only authorized attachments/accessories. Do not service product yourself. Contact our qualified servicing personnel for servicing or repairs, especially when power supply cord or plug is damaged.
Specifications
In
Connector: ¼" TS
Impedance: 500 kΩ
Out
Connector: ¼" TS
Impedance: 1 kΩ
Power Supply: 9 V  , 100 mA DC regulated
Behringer PSU-SB
| USA/Canada | 120 V~, 60 Hz |
| Europe/U.K./ Australia | 230 V~, 50 Hz |
| China | 220 V~, 50 Hz |
| Korea | 220 V~, 60 Hz |
| Japan | 100 V~, 50/60 Hz |
| Power connector | 2 mm DC jack, negative center |
| Battery | 9 V type 6LR61 |
| Power consumption | 30 mA |
Physical/Weight
| Dimensions | approx. 2 1/8 x 2 3/4 x 4 4/5" |
| (H x W x D) | approx. 54 x 70 x 123 mm |
| Weight | approx. 0.73 lbs / 0.33 kg |
Behringer is constantly striving to maintain the highest professional standards. As a result of these efforts, modifications may be made from time to time to existing products without prior notice. Specifications and appearance may therefore differ from those listed or shown.
Documents / ResourcesDownload manual
Here you can download full pdf version of manual, it may contain additional safety instructions, warranty information, FCC rules, etc.
Advertisement


Need help?
Do you have a question about the TM300 and is the answer not in the manual?
Questions and answers