Advertisement
- 1 General notes
- 2 Illustrations and descriptions in these operating instructions
- 3 Intended use
- 4 Accessories and spare parts
- 5 Scope of delivery
- 6 Safety instructions
- 7 Symbols on the device
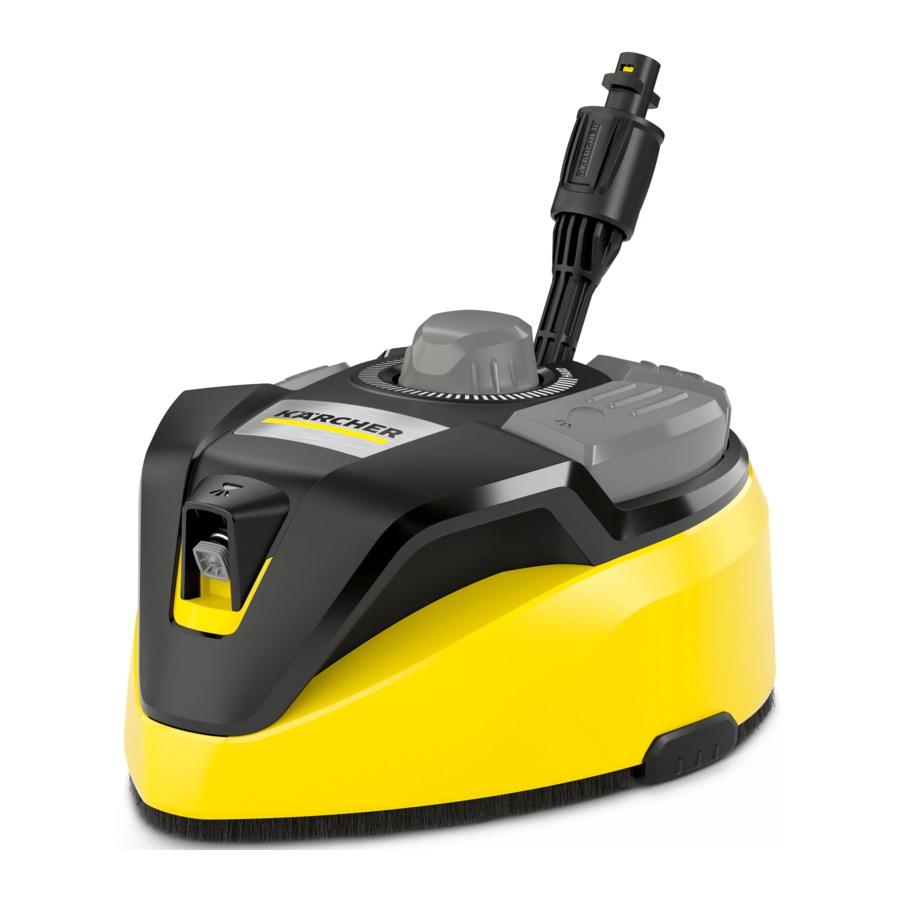
- 8 Device description
- 9 Extension tube installation
- 10 Initial startup
- 11 Operation
- 12 After use
- 13 Storage
- 14 Care and service
- 15 Troubleshooting guide
- 16 Documents / Resources
General notes


Read the original instructions before using the device for the first time and act in accordance with it. Keep the original instructions for future reference or for future owners.
Illustrations and descriptions in these operating instructions
Illustrations and descriptions in these operating instructions may differ from the scope of delivery and equipment for your T-Racer.
Note
Subject to technical changes without notice.
Intended use
The T-Racer can be used with all Kärcher Home & Garden high-pressure cleaners of class K4. Detailed information on the device class is provided in the operating instructions for your high-pressure cleaner.
For devices manufactured up to 1991 you require an additional adapter (see "Accessories and spare parts"). The T-Racer is ideally suited for cleaning floor and wall surfaces of various different materials such as tiles, stone, concrete, plastic and wood. Only use the T-Racer in private households.
Accessories and spare parts
Only use original accessories and original spare parts. They ensure that the appliance will run fault-free and safely.
Information on accessories and spare parts can be found at www.kaercher.com.
Scope of delivery
Check the contents for completeness when unpacking. The scope of delivery for your equipment version is shown on the packaging. Please contact your dealer if any accessories are missing or in the event of any shipping damage.
Safety instructions

- Do not use the device when persons are in the vicinity of the cleaning head.
- Switch the high-pressure cleaner off and disconnect the T-Racer from the high-pressure gun after finishing cleaning work and before performing any work on the T-Racer.
- Do not trigger the high-pressure jet at the high-pressure gun until the T-Racer is on the surface to be cleaned.
- Recoil danger. Keep proper footing and hold the highpressure gun and extension tube firmly.
- Maximum water temperature 60°C (please observe the instructions for your high-pressure cleaner).
Note
- Be sure to always adhere to the safety instructions for your high-pressure cleaner and the locally applicable regulations and directives.
Symbols on the device
 |  Risk of injury! Never reach under the edge of the T-Racer during operation |
 | Cleaning type: Surface cleaner |
 | Cleaning type: Edge and corner cleaning |
 | Cleaning type: Rinsing function |
| HARD | For durable surfaces, e.g. tiles, concrete, stone |
| SOFT | For sensitive surfaces, e.g. wood |
Device description
For the illustrations, refer to the graphics page Illustration A

- Extension tube
- Rotor arm height adjustment
- Casing
- Bayonet connector with union nut
- Handle
- Surface cleaning foot button
- Edge and corner cleaning foot button
- High-pressure nozzle
- Rotor arm
- Front high-pressure nozzle
- Skids
- Rinsing nozzle
- Rinsing function foot button
Extension tube installation
Note
Ensure that the device components are tightly connected on installation.
Illustration B

- Plug the bayonet into the mounting.
- Turn the extension until it latches into place.
- Tighten the union nut.
Repeat the procedure for all further extension tubes.
Initial startup
Selection of the high-pressure nozzles
Using the appropriate high-pressure nozzles is a prerequisite for fault-free operation.
Note
These are to be selected according to the flow rate (l/ min). Information on the flow rate is provided in the operating instructions or on the type plate of the high-pressure cleaner.
Note
The yellow high-pressure nozzles are already fitted.
| Flow rate l/min (l/h) | High pressure class (e.g.) | Colour of the high-pressure nozzles |
| 5.8 (348) - 7.5 (450) | K4 - K5 | Grey |
| Greater than 7.5 (450) | K6 - K7 | Yellow |
Operation
Note
The extension tubes can be used with all Kärcher accessories.
Note
For optimum cleaning results, do not operate the highpressure cleaner in the Eco mode.
Cleaning floors
Remove coarse dirt from the surface to be cleaned (e.g. by sweeping) before using the device to avoid damage to the T-Racer.
ATTENTION
Damage to the rotor arm
The rotor arm can be damaged if it hits edges and corners.
Do not move the device over free-standing corners and edges.
Illustration C

Note
- The T-Racer is not suitable for scraping or scrubbing.
- Test the device on an inconspicuous area before using on sensitive surfaces, e.g. wood.
- Do not allow it to remain in one area, but keep it in motion.
- Attach the T-Racer to the high-pressure gun using the extension tube.
Illustration B- Press the extension tube onto the bayonet connector of the high-pressure gun.
- Turn the extension tube by 90° until it latches intoplace.
- If necessary, repeat the procedure for further connections.
- Adjust the rotor arm height adjustment. according to the surface to be cleaned.
- Unlock the lever of the trigger gun.
- Pull the lever of the trigger gun. The device switches on.
- Clean the floor surface by guiding the T-Racer over the floor surface without exerting excessive pressure.
Cleaning wall surfaces
- Attach the T-Racer directly to the high-pressure gun.
- Press the bayonet connector of the T-Racer into the connection on the high-pressure gun and then turn by 90° until it latches into place.
- Tighten the union nut if present.
- Clean the wall surface.
Rotor arm height adjustment
The clearance of the high-pressure nozzles to the surface to be cleaned can be adjusted via the rotor arm height adjustment.
Adjust the rotor arm height adjustment. according to the surface to be cleaned.
Illustration D

For powerful cleaning of stubborn soiling on durable surfaces, e.g. tiles, concrete, stone:
- Set the rotor arm height adjustment to "HARD".For cleaning sensitive surfaces:
- Set the rotor arm height adjustment to "SOFT".
Surface cleaning foot switch
For cleaning larger areas:
- Press the surface cleaning foot switch. A water jet is emitted from the two high-pressure nozzles in the rotor arm.
Edge and corner cleaning foot switch
Note
Guide the T-Racer along the corner area to achieve optimum cleaning results.
For cleaning corners and edges:
- Press the edge and corner cleaning foot switch. A water jet is emitted from the front high-pressure nozzle.
Rinsing function foot switch
Note
The device has a rinsing function for pre-wetting or rinsing the cleaned surface.
For rinsing:
- Press the rinsing function foot switch. A strong jet, but not a high-pressure water jet is emitted from the rinsing nozzle.
After use
Rinse off the device with a gentle water stream after use.
- Detach the T-Racer and any extension tubes from the high-pressure gun.
- Rinse off the T-Racer with the high-pressure gun (without accessories) or wipe down with a damp cloth.
Storage
Store the device in a frost-protected place.
Care and service
Removing/installing the nozzles
The described procedure applies to all nozzles on the device.
Illustration E

- Remove the clip.
- Pull the high-pressure nozzle out.
- Fit the high-pressure nozzle.
- Fit the clip.
Cleaning the high-pressure nozzle
- Remove the high-pressure nozzle.
- Flush the high-pressure nozzle with clear water in both directions. Replace a damaged high-pressure nozzle where necessary.
- Install the high-pressure nozzle.
Replacing the skids
Worn or damaged skids can be easily replaced:
Illustration F

- Press the skid gently upwards and out of the latch using a suitable tool such as a screwdriver.
- Pull the skid upwards and out.
- Press the new skid gently into the support until it latches into place.
Troubleshooting guide
High-pressure cleaner not building up pressure or pulsing
High-pressure nozzles clogged or damaged.
- Remove the high-pressure nozzles.
- Check the high-pressure nozzles for clogging and clean if necessary.
- Check the high-pressure nozzles for damage and replace if necessary.
- Flush the T-Race with clear water without the nozzles fitted.
- Install the high-pressure nozzles.
Incorrect high-pressure nozzle selected. The device only provides optimum cleaning results when used with the appropriate high-pressure nozzles!
- Select the appropriate high-pressure nozzles according to the high-pressure cleaner used.
- Install the high-pressure nozzles.
Documents / Resources
References
Download manual
Here you can download full pdf version of manual, it may contain additional safety instructions, warranty information, FCC rules, etc.
Advertisement


Need help?
Do you have a question about the T 7 Plus and is the answer not in the manual?
Questions and answers